Create an access token
To enable PR scans and PR comments, provide an access token with read and write permissions for webhooks and pull requests, and read access for Projects. This access token allows Endor Labs to automatically configure webhooks for PR scanning functionality. To create an access token:- Sign in to Bitbucket Cloud and navigate to your workspace or project.
-
Create a workspace access token or project access token.
Ensure that you have a Bitbucket Cloud Premium account to create an access token at the workspace or project level.
-
When creating the access token, select the following permissions:
- Projects: Read
- Webhooks: Read and Write
- Pull requests: Read and Write
- Repository: Read and Write

- Copy the generated access token and store it in a secure location. You need it when configuring the Bitbucket Cloud App integration in Endor Labs.
Create an API token
To enable PR scans and PR comments, provide an Atlassian account email and an API token with read and write permissions for pull requests, read, write and delete permissions for webhooks, and read access for projects. This API token allow Endor Labs to automatically configure webhooks for PR scanning functionality. To create an Atlassian API token:- Sign in to Bitbucket Cloud and select Account settings from the top right corner.
- Select Security.
- Click Create and manage API tokens.
-
When creating an API token, select the following permissions:
- Projects: Read
- Workspace: Read
- Repository: Read
- Pull requests: Read and Write
- Webhooks: Read and Write and Delete

- Copy the generated API token and store it in a secure location. You need it when configuring the Bitbucket Cloud App integration in Endor Labs.
Configure PR scans during a Bitbucket Cloud App installation
After you complete the initial installation of the Bitbucket Cloud App in Endor Labs, you can configure PR scans. At this point, the Bitbucket Cloud App will be operational. You can also choose to apply PR scans to specific projects rather than all the projects in the workspace through a scan profile. See configure PR scans for specific repositories for more information.-
Select Pull Request Settings and toggle on Enable Pull Request scans to enable automatic scanning of PRs submitted by users.

- Optionally, toggle on Post comments on Pull Requests to allow Endor Labs to comment on PRs for policy violations. When you enable PR comments, Endor Labs posts a comment on the pull request if any issues are detected during the PR scan. You need to set up action policies in Endor Labs to receive the comments. See Bitbucket Cloud PR comments for more information.
- By default, PR scans skip reachability analysis for faster results. Under Advanced Options, toggle on Enable Full scan with reachability when you want reachability analysis and call graph generation for supported languages.
-
Click Save PR Settings.
Webhook ConfigurationEndor Labs automatically generates and configures the webhook secret when PR scans are enabled. If you modify or delete the webhook in Bitbucket Cloud, you must delete and create a new Bitbucket Cloud App installation.
Configure PR scans for existing Bitbucket Cloud integrations
You can configure PR scans for existing Bitbucket Cloud integrations or after creating a new Bitbucket Cloud integration.Permissions for your credentialsEnsure that the credentials have the required permissions for the selected authentication method. Refer to Create an access token or Create an API token for more information.
- Select User menu > Integrations from the left sidebar.
- Click Manage next to Bitbucket Cloud under Source Control Managers.
- Click the vertical three dots next to the Bitbucket Cloud integration that you want to update.
- Select Edit Configuration.
-
Select Pull Request Settings.
- Toggle on Enable Pull Request Scans to enable PR scans.
- Optionally, toggle on Post comments on Pull Requests to enable PR comments. Ensure that you complete the PR comments configuration in Endor Labs to receive the comments. See Bitbucket Cloud PR comments for more information.
- Click Save PR Settings to save the PR settings.
-
Click Update Configuration to save the changes.
The changes are applied from the next scanning cycle.
Click Rescan Org after editing the integration to apply changes immediately instead of waiting for the next scheduled scan.
Configure PR scans for specific repositories
You can configure PR scans and PR comments only for specific repositories. If you select the options to configure PR scans in your Bitbucket Cloud App integration, pull requests for all the repositories in your project or workspace are scanned. Instead, you can choose to configure PR scans and PR comments for selected repositories using scan profiles.- Enable PR scans and PR comments during the initial Bitbucket Cloud App installation. This ensures that the webhooks are properly configured and recognized by Endor Labs.
- Edit the Bitbucket Cloud App integration and disable Pull Request Scans and Pull Request Comments. This prevents PR scans from running for all repositories in the workspace.
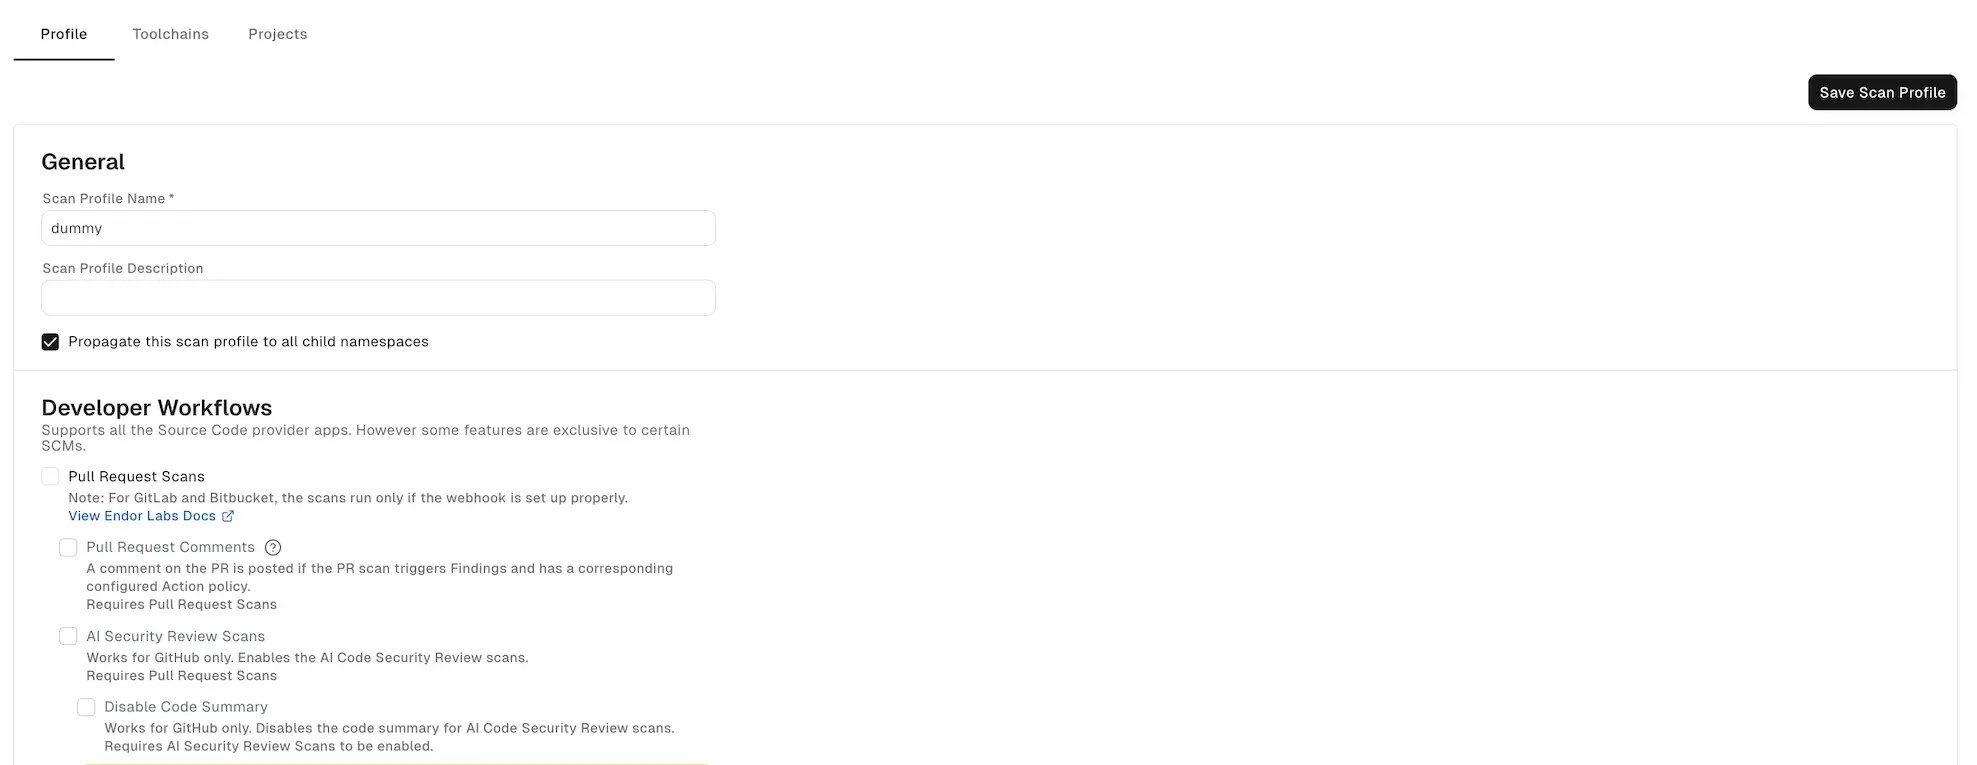
-
Create a scan profile with Pull Request Scans and optionally Pull Request Comments enabled under Developer Workflow.
- Associate the scan profile with the specific repository where you want PR scans to run.
Bitbucket Cloud PR comments
PR comments are automated comments added to pull requests when Endor Labs detects policy violations or security issues during scans. When a PR is raised or updated, Endor Labs runs scans on the proposed changes and adds a comment if any violations are detected based on the configured action policies. After you enable PR comments, you need to set up an action policy to allow comments to be posted on pull requests.Configure action policy for PR comments
The action policy that you create triggers the posting of comments on your pull request after a scan is complete. See Action policy for more information. You can create multiple action policies based on your requirements, which the PR scan can trigger. If you create action policy with theSecret template, you get an inline comment with the line number where the secret is detected.
Ensure that you configure the following important settings in the action policy:
- Choose an appropriate action policy template or create a custom action policy. You can choose an action policy template like Vulnerabilities or create a custom action policy.
-
Under Action, select Enforce Policy, then choose:
- Warn to post a comment without breaking the build.
- Break the Build to fail the build and block the pull request.
- Define the scope of the policy using tags. Only projects that match the specified tags will receive PR comments.
- Select Propagate this policy to all child namespaces if you want to apply the policy to all child namespaces.
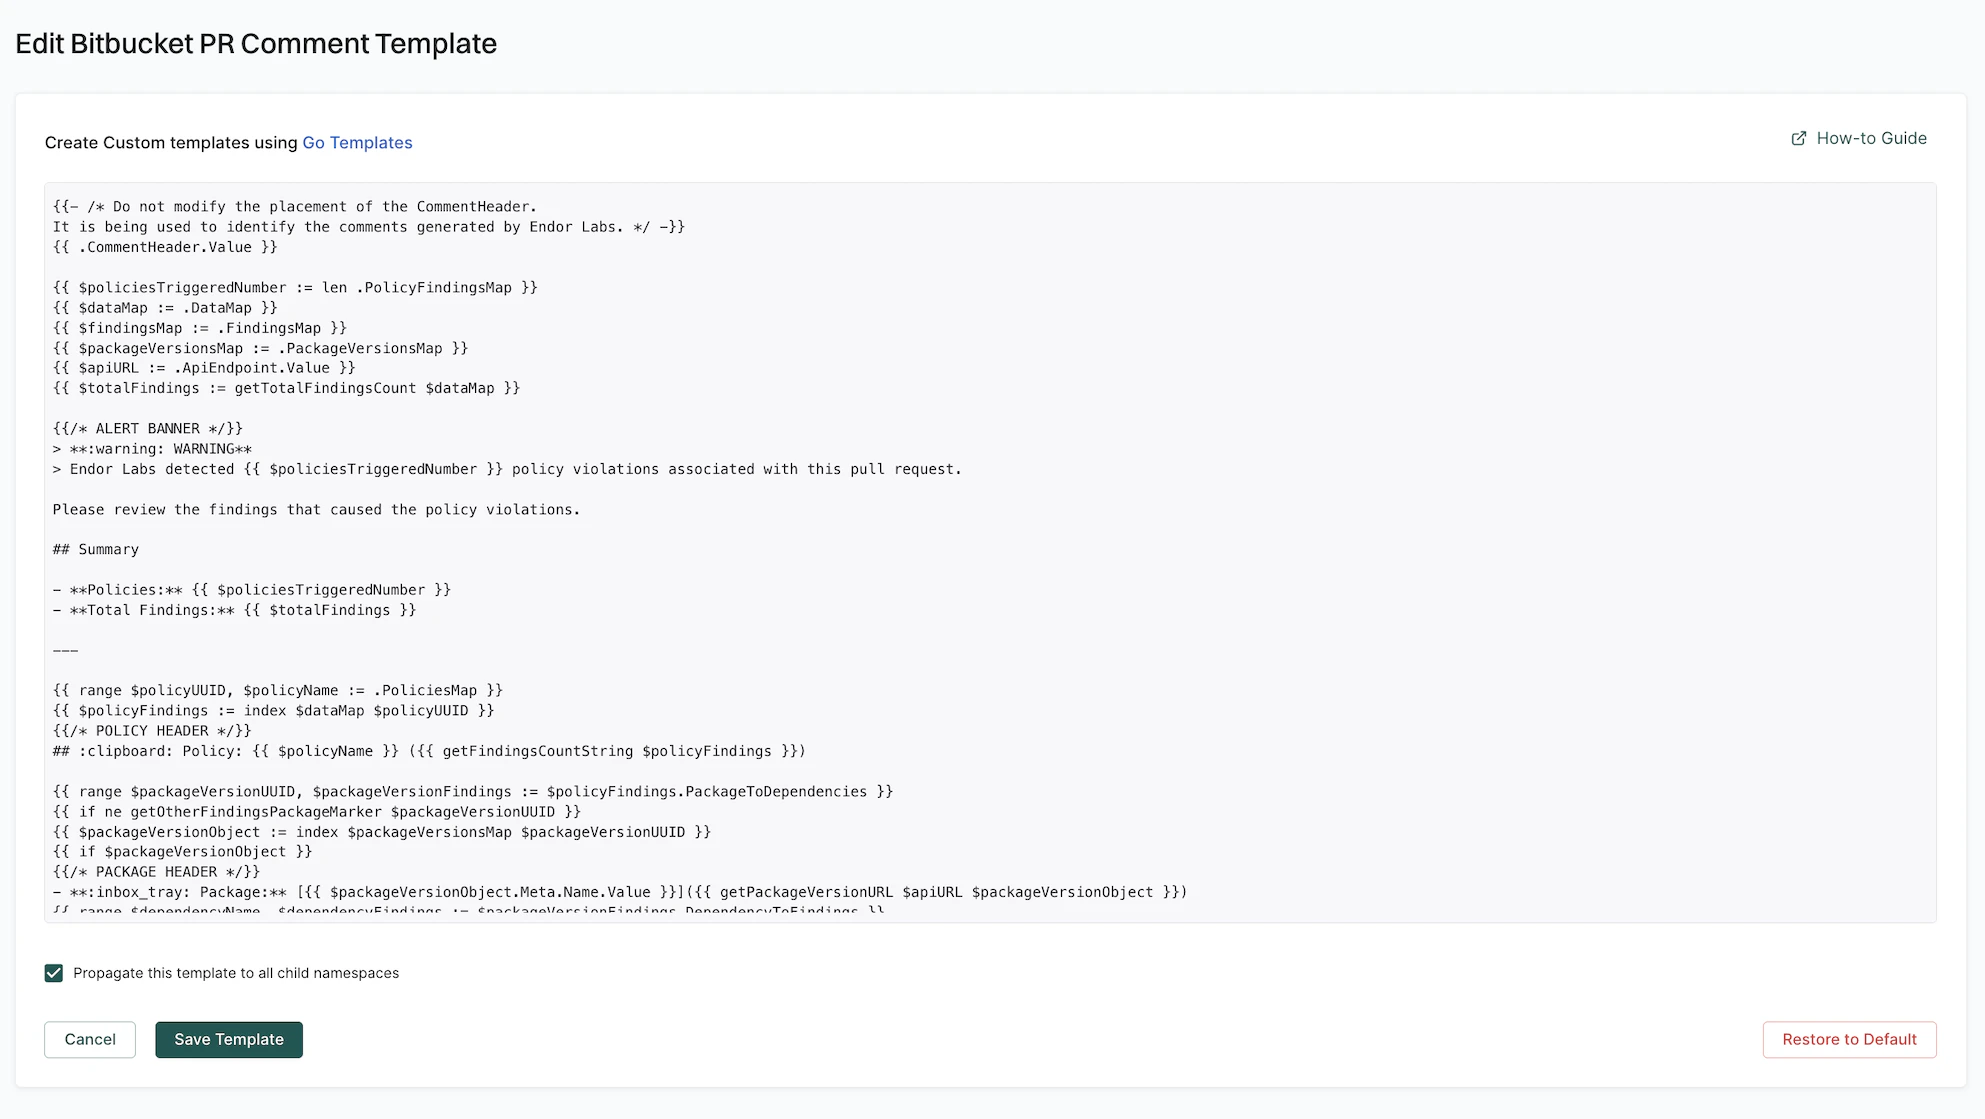
PR comments template
Endor Labs provides a default template for PR comments that you can use out-of-the-box. You can also create custom templates using Go Templates. The following section shows the default template for PR comments. You can create your custom template by editing the default template and saving the changes. The following specification shows the additional functions that you can use in your custom template. You can access these functions by using their corresponding keys. To edit the default template:- Select User menu > Integrations from the left sidebar.
-
Click Edit Template next to Bitbucket under Template for PR Comments.
Bitbucket only supports markdown in PR comments and does not support HTML tags.
- Update the template with the required changes.
- Select Propagate this template to all child namespaces if you want to apply the template to all child namespaces.
- Click Save Template to save the changes.
Restore the default templateYou can restore the default template by clicking Restore to Default in the template editor to go back to the initial template.
Action policy propagation in child namespacesIf you select Propagate this policy to all child namespaces, and update the policy in the child namespace, the policy in the child namespace takes precedence over the policy in the parent namespace. If you select the propagate option for the child namespace, its child namespaces will also inherit the policy. Since namespace hierarchy follows the workspace and projects hierarchy of Bitbucket Cloud, you can effectively use this option to control the policy for different levels of your organization.
PR scan comments in Bitbucket Cloud
After you enable PR comments, Endor Labs posts a comment on the pull request if any issues are detected during the PR scan based on the action policies. The following example shows a comment on the pull request as a result of the action policy for identifying leaked secrets.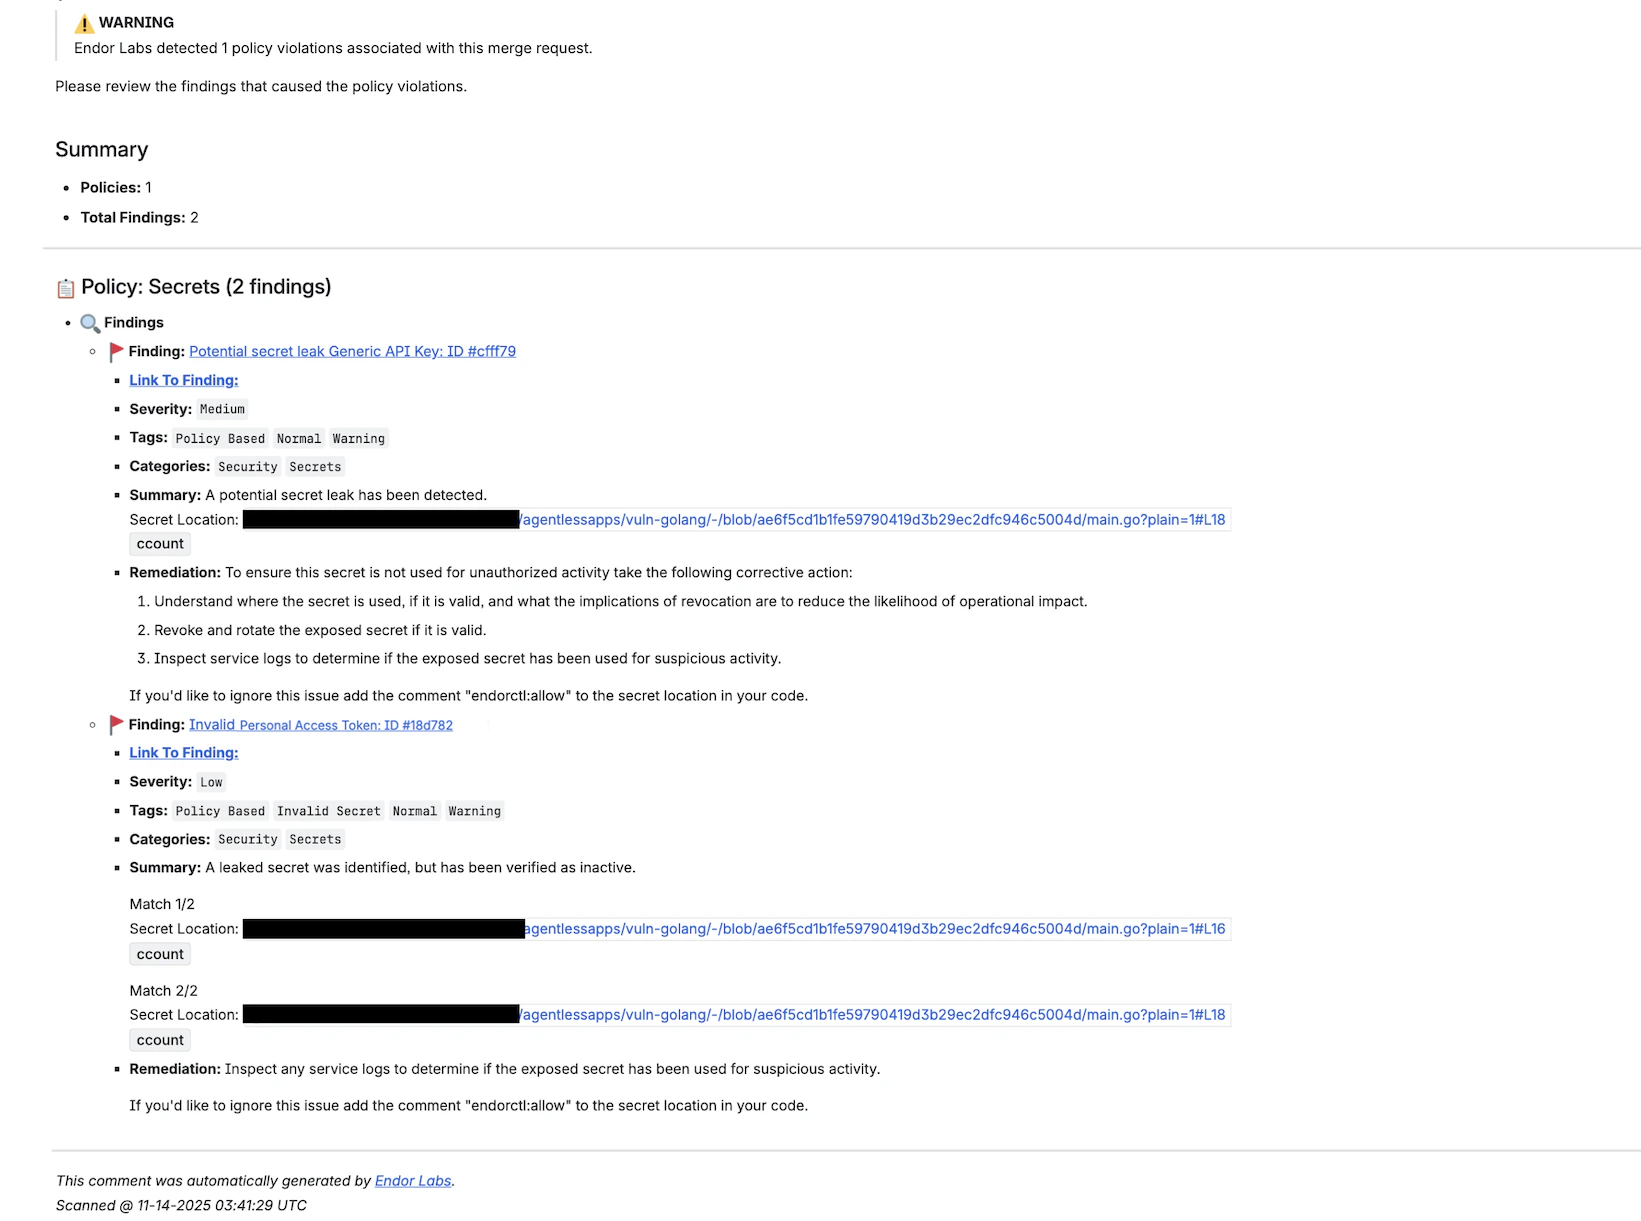

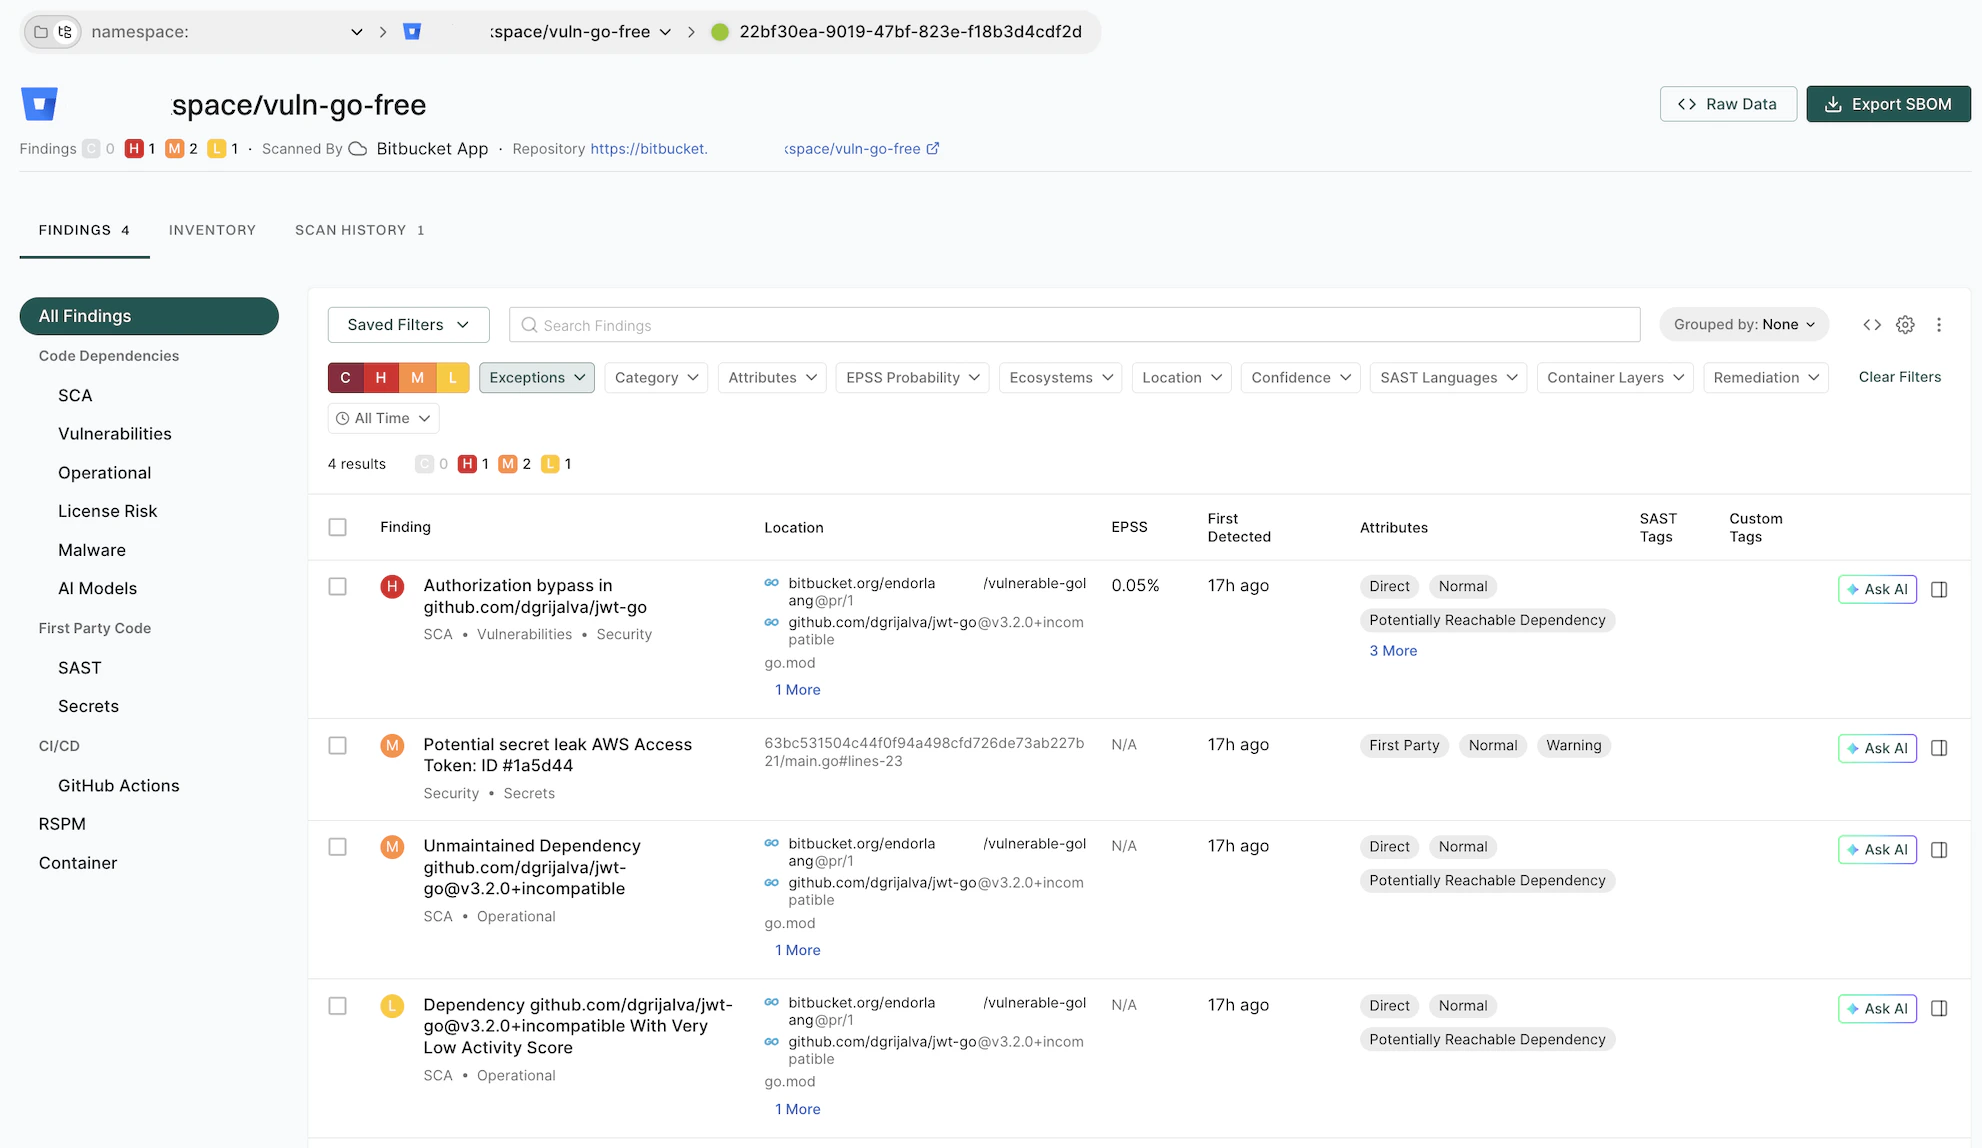
View PR scan findings
When you create a new pull request, the Endor Labs Bitbucket Cloud App scans the pull request. Endor Labs generates findings based on the finding policy.- Select Projects from the left sidebar.
- Select the project for which you want to view the PR scan findings.
-
Select PR runs to view the PR scan findings.
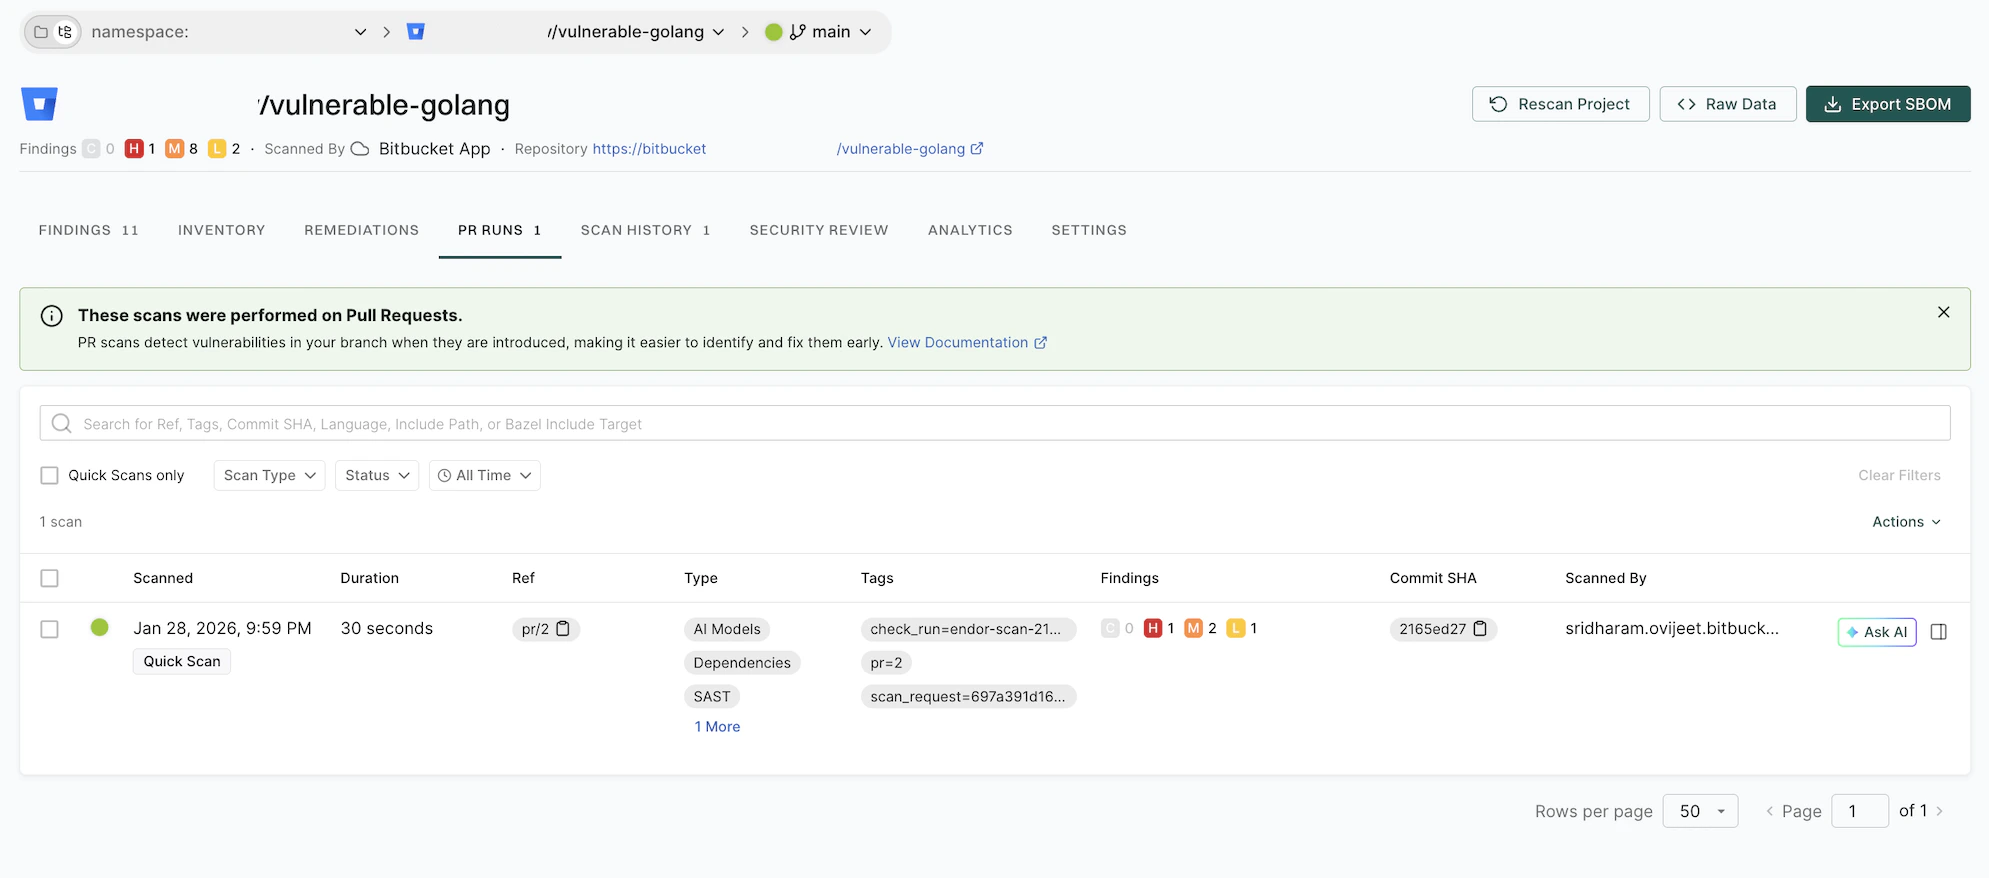
-
Select the PR for which you want to view the findings.
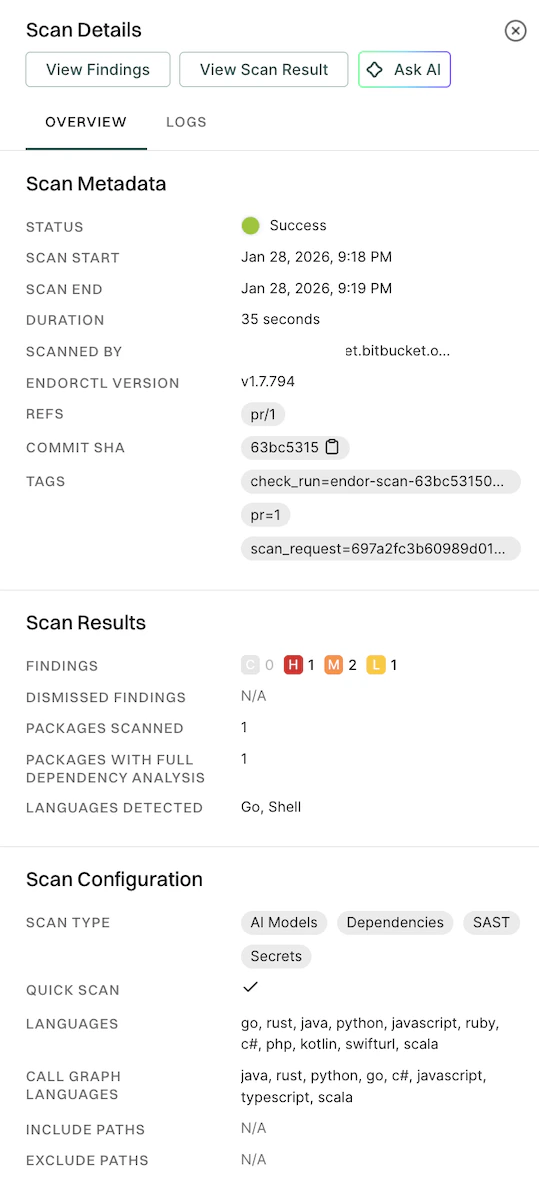
-
Click View Findings to view the findings on the PR.