

- The supported identity provider through which a given identity comes from.
- The role provided to an identity.
- An optional expiration time for the policy.
- The rule criteria or claims required for an identity to access Endor Labs.
Set up authorization policies
To set up an authorization policy to your Endor Labs tenant:- Select User menu > Settings from the left sidebar.
- Select Access Control > Auth Policy.
- Select Add Auth Policy.
- Select the identity provider for which you want to configure an authorization policy.
- Select the role to be granted to a matching identity.
- Select an expiration time for the authorization rule. This may be either No expiration, 24 hours, 72 hours, one week, two weeks, 30 days, 60 days, or 90 days.
- Select the claims for which the authorization rule will provide access.
- Select Add Permission Rule to define granular permissions by specifying resource kinds and allowed methods.
- Under Advanced, select a set of namespaces for which the authorization policy applies. If you choose to propagate this policy to all child namespaces, then the authorization policy will apply to any selected namespaces and their children.
- Click Add Auth Policy to save your authorization policy.
Claims
Claims are key-value pairs from your identity provider’s JWT or SAML token that Endor Labs evaluates when a user authenticates. Each claim has a:- Key: The token attribute name.
- Value: The expected attribute value.
When a policy contains multiple claims, all of them must match for the policy to apply. Claim values are case-sensitive.
GitHub and GitLab
GitHub and GitLab
Use the
user key with the user’s platform username as the value. The username is the handle the user signs in with on GitHub or GitLab, not their display name or email address.For example, to grant access to a GitHub user with the handle jsmith, set Key to user and Value to jsmith.Google
Use the
user key to grant access to a specific Gmail address, or the domain key to grant access to all users in an email domain.For example:- To grant access to a single user, set Key to
userand Value tojsmith@example.com. - To grant access to everyone in a domain, set Key to
domainand Value toexample.com.
domain is useful for organizations where all employees share a corporate Google Workspace domain and you want to grant access to the whole group rather than individual users.Google Cloud
Google Cloud
Use the
email key with the principal email address of your workload’s service account.This is typically a service account address in the format name@project-id.iam.gserviceaccount.com.GitHub Action OIDC
GitHub Action OIDC
Use the
user key to restrict access to workflows running in a specific GitHub organization or repository. Set the value to the organization or repository in the format org or org/repo.For example:- To allow any workflow in the
acmeorganization, set Value toacme. - To restrict access to a specific repository, set Value to
acme/payments-service.
AWS Role
AWS Role
Use the
user key with the full AWS ARN of the IAM role your machine uses to authenticate. For example, arn:aws:iam::123456789012:role/endorlabs-scanner.The ARN must match exactly as it appears in your AWS IAM configuration.Email
Use the
email key with the email address to which Endor Labs sends the authentication link. This is for users who sign in via a one-time link sent to their email address.Azure
Azure
Azure authorization policies require three claim keys that together uniquely identify the application identity:
tid: The Directory (tenant) ID of your Azure Active Directory tenant.appid: The Application (client) ID of the registered application in Azure.oid: The Object ID assigned to the application or managed identity in the tenant.
az_jwt_sub: The subject claim from the Azure JWT token. Use this to scope the policy to a specific identity within the application.subscriptions: The Azure subscription ID, to restrict access to workloads running under a specific subscription.
Custom identity provider
Custom identity provider
Use any key-value pair that your SAML or OIDC identity provider includes in its token. The key must match the claim attribute name exactly as it appears in the token.For example, if your Okta OIDC token includes a
groups claim, set Key to groups and Value to the group name you want to match. If your organization maps department information into a custom claim called department, you can use that to scope access to a specific team.Permission rules
Permission rules control what actions an authenticated identity can perform in Endor Labs. Each rule has two parts:-
Resource kind: The type of object the rule applies to, such as
Project,Finding,AuthorizationPolicy, orScanProfile. Use*to apply the rule to all resource kinds. -
Methods: The operations allowed on that resource.
The following methods are available:
- Read: Use this to grant view-only access to a resource without allowing any modifications.
- Create: Use this to allow an identity to add new resources, such as creating projects or scan profiles.
- Update: Use this when an identity needs to edit resources it did not necessarily create, such as updating findings or policies.
- Delete: Assign this only when the identity explicitly needs to delete resources, as it cannot be undone.
- All: Use this when an identity needs full control over a resource type.
Read on all resources using *, then add a separate rule granting Create and Update on Project only, giving a CI service account the ability to run scans without broader write access.
Deleting an integration from the Endor Labs application uses the Update method on the
Installation resource kind. To let an identity delete integrations from the application, grant Update permission on Installation.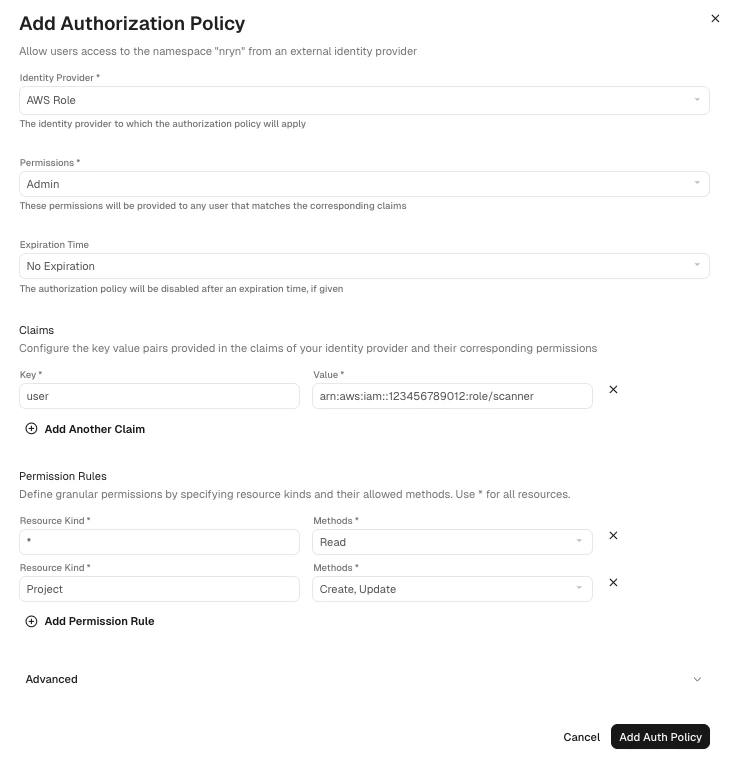
Search authorization policies
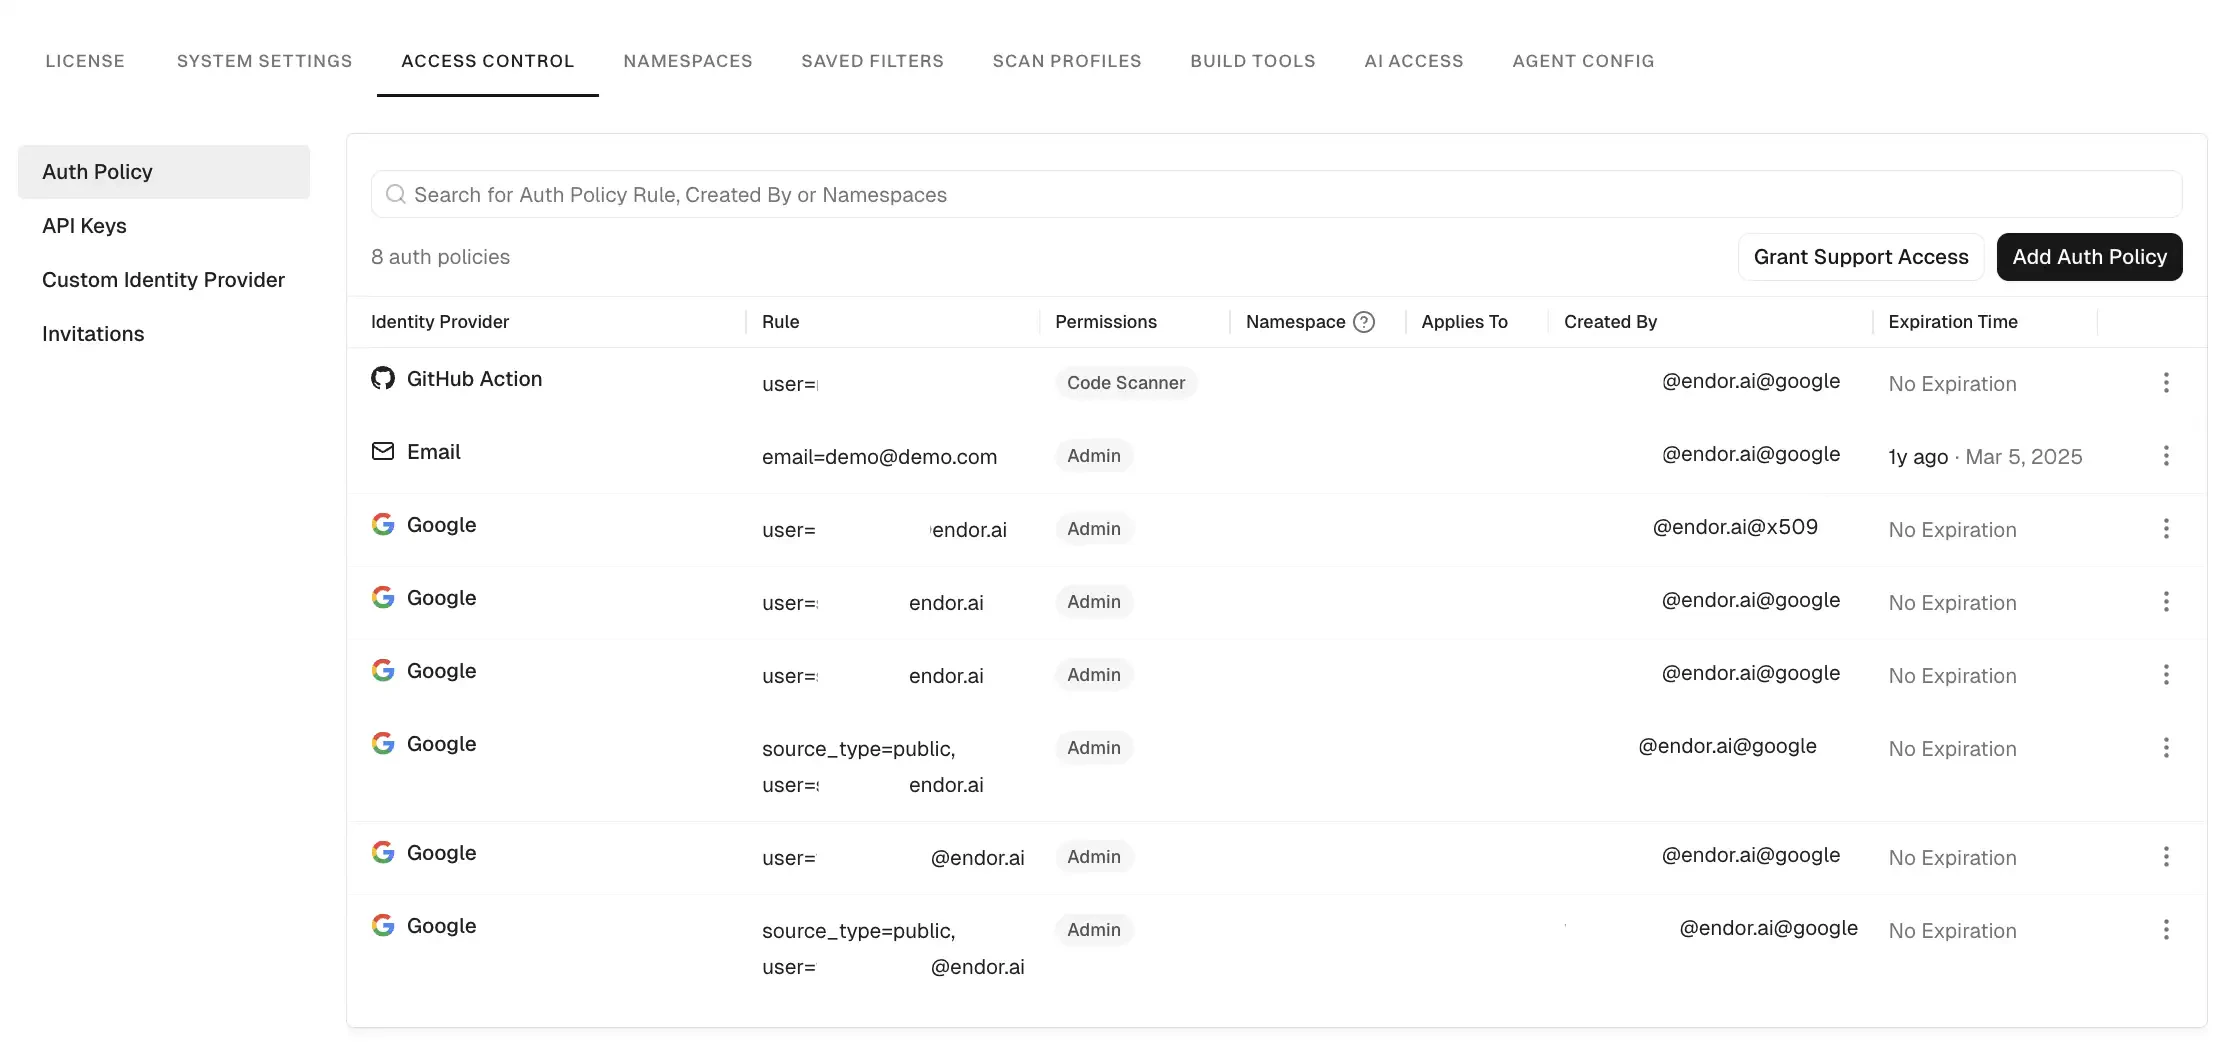
You can use the search functionality to find authorization policies based on specific criteria. To search for authorization policies:- Select User menu > Settings > Access Control.
- Select Auth Policy.
- Use the search bar to find policies by:
- Rule: Search policies by any text or string patterns within the rule definitions.
- Created By: Search policies by the email address of the creator.
- Namespaces: Search policies associated with a specific namespace.
Edit authorization policies
To edit an authorization policy:- Select User menu > Settings > Access Control.
- Select Auth Policy.
- Click the vertical three dots on the right side of the policy you want to edit and click Edit Auth Policy.
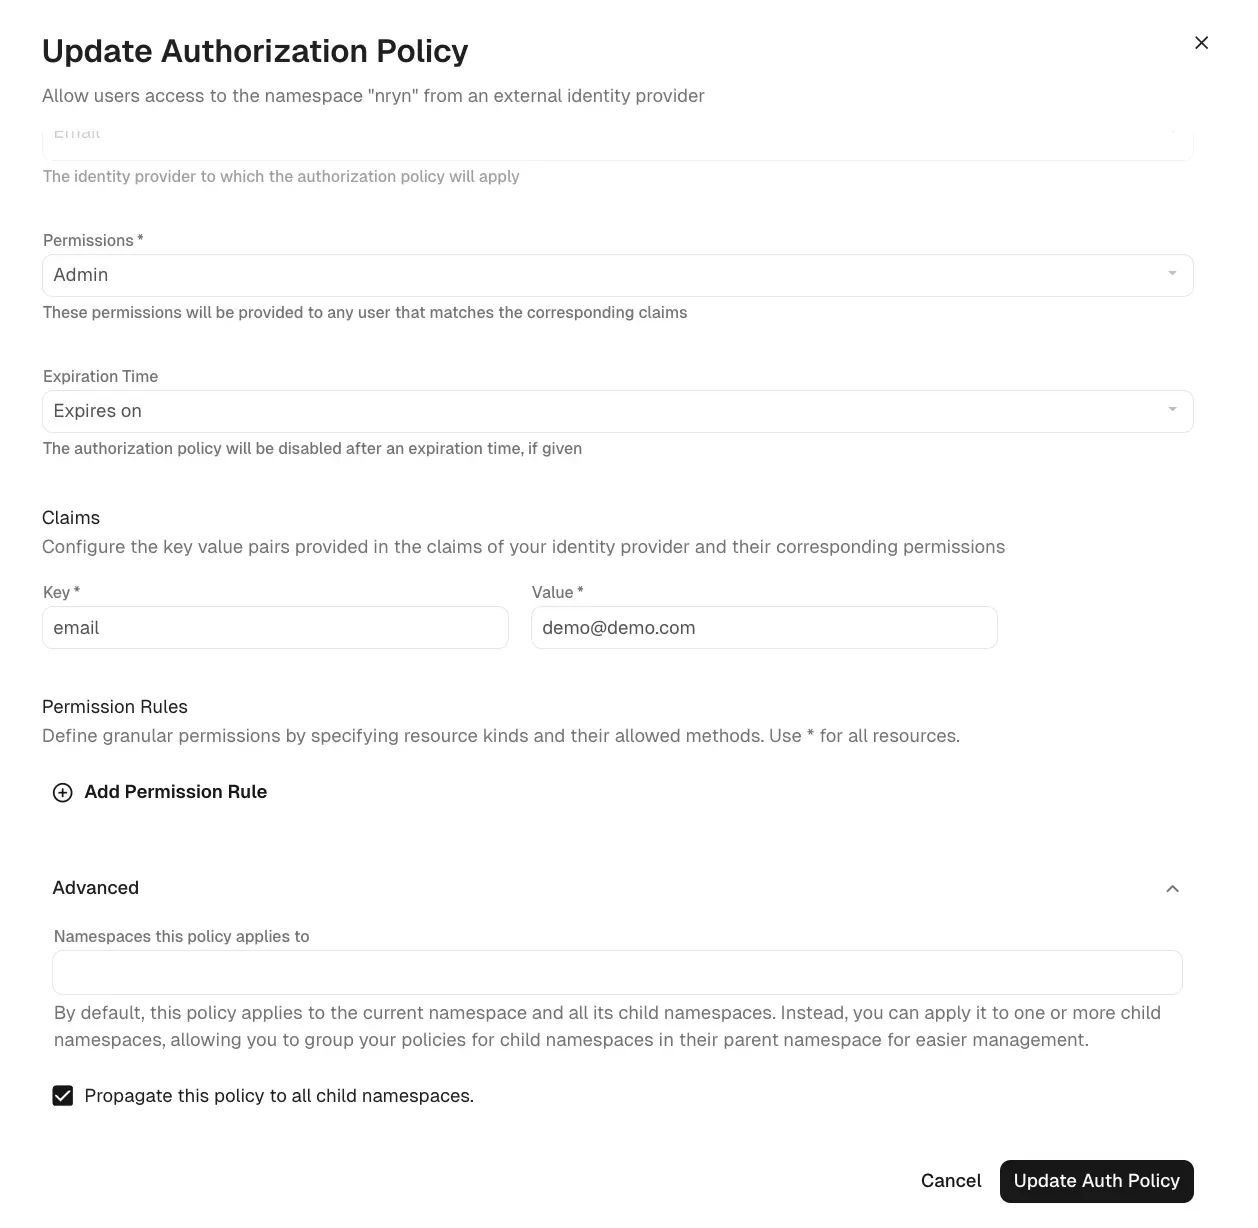
- You can update the identity provider, permission, expiration time, claims of key and value, and namespaces the policy applies to.
- Click Propagate this policy to all child namespaces to apply this policy to all child namespaces within the hierarchy.
- Click Update Auth Policy.
Delete authorization policies
To delete an authorization policy:- Select User menu > Settings from the left sidebar.
- Select Access Control > Auth Policy.
- Click the vertical three dots on the right side of the policy you want to delete and click Delete Auth Policy.
- Click Confirm in Delete Authorization Policy.
Grant support access
You can give the Endor Labs team read-only access to your namespaces for a limited time, allowing them to offer technical support and resolve issues. You can revoke access and delete these policies at any time. See delete authorization policy for more information. To grant support access to your namespace:- Select User menu > Settings from the left sidebar.
- Select Access Control > Auth Policy.
- Select Grant Support Access.
- Select an expiration time for the access from the drop down menu.
- Click Grant Access.