This is the multi-page printable view of this section. Click here to print.

Return to the regular view of this page.

SAST scan

This is the multi-page printable view of this section. Click here to print.

Return to the regular view of this page.

Static Application Security Testing (SAST) is an automated security analysis methodology that examines application code to identify potential security vulnerabilities.

SAST has the following characteristics:

  • White-box Testing: Provides full visibility into application internals
  • Non-runtime Analysis: Performs scans without code execution
  • Early Detection: Identifies vulnerabilities during development phases
  • Language Support: Analyzes multiple programming languages and frameworks

Endor Labs integrates Opengrep to provide SAST scan with endorctl.

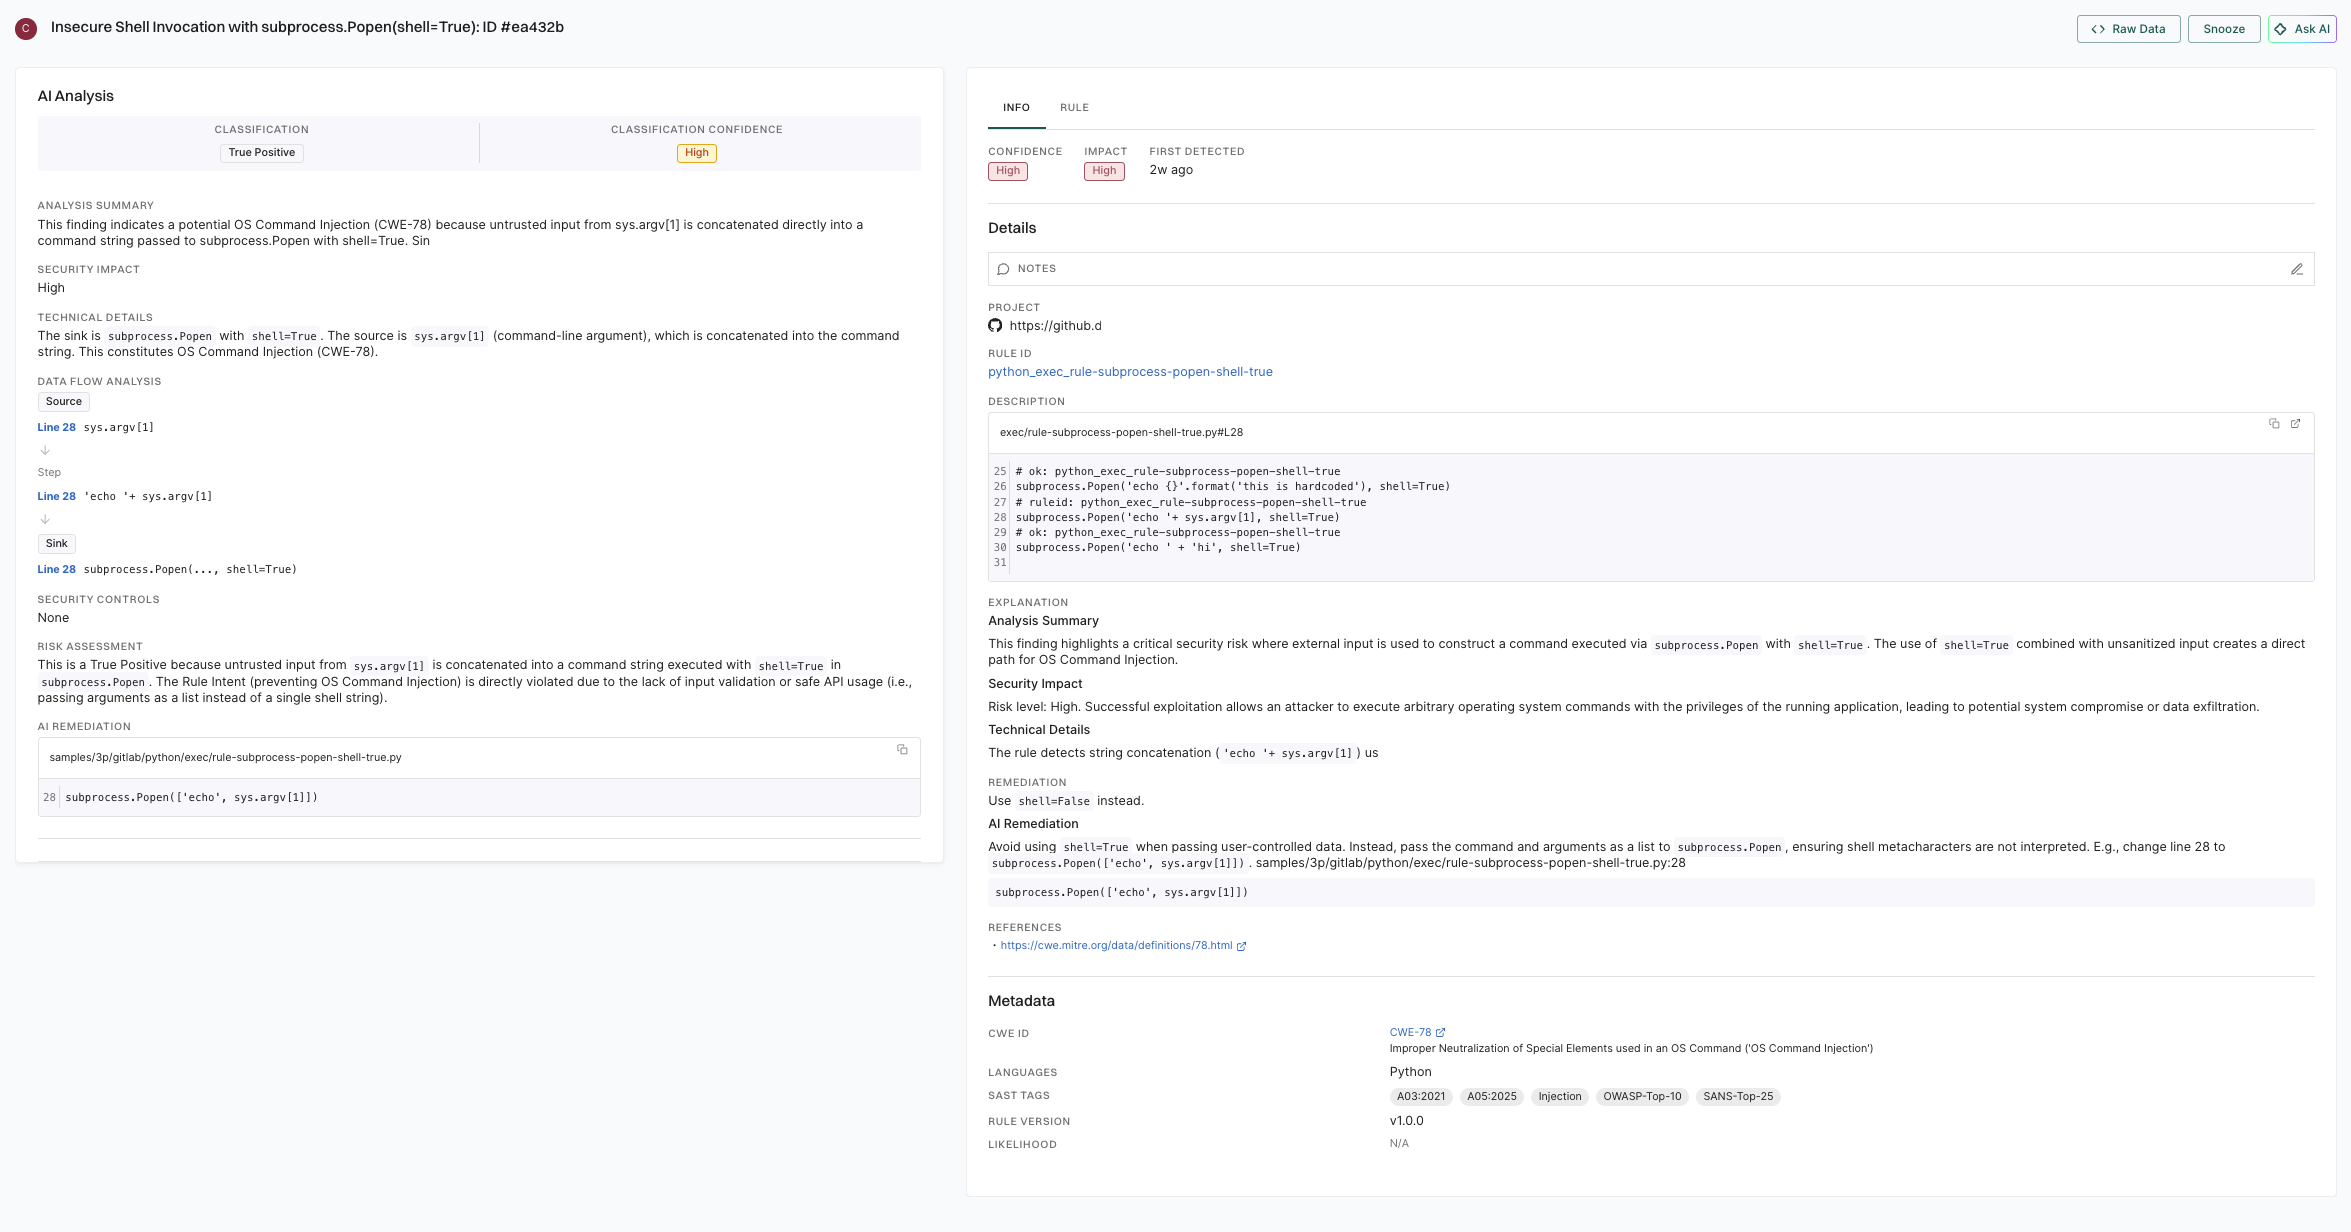
Endor Labs enhances SAST scanning with AI analysis that evaluates each finding to determine whether it represents a genuine security vulnerability or a false positive. This automated classification streamlines your security workflow by eliminating the need for manual triage of every alert, allowing your team to prioritize and address real threats more efficiently. See AI analysis with SAST scan for more information.

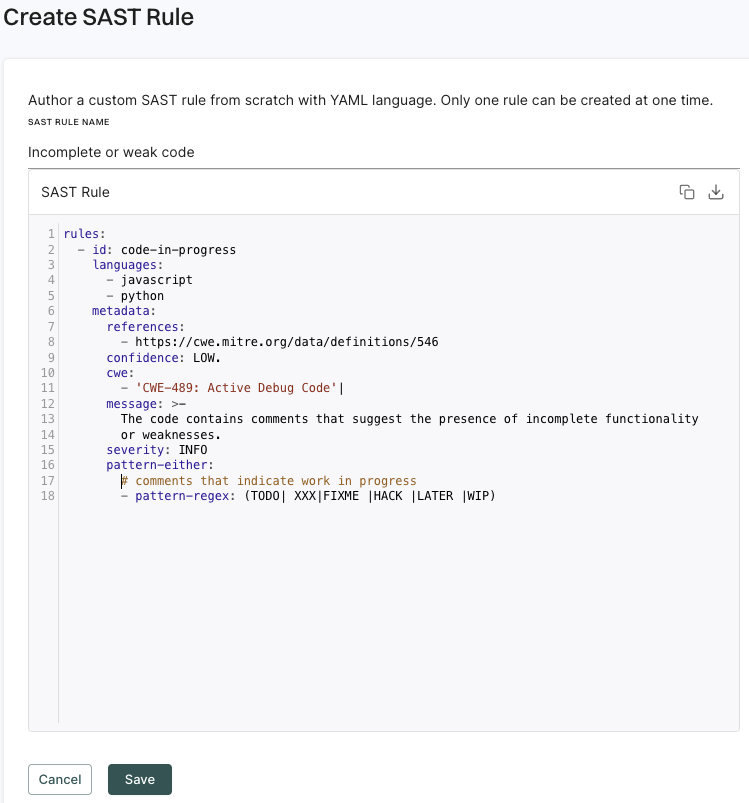
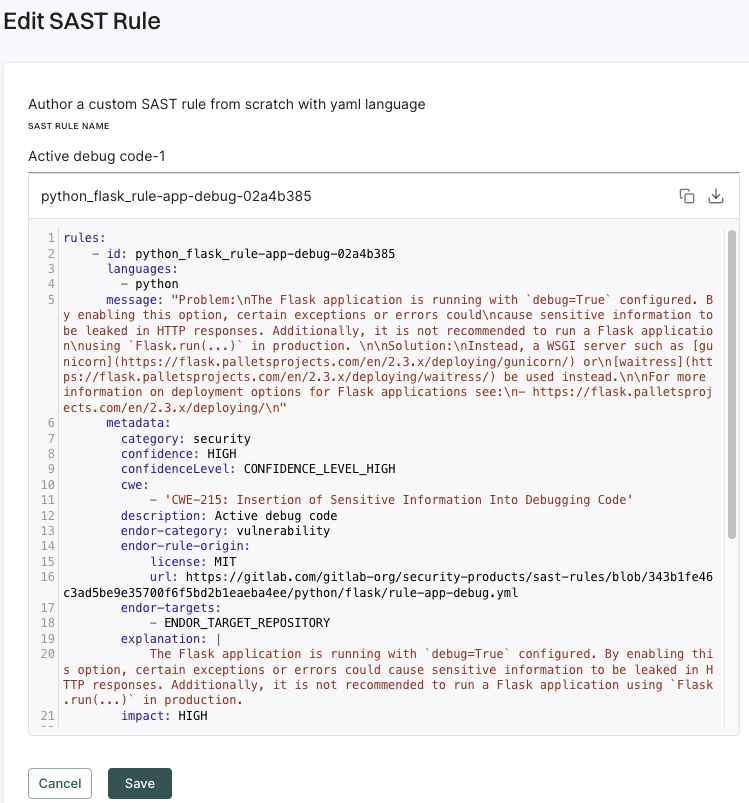
Opengrep is an open-source, static analysis tool that finds bugs and vulnerabilities in the source code using pattern matching. Opengrep parses the source code, applies pattern matching based on rules, and reports matches based on the rule specifications. Opengrep rules are in the yaml format.

When you run a SAST scan, Endor Labs downloads Opengrep and works seamlessly.

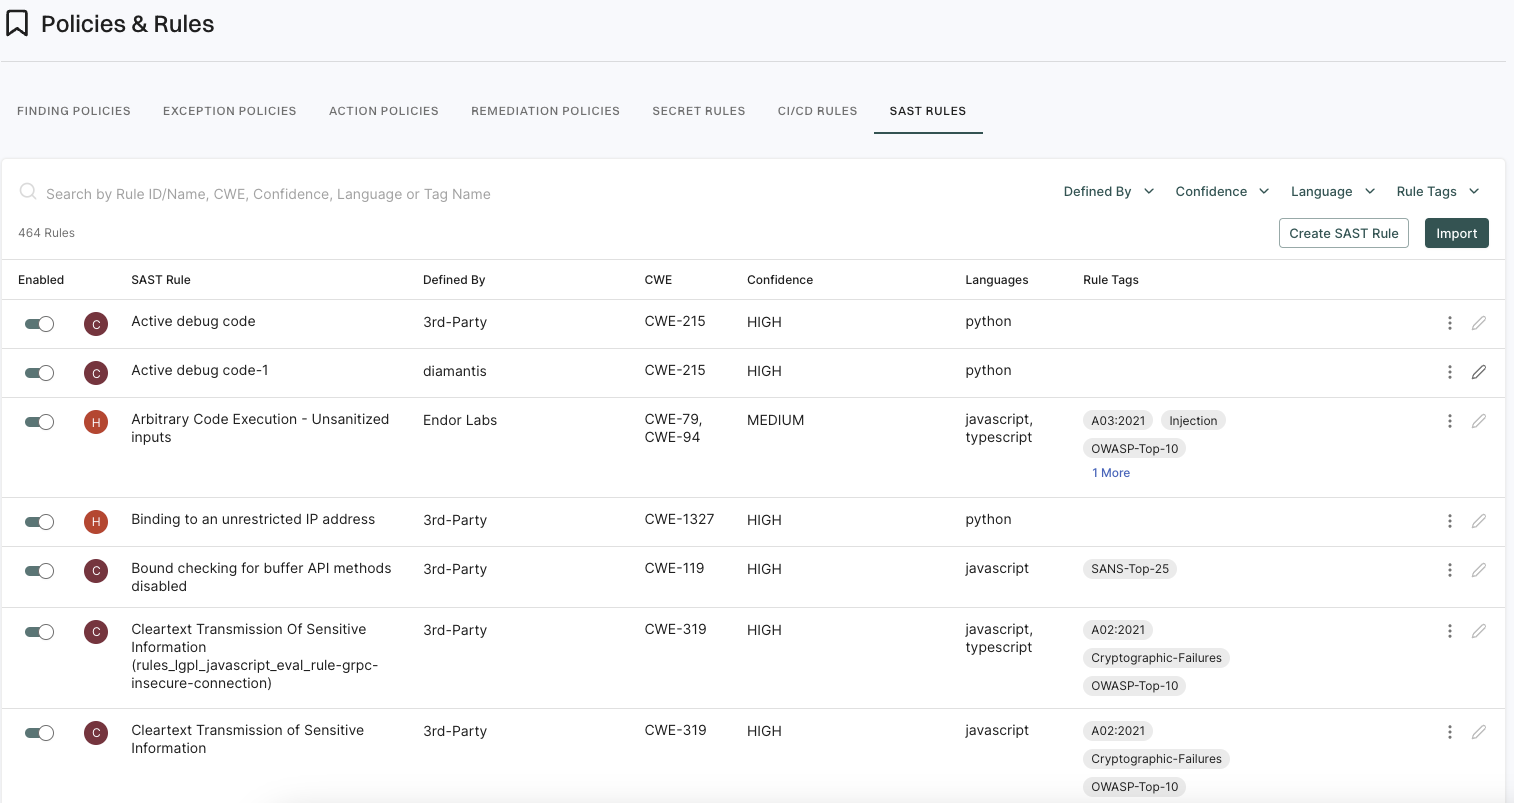
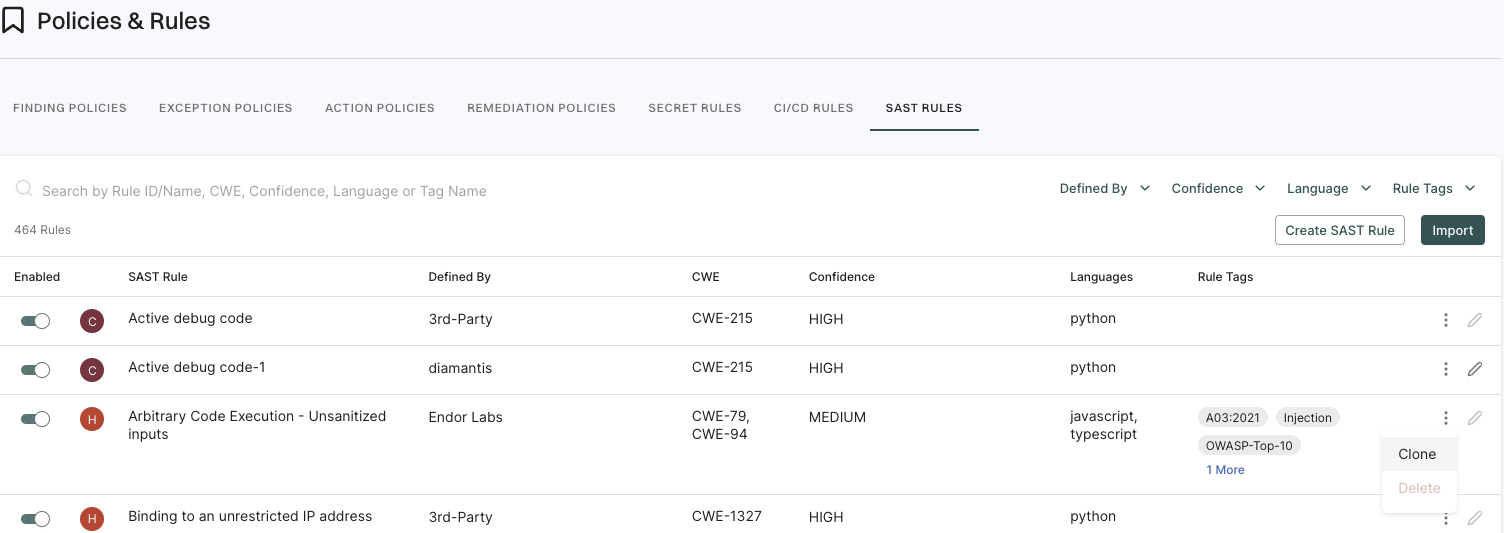
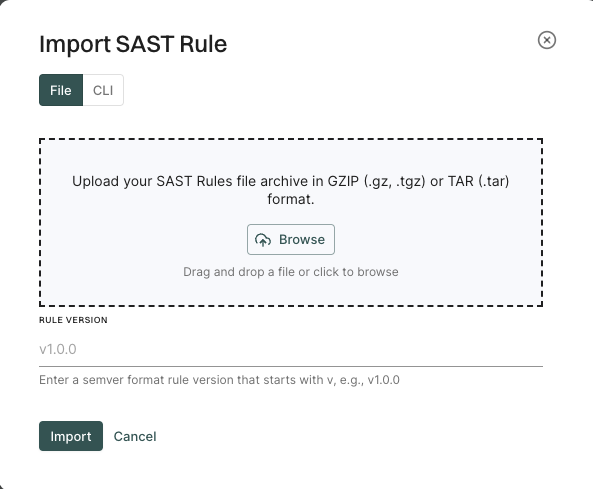
Endor Labs includes a set of curated rules. You can create your own rules or import rules with the rule designer.

Note
Enable the default SAST finding policies to generate findings from SAST scans.

When you scan with the SAST option enabled, Endor Labs uses Opengrep to scan for weaknesses in your source code based on the enabled rules and generates results based on the configured finding policies.

Tip
Endor Labs does not scan the files included in the .gitignore files during SAST scan. You can also use the nosemgrep annotation in the code to skip SAST scan. Refer to the Semgrep Documentation for more information.

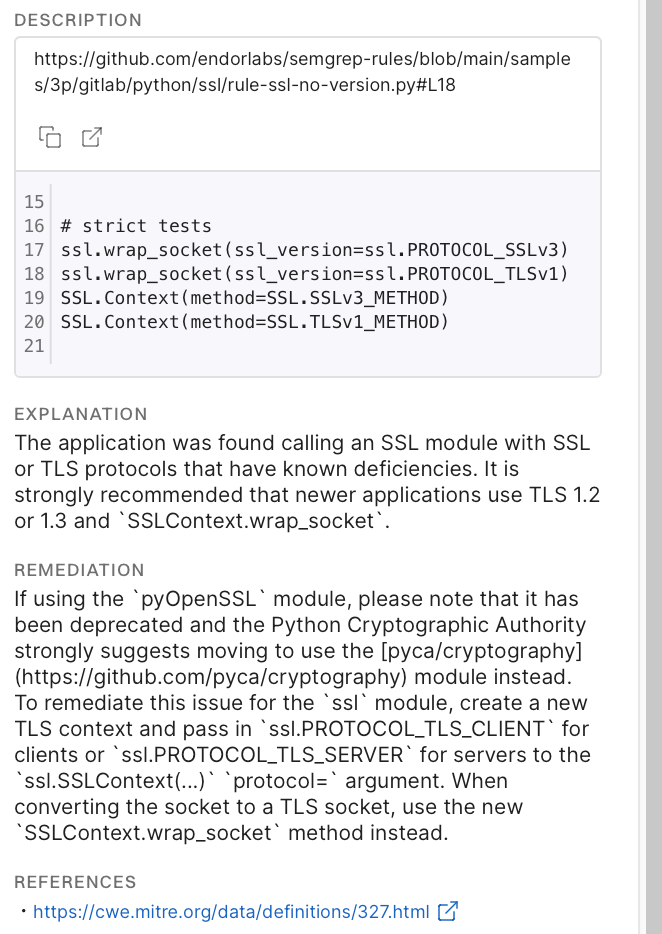
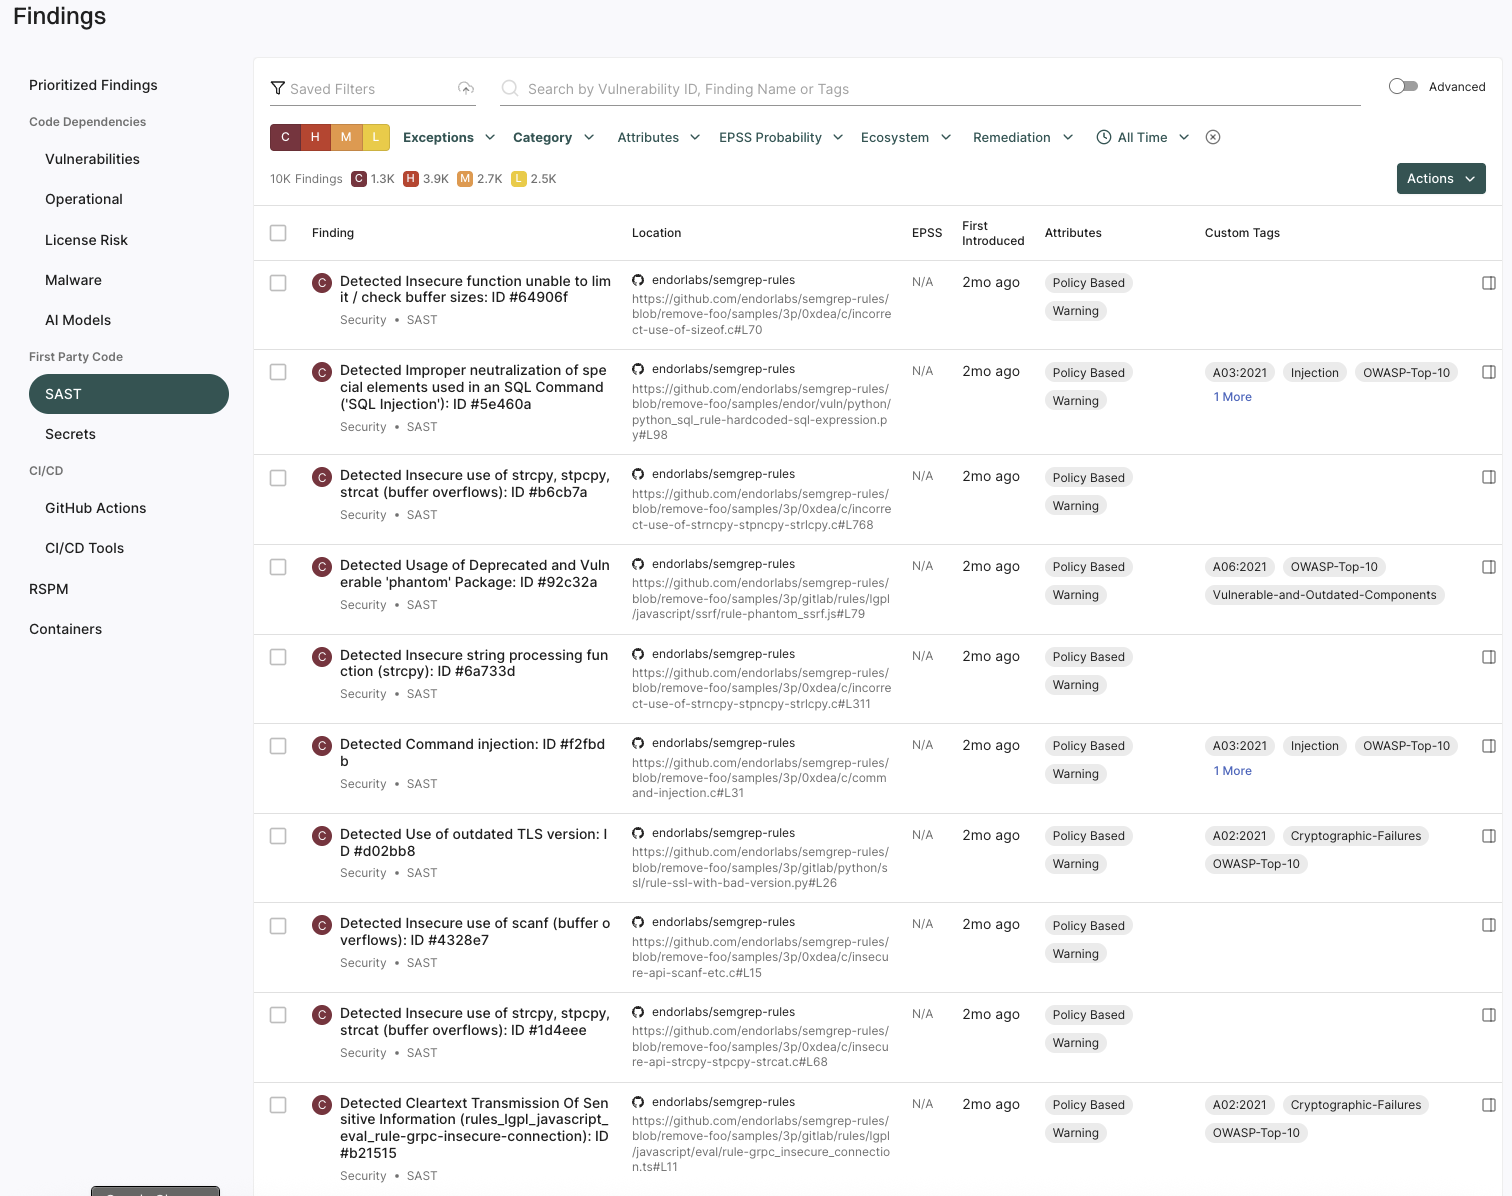
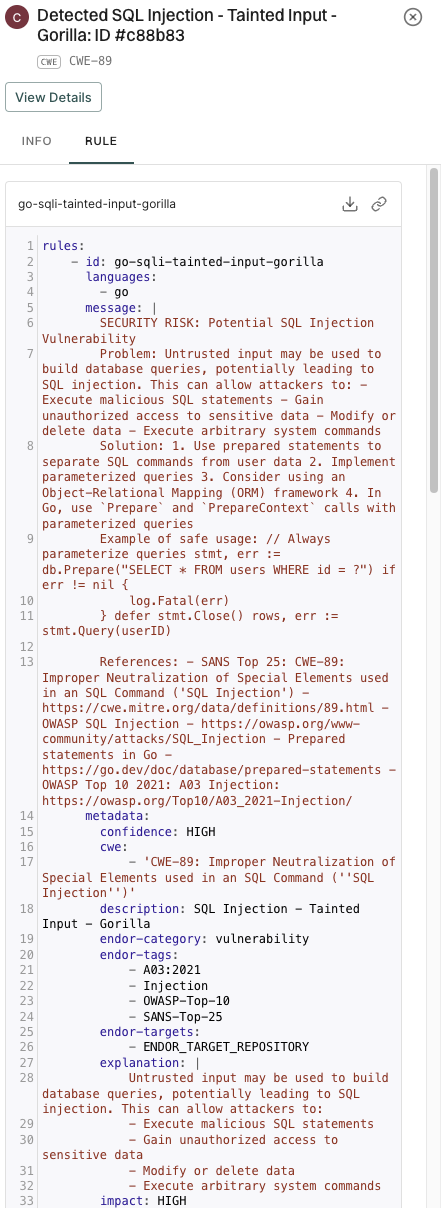
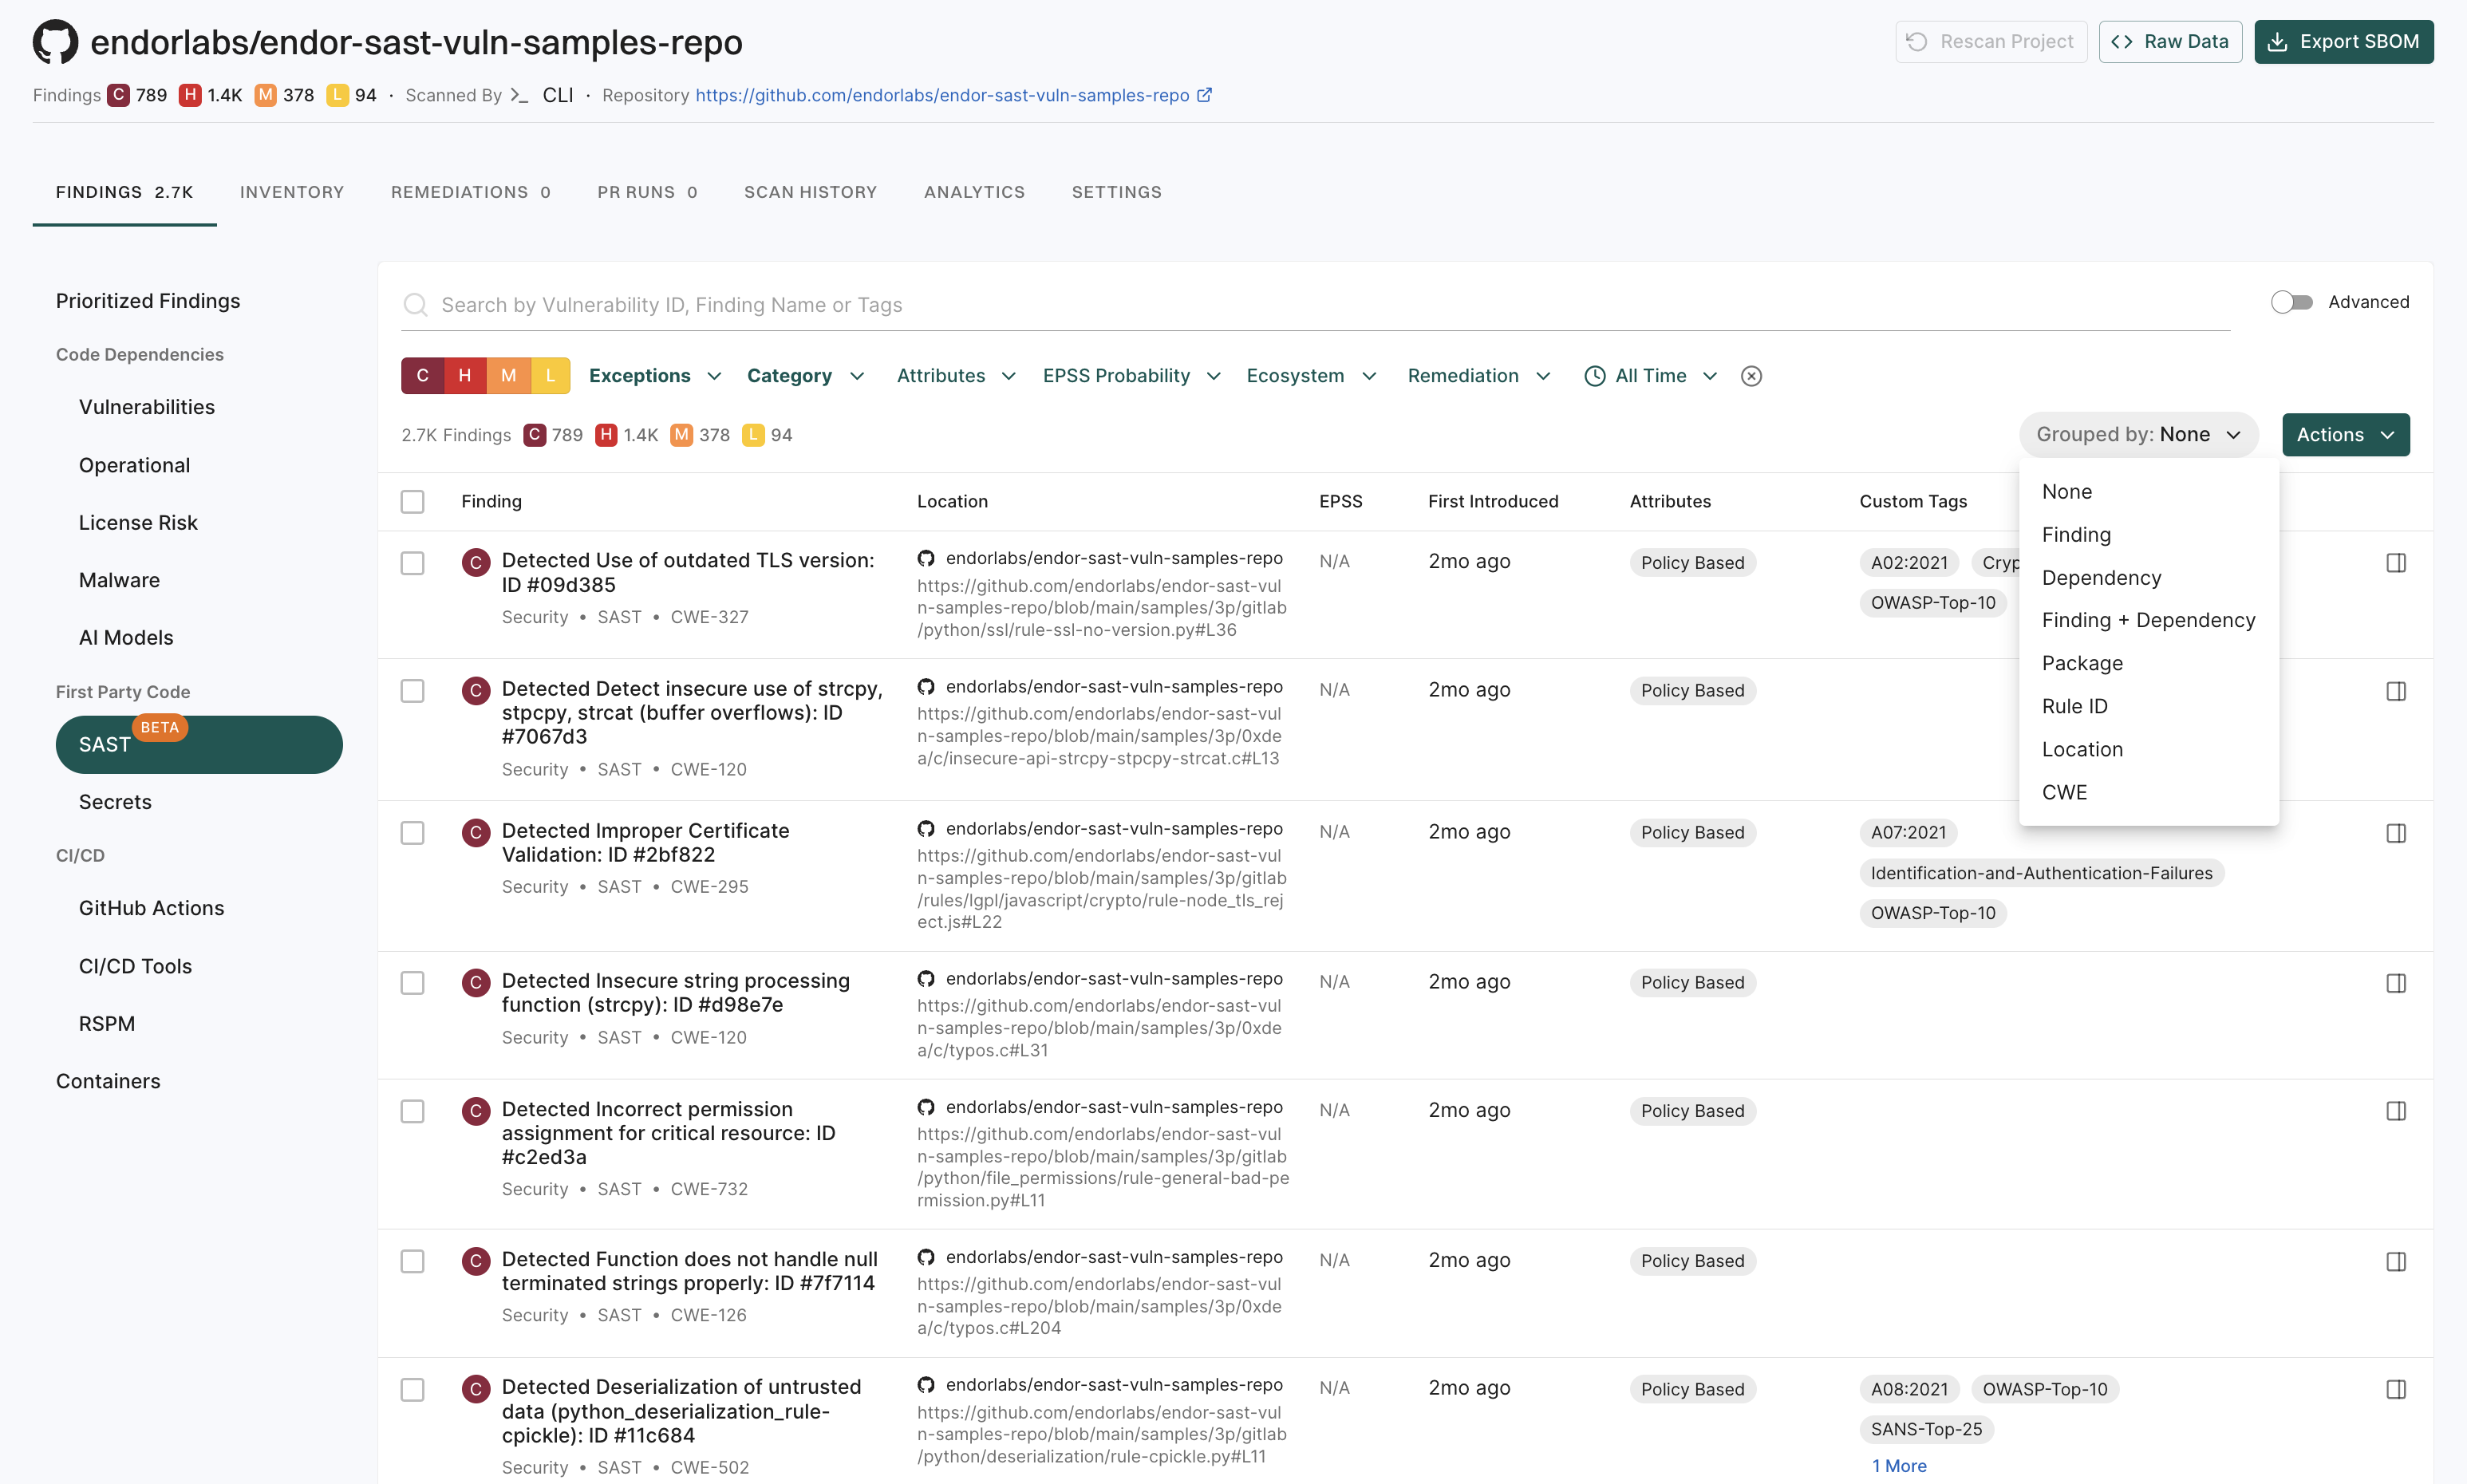
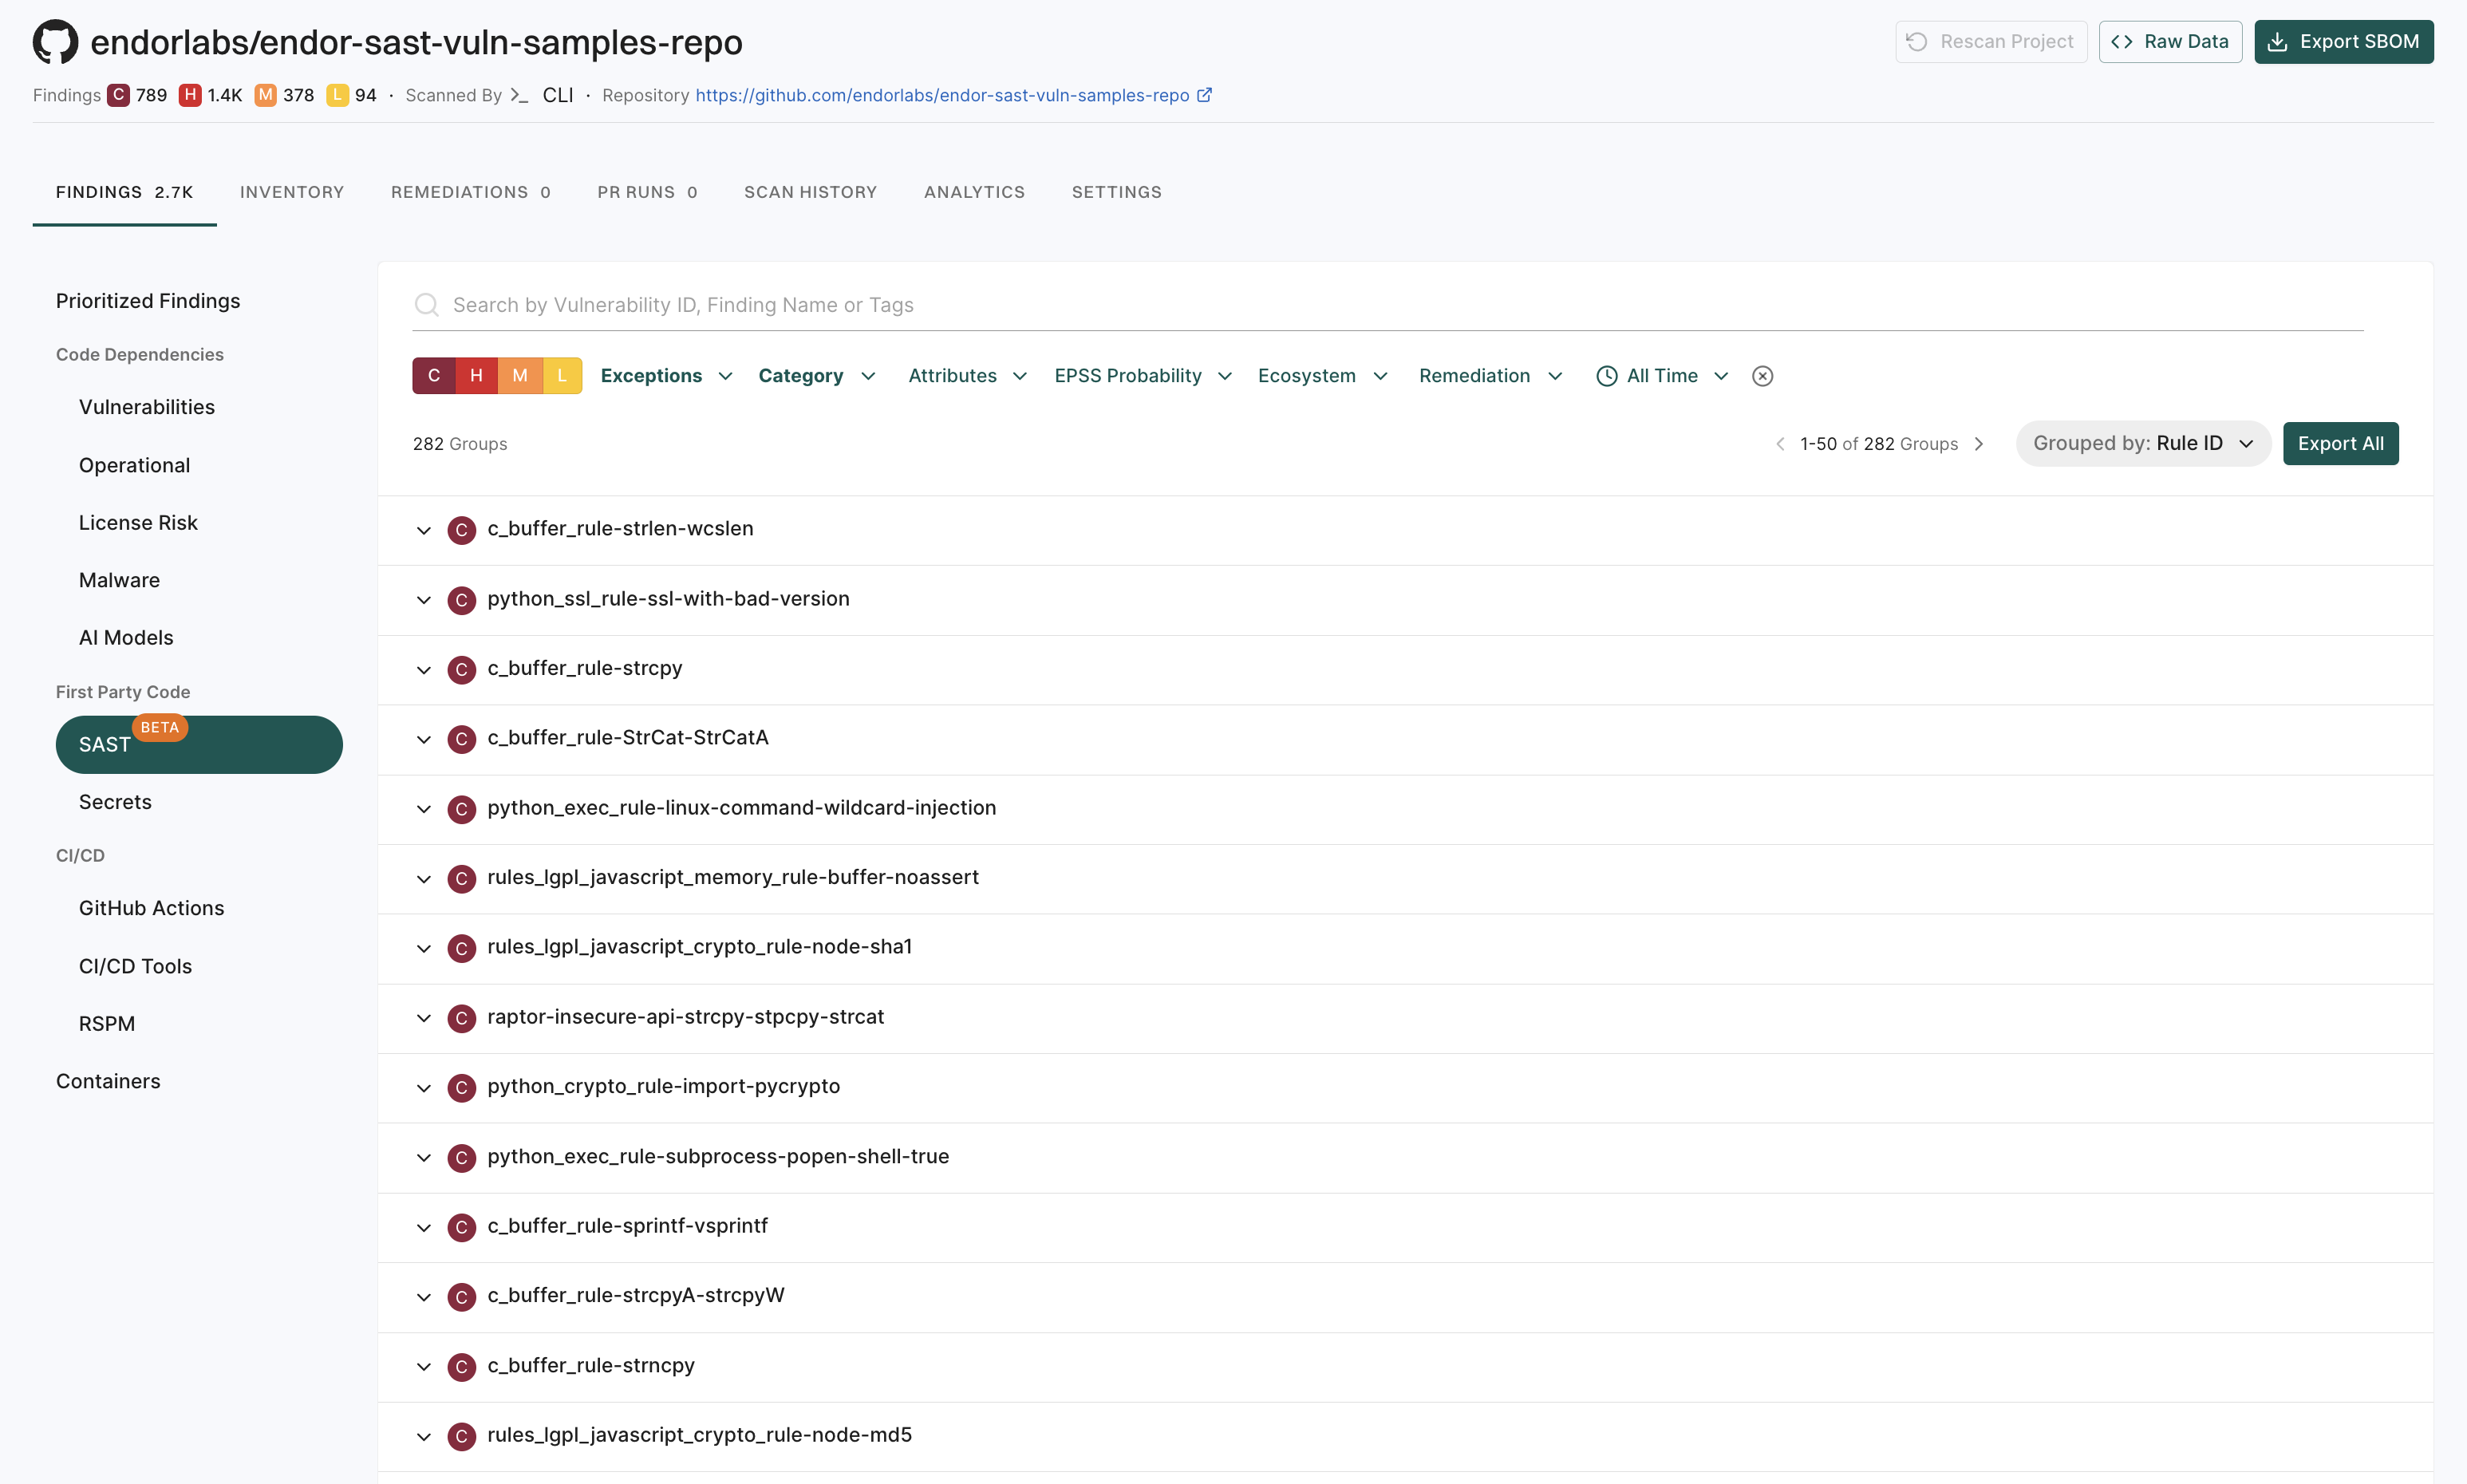
Login to Endor Labs to view the findings of a SAST scan. See SAST Findings for more information.

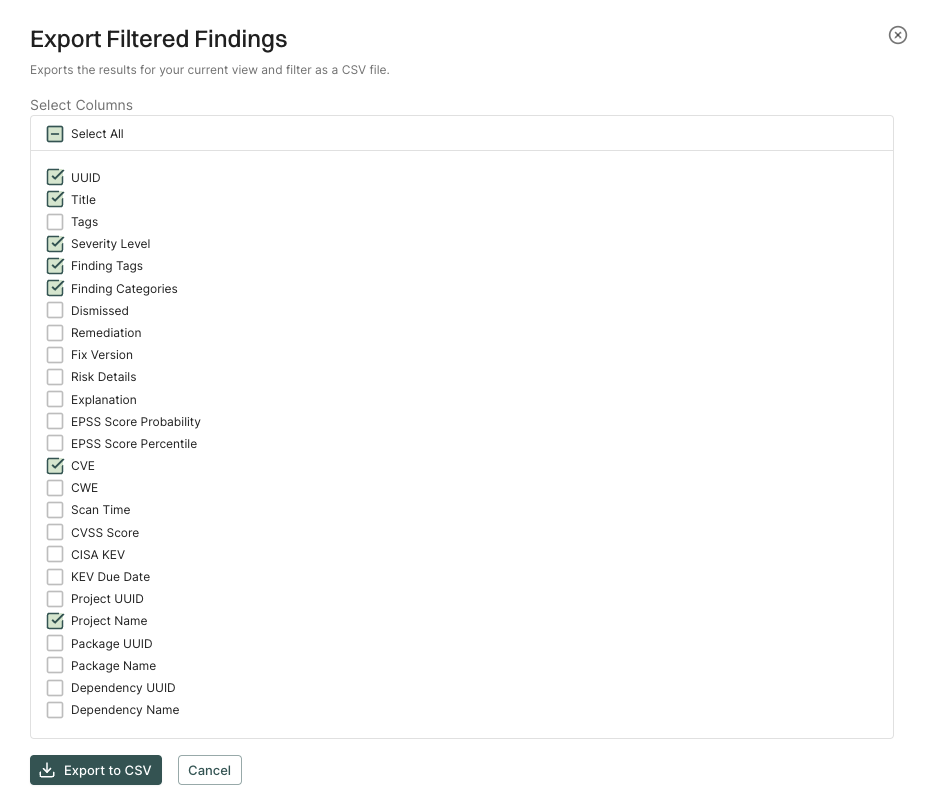
You can create exception policies to exclude results from the findings page. See create exception policy for more information.

You can create a finding policy using predefined templates to control which SAST results appear as findings. See SAST policies for more information.

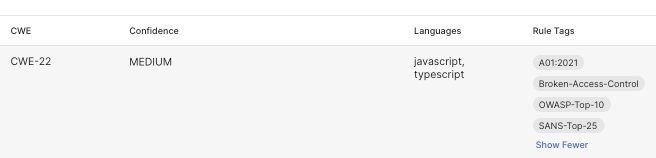
Endor Labs determines the severity of findings by combining two factors from the SAST rule: impact and confidence. Impact measures the potential consequences if a security issue were to be exploited. Confidence represents how certain the system is that a detected pattern indicates a genuine security issue rather than a false positive.

The following matrix shows how Endor Labs resolves severity by combining impact and confidence.

High Impact Medium High Critical
Medium Impact Low Medium High
Low Impact Low Low Medium
Low Confidence Medium Confidence High Confidence

Endor Labs supports single-function analysis for the following languages through curated rules and custom user rules:

Apex Bash C Cairo Circom Clojure C++ C# Dart Dockerfile Elixir Generic Go Hack HTML Java JavaScript JSON Jsonnet Julia Kotlin Lisp Lua Move OCaml PHP PromQL Protobuf Python QL R Regex Ruby Rust Scala Scheme Solidity Swift Terraform TypeScript XML YAML

Endor Labs offers several ways to run SAST scans based on your project setup.

  1. AI-analyzed SAST scan with endorctl
  2. SAST scan in monitoring scans
  3. AI-analyzed SAST scan in monitoring scans
  4. SAST scan in Endor Labs GitHub Action

You can run AI-analyzed SAST scans using endorctl by adding the --ai-sast-analysis=agent-fallback flag to your scan command. The AI agent automatically classifies findings as true positives or false positives, reducing manual triage effort. See Run a SAST scan for more information.

You can enable SAST scans when you configure monitoring or supervisory scans using the Endor Labs GitHub App, Azure DevOps App, Bitbucket App, and GitLab App. See Monitoring scans for more information. To disable the storage of code snippet in SAST scans for monitoring scans, you need to create a scan profile for your monitoring scan with disable code snippet storage as enabled. This setting applies to all scans that you use this scan profile, not just the monitoring scans.

Create or edit a scan profile, and select Enable the false positive reduction agent to enable AI SAST analysis for false positive reduction in monitoring scans. You need to associate this scan profile with your project. See Configure scan profile through Endor Labs user interface for more information.

You can also enable SAST scan in the Endor Labs GitHub Action. Set the scanning parameter, scan_sast as true. To disable code snippet storage for SAST scans, set disable_code_snippet_storage as true. See Scan with GitHub Actions for more information.

You can use the --pr-incremental flag to perform an incremental scan on your pull requests or merge requests for SAST. In monitoring scans, incremental scans are done by default for PR scans. Endor Labs only scans the files that have changed since the last scan on the baseline branch. Endor Labs computes a diff between the target branch and the baseline branch to identify the changed files. Any modified file is sent through Opengrep to fully scan for SAST issues, and unchanged files are skipped. Endor Labs does not perform chunk-level or line-level code diff analysis for SAST. If there are more than 1000 modified files, Endor Labs performs a complete scan.

SAST Rules

Endor Labs uses Semgrep-compatible rules for SAST scans. Endor Labs includes hundreds of rules for various languages, including rules created by Endor Labs and vetted third-party rules. To this end, Endor Labs reviews existing open source rules and complements them with Endor Labs rules to cover additional technologies or vulnerability types.

You can edit existing rules in your tenant to make modifications specific to your environment. You can also create new custom rules with the rule designer based on your requirements. You can also use the rule designer to add any Semgrep rule as a custom rule.

From the left sidebar, navigate to Policies & Rules and select SAST RULES to view all SAST rules in the system.

SAST rules

You can use the toggle against a rule to enable or disable the rule during the scan.

You can search for rules based on various parameters like rule name, languages, CWE, and tags.

You can create SAST rules in your tenants, and can edit, delete, or propagate them to child namespaces. But you cannot edit rules that are marked as Endor Labs or 3rd Party. You can choose to disable the rule to not apply them during scanning or clone them to modify the rules.

The following sections provide more information on the actions you can do with SAST rules.

Clone a SAST rule

You can clone an existing SAST rule and use that as a base to build your own rule.

Cloning a rule provides the following benefits:

  • You can make changes to a rule and review the results instead of directly editing an existing rule.
  • You can create a clone of a rule that you do not have permission to edit and make your changes.

To clone a SAST rule:

  1. Select Policies & Rules from the left sidebar.

  2. Select SAST RULES.

  3. Click on the vertical three dots next to a rule and select Clone.

    A copy of the rule appears in the list of rules with the rule name in the format, <original rule name\>-\<Clone number\>. For example, the first clone of Arbitrary Code Execution - Unsanitized inputs becomes Arbitrary Code Execution - Unsanitized inputs Clone, with subsequent clones appended with Clone 1, Clone 2, etc.

    Clone SAST rule

  4. Select Edit to edit the cloned rule according to your requirements.

    See Edit a SAST Rule for more information.

Create a SAST rule

To create a SAST rule:

  1. Select Policies & Rules from the left sidebar.

  2. Select SAST RULES.

  3. Click Create SAST Rule.

  4. Enter the SAST rule in the yaml format.

    Create SAST rule

  5. Click Save to save the rule.

Edit a SAST rule

You can edit only the custom SAST rules. You cannot edit or delete Endor Labs or third-party rules.

To edit a SAST rule:

  1. Select Policies & Rules from the left sidebar.

  2. Select SAST RULES.

  3. Click on the vertical three dots next to a rule and select Edit.

    Edit SAST rule

  4. After you complete the edits, click Save to save the rule. You can also delete or disable a rule from the Edit SAST Rule screen.

Import SAST rules

You can import Semgrep-compatible SAST rules that you create as yaml files. The files must have yaml or yml extensions and the rules should be inside a gzip or tar archive.

You can bulk import rules through the user interface.

  1. Select Policies & Rules from the left sidebar.

  2. Select SAST RULES.

  3. Click Import.

    Import SAST rule

  4. Click Browse and select the archive file that contains the rules.

  5. Enter the version of the rule.

You can bulk import a number of rules using the following command.

endorctl rule-set import --file-path <file> --rule-version <version> -n namespace

Option Description
-n, --namespace Namespace of the project with which you are working. Mandatory.
β€”-file-path The path to the file that contains the rule set that should be imported. Supported file types are .tar and .gz.
β€”rule-version The semantic version that applies to all the rules in the set. The command fails if there are any rules that exist with this version.

Add metadata to a SAST rule

You can add metadata to the custom SAST rule that you create or when you clone an existing Endor Labs rule in the metadata section.

The following example shows the SAST rule template with the metadata section.


rules:
- id: <lang>-<rulename>
  languages:
  - < java | js | py >

  < patterns, mode, options >

  message: < Rule message that provides details about the matched pattern and informs about how to mitigate any related issues, and can be shown in our UI. >
  severity: < INFO | WARNING | ERROR >
  metadata:
    version: 1.0.0
    description: A customer visible description for this rule.
    explanation: |
        An explanation of the issue.
    remediation: |
        Possible remediation steps you can take to fix the issue.
    cwe:
    - "CWE-xxx: <cwe title from https://cwe.mitre.org/data/definitions/xxx.html>"
    likelihood: < HIGH | MEDIUM | LOW >
    impact: < HIGH | MEDIUM | LOW >
    confidence: < HIGH | MEDIUM | LOW >

You can add the following metadata information to the rule:

  • explanation: An explanation of the issue.

  • remediation: Possible remediation steps you can take to fix the issue.

  • cwe: The CWE ID of the issue. The OWASP or SANS-25 category of the CWE ID will automatically appear under Rule Tags in Findings if such a mapping can be established.

    The following image shows an example where the CWE-22 is automatically mapped to the appropriate category.

    Finding details

  • impact: The impact of the issue. Impact is one of the factors that determines the severity of the issue. See SAST severity matrix for more information.

  • confidence: The confidence level that the issue is real. Confidence is one of the factors that determines the severity of the issue. See SAST severity matrix for more information.

For example:


rules:
  - id: python_ssl_rule-ssl-no-version
    .
    .
    .
    metadata:
      explanation: |
        The application was found calling an SSL module with SSL or TLS protocols that have known deficiencies. It is strongly recommended that newer applications use TLS 1.2 or 1.3 and `SSLContext.wrap_socket`.
      remediation: |
        If using the `pyOpenSSL` module, please note that it has been deprecated and the Python Cryptographic Authority strongly suggests moving to use the [pyca/cryptography](https://github.com/pyca/cryptography) module instead. To remediate this issue for the `ssl` module, create a new TLS context and pass in `ssl.PROTOCOL_TLS_CLIENT` for clients or `ssl.PROTOCOL_TLS_SERVER` for servers to the `ssl.SSLContext(...)` `protocol=` argument. When converting the socket to a TLS socket, use the new `SSLContext.wrap_socket` method instead.
    .
    .
    .

When Endor Labs generates a finding based on this rule, the explanation and remediation sections appear in the finding details.

Finding details

The metadata information also appears in the SARIF output.

{
  "locations": [
    {
      "physicalLocation": {
        "artifactLocation": {
          "uri": "samples/3p/gitlab/python/ssl/rule-ssl-with-bad-version.py"
        },
        "region": {
          "startLine": 9
        }
      }
    }
  ],
  "message": {
    "text": "Problem:\nThe application was found calling an SSL module with SSL or TLS protocols that have known deficiencies. It is strongly\nrecommended that newer applications use TLS 1.2 or 1.3 and `SSLContext.wrap_socket`.\n\nSolution:\nIf using the `pyOpenSSL` module, please note that it has been deprecated and the Python Cryptographic Authority strongly\nsuggests moving to use the [pyca/cryptography](https://github.com/pyca/cryptography) module instead.\nTo remediate this issue for the `ssl` module, create a new TLS context and pass in `ssl.PROTOCOL_TLS_CLIENT` for clients\nor `ssl.PROTOCOL_TLS_SERVER` for servers to the `ssl.SSLContext(...)` `protocol=` argument. When converting the socket\nto a TLS socket, use the new `SSLContext.wrap_socket` method instead.\n\nExample creating a TLS 1.3 client socket connection by using a newer version of Python (3.11.4) and the SSL module:\n```\nimport ssl\nimport socket\n\n# Create our initial socket\nwith socket.socket(socket.AF_INET, socket.SOCK_STREAM) as sock:\n    # Connect the socket\n    sock.connect(('www.example.org', 443))\n\n    # Create a new SSLContext with protocol set to ssl.PROTOCOL_TLS_CLIENT\n    # This will auto-select the highest grade TLS protocol version (1.3)\n    context = ssl.SSLContext(protocol=ssl.PROTOCOL_TLS_CLIENT)\n    # Load our a certificates for server certificate authentication\n    context.load_verify_locations('cert.pem')\n    # Create our TLS socket, and validate the server hostname matches\n    with context.wrap_socket(sock, server_hostname=\"www.example.org\") as tls_sock:\n        # Send some bytes over the socket (HTTP request in this case)\\\n        data = bytes('GET / HTTP/1.1\\r\\nHost: example.org\\r\\n\\r\\n', 'utf-8')\n        sent_bytes = tls_sock.send(data)\n        # Validate number of sent bytes\n        # ...\n        # Read the response\n        resp = tls_sock.recv()\n        # Work with the response\n        # ...\n```\n\nFor more information on the ssl module see:\n- https://docs.python.org/3/library/ssl.html\n\nFor more information on pyca/cryptography and openssl see:\n- https://cryptography.io/en/latest/openssl/\n"
  },
  "properties": {
    "explanation": "The application was found calling an SSL module with SSL or TLS protocols that have known deficiencies. It is strongly recommended that newer applications use TLS 1.2 or 1.3 and `SSLContext.wrap_socket`.\n",
    "remediation": "If using the `pyOpenSSL` module, please note that it has been deprecated and the Python Cryptographic Authority strongly suggests moving to use the [pyca/cryptography](https://github.com/pyca/cryptography) module instead. To remediate this issue for the `ssl` module, create a new TLS context and pass in `ssl.PROTOCOL_TLS_CLIENT` for clients or `ssl.PROTOCOL_TLS_SERVER` for servers to the `ssl.SSLContext(...)` `protocol=` argument. When converting the socket to a TLS socket, use the new `SSLContext.wrap_socket` method instead.\n",
    "tags": [
      "A02:2021",
      "Cryptographic-Failures",
      "OWASP-Top-10"
    ]
  }
}

Run a SAST scan

Run a SAST scan with endorctl to identify security vulnerabilities and code quality issues in your source code.

Ensure that you install endorctl and configure your environment to run Endor Labs scan before you proceed to do a SAST scan.

You can run a SAST scan on a project with endorctl using the following command.

endorctl scan --sast --path=/path/to/code -n <namespace>

To view the findings generated by this scan in Endor Labs, see view SAST findings.

Endor Labs uses AI Agent analysis to perform intelligent triage of SAST findings when you run a scan. The AI agent leverages a large language model (LLM) to examine code context, trace data flows, and evaluate security controls, automatically classifying each finding as either a True Positive, indicating a genuine security vulnerability, or a False Positive. This automated classification eliminates the need for manual review of every alert, allowing you to focus on addressing real security threats.

AI analysis does not process findings from test files such as unit tests and integration tests, or findings with low severity ratings. See AI triage behaviour for more information.

License requirement
AI SAST analysis features require a Code Pro license. A standard Code license covers basic SAST scanning, but AI analysis capabilities require Code Pro.

The AI analysis process uses a large language model (LLM) to systematically evaluate each finding through the following steps:

  1. Identify SAST rule match location - The LLM locates the exact code line where the SAST rule was triggered and examines the matching code patterns.

  2. Trace data flow from source to sink - The LLM follows the data flow from where it enters the application to where it is used in potentially vulnerable code to determine if user-controlled input reaches vulnerable paths.

  3. Examine function calls and security controls - The LLM reviews function calls in the data flow path, including sanitizers, validators, and other security controls that may mitigate risks.

  4. Analyze function context and application usage - The LLM understands the purpose of functions involved in the rule match, how they are used in the application, and the application context such as web application, test file, or code example.

  5. Classify findings as true or false positive - The LLM evaluates all gathered information including whether inputs are user-controlled or hard-coded, presence of sanitization functions, application context, and existing security controls to classify the finding as a true positive or false positive.

AI analysis processes only new findings and existing un-analyzed findings. If some findings are not analyzed in one run, they will be analyzed in the next scan. The analysis process runs for up to 30 minutes by default.

To modify the analysis timeout duration, set the following environment variable:

export ENDOR_SCAN_AI_SAST_ANALYSIS_TIMEOUT=10m

You can run an AI-analyzed SAST scan on a project with endorctl using the following command.

endorctl scan --sast --path=/path/to/code -n <namespace> --ai-sast-analysis=agent-fallback

AI analysis starts with the fast agent mode, but automatically falls back to deep analysis mode when a true positive is detected. This provides a balance between speed and accuracy by using detailed analysis only when needed.

To view the findings generated by this scan in Endor Labs, see AI-analyzed SAST findings.

You can control which findings are analyzed by AI triage and manage re-analysis behavior. When running AI-analyzed SAST scans, use the --ai-sast-rescan option to ensure all findings are analyzed. This option removes all existing AI analyses and re-analyzes all findings from scratch. Without this option, SAST findings that have already undergone AI triage are skipped during subsequent scans.

endorctl scan --sast --path=/path/to/code -n <namespace> --ai-sast-analysis=agent-fallback --ai-sast-rescan

The following types of findings are automatically excluded from AI triage. To include them, set the corresponding environment variable to false:

Finding Type Environment Variable
Test file findings ENDOR_SAST_IGNORE_TEST_TRIAGE
Low severity findings ENDOR_SAST_IGNORE_LOW_SEV_TRIAGE
Low confidence rule findings ENDOR_SAST_IGNORE_LOW_CONF_RULE

You can use AI Analysis Status criteria in finding policies to filter findings by their such as true positives, false positives, or both, in your findings view. Similarly, action policies can trigger actions based on AI classification, such as send notifications only for true positives.

You can run the endorctl scan --sast command with the following options.

Option Description
-n, --namespace Namespace of the project with which you are working. Mandatory.
--include-path Limit the scan to the specified file paths or directories using Glob style expressions. For example, --include-path="src/java/**", scans all the files under src/java, including any subdirectories, while --include-path="src/java/*", only includes the files directly under src/java. Paths must be relative to the root of the repository. Use quotes to ensure that your shell does not expand wildcards.
--exclude-path Specify one or more file paths or directories using Glob style expressions. For example, --include-path="src/java/**", scans all the files under src/java, including any subdirectories, while --include-path="src/java/*", only includes the files directly under src/java. Paths must be relative to the root of the repository. Use quotes to ensure that your shell does not expand wildcards.
--disable-code-snippet-storage Specify the flag to disable storing the code snippet that violates the SAST policy.
--path The path to issue the scan.
--ai-sast-analysis=agent-fallback Enable AI agent to identify and classify false positives in SAST findings. The agent-fallback mode starts with fast analysis and automatically falls back to deep analysis when needed.
--ai-sast-rescan Remove all existing AI analyses and re-analyze all findings from scratch, including those that have already undergone AI triage.

Create Exception Policy for SAST Findings

Exception policies define the conditions for applying an exception to a finding. When an exception is applied to a finding, it is tracked as an exception and action policies do not apply to it. Findings with exceptions are filtered out from Endor Labs reports by default.

See Exception Policies for more information.

Instead of creating an exception policy, you can also use the following methods to avoid findings:

  • Disable the rule under SAST Rules
  • Use the include-path and exclude-path to scan parts of the project

You can create an exception policy so that you can mark a SAST finding as an exception.

For example, you want to mark findings with the description, Detected Potential Open Redirect Vulnerability in Angular Application, as exceptions.

  1. Select Policies from the left sidebar.

  2. Select EXCEPTION POLICIES.

  3. Click Create Exception Policy to create a new exception policy.

  4. Select Standard Exception Find Attributes as the POLICY TEMPLATE.

  5. Enter Detected Potential Open Redirect Vulnerability in Angular Application in Finding Name Contains.

  6. Select from the following reasons why you are applying this exception:

    • In Triage: The finding is still being triaged for more information.
    • False Positive: The finding is a false positive.
    • Risk Accepted: The risk associated with the finding is accepted.
    • Other: Another reason applies for this exception.
  7. Select when the exception should expire.

    Options include 30, 60, 90 days, and Never.

  8. Assign Scope for which this exception policy should apply. Scopes are defined by the tags assigned to a project.

    • In Inclusions, enter the tags of the projects that you want to apply an exception to.
    • In Exclusions, enter the tags of the projects that you do not want to apply an exception to. Exclusions take precedence over the inclusions, in case of a conflict.
    • Click the link to view the projects included in the finding policy.

    See Tagging projects for more information about creating project tags.

  9. Enter a human-readable Name for your exception policy.

  10. Enter a Description for your exception policy that explains its function.

  11. Enter any Policy Tags that you want to associate with your policy. Tags can have a maximum of 63 characters and can contain letters, numbers, and characters = @ _ -

  12. Click Create Exception Policy.

You can also create exceptions directly from a finding.

  1. Select Projects from the left sidebar.
  2. Search for and select a project, and select Findings.
  3. Search for findings using advanced or basic filters.
  4. Select findings and click the vertical three dots.
  5. Select Add Exception Policy.
  6. Select a template or create the policy from scratch. The template parameters are automatically pre-filled based on the selected finding.
  7. Click Create Exception Policy.

Use this feature to specifically apply exception to findings with a specific hash value. For example, Detected Potential time of check time of use vulnerability (open/fopen): ID #e81f27. This exception policy after creation only applies to the SAST findings with this hash ID and not any others.

View SAST Findings

You can view SAST findings in the Findings page.

  1. Select Findings from the left sidebar.

  2. Select SAST under First Party Code.

    View SAST findings

  3. You can use the filters to further refine the SAST findings.

  4. Select a row to view finding details.

    View SAST finding details
  5. Select Rule to view the rule that triggered the finding.

    View SAST finding rules

  6. To export findings as a CSV file, select the findings, click the vertical three dots, and select Export Selected or Export All. See export findings to learn more.

    SAST finding export

When you run a SAST scan with --ai-sast-analysis=agent-fallback, an AI agent analyzes the findings to determine if they are true security issues or false positives. The AI agent automatically tags verified true positives with True Positive and false positives with False Positive for easy filtering.

To view AI-analyzed SAST findings:

  1. Select Findings from the left sidebar.
  2. Select SAST under First Party Code.
  3. Use the Attributes filter and select True Positive or False Positive to filter out whatever you want.
  4. Select a finding to view the details.
    • AI Analysis: Indicates the AI agent’s classification and analysis of the finding.
      • Classification: Specifies if the finding is categorized as a true positive or false positive, including the associated confidence level.
      • Analysis Summary: A brief explanation of the security issue identified, including why the finding was triggered and what type of vulnerability it represents.
      • Security Impact: The risk level and potential consequences if the vulnerability is exploited.
      • Technical Details: Technical explanation of how the vulnerability can be exploited, including the source and sink points in the code.
      • Data Flow Analysis: Traces how untrusted data flows through your code from input to the vulnerable point.
      • Security Controls: Displays what security protections exist or are missing in the code.
      • Risk Assessment: Detailed reasoning for why the finding is classified as a true positive or false positive, with supporting evidence.
      • AI Remediation: Suggested code fix to address the vulnerability.
    • Info, Rule, Explanation, and Metadata: Displays the underlying SAST rule information, detailed explanations of the security issue, remediation guidance, and metadata such as CWE classifications and security tags.
      • Info: Contains key metadata for the finding, including confidence, impact, first detected time, project, and rule ID.
      • Rule: The specific SAST rule that detected the finding, including rule description and code examples.
      • Explanation: Analysis summary, security impact, and technical details about why this is a SAST finding.
      • Remediation: General remediation guidance for addressing this type of vulnerability.
      • References: Links to relevant security references such as CWE definitions.
      • Metadata: Contains classification details such as the CWE ID, affected languages, security tags applied to the finding, and detected rule version.

AI analysis SAST finding

Use the group by filters to organize to have granular view of SAST findings in your project.

You can group findings by the following parameters for SAST:

  • Findings
  • Rule ID
  • Location
  1. From the left sidebar, select Projects.

  2. Select the project for which you want to view the findings.

  3. In the Findings page, select SAST under First Party Code.

    SAST finding group by

  4. Select the required group by filter, for example, Rule ID.

    SAST finding group by rule ID