> ## Documentation Index
> Fetch the complete documentation index at: https://docs.endorlabs.com/llms.txt
> Use this file to discover all available pages before exploring further.
# Deploy Endor Labs GitLab App
> Learn how to continuously monitor your environment with the Endor Labs GitLab App.
export const Diagram = ({children}) => {
const [svg, setSvg] = useState('');
const [error, setError] = useState(null);
const [mounted, setMounted] = useState(false);
const [id] = useState(() => `diagram-${Math.random().toString(36).slice(2)}`);
const DEFAULTS = {
theme: 'base',
fontSize: '14px',
fontFamily: 'inherit',
primaryColor: '#26D07C',
primaryTextColor: '#000000',
primaryBorderColor: '#059669',
secondaryColor: '#e5e7eb',
secondaryTextColor: '#000000',
secondaryBorderColor: '#9ca3af',
tertiaryColor: '#e5e7eb',
tertiaryTextColor: '#000000',
tertiaryBorderColor: '#9ca3af',
lineColor: '#6b7280',
background: '#ffffff',
edgeLabelBackground: '#f9fafb',
clusterBkg: '#f0fdf4',
clusterBorder: '#059669',
nodeTextColor: '#000000',
endorColor: '#26D07C',
endorBorder: '#059669',
managedColor: '#A7F3D0',
managedBorder: '#059669',
externalColor: '#e5e7eb',
externalBorder: '#9ca3af'
};
const VAR_LINE_RE = /^(\w+):\s*(.+)$/;
const TOKEN_RE = /\{\{(\w+)\}\}/g;
const parseVarsBlock = raw => {
const vars = {};
const lines = raw.trim().split('\n');
const diagramLines = [];
let inVars = false;
for (const line of lines) {
const trimmed = line.trim();
if (trimmed === '%%vars') {
inVars = true;
continue;
}
if (inVars && trimmed === '%%') {
inVars = false;
continue;
}
if (inVars) {
const m = VAR_LINE_RE.exec(trimmed);
if (m) vars[m[1]] = m[2];
} else {
diagramLines.push(line);
}
}
return {
vars,
diagramLines
};
};
const buildInitConfig = merged => ({
theme: merged.theme,
themeVariables: {
fontSize: merged.fontSize,
fontFamily: merged.fontFamily,
primaryColor: merged.primaryColor,
primaryTextColor: merged.primaryTextColor,
primaryBorderColor: merged.primaryBorderColor,
secondaryColor: merged.secondaryColor,
secondaryTextColor: merged.secondaryTextColor,
secondaryBorderColor: merged.secondaryBorderColor,
tertiaryColor: merged.tertiaryColor,
tertiaryTextColor: merged.tertiaryTextColor,
tertiaryBorderColor: merged.tertiaryBorderColor,
lineColor: merged.lineColor,
background: merged.background,
edgeLabelBackground: merged.edgeLabelBackground,
clusterBkg: merged.clusterBkg,
clusterBorder: merged.clusterBorder,
nodeTextColor: merged.nodeTextColor
}
});
const renderWithMermaid = (mermaid, fullDiagram) => {
mermaid.initialize({
startOnLoad: false,
zoom: {
enabled: false
}
});
mermaid.render(id, fullDiagram).then(({svg: rendered}) => {
setSvg(rendered);
setError(null);
}).catch(err => setError(err.message));
};
useEffect(() => {
setMounted(true);
}, []);
useEffect(() => {
if (!mounted || !children) return;
const raw = typeof children === 'string' ? children : String(children);
const {vars, diagramLines} = parseVarsBlock(raw);
const merged = {
...DEFAULTS,
...vars
};
const diagram = diagramLines.join('\n').trim().replaceAll(TOKEN_RE, (_, key) => merged[key] || '');
const fullDiagram = `%%{init: ${JSON.stringify(buildInitConfig(merged))}}%%\n${diagram}`;
const existing = document.getElementById(id);
if (existing) existing.remove();
if (globalThis.mermaid) {
renderWithMermaid(globalThis.mermaid, fullDiagram);
} else {
const script = document.createElement('script');
script.src = 'https://cdn.jsdelivr.net/npm/mermaid@11/dist/mermaid.min.js';
script.onload = () => renderWithMermaid(globalThis.mermaid, fullDiagram);
script.onerror = () => setError('Failed to load Mermaid');
document.head.appendChild(script);
}
}, [mounted, children, id]);
if (!mounted) return null;
if (error) {
return
Diagram error: {error}
;
}
if (!svg) {
return
Loading diagram...
;
}
return ;
};
Endor Labs provides a GitLab App that continuously monitors users' projects for security and operational risk. You can use the GitLab App to selectively scan your repositories for SCA, secrets, SAST, and CI/CD tools. You can use the GitLab App with a GitLab cloud account or a self-hosted GitLab instance.
When you use Endor Labs GitLab App, Endor Labs creates namespaces based on your organization hierarchy in GitLab.
The namespaces created by the Endor Labs GitLab App are not like regular namespaces and are called managed namespaces. These namespaces are named after subgroup slugs in GitLab.
See [Manage GitLab App](/setup-deployment/scm-integrations/gitlab-app/manage-gitlab-app) to learn how to manage your GitLab App integration in Endor Labs.
You can also scan your merge requests using the GitLab App. You can enable MR scans during the [installation of the GitLab App](#install-the-gitlab-app) or [by editing the GitLab App integration](/setup-deployment/scm-integrations/gitlab-app/manage-gitlab-app#edit-gitlab-app-integration). See [GitLab App MR scans](/setup-deployment/scm-integrations/gitlab-app/gitlab-mr-scan) for more information.
## Limitations of GitLab groups in Endor Labs namespace
Ensure that you consider the following limitations when you use the GitLab monitoring scan.
* GitLab supports up to 20 levels of subgroup nesting, while Endor Labs currently supports a maximum of 10 levels, assuming the installation is created at the tenant level. If a GitLab installation is created within a nested namespace, such as `tenant.namespace1.namespace2`, the available nesting depth for subgroups in GitLab is reduced. In this case, Endor Labs can only support up to eight levels of nested subgroups.
* Endor Labs supports GitLab groups with a maximum of 64 characters.
## Managed namespaces for GitLab
Managed namespaces are always reflective in terms of structure and content in GitLab.
Managed namespaces have the following restrictions:
* You cannot delete managed namespaces.
* You cannot delete projects present within managed namespaces.
* You cannot add projects or create namespaces within managed namespaces.
* You cannot create any new Endor Labs App installation within the managed namespaces.
For example, you cannot create an Endor Labs GitHub App installation within a namespace that was created by the Endor Labs GitLab App.
Any modifications to the namespaces have to be in GitLab. The changes that you make to the namespaces and projects are reflected in Endor Labs after a rescan.
If your organization has the following hierarchy in GitLab:
{`
graph TD
GL((GitLab))
HC[HappyCorp]
%% Main divisions
Web[Web]
Mobile[Mobile]
Desktop[Desktop]
%% Web subgroups
WA[Alpha]
WB[Beta]
WG[Gamma]
%% Mobile subgroups
MD[Delta]
ME[Epsilon]
MZ[Zeta]
%% Desktop subgroups
DP[Pi]
DR[Rho]
DS[Sigma]
%% Main connections
GL --> HC
HC --> Web
HC --> Mobile
HC --> Desktop
%% Web connections
Web --> WA
Web --> WB
Web --> WG
%% Mobile connections
Mobile --> MD
Mobile --> ME
Mobile --> MZ
%% Desktop connections
Desktop --> DP
Desktop --> DR
Desktop --> DS
class HC main
class Web,Mobile,Desktop division
classDef circle fill:#95A5A6
class GL circle
`}
Endor Labs creates managed namespaces that mirror your GitLab groups under an Endor Labs namespace (for example, `happyendor`). Endor Labs creates `happycorp` as the parent namespace with `web`, `mobile`, and `desktop` as the child namespaces. The namespace `happycorp` will be under the Endor Labs namespace.
Each of these child namespaces have further child namespaces as follows:
* web: alpha, beta, gamma
* mobile: delta, epsilon, zeta
* desktop: pi, rho, sigma
The following diagram shows the organization of namespaces in Endor Labs.
{`
graph TD
EN[happyendor]
HC[happycorp]
%% Main divisions
Web[web]
Mobile[mobile]
Desktop[desktop]
%% Web subgroups
WA[alpha]
WB[beta]
WG[gamma]
%% Mobile subgroups
MD[delta]
ME[epsilon]
MZ[zeta]
%% Desktop subgroups
DP[pi]
DR[rho]
DS[sigma]
%% Main connections
EN --> HC
HC --> Web
HC --> Mobile
HC --> Desktop
%% Web connections
Web --> WA
Web --> WB
Web --> WG
%% Mobile connections
Mobile --> MD
Mobile --> ME
Mobile --> MZ
%% Desktop connections
Desktop --> DP
Desktop --> DR
Desktop --> DS
class HC main
class EN endor
class Web,Mobile,Desktop division
class WA,WB,WG,MD,ME,MZ,DP,DR,DS group
classDef main fill:#008B87
classDef division fill:#008B87
classDef group fill:#008B87
`}
In Endor Labs, namespaces are always in lowercase. If your groups have uppercase characters in their names, the corresponding namespaces will be converted to lowercase.
## Manage multiple installations of GitLab App
You cannot create multiple GitLab installations with the same root group in the host URL within the same Endor Labs namespace.
For example, if a GitLab installation exists with a host URL like `gitlab.com/group1/sg1`, you cannot create another installation with a host URL like `gitlab.com/group1/sg2` within the same Endor namespace. Instead, you must create the installation with a different root group in the host URL, such as `gitlab.com/group2/sg2`.
{`
graph TD
%% Endor Labs namespace
EN[happyendor]
%% GitLab groups
G1[group1]
G2[group2]
SG1[sg1]
SG2[sg2]
%% connections
EN --> G1
EN --> G2
G1 --> SG1
G2 --> SG2
class EN endor
class G1,G2,SG1,SG2 managed
classDef managed fill:#008B87
`}
If you wish to create an installation with a host URL like `gitlab.com/group1/sg2`, it should be inside a different Endor Labs namespace.
{`
graph TD
%% Endor Labs namespace
EN[happyendor]
EN2[happyendor2]
%% GitLab groups
G1[group1]
G2[group1]
SG1[sg1]
SG2[sg2]
%% connections
EN --> G1
EN2 --> G2
G1 --> SG1
G2 --> SG2
class EN,EN2 endor
class G1,G2,SG1,SG2 managed
classDef managed fill:#008B87
`}
## Default branch detection
When Endor Labs scans a repository for the first time, it detects the default branch of the repository. The findings that are created in the scan are associated with the default branch.
### Changing the default branch
When you change the default branch in your source control system (for example, from `main` to `dev`):
* Endor Labs automatically detects the new default branch and sets that as the default reference
* The previous default branch becomes a reference branch
* Scans continue on the new default branch and the reference branch
The findings associated with the previous default branch are no longer associated with the default context reference. You can view them in the reference context.
### Renaming the default branch
When you rename the default branch in your source control system:
* Endor Labs automatically switches to the renamed branch
* Scans continue without disruption
### Adding repository versions
When you add a new repository version (for example, a `dev` branch), both the default branch and the new version are scanned by the Endor Labs App.
### Control default branch detection
You can control the default branch detection by setting the `ENDOR_SCAN_TRACK_DEFAULT_BRANCH` environment variable in a scan profile. You need to configure the project to use the scan profile. See [Configure scan profiles](/scan/scan-profiles) for more information.
By default, the environment variable is set to `true`. When set to `true`, the default branch detection is enabled, and the first branch you scan is automatically considered as the default branch.
## Prerequisites for GitLab App
Before installing and scanning projects with Endor Labs GitLab App, make sure you have:
* A [GitLab cloud](https://www.gitlab.com) account or a self-hosted GitLab instance.
* An organization in GitLab.
* Endor Labs GitLab App requires a [GitLab personal access token](https://docs.gitlab.com/ee/user/profile/personal_access_tokens.html#create-a-personal-access-token) with at least `read_api` permission. You need to provide the `api` permission if you want to scan your merge requests.
**Admin Authorization Role**
Only users with admin authorization role in Endor Labs can create and manage installations. See [Authorization roles](/platform-administration/rbac/authorization-roles) for more information.
**GitLab Personal Access Token**
If you have restrictions on using a regular GitLab personal access token or face issues with such a token, you can use a [personal access token for a GitLab service account](https://docs.gitlab.com/user/profile/service_accounts/#view-and-manage-personal-access-tokens-for-a-service-account) instead.
## Install the GitLab App
1. Select **Projects** from the left sidebar.
2. Click **Add Project**.
3. Under **Namespace**, select the Endor Labs namespace for this installation.
We recommend you use a [child namespace](/platform-administration/namespaces) for better organization of your projects.
4. Select **Gitlab**.
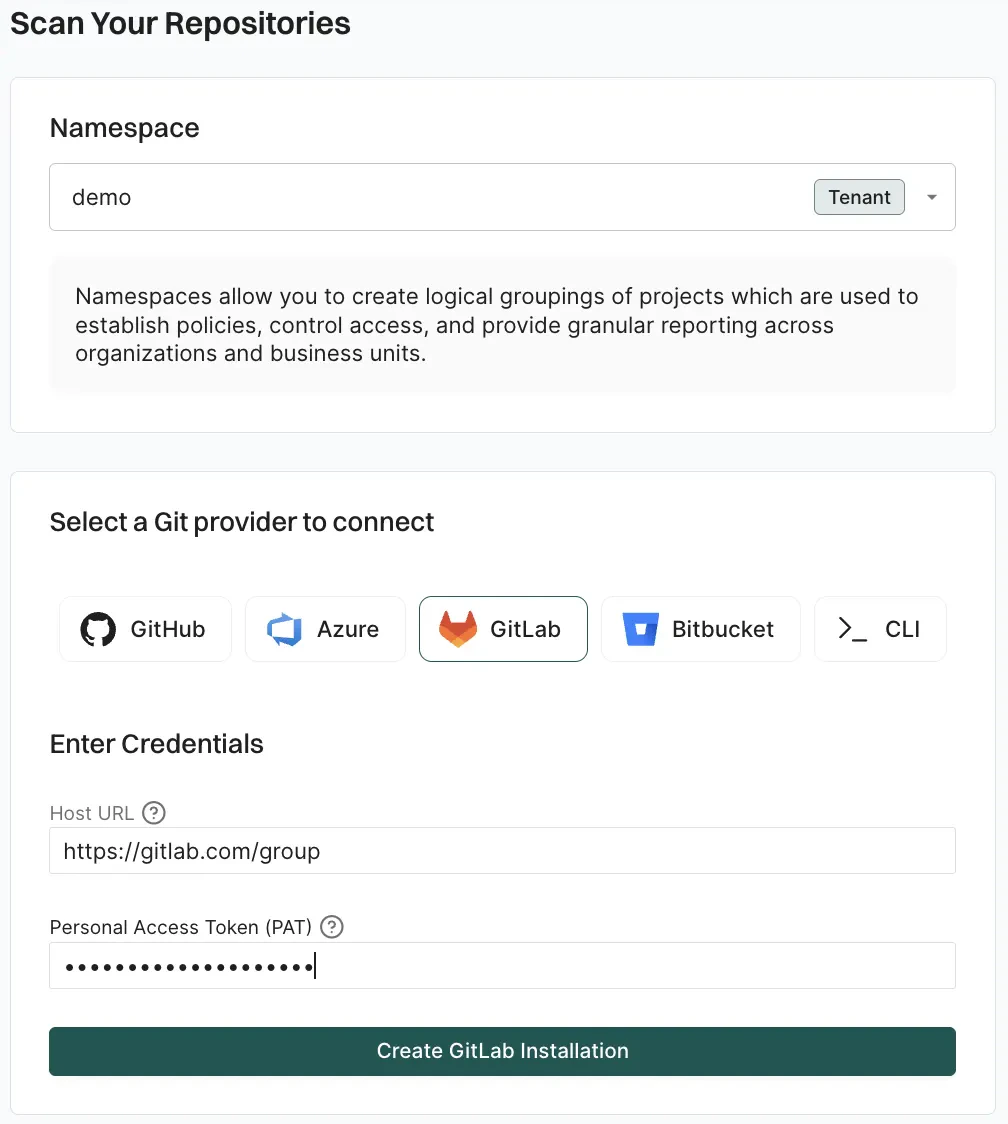 5. Enter the GitLab organization URL in the format: `https://gitlab.com/{group}/{subgroup1}/...`.
You need to enter at least the root group. For example, `https://gitlab.com/group1`.
You can provide the host URL up to any subgroup level. For example, `https://gitlab.com/group1/subgroup1/subgroup2/subgroup3`.
Endor Labs creates namespaces for groups and subgroups and maps projects to these namespaces.
If the GitLab installation is created at the tenant level, Endor Labs supports up to 10 levels of GitLab group nesting. If the installation is created within a nested namespace under the tenant, the supported nesting depth decreases by one level for each additional level of nesting.
6. Enter the GitLab personal access token.
**Scope of the Personal Access Token**
The personal access token must have at least the `read_api` scope. If you want to scan merge requests, you need to provide the personal access token of a project developer role with the `api` scope.
7. Click **Create GitLab Installation**.
8. Toggle and select the scan types to enable:
* **SCA**: Perform software composition analysis and discover AI models used in your repository.
* **Secrets**: Scan GitLab projects for exposed secrets.
* **SAST**: Scan GitLab projects to generate SAST findings.
The available scan types depend upon your license.
5. Enter the GitLab organization URL in the format: `https://gitlab.com/{group}/{subgroup1}/...`.
You need to enter at least the root group. For example, `https://gitlab.com/group1`.
You can provide the host URL up to any subgroup level. For example, `https://gitlab.com/group1/subgroup1/subgroup2/subgroup3`.
Endor Labs creates namespaces for groups and subgroups and maps projects to these namespaces.
If the GitLab installation is created at the tenant level, Endor Labs supports up to 10 levels of GitLab group nesting. If the installation is created within a nested namespace under the tenant, the supported nesting depth decreases by one level for each additional level of nesting.
6. Enter the GitLab personal access token.
**Scope of the Personal Access Token**
The personal access token must have at least the `read_api` scope. If you want to scan merge requests, you need to provide the personal access token of a project developer role with the `api` scope.
7. Click **Create GitLab Installation**.
8. Toggle and select the scan types to enable:
* **SCA**: Perform software composition analysis and discover AI models used in your repository.
* **Secrets**: Scan GitLab projects for exposed secrets.
* **SAST**: Scan GitLab projects to generate SAST findings.
The available scan types depend upon your license.
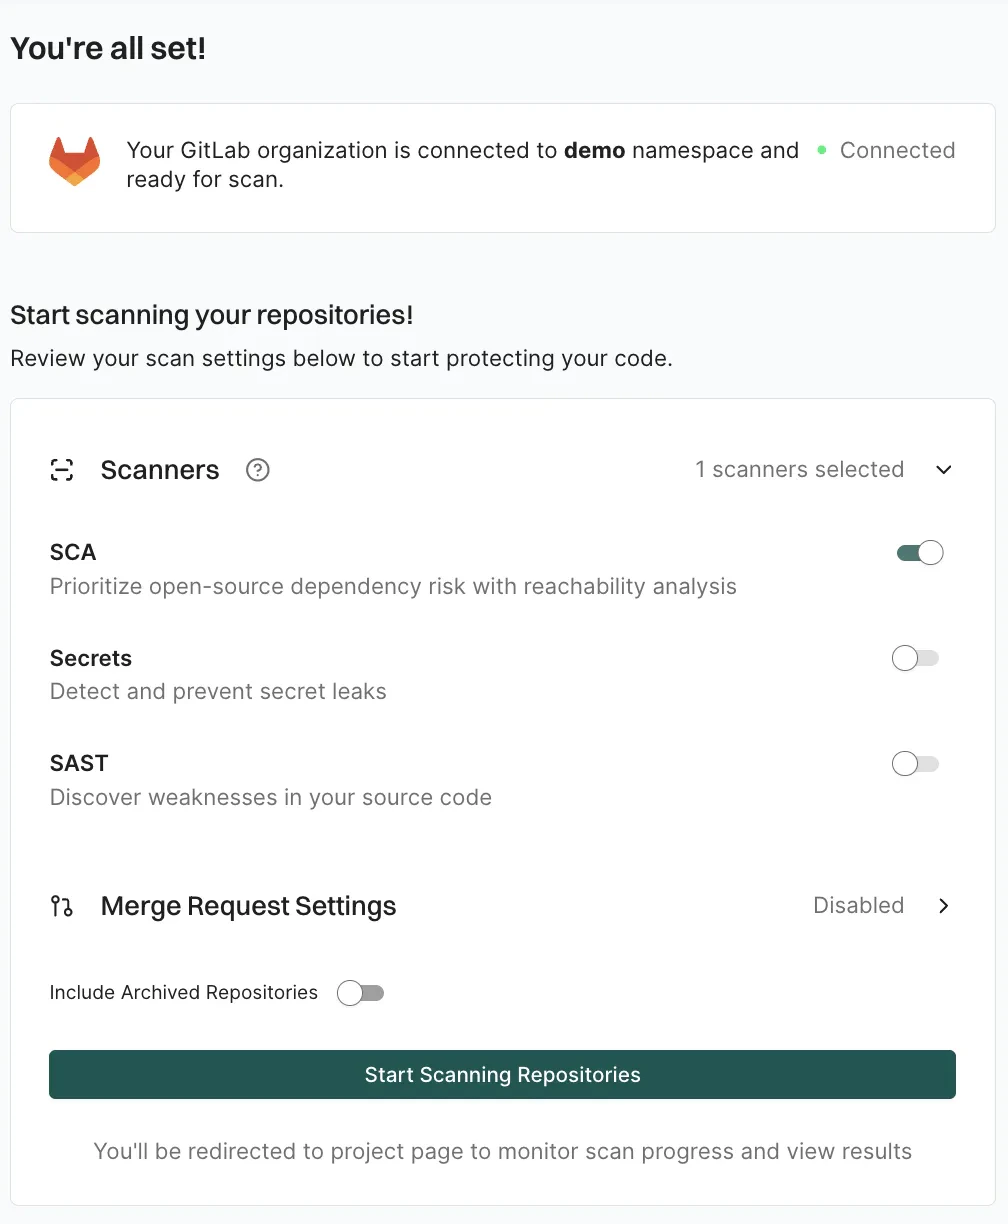 9. Select **Merge Request Settings** to turn on merge request scans and configure the GitLab webhook. Merge request scans only run after the webhook is configured in GitLab. See [GitLab App MR scans](/setup-deployment/scm-integrations/gitlab-app/gitlab-mr-scan) and [Configure webhook for GitLab App MR scans](/setup-deployment/scm-integrations/gitlab-app/gitlab-mr-scan#configure-webhook-for-gitlab-app-mr-scans) for more information.
You can change merge request settings later when you [edit the GitLab App integration](/setup-deployment/scm-integrations/gitlab-app/manage-gitlab-app#edit-gitlab-app-integration).
10. Toggle on **Include Archived Repositories** if you want to scan archived repositories. By default, GitLab archived repositories aren't scanned.
11. Click **Start Scanning Repositories**.
Your GitLab App installation is created and starts monitoring the projects in your groups. Endor Labs GitLab App scans your GitLab projects every 24 hours and reports any new findings.
9. Select **Merge Request Settings** to turn on merge request scans and configure the GitLab webhook. Merge request scans only run after the webhook is configured in GitLab. See [GitLab App MR scans](/setup-deployment/scm-integrations/gitlab-app/gitlab-mr-scan) and [Configure webhook for GitLab App MR scans](/setup-deployment/scm-integrations/gitlab-app/gitlab-mr-scan#configure-webhook-for-gitlab-app-mr-scans) for more information.
You can change merge request settings later when you [edit the GitLab App integration](/setup-deployment/scm-integrations/gitlab-app/manage-gitlab-app#edit-gitlab-app-integration).
10. Toggle on **Include Archived Repositories** if you want to scan archived repositories. By default, GitLab archived repositories aren't scanned.
11. Click **Start Scanning Repositories**.
Your GitLab App installation is created and starts monitoring the projects in your groups. Endor Labs GitLab App scans your GitLab projects every 24 hours and reports any new findings.