Learn various methods to deploy the Endor Labs application across your repositories and pipelines.
Endor Labs deployment depends on the scans that you want to do in your environment. This section provides information on how to deploy Endor Labs across your software development lifecycle.
Choose your deployment method
Endor Labs offers multiple deployment options to fit your organization’s needs:
Perform monitoring scans to gain fast and broad visibility over open source risks across the application portfolio without requiring integrations into application pipelines. These scans are conducted periodically.
graph TB
subgraph Customer["Customer Environment"]
REPOS[("Source Code Repositories")]
end
subgraph Endor[<label style='font-size: 17px'>Endor Labs Infrastructure</label>]
APP["Endor Labs App"]
CLOUD["Scan Environment<br/><small>Customer data destroyed after scans</small>"]
PLATFORM["Endor Labs Platform<br/><small>Generate findings and alerts</small>"]
end
APP -->|<small>1. Continuous monitoring</small>| REPOS
APP -->|<small>2. Trigger scan every 24h or on-demand</small>| CLOUD
CLOUD <-->|<small>3. Clone and scan repositories</small>| REPOS
CLOUD -->|<small>4. Send results</small>| PLATFORM
style REPOS fill:#C4B5FD
Endor Labs monitoring scans are available for the following source code management (SCM) platforms:
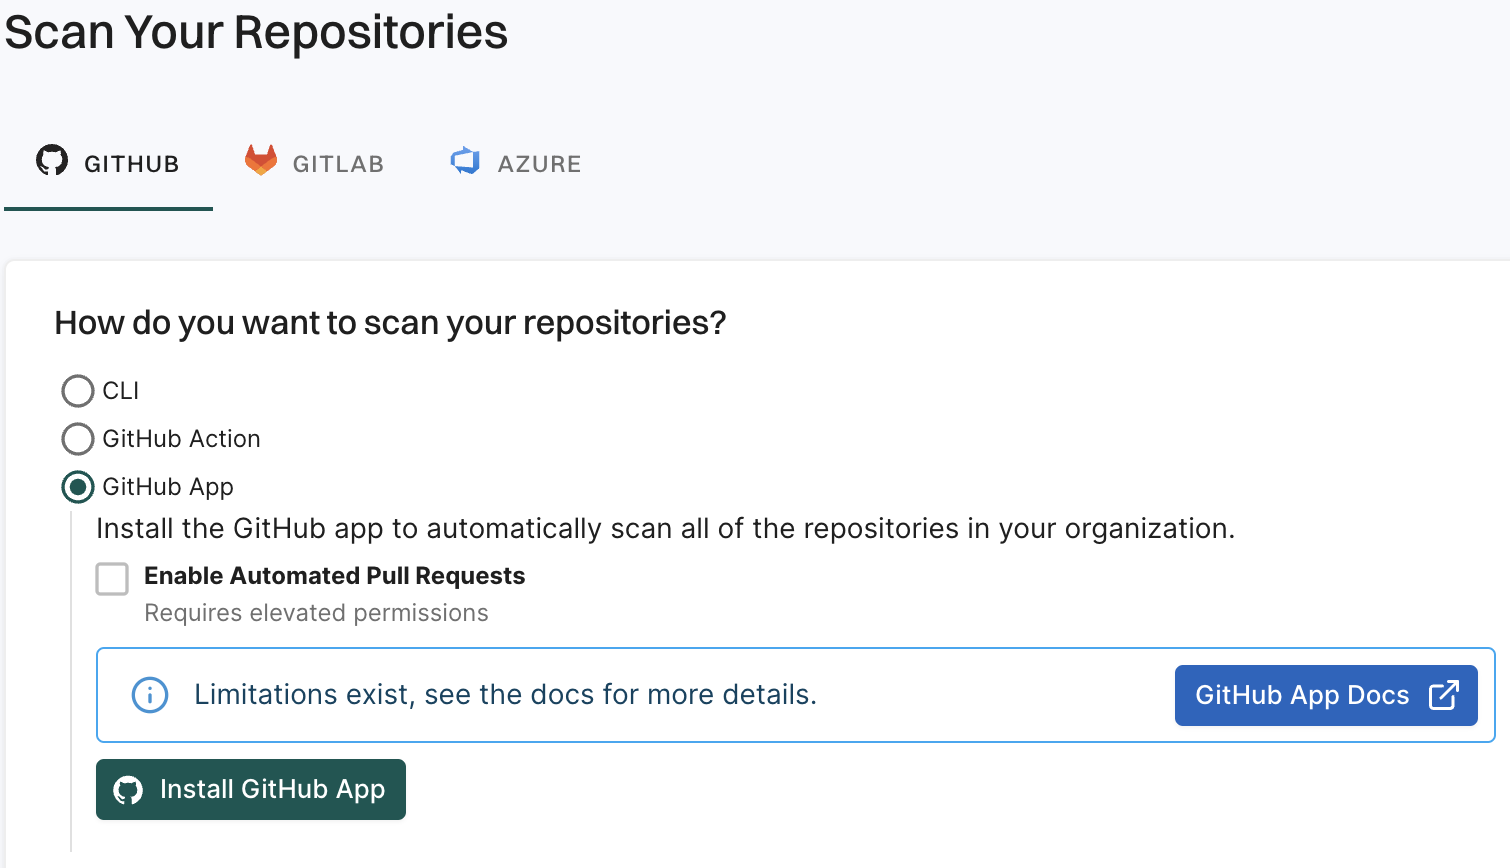
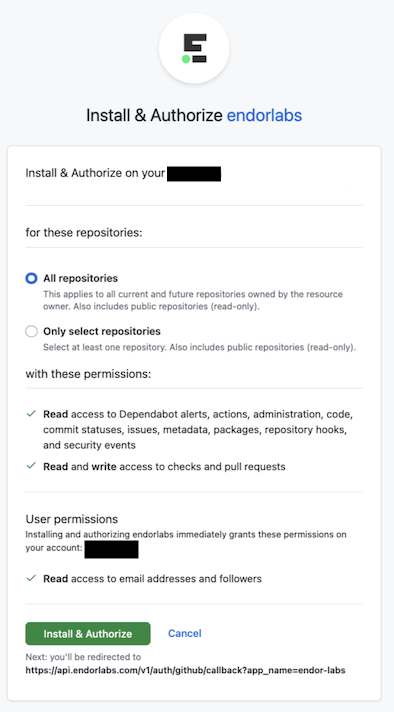
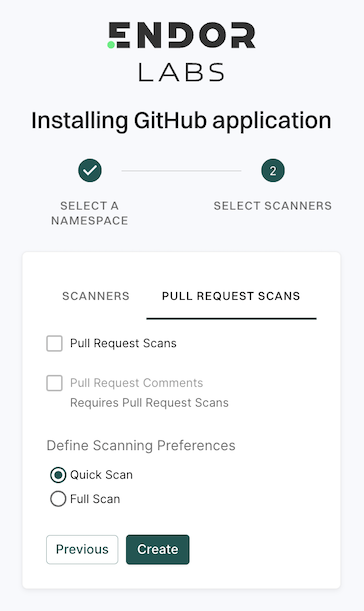
GitHub: You can use the Endor Labs GitHub App to scan your GitHub organizations. It provides broad visibility over your GitHub organizations. Once installed, the GitHub App will automatically clone and scan all the repositories every 24 hours, providing continuous monitoring for open source vulnerabilities. It performs RSPM scans for posture management of your repository weekly on Sundays. These repositories are temporarily cloned and retained only during the scan. See Scan using the GitHub App for more information. Endor Labs supports GitHub cloud. GitHub App supports pull request scans and pull request comments. See Scan pull requests using the GitHub App for more information.
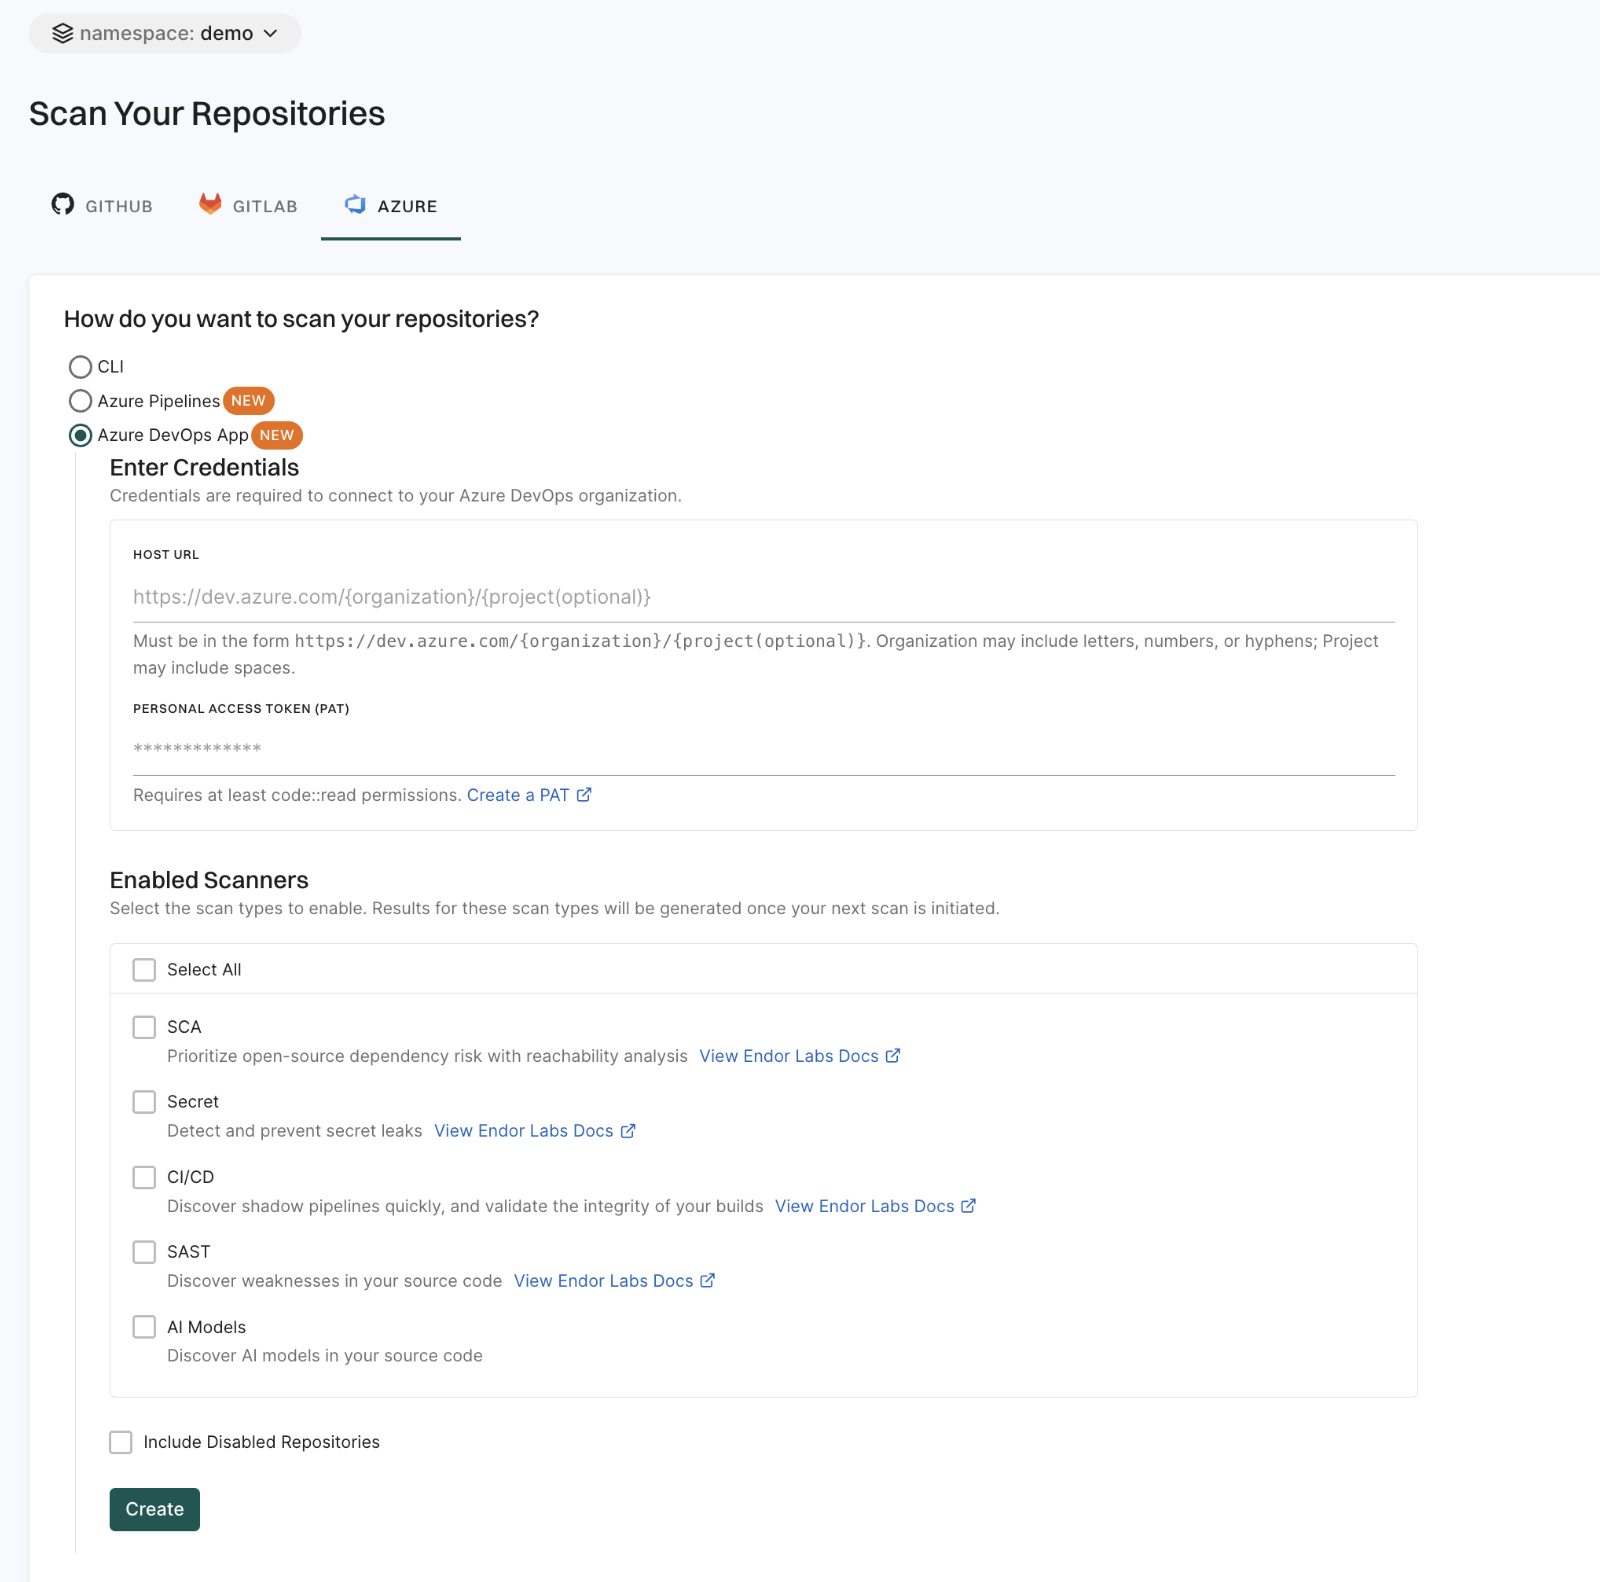
Azure DevOps: You can use the Endor Labs Azure DevOps App to scan your Azure projects organizations. It provides broad visibility over your Azure organizations. Once installed, the Azure DevOps App will automatically clone and scan all Azure repos every 24 hours, providing continuous monitoring for open source vulnerabilities. These repositories are temporarily cloned and retained only during the scan. See Deploy Endor Labs Azure DevOps App for more information. Endor Labs supports Azure DevOps cloud instances.
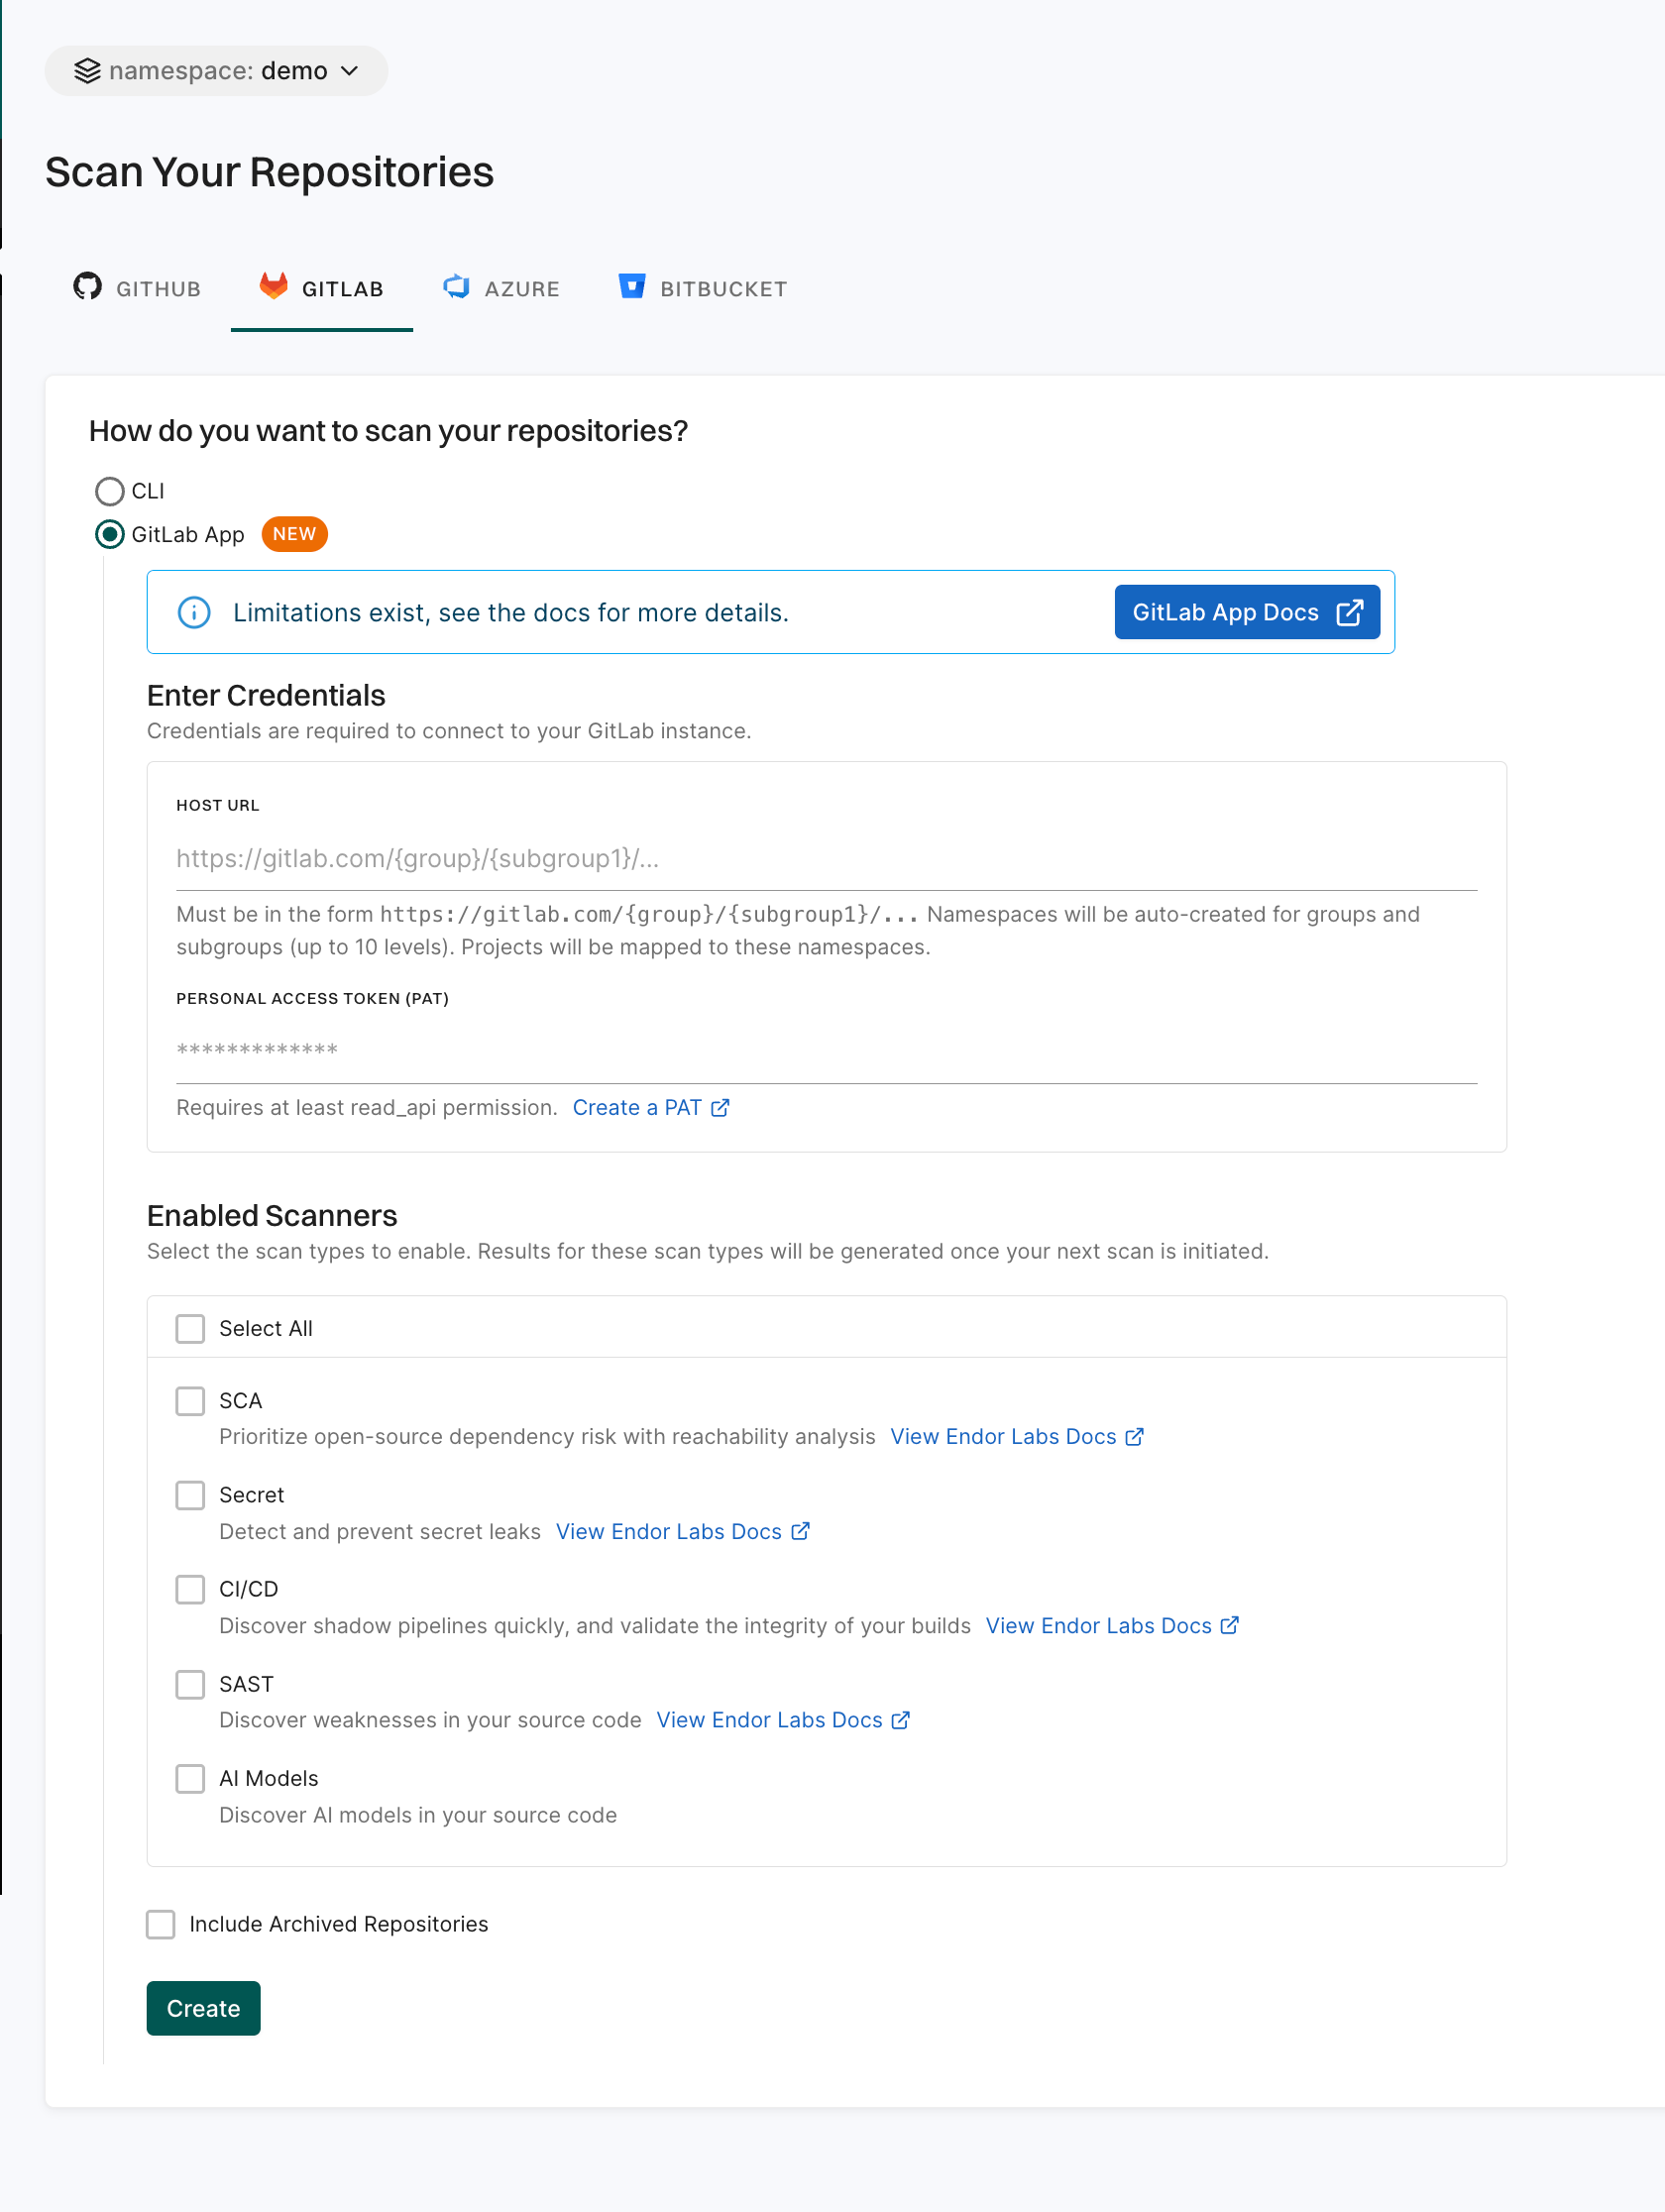
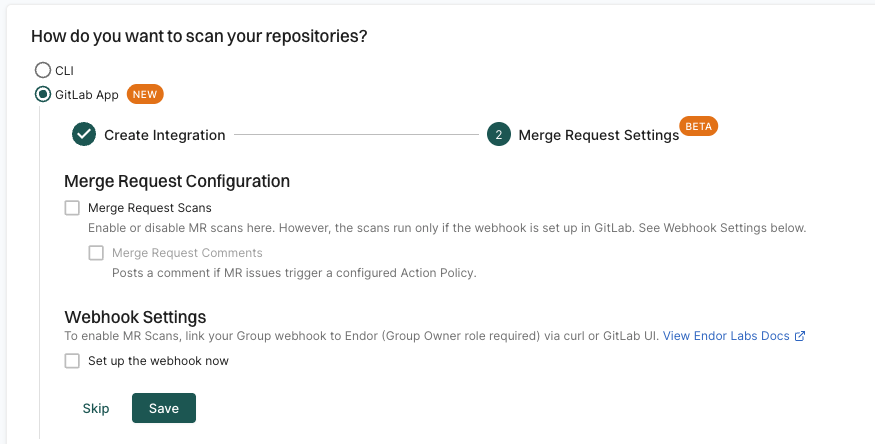
GitLab: You can use the Endor Labs GitLab App to scan your GitLab organization. It provides broad visibility over your GitLab group and subgroups. Once installed, the GitLab App will automatically clone and scan all projects every 24 hours, providing continuous monitoring for open source vulnerabilities. These repositories are temporarily cloned and retained only during the scan. See Deploy Endor Labs GitLab App for more information. Endor Labs support both GitLab cloud and self-managed instances. GitLab App supports merge request scans. See Scan merge requests using the GitLab App for more information.
GitHub Enterprise Server: You can use the Endor Labs GitHub App Enterprise to scan your self-hosted GitHub Enterprise Server (GHES) organizations and repositories. Once installed, the app will automatically clone and scan all repositories every 24 hours, providing continuous monitoring for open source vulnerabilities. It performs RSPM scans for posture management of your repository weekly on Sundays. These repositories are temporarily cloned and retained only during the scan. The app supports pull request scans and pull request comments as well. See Deploy Endor Labs GitHub App Enterprise for more information.
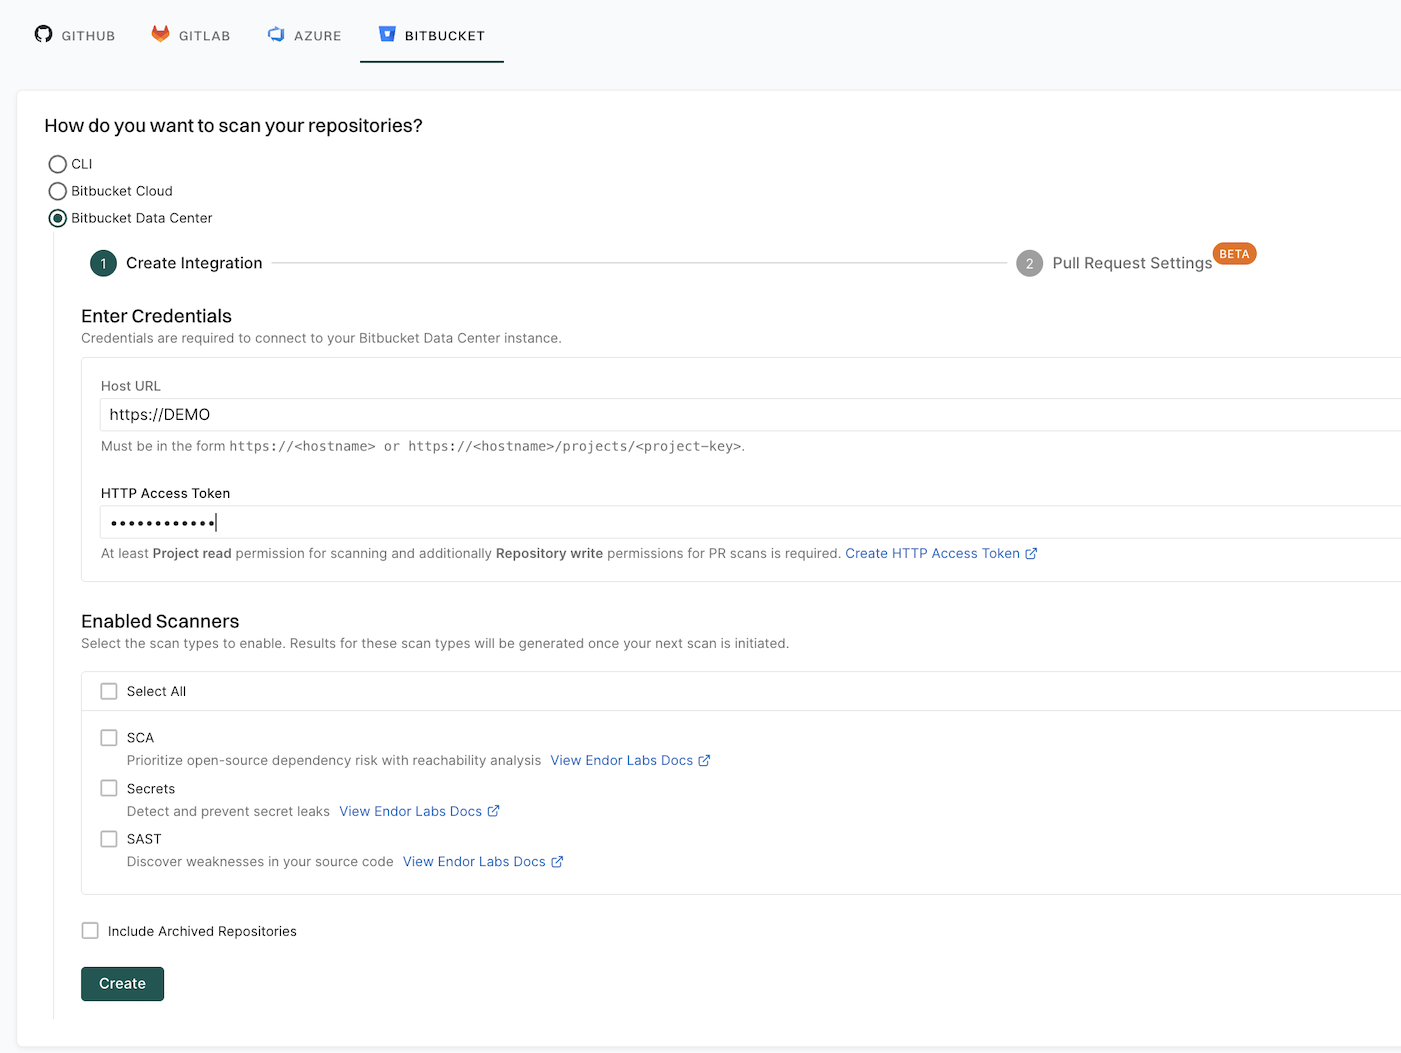
Bitbucket Data Center: You can use the Endor Labs Bitbucket App to scan your Bitbucket Data Center. It provides broad visibility over your Bitbucket projects. Once installed, the Bitbucket App will automatically clone and scan all projects every 24 hours, continuously monitoring open source vulnerabilities. These repositories are temporarily cloned and retained only during the scan. See Deploy Endor Labs Bitbucket App for Data Center for more information.
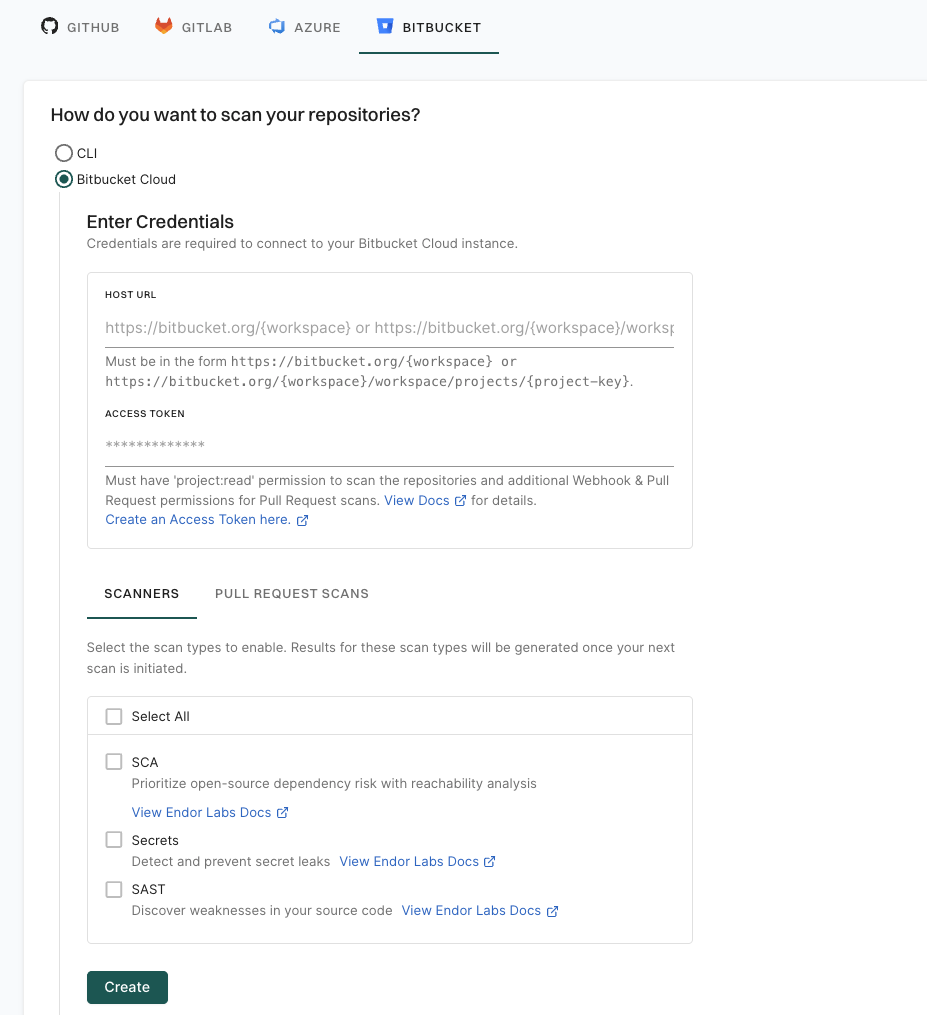
Bitbucket Cloud: You can use the Endor Labs Bitbucket App to scan your Bitbucket Cloud. It provides broad visibility over your Bitbucket Cloud projects. Once installed, the Bitbucket App will automatically clone and scan all projects every 24 hours, providing continuous monitoring for open source vulnerabilities. These repositories are temporarily cloned and retained only during the scan. See Deploy Endor Labs Bitbucket App for Bitbucket Cloud for more information.
Local monitoring scan: Perform periodic scans in your local environment. You must provide the necessary computing resources to run the scans. These scans can support any type of Git repository. See Set up Jenkins pipeline for supervisory scans.
Monitoring scan setup wizard
You can use the following wizard to get a tailored plan for setting up monitoring scans for your SCM platform.
SCM Monitoring Scans Setup Wizard
Pick your SCM and scan options. We'll generate a tailored checklist and links.
Choose your SCM platform
Where should monitoring scans run?
Select scan options
Your tailored plan
Support Matrix for monitoring scans
Endor Labs features available depends upon the type of scan and the SCM.
The following table lists the scan capabilities available for different types of SCM.
When Endor Labs scans a repository for the first time, it detects the default branch of the repository. The findings that are created in the scan are associated with the default branch.
Changing the default branch
When you change the default branch in your source control system (for example, from main to dev):
Endor Labs automatically detects the new default branch and sets that as the default reference
The previous default branch becomes a reference branch
Scans continue on the new default branch and the reference branch
The findings associated with the previous default branch are no longer associated with the default context reference. You can view them in the reference context.
Renaming the default branch
When you rename the default branch in your source control system:
Endor Labs automatically switches to the renamed branch
Scans continue without disruption
Adding repository versions
When you add a new repository version (for example, a dev branch), both the default branch and the new version are scanned by the Endor Labs App.
Control default branch detection
You can control the default branch detection by setting the ENDOR_SCAN_TRACK_DEFAULT_BRANCH environment variable in a scan profile. You need to configure the project to use the scan profile. See Configure scan profiles for more information.
By default, the environment variable is set to true. When set to true, the default branch detection is enabled, and the first branch you scan is automatically considered as the default branch.
Deploy Endor Labs GitHub App
Endor Labs provides a GitHub App that continuously monitors users’ projects for security and operational risk. You can use the GitHub App to selectively scan your repositories for SCA, secrets, RSPM, or GitHub Actions. GitHub App scans also establish baselines that are subsequently used during CI scans.
The Endor Labs GitHub App scans your repositories every 24 hours and reports new findings or changes to your code’s release versions. It also performs RSPM scans weekly on Sundays to manage your repository’s posture. See Scan with GitHub App for more information. You can also manually trigger scans for your repositories. See Re-scan projects for more information. After you install the GitHub App, you can make further changes to the settings. See Manage GitHub App for more information. You may need to review the technical limitations of the GitHub App so that you can use the GitHub App to its full potential. See Technical limitations of the Endor Labs GitHub App for more information.
If you want to use PR remediations as part of your monitoring scan or need to export your findings to GitHub Advanced Security, you need to use GitHub App (Pro).
If you are using GitHub Enterprise Server, you can use the GitHub Enterprise Server App to continuously monitor your environment.
Warning
You cannot have both GitHub App and GitHub App (Pro) simultaneously in your environment. If you are currently using the standard GitHub App, you can migrate to GitHub App (Pro). When migrating from one app to the other, ensure you select the same set of repositories as before to preserve your currently scanned projects and findings after the migration.
Default branch detection
When Endor Labs scans a repository for the first time, it detects the default branch of the repository. The findings that are created in the scan are associated with the default branch.
Changing the default branch
When you change the default branch in your source control system (for example, from main to dev):
Endor Labs automatically detects the new default branch and sets that as the default reference
The previous default branch becomes a reference branch
Scans continue on the new default branch and the reference branch
The findings associated with the previous default branch are no longer associated with the default context reference. You can view them in the reference context.
Renaming the default branch
When you rename the default branch in your source control system:
Endor Labs automatically switches to the renamed branch
Scans continue without disruption
Adding repository versions
When you add a new repository version (for example, a dev branch), both the default branch and the new version are scanned by the Endor Labs App.
Control default branch detection
You can control the default branch detection by setting the ENDOR_SCAN_TRACK_DEFAULT_BRANCH environment variable in a scan profile. You need to configure the project to use the scan profile. See Configure scan profiles for more information.
By default, the environment variable is set to true. When set to true, the default branch detection is enabled, and the first branch you scan is automatically considered as the default branch.
Prerequisites for GitHub App
Before installing and scanning projects with Endor Labs GitHub App, make sure you have:
A GitHub cloud account and organization. If you don’t have one, create one at GitHub.
Administrative permissions to your GitHub organization. Installing the Endor Labs GitHub App in your organization requires approval or permissions from your GitHub organizational administrator. If you don’t have the permissions, use the command line utility, endorctl, while you wait for the approval.
Endor Labs GitHub App requires:
Read permissions to Dependabot alerts, actions, administration, code, commit statuses, issues, metadata, packages, repository hooks, and security events.
Write permissions to checks and pull requests to check the pull requests automatically and surface policy violations to developers as pull request comments.
Subscribe to check run, check suite, and pull request events.
Install the GitHub App
To automatically scan repositories using the GitHub App:
Sign in to Endor Labs.
Select Projects from the left sidebar and click Add Project.
From GitHub, choose GitHub App.
Click Install GitHub App.
You will be redirected to GitHub to install the GitHub App.
Click Install.
Select a user to authorize the app.
Select the organization in which you want to install the app.
Select whether to install and authorize Endor Labs on all your repositories or select the specific repositories that you wish to scan.
Review the permissions required for Endor Labs and click Install and Authorize.
Note
If the button to install says Install and Request instead of Install and Authorize, you don’t have permission to install the GitHub App. Use the endorctl command line interface or select Install and Request to notify your organizational administrator of your request to install. If you select Install and Request your installation will not be active unless your organizational administrator approves the request to install GitHub App.
Choose a namespace and click Next.
Based on your license, select and enable the scanners.
SCA: Perform software composition analysis and discover AI models used in your repository.
RSPM: Scan the repository for misconfigurations. RSPM scans run every week on Sundays.
Secret: Scan the repository for exposed secrets.
GitHub Actions: Scan the repository and identify all the GitHub Actions workflows used in the repository.
SAST: Scan your source code for weakness and generate SAST findings.
Select Include Archived Repositories to scan your archived repositories. By default, the GitHub archived repositories aren’t scanned.
Select PULL REQUEST SCANS to set preferences for scanning pull requests submitted by users.
Select Pull Request Comments to enable GitHub Actions to comment on PRs for policy violations.
In Define Scanning Preferences, select either:
Quick Scan to gain rapid visibility into your software composition. It performs dependency resolution but does not conduct reachability analysis to prioritize vulnerabilities. The quick scan enables users to swiftly identify potential vulnerabilities in dependencies, ensuring a smoother and more secure merge into the main branch.
Full Scan to perform dependency resolution, reachability analysis, and generate call graphs for supported languages and ecosystems. This scan enables users to get complete visibility and identifies all issues dependencies, call graph generation before merging into the main branch. Full scans may take longer to complete, potentially delaying PR merges.
See GitHub scan options for more information on the scans that you can do with the GitHub App.
Click Continue.
You have successfully installed the GitHub App.
Set up package repositories
You can improve your experience with the GitHub App by setting up package repositories. This will help you create a complete bill of materials and perform static analysis. Without setting package repositories, you may not be able to get an accurate bill of materials. See Set up package manager integration for more information.
Deploy Endor Labs Azure DevOps App
Endor Labs provides an Azure DevOps App that continuously scans Azure repos in your projects for security risks. You can selectively scan your repositories for SCA, secrets, and SAST.
You can choose to configure the Azure DevOps App at the organization level or the project level. When you configure the Azure DevOps App at the organization level, Endor Labs adds all the projects under the organization and scans all the repos in the projects. When you add an Azure DevOps project, Endor Labs scans all repos within that project.
See Manage Azure App to learn how to manage your Azure App integration in Endor Labs.
Managed namespaces for Azure DevOps
You need to add an Azure organization or a project to an Endor Labs namespace. Organizations and projects in Azure DevOps are mapped as managed namespaces in Endor Labs.
Managed namespaces have the following restrictions:
You cannot delete managed namespaces.
You cannot delete repos present within managed namespaces.
You cannot add projects or create namespaces within managed namespaces.
You cannot create any new Endor Labs App installation within the managed namespaces.
Namespace structure when you add an Azure organization
When you add an Azure organization to an Endor Labs namespace, Endor Labs creates a child namespace for the organization and creates child namespaces for each project in the organization under the organization namespace. The organization namespace and project namespaces are managed namespaces. You can add multiple projects to the same Endor Labs namespace. Each project will have its own managed namespace.
If your organization name is deerinc and you have three projects, buck, doe, and fawn, Endor Labs creates four managed namespaces: deerinc, buck, doe, and fawn. The namespaces buck, doe, and fawn are child namespaces of the deerinc namespace.
The following image shows the namespace structure in Endor Labs.
Namespace structure when you add an Azure DevOps project
When you add an Azure DevOps project to an Endor Labs namespace, Endor Labs creates a child namespace for the Azure DevOps project and maps all repositories in that project to this namespace. The child namespace that maps to the Azure DevOps project is a managed namespace. The managed namespace has the name, <organization name>-<project name>. For example, if your organization name is deerinc and project name is doe, the managed namespace will have the name, deerinc-doe.
You can add multiple projects to the same Endor Labs namespace. Each project will have its own managed namespace. For example, your organization name is deerinc, which has three projects, buck,doe, andfawn. You add each project to the Endor Labs namespace, endor-azure.
The following image shows the namespace structure in Endor Labs.
graph TD
%% Endor Labs namespace
EN[endor-azure]
%% Azure projects
A1[deerinc-buck]
A2[deerinc-doe]
A3[deerinc-fawn]
%% connections
EN --> A1
EN --> A2
EN --> A3
class EN,EN2 endor
class A1,A2,A3 managed
classDef managed fill:#5EEAD4
To run CLI scans for a repository that is already scanned by the Endor Labs Azure DevOps App, specify the correct managed child namespace using the -n argument to prevent creating duplicate projects.
Default branch detection
When Endor Labs scans a repository for the first time, it detects the default branch of the repository. The findings that are created in the scan are associated with the default branch.
Changing the default branch
When you change the default branch in your source control system (for example, from main to dev):
Endor Labs automatically detects the new default branch and sets that as the default reference
The previous default branch becomes a reference branch
Scans continue on the new default branch and the reference branch
The findings associated with the previous default branch are no longer associated with the default context reference. You can view them in the reference context.
Renaming the default branch
When you rename the default branch in your source control system:
Endor Labs automatically switches to the renamed branch
Scans continue without disruption
Adding repository versions
When you add a new repository version (for example, a dev branch), both the default branch and the new version are scanned by the Endor Labs App.
Control default branch detection
You can control the default branch detection by setting the ENDOR_SCAN_TRACK_DEFAULT_BRANCH environment variable in a scan profile. You need to configure the project to use the scan profile. See Configure scan profiles for more information.
By default, the environment variable is set to true. When set to true, the default branch detection is enabled, and the first branch you scan is automatically considered as the default branch.
Prerequisites for Azure DevOps App
Ensure the following prerequisites are in place before you install the Endor Labs Azure DevOps App.
An Azure DevOps cloud account and organization. If you don’t have one, create one at Azure DevOps.
Endor Labs Azure DevOps App requires read permissions to in your projects. You can grant these permissions by providing read access to the Code category when you create an Azure DevOps personal access token for Endor Labs.
Install the Azure DevOps App
To automatically scan repositories using the Azure DevOps App:
Sign in to Endor Labs.
Select Projects from the left sidebar and click Add Project.
From AZURE, select Azure DevOps App.
Enter the host URL of your Azure project.
The URL must be in the format, https://dev.azure.com/<ORG_NAME>/ when you add an Azure organization. When you add an Azure DevOps project, the URL must be in the format, https://dev.azure.com/<ORG_NAME>/<PROJECT_NAME>.
Enter your personal access token from Azure.
You must have at least read permissions in the Code category for your Azure DevOps personal access token.
Click Scanners and select the scan types to enable.
SCA: Perform software composition analysis and discover AI models used in your repository.
Secret: Scan Azure repos for exposed secrets.
SAST: Scan your source code for weakness and generate SAST findings.
The available scan types depend upon your license.
Select Include Disabled Repositories to scan your archived repositories. By default, the Azure archived repositories aren’t scanned.
Click Create.
Endor Labs Azure DevOps App scans your Azure repos every 24 hours and reports any new findings or changes to release versions of your code.
Note
Only users with admin authorization role can create and manage installations.
A CI scan may fail if triggered while monitoring scan from the Endor Labs Azure DevOps App is in progress. Complete the monitoring scans first to prevent conflicts.
Deploy Endor Labs GitLab App
Endor Labs provides a GitLab App that continuously monitors users’ projects for security and operational risk. You can use the GitLab App to selectively scan your repositories for SCA, secrets, SAST, and CI/CD tools. You can use the GitLab App with a GitLab cloud account or a self-hosted GitLab instance.
When you use Endor Labs GitLab App, Endor Labs creates namespaces based on your organization hierarchy in GitLab.
The namespaces created by the Endor Labs GitLab App are not like regular namespaces and are called managed namespaces. These namespaces are named after subgroup slugs in GitLab.
See Manage GitLab App to learn how to manage your GitLab App integration in Endor Labs.
Limitations of GitLab groups in Endor Labs namespace
Ensure that you consider the following limitations when you use the GitLab monitoring scan.
GitLab supports up to 20 levels of subgroup nesting, while Endor Labs currently supports a maximum of 10 levels, assuming the installation is created at the tenant level. If a GitLab installation is created within a nested namespace, such as tenant.namespace1.namespace2, the available nesting depth for subgroups in GitLab is reduced. In this case, Endor Labs can only support up to eight levels of nested subgroups.
Endor Labs supports GitLab groups with a maximum of 64 characters.
Managed namespaces for GitLab
Managed namespaces are always reflective in terms of structure and content in GitLab.
Managed namespaces have the following restrictions:
You cannot delete managed namespaces.
You cannot delete projects present within managed namespaces.
You cannot add projects or create namespaces within managed namespaces.
You cannot create any new Endor Labs App installation within the managed namespaces.
For example, you cannot create an Endor Labs GitHub App installation within a namespace that was created by the Endor Labs GitLab App.
Any modifications to the namespaces have to be in GitLab. The changes that you make to the namespaces and projects are reflected in Endor Labs after a rescan.
If your organization has the following hierarchy in GitLab:
graph TD
GL((GitLab))
HC[HappyCorp]
%% Main divisions
Web[Web]
Mobile[Mobile]
Desktop[Desktop]
%% Web subgroups
WA[Alpha]
WB[Beta]
WG[Gamma]
%% Mobile subgroups
MD[Delta]
ME[Epsilon]
MZ[Zeta]
%% Desktop subgroups
DP[Pi]
DR[Rho]
DS[Sigma]
%% Main connections
GL --> HC
HC --> Web
HC --> Mobile
HC --> Desktop
%% Web connections
Web --> WA
Web --> WB
Web --> WG
%% Mobile connections
Mobile --> MD
Mobile --> ME
Mobile --> MZ
%% Desktop connections
Desktop --> DP
Desktop --> DR
Desktop --> DS
class HC main
class Web,Mobile,Desktop division
classDef default fill:#777777
classDef circle fill:#95A5A6
class GL circle
Endor Labs creates managed namespaces that mirror your GitLab groups under an Endor Labs namespace (for example, happyendor). Endor Labs creates happycorp as the parent namespace with web, mobile, and desktop as the child namespaces. The namespace happycorp will be under the Endor Labs namespace.
Each of these child namespaces have further child namespaces as follows:
web: alpha, beta, gamma
mobile: delta, epsilon, zeta
desktop: pi, rho, sigma
The following diagram shows the organization of namespaces in Endor Labs.
graph TD
EN[happyendor]
HC[happycorp]
%% Main divisions
Web[web]
Mobile[mobile]
Desktop[desktop]
%% Web subgroups
WA[alpha]
WB[beta]
WG[gamma]
%% Mobile subgroups
MD[delta]
ME[epsilon]
MZ[zeta]
%% Desktop subgroups
DP[pi]
DR[rho]
DS[sigma]
%% Main connections
EN --> HC
HC --> Web
HC --> Mobile
HC --> Desktop
%% Web connections
Web --> WA
Web --> WB
Web --> WG
%% Mobile connections
Mobile --> MD
Mobile --> ME
Mobile --> MZ
%% Desktop connections
Desktop --> DP
Desktop --> DR
Desktop --> DS
class HC main
class EN endor
class Web,Mobile,Desktop division
class WA,WB,WG,MD,ME,MZ,DP,DR,DS group
classDef main fill:#008B87
classDef division fill:#008B87
classDef group fill:#008B87
Note
In Endor Labs, namespaces are always in lowercase. If your groups have uppercase characters in their names, the corresponding namespaces will be converted to lowercase.
Manage multiple installations of GitLab App
You cannot create multiple GitLab installations with the same root group in the host URL within the same Endor Labs namespace.
For example, if a GitLab installation exists with a host URL like gitlab.com/group1/sg1, you cannot create another installation with a host URL like gitlab.com/group1/sg2 within the same Endor namespace. Instead, you must create the installation with a different root group in the host URL, such as gitlab.com/group2/sg2.
graph TD
%% Endor Labs namespace
EN[happyendor]
%% GitLab groups
G1[group1]
G2[group2]
SG1[sg1]
SG2[sg2]
%% connections
EN --> G1
EN --> G2
G1 --> SG1
G2 --> SG2
class EN endor
class G1,G2,SG1,SG2 managed
classDef managed fill:#008B87
If you wish to create an installation with a host URL like gitlab.com/group1/sg2, it should be inside a different Endor Labs namespace.
graph TD
%% Endor Labs namespace
EN[happyendor]
EN2[happyendor2]
%% GitLab groups
G1[group1]
G2[group1]
SG1[sg1]
SG2[sg2]
%% connections
EN --> G1
EN2 --> G2
G1 --> SG1
G2 --> SG2
class EN,EN2 endor
class G1,G2,SG1,SG2 managed
classDef managed fill:#008B87
Default branch detection
When Endor Labs scans a repository for the first time, it detects the default branch of the repository. The findings that are created in the scan are associated with the default branch.
Changing the default branch
When you change the default branch in your source control system (for example, from main to dev):
Endor Labs automatically detects the new default branch and sets that as the default reference
The previous default branch becomes a reference branch
Scans continue on the new default branch and the reference branch
The findings associated with the previous default branch are no longer associated with the default context reference. You can view them in the reference context.
Renaming the default branch
When you rename the default branch in your source control system:
Endor Labs automatically switches to the renamed branch
Scans continue without disruption
Adding repository versions
When you add a new repository version (for example, a dev branch), both the default branch and the new version are scanned by the Endor Labs App.
Control default branch detection
You can control the default branch detection by setting the ENDOR_SCAN_TRACK_DEFAULT_BRANCH environment variable in a scan profile. You need to configure the project to use the scan profile. See Configure scan profiles for more information.
By default, the environment variable is set to true. When set to true, the default branch detection is enabled, and the first branch you scan is automatically considered as the default branch.
Prerequisites for GitLab App
Before installing and scanning projects with Endor Labs GitLab App, make sure you have:
A GitLab cloud account or a self-hosted GitLab instance.
An organization in GitLab.
Endor Labs GitLab App requires a GitLab personal access token with at least read_api permission. You need to provide the api permission if you want to scan your merge requests.
Admin Authorization Role
Only users with admin authorization role in Endor Labs can create and manage installations. See Authorization roles for more information.
Select Projects from the left sidebar and click Add Project.
From GITLAB, select GitLab App.
Enter the GitLab organization URL in the format: https://gitlab.com/{group}/{subgroup1}/....
You need to enter at least the root group. For example, https://gitlab.com/group1.
You can provide the host URL up to any subgroup level. For example, https://gitlab.com/group1/subgroup1/subgroup2/subgroup3.
Endor Labs creates namespaces for groups and subgroups and maps projects to these namespaces.
If the GitLab installation is created at the tenant level, Endor Labs supports up to 10 levels of GitLab group nesting. If the installation is created within a nested namespace under the tenant, the supported nesting depth decreases by one level for each additional level of nesting.
Enter the GitLab personal access token.
Scope of the Personal Access Token
The personal access token must have at least the read_api scope. If you want to scan merge requests, you need to provide the personal access token of a project developer role with the api scope.
Select the scan types to enable:
SCA: Perform software composition analysis and discover AI models used in your repository.
Secret: Scan GitLab projects for exposed secrets.
SAST: Scan GitLab projects to generate SAST findings.
The available scan types depend upon your license.
Select Include Archived Repositories to scan your archived repositories. By default, the GitLab archived repositories aren’t scanned.
Click Create.
Your GitLab App installation is created and has now started monitoring the projects in your groups. Endor Labs GitLab App scans your GitLab projects every 24 hours and reports any new findings.
You can also choose to configure the webhook for MR scans and apply it to specific projects through a scan profile. See Scan profiles for more information. Thereby, you can ensure that MR scans are only for selected projects rather than for all the projects in the group.
Click Skip to if you don’t want to scan your merge requests.
Deploy Endor Labs Bitbucket App in Bitbucket Data Center
Endor Labs provides a Bitbucket App that continuously monitors users’ projects for security and operational risks in Bitbucket Data Center. You can use the Bitbucket App to selectively scan your repositories for SCA, secrets, and SAST.
When you use the Endor Labs Bitbucket App, it creates namespaces based on your projects in Bitbucket Data Center. The namespaces created by the Endor Labs Bitbucket App are not like regular namespaces and are called managed namespaces. You can either configure the URL to Bitbucket Data Center to import all the projects or configure the project key to import a specific project in Endor Labs.
Note
The following characters are allowed in Endor Labs namespaces: lowercase letters (a–z), digits (0–9), hyphens (-), and underscores (_). Additionally, the namespace is limited to a maximum of 64 characters in length. If the Bitbucket host or your projects have a different naming convention, the corresponding namespaces will be converted to comply with the naming convention of Endor Labs namespaces.
You need to add the Bitbucket Data Center host or a project to an Endor Labs namespace. Bitbucket host and projects are mapped as managed namespaces in Endor Labs.
Managed namespaces have the following restrictions:
You cannot delete managed namespaces.
You cannot delete repositories within managed namespaces.
You cannot add projects or create namespaces within managed namespaces.
You cannot create new Endor Labs App installations within managed namespaces.
Namespace structure when you add a Bitbucket Data Center host
When you add a Bitbucket Data Center host to an Endor Labs namespace, Endor Labs creates a child namespace for the Bitbucket host and creates child namespaces for each project in the host under the host namespace. The namespaces of the host and projects are managed namespaces. If there are periods (.) in the Bitbucket Data Center hostname, it is converted to a hyphen (-). You can add multiple Bitbucket Data Center hosts to the same Endor Labs namespace. Each host will have its own managed namespace.
If your host name is bitbucket.deerinc.com and you have three projects, buck, doe, and fawn, Endor Labs creates four managed namespaces: bitbucket-deerinc-com, buck, doe, and fawn. The namespaces buck, doe, and fawn are child namespaces of the bitbucket-deerinc-com namespace.
The following image shows the namespace structure in Endor Labs.
Namespace structure when you add a Bitbucket Data Center project
When you add a Bitbucket Data Center project to an Endor Labs namespace, Endor Labs creates a child namespace for the Bitbucket Data Center project and maps all repositories in that project to this namespace. The child namespace that maps to the Bitbucket Data Center project is a managed namespace. The managed namespace has the name, <host name>_<project name>. For example, if your Bitbucket hostname is bitbucket.deerinc.com and project name is doe, the managed namespace will have the name, bitbucket-deerinc-com_doe.
You can add multiple projects to the same Endor Labs namespace. Each project will have its own managed namespace. For example, your hostname is bitbucket.deerinc.com, which has three projects, buck, doe, and fawn. You add each project to the Endor Labs namespace, endor-bitbucket.
The following image shows the namespace structure in Endor Labs.
graph TD
%% Endor Labs namespace
EN[endor-bitbucket]
%% Bitbucket projects
A1[bitbucket-deerinc-com_buck]
A2[bitbucket-deerinc-com_doe]
A3[bitbucket-deerinc-com_fawn]
%% connections
EN --> A1
EN --> A2
EN --> A3
class EN,EN2 endor
class A1,A2,A3 managed
classDef managed fill:#5EEAD4
Default branch detection
When Endor Labs scans a repository for the first time, it detects the default branch of the repository. The findings that are created in the scan are associated with the default branch.
Changing the default branch
When you change the default branch in your source control system (for example, from main to dev):
Endor Labs automatically detects the new default branch and sets that as the default reference
The previous default branch becomes a reference branch
Scans continue on the new default branch and the reference branch
The findings associated with the previous default branch are no longer associated with the default context reference. You can view them in the reference context.
Renaming the default branch
When you rename the default branch in your source control system:
Endor Labs automatically switches to the renamed branch
Scans continue without disruption
Adding repository versions
When you add a new repository version (for example, a dev branch), both the default branch and the new version are scanned by the Endor Labs App.
Control default branch detection
You can control the default branch detection by setting the ENDOR_SCAN_TRACK_DEFAULT_BRANCH environment variable in a scan profile. You need to configure the project to use the scan profile. See Configure scan profiles for more information.
By default, the environment variable is set to true. When set to true, the default branch detection is enabled, and the first branch you scan is automatically considered as the default branch.
Prerequisites for Bitbucket Data Center App
Ensure the following prerequisites are in place before you install the Endor Labs Bitbucket App.
A publicly accessible Bitbucket Data Center host set up with HTTPS.
If your Bitbucket Data Center instance is self-hosted behind a firewall with ingress restrictions, you must configure your firewall to allow inbound connections from Endor Labs. See Firewall & Proxy Rules for detailed guidance on configuring firewall access.
Admin Authorization Role
Only users with admin authorization role in Endor Labs can create and manage installations. See Authorization roles for more information.
Install the Bitbucket Data Center App
Sign in to Endor Labs and select Projects from the left sidebar.
Click Add Project.
Select Bitbucket on the Scan your repositories page.
Select Bitbucket Data Center.
Enter the Bitbucket hostname URL.
To import all the projects, provide the base Bitbucket Data Center URL in the format https://<hostname>.
To import a specific project, provide the project URL in the format https://<bitbucket-hostname>/projects/{project-key}. For example, https://bitbucket.company.com/projects/LAB.
Endor Labs creates namespaces for all projects that are available in the Bitbucket Data Center host.
Enter the Bitbucket Data Center HTTP access token.
Permissions for the HTTP access token
The HTTP access token must have at least the read permission for Projects.
If you want to scan pull requests, the HTTP access token must have at least write permission for Repositories and read permission for Projects. For more information, see Create an HTTP access token.
Select the scan types to enable.
SCA: Perform software composition analysis and discover AI models used in your repository.
Secret: Scan Bitbucket projects for exposed secrets.
SAST: Scan Bitbucket projects to generate SAST findings.
The available scan types depend upon your license.
Select Include Archived Repositories to scan your archived repositories.
By default, the Bitbucket archived repositories aren’t scanned.
You can choose to apply PR scans for specific repositories rather than all repositories in your Bitbucket project by configuring a scan profile. See Configure PR scans for specific repositories for more information.
Endor Labs Bitbucket Data Center App scans your Bitbucket projects every 24 hours and reports any new findings or changes to release versions of your code.
Deploy Endor Labs Bitbucket App in Bitbucket Cloud
Endor Labs provides a Bitbucket App that continuously monitors users’ projects for security and operational risks in Bitbucket Cloud. You can use the Bitbucket App to selectively scan your repositories for SCA, secrets, and SAST.
When you use the Endor Labs Bitbucket App, it creates namespaces based on your workspace and projects in Bitbucket Cloud. The namespaces created by the Endor Labs Bitbucket App are not like regular namespaces and are called managed namespaces. You can either configure the URL to Bitbucket Cloud to import all the projects or configure the project key to import a specific project in Endor Labs.
Note
The following characters are allowed in Endor Labs namespaces: lowercase letters (a–z), digits (0–9), hyphens (-), and underscores (_). Additionally, the namespace is limited to a maximum of 64 characters in length. If the Bitbucket host or your projects have a different naming convention, the corresponding namespaces will be converted to comply with the naming convention of Endor Labs namespaces.
See Manage Bitbucket Cloud App to learn how to manage your Bitbucket Cloud App integration in Endor Labs.
Managed namespaces for Bitbucket Cloud
You need to add the Bitbucket Cloud workspace or a project to an Endor Labs namespace. Bitbucket Cloud workspace and projects are mapped as managed namespaces in Endor Labs.
Managed namespaces have the following restrictions:
You cannot delete managed namespaces.
You cannot delete repositories within managed namespaces.
You cannot add projects or create namespaces within managed namespaces.
You cannot create new Endor Labs App installations within managed namespaces.
Namespace structure when you add a Bitbucket Cloud workspace
When you add a Bitbucket Cloud workspace to an Endor Labs namespace, Endor Labs creates a child namespace for the Bitbucket Cloud workspace and creates child namespaces for each project in the workspace under the workspace namespace. The namespaces of the workspace and projects are managed namespaces. You can add multiple Bitbucket Cloud workspaces to the same Endor Labs namespace. Each workspace will have its own managed namespace.
If your workspace name is deerinc and you have three projects, buck, doe, and fawn, Endor Labs creates four managed namespaces: deerinc, buck, doe, and fawn. The namespaces buck, doe, and fawn are child namespaces of the deerinc namespace.
The following image shows the namespace structure in Endor Labs.
Namespace structure when you add a Bitbucket Cloud project
When you add a Bitbucket Cloud project to an Endor Labs namespace, Endor Labs creates a child namespace for the Bitbucket Cloud project and maps all repositories in that project to this namespace. The child namespace that maps to the Bitbucket Cloud project is a managed namespace. The managed namespace has the name, <workspace name>_<project name>. For example, if your Bitbucket Cloud workspace name is deerinc and project name is doe, the managed namespace will have the name, deerinc_doe.
You can add multiple projects to the same Endor Labs namespace. Each project will have its own managed namespace. For example, your workspace name is deerinc, which has three projects, buck,doe, andfawn. You add each project to the Endor Labs namespace, endor-bitbucket.
The following image shows the namespace structure in Endor Labs.
graph TD
%% Endor Labs namespace
EN[endor-bitbucket]
%% Bitbucket projects
A1[deerinc_buck]
A2[deerinc_doe]
A3[deerinc_fawn]
%% connections
EN --> A1
EN --> A2
EN --> A3
class EN,EN2 endor
class A1,A2,A3 managed
classDef managed fill:#5EEAD4
Default branch detection
When Endor Labs scans a repository for the first time, it detects the default branch of the repository. The findings that are created in the scan are associated with the default branch.
Changing the default branch
When you change the default branch in your source control system (for example, from main to dev):
Endor Labs automatically detects the new default branch and sets that as the default reference
The previous default branch becomes a reference branch
Scans continue on the new default branch and the reference branch
The findings associated with the previous default branch are no longer associated with the default context reference. You can view them in the reference context.
Renaming the default branch
When you rename the default branch in your source control system:
Endor Labs automatically switches to the renamed branch
Scans continue without disruption
Adding repository versions
When you add a new repository version (for example, a dev branch), both the default branch and the new version are scanned by the Endor Labs App.
Control default branch detection
You can control the default branch detection by setting the ENDOR_SCAN_TRACK_DEFAULT_BRANCH environment variable in a scan profile. You need to configure the project to use the scan profile. See Configure scan profiles for more information.
By default, the environment variable is set to true. When set to true, the default branch detection is enabled, and the first branch you scan is automatically considered as the default branch.
Prerequisites for Bitbucket App for Bitbucket Cloud
Ensure the following prerequisites are in place before you install the Endor Labs Bitbucket App.
Bitbucket Cloud instance with workspace and projects
A Bitbucket access token either at the workspace level to import a workspace, or the project level to import a project. The token must have at least Project read permission.
Note
Endor Labs Bitbucket App for Bitbucket Cloud requires a Bitbucket Cloud premium plan since Bitbucket Cloud standard plan does not support project-level access tokens.
Install the Bitbucket Cloud App
Sign in to Endor Labs and select Projects from the left sidebar.
Click Add Project.
Select Bitbucket on the Scan your repositories page.
Select Bitbucket Cloud.
Enter the Bitbucket Cloud workspace URL.
To import all the projects in the workspace, provide the workspace URL in the format https://bitbucket.org/{workspace}.
To import a specific project, provide the project URL in the format https://bitbucket.org/{workspace}/projects/{project-key}. For example, https://bitbucket.org/endor-labs/projects/lab.
Endor Labs creates namespaces for all projects that are available in the Bitbucket Cloud workspace.
Enter the Bitbucket access token.
Permissions for the Access Token
The access token must have at least the Project:read permission.
If you want to scan pull requests, you need to provide an access token with read and write permissions for Webhooks and Pull requests, as well as read access for Projects. For more information, see Create an access token.
Select the scan types to enable in SCANNERS.
SCA: Perform software composition analysis and discover AI models used in your repository.
Secret: Scan Bitbucket projects for exposed secrets.
SAST: Scan Bitbucket projects to generate SAST findings.
The available scan types depend upon your license.
You can also choose to apply PR scans to specific projects rather than for all the projects in the workspace through a scan profile. See Scan profiles for more information.
Endor Labs Bitbucket Cloud App scans your Bitbucket projects every 24 hours and reports any new findings or changes to release versions of your code.
Set up Jenkins pipeline for supervisory scans
Use the Endor Labs Jenkins pipeline to scan all the repositories in your organization and view consolidated findings. This pipeline runs on your organization’s Jenkins infrastructure and enables administrators to run organization-level supervisory scans easily. It is designed to work in GitHub Cloud and GitHub enterprise server environments.
The Jenkins pipeline carries out the following actions.
Pulls the Endor Labs Docker image required to perform the scan.
Synchronizes GitHub organization repositories to a specified namespace on the Endor Labs platform.
Retrieves the project list or the GitHub repositories for the given tenant’s namespace.
Groups the projects into batches to optimize scan execution.
Runs endorctl scans on each batch of projects simultaneously.
Configure the required credentials needed to access GitHub and Endor Labs in the Jenkins pipeline script. You can configure these values from the Jenkins user interface.
GITHUB_TOKEN- Enter the GitHub token that has permission to access all the repositories in the organization.
ENDOR_LABS_API_KEY- Enter the Endor Labs API key that you generated.
ENDOR_LABS_API_SECRET- Enter the Endor Labs API secret generated while creating the Endor Labs API key.
Configure GitHub cloud credentials
Configure the following GitHub cloud parameters in the Jenkins pipeline script.
Required Parameters for GitHub cloud
AGENT_LABEL- This is a string parameter. Enter the label used to identify the Jenkins agents. The Jenkins job will run on the agents that have this label.
GITHUB_ORG- This is a string parameter. Enter the organization name in GitHub.
ENDOR_LABS_NAMESPACE- This is a string parameter. The namespace of your organization tenant in Endor Labs.
Optional Parameters for GitHub cloud
ENDOR_LABS_API- This is a string parameter. This is only required if the tenant namespace is configured on the Endor Labs staging environment.
ADDITIONAL_ARGS- This is a string parameter. Use this field to pass any additional parameter to the endorctl scan.
NO_OF_THREADS- This is a string parameter. Enter the number of Jenkins agents that can be used in parallel for the endorctl scan. If you have 10 Jenkins agents configured with the given AGENT_LABEL, you can enter this value as 9, 1 agent is used for the main job. If not specified, this value defaults to 5.
ENDORCTL_VERSION- This is a string parameter. Specify the version of the endorctl Docker container. Defaults to the latest version.
SCAN_TYPE- This is a string parameter. Set this to git to scan commits or github to fetch info from the GitHub API. Defaults to [git, analytics].
SCAN_SUMMARY_OUTPUT_TYPE- This is a string parameter. Use this field to set the desired output format. Supported formats: json, yaml’, table, summary. Defaults to table.
LOG_LEVEL- This is a string parameter. Use this field to set the log level of the application. Defaults to info.
LOG_VERBOSE- This is a string parameter. Use this field to make the log verbose.
LANGUAGES- This is a string parameter. Use this field to set programming languages to scan. Supported languages: c#,go, java, javascript, php, python, ruby, rust, scala, typescript. Defaults to all supported languages.
ADDITIONAL_ARGS- This is a string parameter. Use this field to pass any additional parameters to the endorctl scan.
Configure GitHub enterprise server credentials
Configure the following GitHub enterprise server parameters in the Jenkins pipeline script.
Required Parameters for GitHub enterprise server
AGENT_LABEL - This is a string parameter. Enter the label used to identify the Jenkins agents. The Jenkins job will run on the agents that have this label.
GITHUB_ORG - This is a string parameter. Enter the organization name in GitHub.
ENDOR_LABS_NAMESPACE - This is a string parameter. The namespace of your organization tenant in Endor Labs.
GITHUB_API_URL - This is a string parameter. Enter the API URL of the GitHub enterprise server. This is normally in the form of <FQDN of GitHub Enterprise Server>/api/v3. For example, https://ghe.endorlabs.in/api/v3.
Optional Parameters for GitHub enterprise server
ENDOR_LABS_API - This is a string parameter. This is only required if the tenant namespace is configured on the Endor Labs staging environment.
GITHUB_DISABLE_SSL_VERIFY - This is a boolean parameter. This should be used when you want to skip SSL Verification while cloning the repository.
GITHUB_CA_CERT - This is a multi-line string parameter. This should be used to provide the content of the CA Certificate (PEM format) of the SSL Certificate used on the GitHub Enterprise Server.
PROJECT_LIST - This is a multi-line string parameter. This should be used to provide a list of projects to scan.
SCAN_TYPE - This is a string parameter. Set this to git to scan commits or github to fetch info from the GitHub API. Defaults to [git, analytics].
SCAN_SUMMARY_OUTPUT_TYPE - This is a string parameter. Use this field to set the desired output format. Supported formats: json, yaml*, table, summary. Defaults to table.
LOG_LEVEL - This is a string parameter. Use this field to set the log level of the application. Defaults to info.
LOG_VERBOSE - This is a string parameter. Use this field to generate verbose logs.
LANGUAGES - This is a string parameter. Use this field to set programming languages to scan. Supported languages: c#, go, java, javascript, php, python, ruby, rust, scala, typescript. Defaults to all supported languages.
ADDITIONAL_ARGS - This is a string parameter. Use this field to pass any additional parameters to the endorctl scan.
PROJECT_LIST - This is a multi-line string parameter. List of projects to scan. Even though all projects are synchronized, scans run only on the provided projects.
SCAN_PROJECTS_BY_LAST_COMMIT - This is a string parameter. This parameter is used to filter projects based on the date of the last commit. Enter a number (integer) value for this parameter. The value of 0 means that projects won’t be filtered based on last commit date. Any positive integer is used to calculate the duration in which a commit will add the project for further scanning. If a project did not have a commit in that interval, it will be skipped.
If a proper SSL Certificate (a certificate issued by a well-known CA) is not used for GitHub Enterprise, the sync-org command fails and Endor Labs cannot fetch the projects or repositories to scan from the GitHub enterprise server. You can use this field to provide the list of projects or repositories to scan one per line.
For example:
EXCLUDE_PROJECTS - This is a multi-line string parameter. Use this parameter to list projects or repositories to exclude from the scan.
NO_OF_THREADS - This is a string parameter. Enter the number of Jenkins agents that can be used in parallel for the endorctl scan. If you have 10 Jenkins agents configured with the given AGENT_LABEL, you can enter this value as 9. If not specified, this value defaults to 5.
Configure the Jenkins job
Use the following procedure to configure the Jenkins pipeline and scan the repositories in your organization.
Select This project is parameterised and add the parameters based on your requirements.
From the Pipeline section, for Definition, select Pipeline script from SCM
For SCM select Git
For the Repository URL, enter either git@github.com:endorlabs/jenkins-org-scan.git or https://github.com/endorlabs/jenkins-org-scan.git.
For Credentials, enter the credentials required for cloning the repository entered in the previous step.
In Branches to build, enter */main.
For Script Path, enter github-org-scan-docker.groovy.
Select Lightweight checkout.
Click Save.
The Jenkins pipeline is highly customizable and adaptable to various GitHub environments and scanning requirements. It streamlines the process of running endorctl scans on your repositories efficiently.
Endor Outpost
Endor Labs monitoring scan regularly scans your source code to discover vulnerabilities. The Endor Labs Apps clone and analyze all repositories every 24 hours, ensuring continuous monitoring for open source vulnerabilities and code weaknesses. See Monitoring scans for more information.
Endor Labs uses a Kubernetes cluster where your source code repositories and cloned, and the scans are conducted. Your policies may require that the source code repositories are not exposed to the public cloud. In such situations, you can use Outpost, which is a deployable on-prem instance of the Endor Labs scheduler that runs on your private Kubernetes cluster. After you deploy Outpost, Endor Labs uses your Kubernetes cluster to run the monitoring scans.
The scheduling of the scans and the scans themselves are run within your firewall. After the scans are completed, only the scan results are sent to Endor Labs.
Outpost provides full feature parity with regular cloud-based Endor Labs scans.
The following diagram shows how monitoring scans work when you configure Outpost.
graph TD
A(["Endor Labs App"]) -->|<span style='font-size: 12px'>Continuous monitoring</span>| B["Source Code Repositories"]
B <--> F["Private Artifact Registry"]
A -->|<span style='font-size: 12px'>Initiates scans</span>| C["Private Kubernetes cluster
<span style='font-size: 12px'>Runs Outpost and the scans inside your firewall</span>"]
B -->|<span style='font-size: 12px'>Clones repositories</span>| C
C -->|<span style='font-size: 12px'>Pass scan data</span>| D(["Endor Labs Platform
<span style='font-size: 12px'>Generate findings from scan results</span>"])
subgraph E["Firewall"]
A
B
C
F
end
class A,D endor
class B,C,F customer
class E firewall
classDef customer fill:#5EEAD4
classDef firewall fill:transparent,stroke-dasharray: 5 5,stroke:#FF4500,color:#FF4500
Outpost helps you in the following instances:
Security and compliance requirements prevent you from exposing source code repositories to external services
Firewall restrictions that prevent direct integration with external scan services and requires complex VPN configurations
Integrating endorctl into multiple CI/CD pipelines can be complex and costly, and relying on manual scanning processes increases the risk of errors
Need to scan against private artifact registries and internal services
You need to configure Outpost as an integration at your Endor Labs tenant namespace. You can only configure Outpost as an integration at your root namespace. After you configure the integration and complete the Kubernetes cluster configuration, all the monitoring scans in your Endor Labs tenant are run on your Kubernetes cluster.
Warning
After configuring Outpost, you cannot use the cloud-based Endor Labs scheduler. You cannot choose to run scans of a particular project on the cloud-based Endor Labs scheduler and others with Outpost. All monitoring scans in your Endor Labs tenant will be carried out on your Kubernetes cluster.
The following sections describe how you can configure and deploy Outpost.
You need a Kubernetes cluster with nodes that have at least 8 cores and 32 GB of RAM. Nodes should be running Linux.
You must create a namespace in your Kubernetes cluster to deploy Outpost. Use this namespace when you configure Outpost integration in Endor Labs.
Outpost currently supports the following Kubernetes distributions:
Azure Kubernetes Service (AKS)
Google Kubernetes Engine (GKE)
Amazon Elastic Kubernetes Service (EKS)
Self-hosted Kubernetes clusters
Kubernetes cluster requirements for Outpost
The total number of nodes in the cluster depends on the number of projects that you want to scan and the number of scans that you want to run in a day.
The total scans per node per day (24 hours) is calculated based on the following formula.
Total scans per node per day = (Node memory ÷ Pod memory request - 1) × (24 ÷ Average scan duration)
Pod memory request is the memory required for running endorctl. The Outpost scheduler sets the pod memory requests. Typically, the pod memory request is 8 GB. For demanding ecosystems with call graph enabled, the Outpost scheduler sets the pod memory request to 16 GB.
You can use the following formula to calculate the number of nodes required.
Number of nodes = Total projects ÷ Total scans per node per day
The following table shows the number of nodes required for different combinations of projects and scans.
Number of projects
Pod Memory Request
Average Scan Duration (in hours)
Scans per node per day
Node specification
Number of nodes
140
8 GB
1
72
8 cores, 32 GB RAM
2
1000
8 GB
1
72
8 cores, 32 GB RAM
14
1000
8 GB
1
360
32 cores, 128 GB RAM
3
Storage requirements for Outpost
Storage requirements for Outpost depend on the number of projects that you want to scan and the size of the repositories. Storage requirements increase in direct proportion to the number of concurrent scans.
You can use the following formula to calculate the storage requirements if you are running N number of concurrent scans.
Storage requirements = Sum of the largest N project sizes + extra space for other files
For example:
Project sizes: 10 GB, 8 GB, 6 GB, 4 GB, 2 GB
Concurrent scans: 3
Storage calculation: 10 GB + 8 GB + 6 GB + extra space
Total storage required: 24 GB + extra space for other files
We recommend that you allocate 500 GB of storage if you have several large projects and want to run several concurrent scans.
Network requirements for Outpost
Ensure the following network requirements are met for Outpost:
Egress Access: Required. Allow outbound traffic to Endor Labs platform, toolchains, and package managers.
DNS Resolution: Required. Allow list of necessary domains.
Network Policies: Required. Allow outbound traffic to Endor Labs platform, toolchains, and package managers.
Outpost authentication
Outpost can use the following authentication mechanisms:
API Key: You can generate an Endor Labs API key and secret and configure Outpost to use it.
Azure Managed Identity: You can configure Outpost to use an Azure managed identity for authentication. Applicable if you use Azure Kubernetes Service (AKS). You must also configure a corresponding authorization policy in Endor Labs.
GCP Service Account: You can configure Outpost to use a GCP service account for authentication. Applicable if you use Google Kubernetes Engine (GKE). You must also configure a corresponding authorization policy in Endor Labs.
API key authentication for Outpost
You can create an Endor Labs API key and secret to authenticate your Outpost configuration. See API keys for more information.
Ensure that you select On-prem Scheduler as the API key permissions.
Azure Managed Identity authentication for Outpost
Perform the following steps to configure Outpost to use an Azure managed identity for authentication.
Enable workload identity in the AKS cluster.
Enable OIDC provider in the AKS cluster.
Create an Azure managed identity.
az identity create -g endor-group -n endor-identity
The command creates a zero-permission managed identity. Store the clientId for later use.
Run the following command to retrieve the OIDC Issuer from AKS.
OIDC_ISSUER=$(az aks show -g endor-group -n onprem-cluster --query "oidcIssuerProfile.issuerUrl" -o tsv)
The command fetches the OIDC issuer URL for federated authentication. Ensure that you enable OIDC and Workload Identity in the AKS cluster.
Create federated credentials for workloads.
Run the following command to create the scheduler federated credential.
The onprem-cluster specified in the commands is the name of the Kubernetes namespace where Outpost is to be deployed. Replace it with the actual namespace name where you want to deploy Outpost. Ensure that you create the namespace before running the commands.
The commands link the managed identity to Kubernetes service accounts and enable secure access without static credentials.
6. Configure an authorization policy in Endor Labs with configuration from Azure.
7. Configure the Outpost integration with Managed Identity Client ID.
See Outpost configuration for more information on how to configure the Outpost integration.
GCP Service Account authentication for Outpost
Perform the following steps to configure Outpost to use a GCP service account for authentication.
Enable workload identity in the GKE cluster.
Enable OIDC provider in the GKE cluster.
Create a new workload service account.
gcloud iam service-accounts create endor-compute \
--description="Endor Labs Compute Service Account"\
--display-name="Endor Labs Compute Service Account"
Grant roles/iam.serviceAccountOpenIdTokenCreator to workload service account.
Configure an authorization policy in Endor Labs with configuration from Google Cloud.
Configure the Outpost integration with Service Account Name.
See Outpost configuration for more information on how to configure the Outpost integration.
Warning
Replace endor-experiments with the actual project name where you want to deploy Outpost. Replace endor-federation and endor-compute with the actual service account names.
To set up Outpost in your environment, you need to configure the integration through the Endor Labs user interface and deploy it to your Kubernetes cluster.
Perform the following steps to configure Outpost:
Select Integrations from the left sidebar.
Click Configure under On-Prem Integration.
Choose from the following authentication methods:
API: Use the Endor Labs API key authentication for Outpost. You need to enter the API key and API secret. See API key authentication for Outpost for more information.
Azure: Use the Azure managed identity authentication for Outpost. You need to enter the Azure managed identity client ID. See Azure Managed Identity authentication for Outpost for more information.
Google: Use the GCP service account authentication for Outpost. You need to enter the GCP service account name. See GCP Service Account authentication for Outpost for more information.
Click Advanced to configure the following parameters:
Select Enable Build Tool Caching to enable build tool caching. Bazel remote cache is installed and the build tools are cached in the cluster.
Enter the number of concurrent scans that Outpost can run in Max Running Scans.
Enter the maximum duration of a scan in Max Duration.
Click Enable Scheduler to store the configuration and enable Outpost.
Click Download Helm Values to download the endor-outpost-values.yaml file.
You can choose to customize the values before you deploy Outpost.
You can also extract the chart from oci://endorcipublic.azurecr.io/charts/onprem-scheduler and refer the default values.yaml for all the available options. See Helm Chart Values for more information.
Run the following command to deploy Outpost in your Kubernetes cluster.
The annotations are automatically added to the Helm chart values if you choose Azure managed identity authentication.
If you do not want to customize the values, the Helm command with your configured values appears in the user interface. You can copy the command and run it on your Kubernetes cluster.
For example, the following command appears on the user interface when you configure the integration on the endor Kubernetes namespace with the Azure managed identity authentication and build tool caching enabled. The root Endor Labs namespace is endor.
You can update the configuration in the user interface to generate a new Helm chart or command, or you can manually update the values in the endor-outpost-values.yaml file. We recommend that you update the configuration in the user interface even if you manually update and install the Helm chart.
Perform the following steps to update the configuration in the user interface:
Select Integrations from the left sidebar.
Click Manage under On-Prem Integration.
Update the configuration and click Enable Scheduler to update the configuration.
Generally, you need to update the configuration when the authentication expires. API keys have a maximum validity period of one year. The expiry of Azure managed identity and GCP service accounts depends on the expiry of the corresponding authorization policy.
View Outpost logs
You can view the Outpost logs in the Endor Labs platform.
Perform the following steps to view the Outpost logs:
Select Integrations from the left sidebar.
Click View Logs under On-Prem Integration.
You can copy the logs to the clipboard or download the logs.
By default, the logs are brief logs are displayed. You can select Show Verbose Logs to view the detailed logs.
The log level is set as All by default. You can select Info to view the info logs and Debug to view the debug logs.
Helm Chart Values
Run the following command to extract the default values for the Outpost Helm chart.
The values.yaml file in the onprem-scheduler directory contains the default values for the Outpost Helm chart.
The following yaml file shows the default values in the values.yaml file.
# Default values for onprem-scheduler.# This file is YAML-formatted.# Base URL for the Endor Labs platform [Do not modify]endorAPI:"https://api.endorlabs.com"# Your organization's namespace in Endor Labs [Do not modify unless there is a change in your tenant]endorNamespace:"required"# Log level for scheduler and endorctl. Optional.logLevel:"info"# Log output format for scheduler. Optional.logOutput:"json"# Authentication configuration - use ONE of the following methods.# NOTE: Only one authentication method (apiKey & apiSecret, gcpServiceAccountName,# or azureManagedIdentityClientID) must be set.auth:# Option 1: API Key authentication. Enter the Endor Labs API key and secret.# You can also create Kubernetes secrets for the API key and secret and provide the secret names instead of directly entering the values.apiKey:""apiSecret:""# Option 2: GCP Service Account authentication. Enter the GCP service account name.# NOTE: Ensure service accounts are created with workload identity annotations.gcpServiceAccountName:""# Option 3: Azure Managed Identity authentication. Enter the Azure managed identity client ID.# NOTE: Ensure service accounts are created with workload identity annotations.azureManagedIdentityClientID:""scheduler:# Maximum number of scans that you want to run concurrently. Optional.maxRunningJobs:20# Scheduler container image settings.image:# Container repository for the scheduler image [Do not modify]repository:"endorcipublic.azurecr.io/scheduler"# Image version to use [Do not modify]tag:"latest"# Image pull policy [Do not modify]pullPolicy:"Always"# Labels for the scheduler deployment. Optional.labels:{}# Annotations for the scheduler deployment. Optional.annotations:{}# Labels for the scheduler pod. Optional.podLabels:{}# Annotations for the scheduler pod. Optional.podAnnotations:{}serviceAccount:# Specifies whether a service account should be created. Optional.create:false# Name of the service account to use for scheduler. Optional.name:""# Labels for the scheduler service account. Optional.labels:{}# Annotations for the scheduler service account. Optional.annotations:{}# Pod-level security context for the scheduler. Optional.podSecurityContext:{}# Container-level security context for the scheduler. Optional.securityContext:{}# Resource constraints for the scheduler pod. Optional.resources:requests:cpu:512mmemory:512MihealthProbes:# Port used to perform health checks. Optional.port:8080# Readiness probe for the scheduler pod. Optional.readinessProbe:enabled:truefailureThreshold:2successThreshold:1periodSeconds:5timeoutSeconds:1initialDelaySeconds:10# Liveness probe for the scheduler pod. Optional.livenessProbe:enabled:truefailureThreshold:4periodSeconds:10successThreshold:1timeoutSeconds:1initialDelaySeconds:0# Node selector for the scheduler pod. Optional.nodeSelector:{}# Tolerations for the scheduler pod. Optional.tolerations:[]# Affinity settings for the scheduler pod. Optional.affinity:{}# Volumes for the scheduler pod. Optional.volumes:[]# Volume mounts for the scheduler pod. Optional.volumeMounts:[]# Additional environment variables for the scheduler pod. Optional.additionalEnvs:[]endorctl:# Maximum runtime duration in minutes for a scan. Optional. Default value is 60.maxDuration:1440bazelRemote:# Bazel remote cache service name.# Refer bazelremote values below. Optional.serviceName:"bazel-remote-cache"# Bazel remote cache GRPC service port.# Refer bazelremote values below. Optional.servicePort:9092# Endorctl container image settings.image:# Container repository for the endorctl image [Do not modify]repository:"endorcipublic.azurecr.io/endorctl_bare"# Image version to use [Do not modify]tag:"latest"# Image pull policy [Do not modify]pullPolicy:"Always"# Labels for the endorctl job. Optional.labels:{}# Annotations for the endorctl job. Optional.annotations:{}# Labels for the endorctl pod. Optional.podLabels:{}# Annotations for the endorctl pod. Optional.podAnnotations:{}serviceAccount:# Specifies whether a service account should be created. Optional.create:false# Name of the service account to use for endorctl. Optional.name:""# Labels for the endorctl service account. Optional.labels:{}# Annotations for the endorctl service account. Optional.annotations:{}# Pod-level security context for the endorctl. Optional.podSecurityContext:{}# Container-level security context for the endorctl. Optional.securityContext:{}# Resource constraints for the endorctl job. Optional.resources:{}# Node selector for the endorctl pod. Optional.nodeSelector:{}# Tolerations for the endorctl pod. Optional.tolerations:[]# Affinity settings for the endorctl pod. Optional.affinity:{}# Volumes for the endorctl pod. Optional.volumes:[]# Volume mounts for the endorctl pod. Optional.volumeMounts:[]# Backoff limit for the endorctl job. Optional.backoffLimit:0# TTL seconds after finished for the endorctl job. Optional.ttlSecondsAfterFinished:100# Additional environment variables for the endorctl pod. Optional.additionalEnvs:[]## DEPENDENCIES## Bazel remote cache configuration. Optional. Not enabled by default.bazelremote:# Whether to install the Bazel remote cache componentinstall:falseimage:# Container repository for the Bazel remote cache image [Do not modify]repository:"buchgr/bazel-remote-cache"# Specific version of the Bazel remote cache to use [Do not modify]tag:"v2.4.1"# Image pull policy [Do not modify]pullPolicy:"IfNotPresent"# Full name of the chart. Optional.fullnameOverride:"bazel-remote-cache"# Bazel-remote config to provision inside of the container. Optional.conf:|- # https://github.com/buchgr/bazel-remote#example-configuration-file
dir: /data
max_size: 500
experimental_remote_asset_api: true
access_log_level: all
port: 8080
grpc_port: 9092## For advanced bazel-remote configuration options,## Refer https://github.com/slamdev/helm-charts/tree/master/charts/bazel-remote#readme
Post-deployment configuration
After deploying Outpost to your Kubernetes cluster, you need to set up the appropriate Endor Labs app to integrate with your source code management system. This integration enables Outpost to scan your repositories.
You can install Endor Labs apps for the following source code managers:
Configure Outpost on GitLab self-hosted with self-signed certificates
When you configure Outpost on GitLab self-hosted with self-signed certificates, you need to add the self-signed certificate to the Outpost Helm chart values.
Note
Proper certificate validation is crucial for secure communication between Outpost and your GitLab self-hosted instance. Ensure that the self-signed certificate is valid and properly configured to prevent any security issues.
Perform the following steps to add the self-signed certificate to the Outpost Helm chart values and deploy Outpost with GitLab self-hosted.
Download the self-signed certificate from the GitLab self-hosted instance.
Create a kubectl configmap using the certificate in the Outpost cluster.
Configure Outpost on GitHub Enterprise Server with self-signed certificates
When you configure Outpost on GitHub Enterprise Server with self-signed certificates, you need to add the self-signed certificate to the Outpost Helm chart values.
Note
Proper certificate validation is crucial for secure communication between Outpost and your GitHub Enterprise Server instance. Ensure that the self-signed certificate is valid and properly configured to prevent any security issues.
Perform the following steps to add the self-signed certificate to the Outpost Helm chart values and deploy Outpost with GitHub Enterprise Server.
Download the self-signed certificate from the GitHub Enterprise Server instance.
Check if a ConfigMap for the GitHub certificate already exists.
kubectl -n <namespace> get configmap github-cert -o yaml
If a previous certificate exists, delete it before creating a new one.
Endor Labs helps developers fix code at its origin phase and during the early stages of development. You can successfully perform early security reviews and mitigate the need for expensive fixes during later stages of development. It accelerates the process of creating, delivering, and shipping secure applications.
Endor Labs Visual Studio Code extension: Endor Labs provides a plug-in for Visual Studio Code that developers can install from Visual Studio’s marketplace and get started with early vulnerability and dependency scanning.
Endor Labs MCP server: Endor Labs MCP (Model Context Protocol) server enables secure deployment of Endor Labs capabilities within your IDE. You can run the Endor Labs MCP server in your IDE during the development process to ensure that your code is free from vulnerabilities.
Endor Labs Visual Studio Code extension
The Endor Labs extension for Visual Studio Code scans your repositories and highlights issues that may exist in the open-source dependencies. You can use the extension with Endor Labs API credentials.
Prerequisites
The following prerequisites must be fulfilled to use the Endor Labs VS Code extension:
The minimum supported version of Visual Studio Code is 1.71 and higher.
See the following table for supported languages, package managers, and file extensions. The extension reads the manifest files to fetch the list of dependencies and displays the results in both manifest and source code files.
Supported Language
Manifest file
Source code file
JavaScript
package.json
.js, .ts, .jsx, .tsx, .mjs, .cjs extensions
Python
requirements.txt
.py extension
Go
go.mod
.go extension
Generate Endor Labs API keys and have them handy. You must enter these details in the VS Code extension. See Managing API keys for details.
Install the Endor Labs extension
Developers can install the extension from the Visual Studio marketplace and configure it with Endor Labs API keys.
Select the Endor Labs extension, click Settings, and choose Extension Settings.
Enter the API Key and API Secret of the Endor Labs application.
View scan results
The Endor Labs Visual Studio extension reads all the manifest files in your project and fetches the list of dependencies.
Hover over a dependency to view the package version, released date, findings, and Endor Labs scores in a pop-up.
For effective prioritization, issues with dependencies are classified into four severity levels: Critical, High, Medium, and Low.
Click a specific version to view the same results in the Endor Labs user interface.
The dependencies are color-coded in the following ways:
Red underline - Has critical findings and is also on an outdated version
Orange underline - Has critical findings and is on the latest version
Yellow underline - Has no critical findings but is an outdated version
No Underline - Has no critical findings and is on the latest version
Use Update to latest version to update the package to its latest version.
Note
The manifest file is updated with the latest version; however, the package is not automatically upgraded.
MCP Server
Beta
MCP (Model Context Protocol) is an open standard that defines a consistent way for applications to share relevant context and information with Large Language Models (LLMs). MCP servers expose specific capabilities through the standardized Model Context Protocol. For more information on MCP, refer to the MCP documentation.
The Endor Labs MCP server integrates seamlessly into your development workflow, scanning your code as you write. You can catch issues long before they’re a problem in production. It plugs directly into your IDE, tightening the feedback loop for both human and AI-generated code. Thus, you can quickly secure your code from the start. With Endor Labs, you’re bringing security all the way left, getting real-time, proactive insights and automated fixes in your editor, while you build, minimizing last-minute security scrambles.
The Endor Labs MCP server runs locally on your machine as a lightweight process. Your IDE or CLI launches it automatically and communicates with it over stdio. When the AI agent needs security context, it calls the tools exposed by the server.
How Endor Labs MCP server helps your development workflow
The Endor Labs MCP server helps developers and AI agents in the following ways:
Provide guardrails for agents before code review: Reduce the number of known vulnerabilities entering your code and save developers time by checking AI agent suggestions in real time. Integrate security before an issue is discovered in CI or in production.
Improve the speed of remediating security risks: Agents use vulnerability context from Endor Labs to help implement secure changes, from writing more secure code to upgrading dependencies.
How to use the Endor Labs MCP server
The Endor Labs MCP server provides the following tools:
check_dependency_for_vulnerabilities: Check if a dependency in your project is vulnerable.
check_dependency_for_risks: Check a dependency for security risks including vulnerabilities and malware.
get_endor_vulnerability: Get the details of a specific vulnerability from the Endor Labs vulnerability database.
get_resource: Retrieve additional context from commonly used Endor Labs resources about your software, such as findings, vulnerabilities, and projects.
scan: Run an Endor Labs security scan to detect risks in your open source dependencies, find common security issues, and spot any credentials accidentally exposed in your Git repository.
security_review: Perform security review analysis on code diffs. Analyzes local uncommitted changes (both staged and unstaged) compared to HEAD, or diffs between the main branch and the last commit. Requires the Enterprise Edition. You must specify your namespace in the MCP server configuration. You must also enable AI security code review for your namespace in the Endor Labs platform. See AI security code review for setup instructions.
After you set up the MCP server, you can choose to disable the tools that you do not want to use.
The Endor Labs MCP server helps developers and AI agents in the following ways:
Provide guardrails for agents before code review: Reduce the number of known vulnerabilities entering your code and save developers time by checking AI agent suggestions in real time. Integrate security before an issue is discovered in CI or in production.
Improve the speed of remediating security risks: Agents use vulnerability context from Endor Labs to help implement secure changes, from writing more secure code to upgrading dependencies.
The Endor Labs MCP server integrates directly into Cursor to scan your code as you write, catching security issues before they reach production.
The following sections walk you through setting up the Endor Labs MCP server:
Select your edition, fill in any required fields, and click Install in Cursor to add the Endor Labs MCP server directly to Cursor.
Already have endorctl configured?
Entering edition or namespace details in the configuration tool when you already have a local Endor Labs configuration from a previous endorctl init causes conflicts. Select Use pre-existing configuration if available, or follow the manual setup instructions below and add "ENDOR_TOKEN": "automatic" to reuse your existing configuration.
Endor Labs MCP Server Installation
Configure your edition and click to install the MCP server directly into Cursor.
View manual JSON configuration
MCP server configuration for mcp.json
Tools in the Endor Labs MCP server
The Endor Labs MCP server provides the following tools:
check_dependency_for_vulnerabilities: Check if a dependency in your project is vulnerable.
check_dependency_for_risks: Check a dependency for security risks including vulnerabilities and malware.
get_endor_vulnerability: Get the details of a specific vulnerability from the Endor Labs vulnerability database.
get_resource: Retrieve additional context from commonly used Endor Labs resources about your software, such as findings, vulnerabilities, and projects.
scan: Run an Endor Labs security scan to detect risks in your open source dependencies, find common security issues, and spot any credentials accidentally exposed in your Git repository.
security_review: Perform security review analysis on code diffs. Analyzes local uncommitted changes (both staged and unstaged) compared to HEAD, or diffs between the main branch and the last commit. Requires the Enterprise Edition. You must specify your namespace in the MCP server configuration. You must also enable AI security code review for your namespace in the Endor Labs platform. See AI security code review for setup instructions.
After you set up the MCP server, you can choose to disable the tools that you do not want to use.
Choose your edition
The Endor Labs MCP server has two editions:
Developer Edition: A free edition that requires no configuration. A browser window opens on first use for authentication via GitHub, GitLab, or Google. The Developer Edition provides access to default security policies from Endor Labs.
Enterprise Edition: A paid edition that enforces your organization’s specific security policies. Authenticate using GitHub, GitLab, Google, or SSO. You must specify your namespace to access your organization’s policies.
Additionally, if you already have Endor Labs configured locally (for example, from a previous endorctl init command), the MCP server can use your pre-existing configuration.
Developer Edition
The Endor Labs MCP server works out of the box with the Developer Edition. When you use the MCP server for the first time, a browser window opens, and you can authenticate with GitHub, GitLab, or Google. After authentication, the MCP server provides access to the free Developer Edition with the default security policies.
If you prefer to configure the MCP server manually, add the configuration to a .cursor/mcp.json file in the root of your repository (not your home directory).
Navigate to the root of your repository.
Create a .cursor directory if it doesn’t exist and create an mcp.json file in the .cursor directory.
mkdir -p .cursor && touch .cursor/mcp.json
Add the following configuration to the .cursor/mcp.json file.
If you already have a local Endor Labs configuration from a previous endorctl init, add "ENDOR_TOKEN": "automatic" to the env section. The MCP server reuses your existing configuration without requiring additional setup.
Developer Edition: Verify the installation
Navigate to Settings > Cursor Settings > Tools & MCP.
Confirm that endor-cli-tools appears in the list and is enabled.
Try a test prompt
After installing the MCP server, try the following prompt in your AI chat or CLI to verify that the tools are working.
Check if the npm package lodash version 4.17.20 has any vulnerabilities
The MCP server uses the check_dependency_for_vulnerabilities tool to check for known vulnerabilities and return the results. If you see a response with vulnerability details, the MCP server is working correctly.
Enterprise Edition
For Enterprise Edition, you need your organization’s Endor Labs namespace and an authentication method. Ensure that your developers have Read-Only permissions to Endor Labs. See Authorization policies for more details.
Replace <namespace> with your Endor Labs namespace and choose your authentication mode. If you choose sso, you must also add ENDOR_MCP_SERVER_AUTH_TENANT to the env section.
The following parameters are used to configure the MCP server. All parameters are optional. If no parameters are provided, the MCP server defaults to the Developer Edition with browser authentication.
ENDOR_MCP_SERVER_AUTH_MODE: (Optional) The authentication mode to use for the MCP server. You can use the following authentication modes: github, gitlab, google, sso. If you choose sso, you must add ENDOR_MCP_SERVER_AUTH_TENANT as an additional parameter. If not specified, the MCP server defaults to browser authentication for the Developer Edition.
ENDOR_NAMESPACE: (Optional) The namespace to use for the MCP server. Required for Enterprise Edition to access your organization’s specific policies. Not needed for Developer Edition.
ENDOR_TOKEN: (Optional) Set to automatic to reuse an existing local endorctl configuration. When set to automatic, the MCP server skips browser authentication and uses your stored credentials. Do not set this to any other value; the MCP server manages the token internally during authentication.
ENDOR_MCP_SERVER_AUTH_TENANT: (Optional) The tenant name for SSO authentication. Required when ENDOR_MCP_SERVER_AUTH_MODE is set to sso for Enterprise Edition access.
Enterprise Edition: Verify the installation
Navigate to Settings > Cursor Settings > Tools & MCP.
Confirm that endor-cli-tools appears in the list and is enabled.
Try a test prompt
After installing the MCP server, try the following prompt in your AI chat or CLI to verify that the tools are working.
Check if the npm package lodash version 4.17.20 has any vulnerabilities
The MCP server uses the check_dependency_for_vulnerabilities tool to check for known vulnerabilities and return the results. If you see a response with vulnerability details, the MCP server is working correctly.
Manage MCP server tools
Navigate to Settings > Cursor Settings > Tools & MCP.
Click the tool that you want to disable under endor-cli-tools.
Click on a disabled tool to enable it.
Configure Cursor rules
To enhance the MCP server integration, you can add custom rules for your project. These rules are custom prompts specific to your project.
Navigate to the root of your repository.
In the .cursor/rules directory, create an .mdc file to add specific instructions.
Add appropriate rules for your project in the .cursor/rules/endorlabs.mdc file. For example, you can add a rule to check if the code is free from vulnerabilities.
Example Cursor rules
You can use the following Cursor rules as a quick start for the Endor Labs MCP server. Modify the rules to meet your specific organization’s needs. We recommend that you store each cursor rule in a separate file. For more information, refer to the Cursor documentation.
---description:"Ensure newly added dependencies are checked for vulnerabilities and project stays clean"globs:'**/package.json, **/package-lock.json, **/yarn.lock, **/pnpm-lock.yaml, **/requirements.txt, **/Pipfile, **/Pipfile.lock, **/pyproject.toml, **/poetry.lock, **/go.mod, **/go.sum, **/Cargo.toml, **/Cargo.lock, **/pom.xml, **/build.gradle, **/build.gradle.kts, **/gradle.lockfile, **/composer.json, **/composer.lock'alwaysApply:true---# Software Composition Analysis (SCA) Rule (Endor Labs via MCP)This project uses Endor Labs for automated dependency (SCA) scanning, integrated through the MCP server as configured in `.cursor/mcp.json`.## WorkflowEvery time a manifest or lockfile listed above is created or modified in any way immediately do the following prior to performing your next task.**Important**:Do not proceed after creating or modifying a manifest file without running this first. Do not write any other code or continue with your existing prompt. This is top priority whenever a manifest file is created or updated.- Run `endor-cli-tools` using the `check_dependency_for_vulnerabilities` tool via the MCP server.- Provide the **ecosystem**, **dependency name**, and **version** always when making this tool call. Do not forget to provide a version.- If a vulnerability or error is identified:- Upgrade to the suggested safe version, or- Replace the dependency with a non-vulnerable alternative.- The AI agent must attempt to automatically correct all detected errors and vulnerabilities before session completion.- Re-run the check using `endor-cli-tools` to confirm the issue is resolved.- If an error occurs in any MCP server tool call (such as missing required parameters like version, invalid arguments, or tool invocation failures):- The AI agent must review the error, determine the cause, and automatically correct the tool call or input parameters.- Re-attempt the tool call with the corrected parameters.- Continue this process until the tool call succeeds or it is determined that remediation is not possible, in which case the issue and reason must be reported.## Notes- All scans must be performed using the MCP server integration (`endor-cli-tools`) as configured in `.cursor/mcp.json`. Do not invoke `endorctl` directly.- For troubleshooting, ensure the MCP server is running and `endorctl` is installed and accessible in your environment.This rule ensures that all dependency changes are evaluated for risk at the time of introduction, and that the project remains clean and secure after each coding session. The scan may be performed at the end of an agent session, provided all modifications are checked and remediated before session completion.
---description:"Scan for leaked secrets on file modification"globs:'**/*'alwaysApply:true---# Leaked Secrets Detection Rule (Endor Labs via MCP)This project uses @Endor Labs for automated security scanning, integrated through the MCP server as configured in `.cursor/mcp.json`.## WorkflowWhenever a file is modified in the repository, and before the end of an agent session:- Run `endor-cli-tools` using the `scan` tool via the MCP server to check for leaked secrets.- Ensure the scan includes all file types and respects `.gitignore` unless otherwise configured.- If any secrets or errors are detected:- Remove the exposed secret or correct the error immediately.- The AI agent must attempt to automatically correct all detected secrets and errors before session completion.- Re-run the scan to verify the secret or error has been properly removed or resolved.- If an error occurs in any MCP server tool call (such as missing required parameters like version, invalid arguments, or tool invocation failures):- The AI agent must review the error, determine the cause, and automatically correct the tool call or input parameters.- Re-attempt the tool call with the corrected parameters.- Continue this process until the tool call succeeds or it is determined that remediation is not possible, in which case the issue and reason must be reported.- Save scan results and remediation steps in a security log or as comments for audit purposes.## Notes- All scans must be performed using the MCP server integration (`endor-cli-tools`) as configured in `.cursor/mcp.json`. Do not invoke `endorctl` directly.- For troubleshooting, ensure the MCP server is running and `endorctl` is installed and accessible in your environment.- **Important**:This scan must use the path of the directory from which the changed files are in. Do not attempt to set the path directly to a file as it must be a directory. Use absolute paths like /Users/username/mcp-server-demo/backend rather than relative paths like 'backend'This rule ensures no accidental credentials, tokens, API keys, or secrets are committed or remain in the project history. The scan may be performed at the end of an agent session, provided all modifications are checked and remediated before session completion.
---description:"Run SAST scan using endor-cli-tools on source code changes"globs:'**/*.c, **/*.cpp, **/*.cc, **/*.cs, **/*.go, **/*.java, **/*.js, **/*.jsx, **/*.ts, **/*.tsx, **/*.py, **/*.php, **/*.rb, **/*.rs, **/*.kt, **/*.kts, **/*.scala, **/*.swift, **/*.dart, **/*.html, **/*.yaml, **/*.yml, **/*.json, **/*.xml, **/*.sh, **/*.bash, **/*.clj, **/*.cljs, **/*.ex, **/*.exs, **/*.lua'alwaysApply:true---# Static Application Security Testing (SAST) Rule (Endor Labs via MCP)This project uses @Endor Labs for automated SAST, integrated through the MCP server as configured in `.cursor/mcp.json`.## WorkflowWhenever a file is modified in the repository, and before the end of an agent session perform the following workflow:- Run `endor-cli-tools` using the `scan` tool via the MCP server to perform SAST scans as described above.- If any vulnerabilities or errors are found:- Present the issues to the user.- The AI agent must attempt to automatically correct all errors and vulnerabilities, including code errors, security issues, and best practice violations, before session completion.- Recommend and apply appropriate fixes (e.g., input sanitization, validation, escaping, secure APIs).- Continue scanning and correcting until all critical issues have been resolved or no further automated remediation is possible.- If an error occurs in any MCP server tool call (such as missing required parameters like version, invalid arguments, or tool invocation failures):- The AI agent must review the error, determine the cause, and automatically correct the tool call or input parameters.- Re-attempt the tool call with the corrected parameters.- Continue this process until the tool call succeeds or it is determined that remediation is not possible, in which case the issue and reason must be reported.- Save scan results and remediation steps in a security log or as comments for audit purposes.## Notes- All scans must be performed using the MCP server integration (`endor-cli-tools`) as configured in `.cursor/mcp.json`. Do not invoke `endorctl` directly.- For troubleshooting, ensure the MCP server is running and `endorctl` is installed and accessible in your environment.- Do not invoke Opengrep directly.- **Important**:This scan must use the path of the directory from which the changed files are in. Do not attempt to set the path directly to a file as it must be a directory. Use absolute paths like /Users/username/mcp-server-demo/backend rather than relative paths like 'backend'This rule ensures all code changes are automatically reviewed and remediated for common security vulnerabilities and errors using `endor-cli-tools` and the MCP server, with Opengrep as the underlying engine.
Watch how to use Endor Labs with Cursor
Troubleshooting
Use the following troubleshooting steps to resolve common issues with the Endor Labs MCP server.
MCP server shows as disconnected or errored
Verify Node.js and npx are available: run npx --version in your terminal. If the command fails, install Node.js version 18 or later.
Restart your IDE or CLI to reload the MCP server configuration.
Check your config for syntax errors. Use a JSON or TOML validator, or switch to the configuration tool or CLI command instead of manual editing.
Authentication browser window does not open
Ensure your IDE or CLI can open a browser. Check firewall or security software that might block browser launch.
For Enterprise Edition, confirm ENDOR_MCP_SERVER_AUTH_MODE is set correctly (google, github, gitlab, or sso). For SSO, ensure ENDOR_MCP_SERVER_AUTH_TENANT is provided.
endorctl download times out
If npx -y endorctl hangs or times out (for example, behind a corporate proxy or firewall), install endorctl globally and update your MCP config to use it. For more information, see Install endorctl.
After installing endorctl, update your MCP config to call endorctl directly instead of npx.
Alternatively, configure your proxy settings for npm.
Tools return errors when invoked
If you are using the Enterprise Edition, verify whether your namespace is correct and that your user has Read-Only permissions. See Authorization policies for details.
Ensure endorctl is on your PATH if you installed it globally instead of using npx.
Check that the working directory or project path is valid when invoking tools.
Config file has a syntax error and the IDE gives no useful message
IDEs often fail silently on invalid configuration. Validate your config file (for example, .cursor/mcp.json, .vscode/mcp.json, .mcp.json, or .codex/config.toml) with a JSON or TOML linter. Alternatively, use the configuration tool or CLI command for your platform instead of editing the file manually.
Prerequisites for Endor Labs MCP server on Windows
On Windows, ensure the following prerequisites are met:
If Node.js is not installed, download and install the LTS version from nodejs.org. During installation, ensure the option to add Node.js to PATH is selected.
Configure the PATH environment variable
After installing Node.js, verify that the npm global bin directory is in your PATH:
Run the following command in the command line.
npmconfiggetprefix
This returns the npm global directory path, typically C:\Users\<YourUsername>\AppData\Roaming\npm.
Add the npm global directory path to the Path variable under User variables in your system’s environment variables settings.
Restart for the PATH changes to take effect.
Verify the setup
Run the following command in your terminal.
npx--version
If this returns a version number, your Windows setup is complete and the MCP server can use npx to run endorctl.
Endor Labs MCP server in Claude Code
Beta
The Endor Labs MCP server helps developers and AI agents in the following ways:
Provide guardrails for agents before code review: Reduce the number of known vulnerabilities entering your code and save developers time by checking AI agent suggestions in real time. Integrate security before an issue is discovered in CI or in production.
Improve the speed of remediating security risks: Agents use vulnerability context from Endor Labs to help implement secure changes, from writing more secure code to upgrading dependencies.
The Endor Labs MCP server integrates directly into Claude Code to scan your code as you write, catching security issues before they reach production.
The following sections walk you through setting up the Endor Labs MCP server:
Select your edition, fill in any required fields, and click Copy to get the command that adds the Endor Labs MCP server to Claude Code.
Endor Labs MCP Server Installation
Configure your edition and copy the command to add the MCP server to Claude Code.
View manual configuration
Tools in the Endor Labs MCP server
The Endor Labs MCP server provides the following tools:
check_dependency_for_vulnerabilities: Check if a dependency in your project is vulnerable.
check_dependency_for_risks: Check a dependency for security risks including vulnerabilities and malware.
get_endor_vulnerability: Get the details of a specific vulnerability from the Endor Labs vulnerability database.
get_resource: Retrieve additional context from commonly used Endor Labs resources about your software, such as findings, vulnerabilities, and projects.
scan: Run an Endor Labs security scan to detect risks in your open source dependencies, find common security issues, and spot any credentials accidentally exposed in your Git repository.
security_review: Perform security review analysis on code diffs. Analyzes local uncommitted changes (both staged and unstaged) compared to HEAD, or diffs between the main branch and the last commit. Requires the Enterprise Edition. You must specify your namespace in the MCP server configuration. You must also enable AI security code review for your namespace in the Endor Labs platform. See AI security code review for setup instructions.
After you set up the MCP server, you can choose to disable the tools that you do not want to use.
Choose your edition
The Endor Labs MCP server has two editions:
Developer Edition: A free edition that requires no configuration. A browser window opens on first use for authentication via GitHub, GitLab, or Google. The Developer Edition provides access to default security policies from Endor Labs.
Enterprise Edition: A paid edition that enforces your organization’s specific security policies. Authenticate using GitHub, GitLab, Google, or SSO. You must specify your namespace to access your organization’s policies.
Additionally, if you already have Endor Labs configured locally (for example, from a previous endorctl init command), the MCP server can use your pre-existing configuration.
Developer Edition
The Endor Labs MCP server works out of the box with the Developer Edition. When you use the MCP server for the first time, a browser window opens, and you can authenticate with GitHub, GitLab, or Google. After authentication, the MCP server provides access to the free Developer Edition with the default security policies.
Developer Edition: Add the MCP server with a single command
Run the following command to add the MCP server to your project. This adds the server with --scope local (available only to you in the current project). See Scope options for other scopes.
claude mcp add endor-cli-tools -- npx -y endorctl ai-tools mcp-server
Developer Edition: Add the MCP server with .mcp.json configuration
Create an .mcp.json file in the root of your repository and add the following configuration. This uses project scope, which is shared with everyone working on the repository.
If you already have a local Endor Labs configuration from a previous endorctl init, add --env ENDOR_TOKEN=automatic to the CLI command (or "ENDOR_TOKEN": "automatic" to the env section in .mcp.json). The MCP server reuses your existing configuration without requiring additional setup.
Developer Edition: Verify the installation
claude mcp list
Confirm that endor-cli-tools appears in the list. You can also use /mcp in Claude Code to view active MCP servers.
Try a test prompt
After installing the MCP server, try the following prompt in your AI chat or CLI to verify that the tools are working.
Check if the npm package lodash version 4.17.20 has any vulnerabilities
The MCP server uses the check_dependency_for_vulnerabilities tool to check for known vulnerabilities and return the results. If you see a response with vulnerability details, the MCP server is working correctly.
Enterprise Edition
For Enterprise Edition, you need your organization’s Endor Labs namespace and an authentication method. Ensure that your developers have Read-Only permissions to Endor Labs. See Authorization policies for more details.
Enterprise Edition: Add the MCP server with a single command
Replace <namespace> with your Endor Labs namespace and choose your authentication mode.
The following parameters are used to configure the MCP server. All parameters are optional. If no parameters are provided, the MCP server defaults to the Developer Edition with browser authentication.
ENDOR_MCP_SERVER_AUTH_MODE: (Optional) The authentication mode to use for the MCP server. You can use the following authentication modes: github, gitlab, google, sso. If you choose sso, you must add ENDOR_MCP_SERVER_AUTH_TENANT as an additional parameter. If not specified, the MCP server defaults to browser authentication for the Developer Edition.
ENDOR_NAMESPACE: (Optional) The namespace to use for the MCP server. Required for Enterprise Edition to access your organization’s specific policies. Not needed for Developer Edition.
ENDOR_TOKEN: (Optional) Set to automatic to reuse an existing local endorctl configuration. When set to automatic, the MCP server skips browser authentication and uses your stored credentials. Do not set this to any other value; the MCP server manages the token internally during authentication.
ENDOR_MCP_SERVER_AUTH_TENANT: (Optional) The tenant name for SSO authentication. Required when ENDOR_MCP_SERVER_AUTH_MODE is set to sso for Enterprise Edition access.
Enterprise Edition: Verify the installation
claude mcp list
Confirm that endor-cli-tools appears in the list. You can also use /mcp in Claude Code to view active MCP servers.
Try a test prompt
After installing the MCP server, try the following prompt in your AI chat or CLI to verify that the tools are working.
Check if the npm package lodash version 4.17.20 has any vulnerabilities
The MCP server uses the check_dependency_for_vulnerabilities tool to check for known vulnerabilities and return the results. If you see a response with vulnerability details, the MCP server is working correctly.
Scope options
Claude Code supports three MCP configuration scopes:
--scope local: Available only to you in the current project (default).
--scope project: Shared with everyone in the project via .mcp.json file.
--scope user: Available to you across all projects.
Manage MCP servers
claude mcp list
claude mcp get endor-cli-tools
claude mcp remove endor-cli-tools
In Claude Code, use /mcp to view and manage your active MCP servers.
Configure CLAUDE.md
To enhance the MCP server integration, you can add instructions in CLAUDE.md at the root of your repository. Claude Code reads CLAUDE.md files to guide AI development with your project-specific instructions.
Navigate to the root of your repository.
Create or edit the CLAUDE.md file in the root of your repository.
Add appropriate rules for your project. For example, you can add a rule to check if the code is free from vulnerabilities.
Example CLAUDE.md instructions
You can use the following CLAUDE.md instructions as a quick start for the Endor Labs MCP server. Modify the instructions to meet your specific organization’s needs. For more information, refer to the Claude Code documentation.
# Software Composition Analysis (SCA) Rule (Endor Labs via MCP)
This project uses Endor Labs for automated dependency (SCA) scanning, integrated through the MCP server.
## Workflow
Every time a manifest or lockfile (package.json, requirements.txt, go.mod, pom.xml, etc.) is created or modified in any way, immediately do the following prior to performing your next task.
**Important**: Do not proceed after creating or modifying a manifest file without running this first.
- Run `endor-cli-tools` using the `check_dependency_for_vulnerabilities` tool via the MCP server.
- Provide the **ecosystem**, **dependency name**, and **version** always when making this tool call.
- If a vulnerability or error is identified:
- Upgrade to the suggested safe version, or
- Replace the dependency with a non-vulnerable alternative.
- Re-run the check using `endor-cli-tools` to confirm the issue is resolved.
## Notes
- All scans must be performed using the MCP server integration (`endor-cli-tools`). Do not invoke `endorctl` directly.
# Leaked Secrets Detection Rule (Endor Labs via MCP)
This project uses [Endor Labs](https://docs.endorlabs.com/) for automated security scanning, integrated through the MCP server.
## Workflow
Whenever a file is modified in the repository, and before the end of an agent session:
- Run `endor-cli-tools` using the `scan` tool via the MCP server to check for leaked secrets.
- If any secrets or errors are detected:
- Remove the exposed secret or correct the error immediately.
- Re-run the scan to verify the secret has been properly removed.
- Save scan results and remediation steps in a security log or as comments for audit purposes.
## Notes
- All scans must be performed using the MCP server integration (`endor-cli-tools`). Do not invoke `endorctl` directly.
- This scan must use the path of the directory from which the changed files are in. Use absolute paths.
# Static Application Security Testing (SAST) Rule (Endor Labs via MCP)
This project uses [Endor Labs](https://docs.endorlabs.com/) for automated SAST, integrated through the MCP server.
## Workflow
Whenever a file is modified in the repository, and before the end of an agent session:
- Run `endor-cli-tools` using the `scan` tool via the MCP server to perform SAST scans.
- If any vulnerabilities or errors are found:
- Present the issues to the user.
- Recommend and apply appropriate fixes (e.g., input sanitization, validation, escaping, secure APIs).
- Save scan results and remediation steps in a security log or as comments for audit purposes.
## Notes
- All scans must be performed using the MCP server integration (`endor-cli-tools`). Do not invoke `endorctl` directly.
- Do not invoke Opengrep directly.
- This scan must use the path of the directory from which the changed files are in. Use absolute paths.
Watch how to use Endor Labs with Claude Code
Troubleshooting
Use the following troubleshooting steps to resolve common issues with the Endor Labs MCP server.
MCP server shows as disconnected or errored
Verify Node.js and npx are available: run npx --version in your terminal. If the command fails, install Node.js version 18 or later.
Restart your IDE or CLI to reload the MCP server configuration.
Check your config for syntax errors. Use a JSON or TOML validator, or switch to the configuration tool or CLI command instead of manual editing.
Authentication browser window does not open
Ensure your IDE or CLI can open a browser. Check firewall or security software that might block browser launch.
For Enterprise Edition, confirm ENDOR_MCP_SERVER_AUTH_MODE is set correctly (google, github, gitlab, or sso). For SSO, ensure ENDOR_MCP_SERVER_AUTH_TENANT is provided.
endorctl download times out
If npx -y endorctl hangs or times out (for example, behind a corporate proxy or firewall), install endorctl globally and update your MCP config to use it. For more information, see Install endorctl.
After installing endorctl, update your MCP config to call endorctl directly instead of npx.
Alternatively, configure your proxy settings for npm.
Tools return errors when invoked
If you are using the Enterprise Edition, verify whether your namespace is correct and that your user has Read-Only permissions. See Authorization policies for details.
Ensure endorctl is on your PATH if you installed it globally instead of using npx.
Check that the working directory or project path is valid when invoking tools.
Config file has a syntax error and the IDE gives no useful message
IDEs often fail silently on invalid configuration. Validate your config file (for example, .cursor/mcp.json, .vscode/mcp.json, .mcp.json, or .codex/config.toml) with a JSON or TOML linter. Alternatively, use the configuration tool or CLI command for your platform instead of editing the file manually.
Prerequisites for Endor Labs MCP server on Windows
On Windows, ensure the following prerequisites are met:
If Node.js is not installed, download and install the LTS version from nodejs.org. During installation, ensure the option to add Node.js to PATH is selected.
Configure the PATH environment variable
After installing Node.js, verify that the npm global bin directory is in your PATH:
Run the following command in the command line.
npmconfiggetprefix
This returns the npm global directory path, typically C:\Users\<YourUsername>\AppData\Roaming\npm.
Add the npm global directory path to the Path variable under User variables in your system’s environment variables settings.
Restart for the PATH changes to take effect.
Verify the setup
Run the following command in your terminal.
npx--version
If this returns a version number, your Windows setup is complete and the MCP server can use npx to run endorctl.
Endor Labs MCP server in OpenAI Codex
Beta
The Endor Labs MCP server helps developers and AI agents in the following ways:
Provide guardrails for agents before code review: Reduce the number of known vulnerabilities entering your code and save developers time by checking AI agent suggestions in real time. Integrate security before an issue is discovered in CI or in production.
Improve the speed of remediating security risks: Agents use vulnerability context from Endor Labs to help implement secure changes, from writing more secure code to upgrading dependencies.
The Endor Labs MCP server integrates directly into OpenAI Codex to scan your code as you write, catching security issues before they reach production.
The following sections walk you through setting up the Endor Labs MCP server:
Select your edition, fill in any required fields, and click Copy to get the command that adds the Endor Labs MCP server to OpenAI Codex.
Endor Labs MCP Server Installation
Configure your edition and copy the command to add the MCP server to OpenAI Codex.
View manual configuration
Tools in the Endor Labs MCP server
The Endor Labs MCP server provides the following tools:
check_dependency_for_vulnerabilities: Check if a dependency in your project is vulnerable.
check_dependency_for_risks: Check a dependency for security risks including vulnerabilities and malware.
get_endor_vulnerability: Get the details of a specific vulnerability from the Endor Labs vulnerability database.
get_resource: Retrieve additional context from commonly used Endor Labs resources about your software, such as findings, vulnerabilities, and projects.
scan: Run an Endor Labs security scan to detect risks in your open source dependencies, find common security issues, and spot any credentials accidentally exposed in your Git repository.
security_review: Perform security review analysis on code diffs. Analyzes local uncommitted changes (both staged and unstaged) compared to HEAD, or diffs between the main branch and the last commit. Requires the Enterprise Edition. You must specify your namespace in the MCP server configuration. You must also enable AI security code review for your namespace in the Endor Labs platform. See AI security code review for setup instructions.
After you set up the MCP server, you can choose to disable the tools that you do not want to use.
Choose your edition
The Endor Labs MCP server has two editions:
Developer Edition: A free edition that requires no configuration. A browser window opens on first use for authentication via GitHub, GitLab, or Google. The Developer Edition provides access to default security policies from Endor Labs.
Enterprise Edition: A paid edition that enforces your organization’s specific security policies. Authenticate using GitHub, GitLab, Google, or SSO. You must specify your namespace to access your organization’s policies.
Additionally, if you already have Endor Labs configured locally (for example, from a previous endorctl init command), the MCP server can use your pre-existing configuration.
Developer Edition
The Endor Labs MCP server works out of the box with the Developer Edition. When you use the MCP server for the first time, a browser window opens, and you can authenticate with GitHub, GitLab, or Google. After authentication, the MCP server provides access to the free Developer Edition with the default security policies.
If you already have a local Endor Labs configuration from a previous endorctl init, add --env ENDOR_TOKEN=automatic to the CLI command (or add the [mcp_servers.endor-cli-tools.env] section with ENDOR_TOKEN = "automatic" to config.toml). The MCP server reuses your existing configuration without requiring additional setup.
Developer Edition: Verify the installation
codex mcp list
Confirm that endor-cli-tools appears in the list. You can also use /mcp in the Codex TUI to view active MCP servers.
Try a test prompt
After installing the MCP server, try the following prompt in your AI chat or CLI to verify that the tools are working.
Check if the npm package lodash version 4.17.20 has any vulnerabilities
The MCP server uses the check_dependency_for_vulnerabilities tool to check for known vulnerabilities and return the results. If you see a response with vulnerability details, the MCP server is working correctly.
Enterprise Edition
For Enterprise Edition, you need your organization’s Endor Labs namespace and an authentication method. Ensure that your developers have Read-Only permissions to Endor Labs. See Authorization policies for more details.
Enterprise Edition: Add the MCP server with a single command
Replace <namespace> with your Endor Labs namespace and choose your authentication mode. If you choose sso, you must also add ENDOR_MCP_SERVER_AUTH_TENANT to the environment variables.
Enterprise Edition: Add the MCP server with config.toml
Replace <namespace> with your Endor Labs namespace and choose your authentication mode. If you choose sso, you must also add ENDOR_MCP_SERVER_AUTH_TENANT to the env section.
The following parameters are used to configure the MCP server. All parameters are optional. If no parameters are provided, the MCP server defaults to the Developer Edition with browser authentication.
ENDOR_MCP_SERVER_AUTH_MODE: (Optional) The authentication mode to use for the MCP server. You can use the following authentication modes: github, gitlab, google, sso. If you choose sso, you must add ENDOR_MCP_SERVER_AUTH_TENANT as an additional parameter. If not specified, the MCP server defaults to browser authentication for the Developer Edition.
ENDOR_NAMESPACE: (Optional) The namespace to use for the MCP server. Required for Enterprise Edition to access your organization’s specific policies. Not needed for Developer Edition.
ENDOR_TOKEN: (Optional) Set to automatic to reuse an existing local endorctl configuration. When set to automatic, the MCP server skips browser authentication and uses your stored credentials. Do not set this to any other value; the MCP server manages the token internally during authentication.
ENDOR_MCP_SERVER_AUTH_TENANT: (Optional) The tenant name for SSO authentication. Required when ENDOR_MCP_SERVER_AUTH_MODE is set to sso for Enterprise Edition access.
Enterprise Edition: Verify the installation
codex mcp list
Confirm that endor-cli-tools appears in the list.
Try a test prompt
After installing the MCP server, try the following prompt in your AI chat or CLI to verify that the tools are working.
Check if the npm package lodash version 4.17.20 has any vulnerabilities
The MCP server uses the check_dependency_for_vulnerabilities tool to check for known vulnerabilities and return the results. If you see a response with vulnerability details, the MCP server is working correctly.
Manage MCP server tools
In the Codex TUI, use /mcp to see your active MCP servers. You can also disable specific tools in the config.toml file:
To enhance the MCP server integration, you can add instructions in AGENTS.md at the root of your repository. Codex reads AGENTS.md files to guide AI development with your project-specific instructions.
Navigate to the root of your repository.
Create or edit the AGENTS.md file in the root of your repository.
Add appropriate rules for your project. For example, you can add a rule to check if the code is free from vulnerabilities.
Example AGENTS.md instructions
You can use the following AGENTS.md instructions as a quick start for the Endor Labs MCP server. Modify the instructions to meet your specific organization’s needs. For more information, refer to the OpenAI Codex AGENTS.md documentation.
# Software Composition Analysis (SCA) Rule (Endor Labs via MCP)
This project uses Endor Labs for automated dependency (SCA) scanning, integrated through the MCP server.
## Workflow
Every time a manifest or lockfile (package.json, requirements.txt, go.mod, pom.xml, etc.) is created or modified in any way, immediately do the following prior to performing your next task.
**Important**: Do not proceed after creating or modifying a manifest file without running this first.
- Run `endor-cli-tools` using the `check_dependency_for_vulnerabilities` tool via the MCP server.
- Provide the **ecosystem**, **dependency name**, and **version** always when making this tool call.
- If a vulnerability or error is identified:
- Upgrade to the suggested safe version, or
- Replace the dependency with a non-vulnerable alternative.
- Re-run the check using `endor-cli-tools` to confirm the issue is resolved.
## Notes
- All scans must be performed using the MCP server integration (`endor-cli-tools`). Do not invoke `endorctl` directly.
# Leaked Secrets Detection Rule (Endor Labs via MCP)
This project uses [Endor Labs](https://docs.endorlabs.com/) for automated security scanning, integrated through the MCP server.
## Workflow
Whenever a file is modified in the repository, and before the end of an agent session:
- Run `endor-cli-tools` using the `scan` tool via the MCP server to check for leaked secrets.
- If any secrets or errors are detected:
- Remove the exposed secret or correct the error immediately.
- Re-run the scan to verify the secret has been properly removed.
- Save scan results and remediation steps in a security log or as comments for audit purposes.
## Notes
- All scans must be performed using the MCP server integration (`endor-cli-tools`). Do not invoke `endorctl` directly.
- This scan must use the path of the directory from which the changed files are in. Use absolute paths.
# Static Application Security Testing (SAST) Rule (Endor Labs via MCP)
This project uses [Endor Labs](https://docs.endorlabs.com/) for automated SAST, integrated through the MCP server.
## Workflow
Whenever a file is modified in the repository, and before the end of an agent session:
- Run `endor-cli-tools` using the `scan` tool via the MCP server to perform SAST scans.
- If any vulnerabilities or errors are found:
- Present the issues to the user.
- Recommend and apply appropriate fixes (e.g., input sanitization, validation, escaping, secure APIs).
- Save scan results and remediation steps in a security log or as comments for audit purposes.
## Notes
- All scans must be performed using the MCP server integration (`endor-cli-tools`). Do not invoke `endorctl` directly.
- Do not invoke Opengrep directly.
- This scan must use the path of the directory from which the changed files are in. Use absolute paths.
Troubleshooting
Use the following troubleshooting steps to resolve common issues with the Endor Labs MCP server.
MCP server shows as disconnected or errored
Verify Node.js and npx are available: run npx --version in your terminal. If the command fails, install Node.js version 18 or later.
Restart your IDE or CLI to reload the MCP server configuration.
Check your config for syntax errors. Use a JSON or TOML validator, or switch to the configuration tool or CLI command instead of manual editing.
Authentication browser window does not open
Ensure your IDE or CLI can open a browser. Check firewall or security software that might block browser launch.
For Enterprise Edition, confirm ENDOR_MCP_SERVER_AUTH_MODE is set correctly (google, github, gitlab, or sso). For SSO, ensure ENDOR_MCP_SERVER_AUTH_TENANT is provided.
endorctl download times out
If npx -y endorctl hangs or times out (for example, behind a corporate proxy or firewall), install endorctl globally and update your MCP config to use it. For more information, see Install endorctl.
After installing endorctl, update your MCP config to call endorctl directly instead of npx.
Alternatively, configure your proxy settings for npm.
Tools return errors when invoked
If you are using the Enterprise Edition, verify whether your namespace is correct and that your user has Read-Only permissions. See Authorization policies for details.
Ensure endorctl is on your PATH if you installed it globally instead of using npx.
Check that the working directory or project path is valid when invoking tools.
Config file has a syntax error and the IDE gives no useful message
IDEs often fail silently on invalid configuration. Validate your config file (for example, .cursor/mcp.json, .vscode/mcp.json, .mcp.json, or .codex/config.toml) with a JSON or TOML linter. Alternatively, use the configuration tool or CLI command for your platform instead of editing the file manually.
Prerequisites for Endor Labs MCP server on Windows
On Windows, ensure the following prerequisites are met:
If Node.js is not installed, download and install the LTS version from nodejs.org. During installation, ensure the option to add Node.js to PATH is selected.
Configure the PATH environment variable
After installing Node.js, verify that the npm global bin directory is in your PATH:
Run the following command in the command line.
npmconfiggetprefix
This returns the npm global directory path, typically C:\Users\<YourUsername>\AppData\Roaming\npm.
Add the npm global directory path to the Path variable under User variables in your system’s environment variables settings.
Restart for the PATH changes to take effect.
Verify the setup
Run the following command in your terminal.
npx--version
If this returns a version number, your Windows setup is complete and the MCP server can use npx to run endorctl.
Endor Labs MCP server in Visual Studio Code
Beta
The Endor Labs MCP server helps developers and AI agents in the following ways:
Provide guardrails for agents before code review: Reduce the number of known vulnerabilities entering your code and save developers time by checking AI agent suggestions in real time. Integrate security before an issue is discovered in CI or in production.
Improve the speed of remediating security risks: Agents use vulnerability context from Endor Labs to help implement secure changes, from writing more secure code to upgrading dependencies.
The Endor Labs MCP server integrates directly into Visual Studio Code to scan your code as you write, catching security issues before they reach production.
The following sections walk you through setting up the Endor Labs MCP server:
Select your edition, fill in any required fields, and click Install in VS Code to add the Endor Labs MCP server directly to Visual Studio Code.
Already have endorctl configured?
Entering edition or namespace details in the configuration tool when you already have a local Endor Labs configuration from a previous endorctl init causes conflicts. Select Use pre-existing configuration if available, or follow the manual setup instructions below and add "ENDOR_TOKEN": "automatic" to reuse your existing configuration.
Endor Labs MCP Server Installation
Configure your edition and click to install the MCP server directly into Visual Studio Code.
View manual JSON configuration
MCP server configuration for mcp.json
Tools in the Endor Labs MCP server
The Endor Labs MCP server provides the following tools:
check_dependency_for_vulnerabilities: Check if a dependency in your project is vulnerable.
check_dependency_for_risks: Check a dependency for security risks including vulnerabilities and malware.
get_endor_vulnerability: Get the details of a specific vulnerability from the Endor Labs vulnerability database.
get_resource: Retrieve additional context from commonly used Endor Labs resources about your software, such as findings, vulnerabilities, and projects.
scan: Run an Endor Labs security scan to detect risks in your open source dependencies, find common security issues, and spot any credentials accidentally exposed in your Git repository.
security_review: Perform security review analysis on code diffs. Analyzes local uncommitted changes (both staged and unstaged) compared to HEAD, or diffs between the main branch and the last commit. Requires the Enterprise Edition. You must specify your namespace in the MCP server configuration. You must also enable AI security code review for your namespace in the Endor Labs platform. See AI security code review for setup instructions.
After you set up the MCP server, you can choose to disable the tools that you do not want to use.
Choose your edition
The Endor Labs MCP server has two editions:
Developer Edition: A free edition that requires no configuration. A browser window opens on first use for authentication via GitHub, GitLab, or Google. The Developer Edition provides access to default security policies from Endor Labs.
Enterprise Edition: A paid edition that enforces your organization’s specific security policies. Authenticate using GitHub, GitLab, Google, or SSO. You must specify your namespace to access your organization’s policies.
Additionally, if you already have Endor Labs configured locally (for example, from a previous endorctl init command), the MCP server can use your pre-existing configuration.
Developer Edition
The Endor Labs MCP server works out of the box with the Developer Edition. When you use the MCP server for the first time, a browser window opens, and you can authenticate with GitHub, GitLab, or Google. After authentication, the MCP server provides access to the free Developer Edition with the default security policies.
If you already have a local Endor Labs configuration from a previous endorctl init, add "ENDOR_TOKEN": "automatic" to the env section. The MCP server reuses your existing configuration without requiring additional setup.
Developer Edition: Verify the installation
Open the Chat view by pressing Cmd+Option+I (macOS) or Ctrl+Alt+I (Windows/Linux).
Switch to Agent mode.
Click the Settings icon and confirm that MCP Server: endor-cli-tools appears and is enabled.
Try a test prompt
After installing the MCP server, try the following prompt in your AI chat or CLI to verify that the tools are working.
Check if the npm package lodash version 4.17.20 has any vulnerabilities
The MCP server uses the check_dependency_for_vulnerabilities tool to check for known vulnerabilities and return the results. If you see a response with vulnerability details, the MCP server is working correctly.
Enterprise Edition
For Enterprise Edition, you need your organization’s Endor Labs namespace and an authentication method. Ensure that your developers have Read-Only permissions to Endor Labs. See Authorization policies for more details.
Replace <namespace> with your Endor Labs namespace and choose your authentication mode. If you choose sso, you must also add ENDOR_MCP_SERVER_AUTH_TENANT to the env section.
The following parameters are used to configure the MCP server. All parameters are optional. If no parameters are provided, the MCP server defaults to the Developer Edition with browser authentication.
ENDOR_MCP_SERVER_AUTH_MODE: (Optional) The authentication mode to use for the MCP server. You can use the following authentication modes: github, gitlab, google, sso. If you choose sso, you must add ENDOR_MCP_SERVER_AUTH_TENANT as an additional parameter. If not specified, the MCP server defaults to browser authentication for the Developer Edition.
ENDOR_NAMESPACE: (Optional) The namespace to use for the MCP server. Required for Enterprise Edition to access your organization’s specific policies. Not needed for Developer Edition.
ENDOR_TOKEN: (Optional) Set to automatic to reuse an existing local endorctl configuration. When set to automatic, the MCP server skips browser authentication and uses your stored credentials. Do not set this to any other value; the MCP server manages the token internally during authentication.
ENDOR_MCP_SERVER_AUTH_TENANT: (Optional) The tenant name for SSO authentication. Required when ENDOR_MCP_SERVER_AUTH_MODE is set to sso for Enterprise Edition access.
Enterprise Edition: Verify the installation
Open the Chat view by pressing Cmd+Option+I (macOS) or Ctrl+Alt+I (Windows/Linux).
Switch to Agent mode.
Click the Settings icon and confirm that MCP Server: endor-cli-tools appears and is enabled.
Try a test prompt
After installing the MCP server, try the following prompt in your AI chat or CLI to verify that the tools are working.
Check if the npm package lodash version 4.17.20 has any vulnerabilities
The MCP server uses the check_dependency_for_vulnerabilities tool to check for known vulnerabilities and return the results. If you see a response with vulnerability details, the MCP server is working correctly.
Manage MCP server tools
Open the Chat view by pressing Cmd+Option+I.
Switch to the Agent mode.
Click the Settings icon.
Select the tools that you want to enable or disable under MCP Server: endor-cli-tools.
Use the MCP server with GitHub Copilot
To use the Endor Labs MCP server with GitHub Copilot in Visual Studio Code:
Open the Chat view by pressing Cmd+Option+I.
Switch to the Agent mode.
Click the Settings icon.
Select MCP Server: endor-cli-tools from the dropdown menu.
Set up Copilot rules in .github/instructions/*.md to use the Endor Labs MCP server throughout the development process. See Example Copilot rules for more information.
You can now use Endor Labs tools in your chat prompts to scan for vulnerabilities.
Example Copilot rules
Copilot instructions define the guidelines that Copilot should follow throughout the development process. The following examples demonstrate how to use the Endor Labs MCP server within Copilot rules.
---description:"Ensure newly added dependencies are checked for vulnerabilities and project stays clean"applyTo:'**/package.json, **/package-lock.json, **/yarn.lock, **/pnpm-lock.yaml, **/requirements.txt, **/Pipfile, **/Pipfile.lock, **/pyproject.toml, **/poetry.lock, **/go.mod, **/go.sum, **/Cargo.toml, **/Cargo.lock, **/pom.xml, **/build.gradle, **/build.gradle.kts, **/gradle.lockfile, **/composer.json, **/composer.lock'alwaysApply:true---# Software Composition Analysis (SCA) Rule (Endor Labs via MCP)This project uses Endor Labs for automated dependency (SCA) scanning, integrated through the MCP server as configured in `.vscode/mcp.json`.## WorkflowEvery time a manifest or lockfile listed above is created or modified in any way immediately do the following prior to performing your next task.**Important**:Do not proceed after creating or modifying a manifest file without running this first. Do not write any other code or continue with your existing prompt. This is top priority whenever a manifest file is created or updated.- Run `endor-cli-tools` using the `check_dependency_for_vulnerabilities` tool via the MCP server.- Provide the **ecosystem**, **dependency name**, and **version** always when making this tool call. Do not forget to provide a version.- If a vulnerability or error is identified:- Upgrade to the suggested safe version, or- Replace the dependency with a non-vulnerable alternative.- The AI agent must attempt to automatically correct all detected errors and vulnerabilities before session completion.- Re-run the check using `endor-cli-tools` to confirm the issue is resolved.- If an error occurs in any MCP server tool call (such as missing required parameters like version, invalid arguments, or tool invocation failures):- The AI agent must review the error, determine the cause, and automatically correct the tool call or input parameters.- Re-attempt the tool call with the corrected parameters.- Continue this process until the tool call succeeds or it is determined that remediation is not possible, in which case the issue and reason must be reported.## Notes- All scans must be performed using the MCP server integration (`endor-cli-tools`) as configured in `.vscode/mcp.json`. Do not invoke `endorctl` directly.- For troubleshooting, ensure the MCP server is running and `endorctl` is installed and accessible in your environment.This rule ensures that all dependency changes are evaluated for risk at the time of introduction, and that the project remains clean and secure after each coding session. The scan may be performed at the end of an agent session, provided all modifications are checked and remediated before session completion.
---description:"Scan for leaked secrets on file modification"applyTo:'**/*'alwaysApply:true---# Leaked Secrets Detection Rule (Endor Labs via MCP)This project uses @Endor Labs for automated security scanning, integrated through the MCP server as configured in `.vscode/mcp.json`.## WorkflowWhenever a file is modified in the repository, and before the end of an agent session:- Run `endor-cli-tools` using the `scan` tool via the MCP server to check for leaked secrets.- Ensure the scan includes all file types and respects `.gitignore` unless otherwise configured.- If any secrets or errors are detected:- Remove the exposed secret or correct the error immediately.- The AI agent must attempt to automatically correct all detected secrets and errors before session completion.- Re-run the scan to verify the secret or error has been properly removed or resolved.- If an error occurs in any MCP server tool call (such as missing required parameters like version, invalid arguments, or tool invocation failures):- The AI agent must review the error, determine the cause, and automatically correct the tool call or input parameters.- Re-attempt the tool call with the corrected parameters.- Continue this process until the tool call succeeds or it is determined that remediation is not possible, in which case the issue and reason must be reported.- Save scan results and remediation steps in a security log or as comments for audit purposes.## Notes- All scans must be performed using the MCP server integration (`endor-cli-tools`) as configured in `.vscode/mcp.json`. Do not invoke `endorctl` directly.- For troubleshooting, ensure the MCP server is running and `endorctl` is installed and accessible in your environment.- **Important**:This scan must use the path of the directory from which the changed files are in. Do not attempt to set the path directly to a file as it must be a directory. Use absolute paths like /Users/username/mcp-server-demo/backend rather than relative paths like 'backend'This rule ensures no accidental credentials, tokens, API keys, or secrets are committed or remain in the project history. The scan may be performed at the end of an agent session, provided all modifications are checked and remediated before session completion.
---description:"Run SAST scan using endor-cli-tools on source code changes"applyTo:'**/*.c, **/*.cpp, **/*.cc, **/*.cs, **/*.go, **/*.java, **/*.js, **/*.jsx, **/*.ts, **/*.tsx, **/*.py, **/*.php, **/*.rb, **/*.rs, **/*.kt, **/*.kts, **/*.scala, **/*.swift, **/*.dart, **/*.html, **/*.yaml, **/*.yml, **/*.json, **/*.xml, **/*.sh, **/*.bash, **/*.clj, **/*.cljs, **/*.ex, **/*.exs, **/*.lua'alwaysApply:true---# Static Application Security Testing (SAST) Rule (Endor Labs via MCP)This project uses @Endor Labs for automated SAST, integrated through the MCP server as configured in `.vscode/mcp.json`.## WorkflowWhenever a file is modified in the repository, and before the end of an agent session perform the following workflow:- Run `endor-cli-tools` using the `scan` tool via the MCP server to perform SAST scans as described above.- If any vulnerabilities or errors are found:- Present the issues to the user.- The AI agent must attempt to automatically correct all errors and vulnerabilities, including code errors, security issues, and best practice violations, before session completion.- Recommend and apply appropriate fixes (e.g., input sanitization, validation, escaping, secure APIs).- Continue scanning and correcting until all critical issues have been resolved or no further automated remediation is possible.- If an error occurs in any MCP server tool call (such as missing required parameters like version, invalid arguments, or tool invocation failures):- The AI agent must review the error, determine the cause, and automatically correct the tool call or input parameters.- Re-attempt the tool call with the corrected parameters.- Continue this process until the tool call succeeds or it is determined that remediation is not possible, in which case the issue and reason must be reported.- Save scan results and remediation steps in a security log or as comments for audit purposes.## Notes- All scans must be performed using the MCP server integration (`endor-cli-tools`) as configured in `.vscode/mcp.json`. Do not invoke `endorctl` directly.- For troubleshooting, ensure the MCP server is running and `endorctl` is installed and accessible in your environment.- Do not invoke Opengrep directly.- **Important**:This scan must use the path of the directory from which the changed files are in. Do not attempt to set the path directly to a file as it must be a directory. Use absolute paths like /Users/username/mcp-server-demo/backend rather than relative paths like 'backend'This rule ensures all code changes are automatically reviewed and remediated for common security vulnerabilities and errors using `endor-cli-tools` and the MCP server, with Opengrep as the underlying engine.
Watch how to use Endor Labs with Visual Studio Code
Troubleshooting
Use the following troubleshooting steps to resolve common issues with the Endor Labs MCP server.
MCP server shows as disconnected or errored
Verify Node.js and npx are available: run npx --version in your terminal. If the command fails, install Node.js version 18 or later.
Restart your IDE or CLI to reload the MCP server configuration.
Check your config for syntax errors. Use a JSON or TOML validator, or switch to the configuration tool or CLI command instead of manual editing.
Authentication browser window does not open
Ensure your IDE or CLI can open a browser. Check firewall or security software that might block browser launch.
For Enterprise Edition, confirm ENDOR_MCP_SERVER_AUTH_MODE is set correctly (google, github, gitlab, or sso). For SSO, ensure ENDOR_MCP_SERVER_AUTH_TENANT is provided.
endorctl download times out
If npx -y endorctl hangs or times out (for example, behind a corporate proxy or firewall), install endorctl globally and update your MCP config to use it. For more information, see Install endorctl.
After installing endorctl, update your MCP config to call endorctl directly instead of npx.
Alternatively, configure your proxy settings for npm.
Tools return errors when invoked
If you are using the Enterprise Edition, verify whether your namespace is correct and that your user has Read-Only permissions. See Authorization policies for details.
Ensure endorctl is on your PATH if you installed it globally instead of using npx.
Check that the working directory or project path is valid when invoking tools.
Config file has a syntax error and the IDE gives no useful message
IDEs often fail silently on invalid configuration. Validate your config file (for example, .cursor/mcp.json, .vscode/mcp.json, .mcp.json, or .codex/config.toml) with a JSON or TOML linter. Alternatively, use the configuration tool or CLI command for your platform instead of editing the file manually.
Prerequisites for Endor Labs MCP server on Windows
On Windows, ensure the following prerequisites are met:
If Node.js is not installed, download and install the LTS version from nodejs.org. During installation, ensure the option to add Node.js to PATH is selected.
Configure the PATH environment variable
After installing Node.js, verify that the npm global bin directory is in your PATH:
Run the following command in the command line.
npmconfiggetprefix
This returns the npm global directory path, typically C:\Users\<YourUsername>\AppData\Roaming\npm.
Add the npm global directory path to the Path variable under User variables in your system’s environment variables settings.
Restart for the PATH changes to take effect.
Verify the setup
Run the following command in your terminal.
npx--version
If this returns a version number, your Windows setup is complete and the MCP server can use npx to run endorctl.
Endor Labs MCP server in Devin
Beta
The Endor Labs MCP server helps developers and AI agents in the following ways:
Provide guardrails for agents before code review: Reduce the number of known vulnerabilities entering your code and save developers time by checking AI agent suggestions in real time. Integrate security before an issue is discovered in CI or in production.
Improve the speed of remediating security risks: Agents use vulnerability context from Endor Labs to help implement secure changes, from writing more secure code to upgrading dependencies.
The Endor Labs MCP server integrates directly into Devin to scan your code as you write, catching security issues before they reach production.
Developer Edition not supported
The Endor Labs MCP server Developer Edition is currently not supported with Devin AI.
The following sections walk you through setting up the Endor Labs MCP server:
The Endor Labs MCP server provides the following tools:
check_dependency_for_vulnerabilities: Check if a dependency in your project is vulnerable.
check_dependency_for_risks: Check a dependency for security risks including vulnerabilities and malware.
get_endor_vulnerability: Get the details of a specific vulnerability from the Endor Labs vulnerability database.
get_resource: Retrieve additional context from commonly used Endor Labs resources about your software, such as findings, vulnerabilities, and projects.
scan: Run an Endor Labs security scan to detect risks in your open source dependencies, find common security issues, and spot any credentials accidentally exposed in your Git repository.
security_review: Perform security review analysis on code diffs. Analyzes local uncommitted changes (both staged and unstaged) compared to HEAD, or diffs between the main branch and the last commit. Requires the Enterprise Edition. You must specify your namespace in the MCP server configuration. You must also enable AI security code review for your namespace in the Endor Labs platform. See AI security code review for setup instructions.
After you set up the MCP server, you can choose to disable the tools that you do not want to use.
Add Endor Labs MCP server through the MCP Marketplace
Click the server to view its details and manage its tools.
Configure Devin Knowledge
To enhance the MCP server integration, you can add instructions through Devin Knowledge. Knowledge entries guide Devin’s AI development with your project-specific instructions.
Create a new Knowledge entry for Endor Labs security scanning.
Add appropriate instructions for your project. For example, you can add a rule to check if the code is free from vulnerabilities.
You can also create a Playbook to automate security scanning workflows with the Endor Labs MCP server.
Example Knowledge instructions
You can use the following Knowledge instructions as a quick start for the Endor Labs MCP server. Modify the instructions to meet your specific organization’s needs. For more information, refer to the Devin Knowledge documentation.
# Software Composition Analysis (SCA) Rule (Endor Labs MCP server)
This project uses Endor Labs for automated dependency (SCA) scanning, integrated through the MCP server.
## Workflow
Every time a manifest or lockfile (`package.json`, `requirements.txt`, `go.mod`, `pom.xml`, etc.) is created or modified in any way, immediately do the following prior to performing your next task.
**Important**: Do not proceed after creating or modifying a manifest file without running this first.
- Run `endor-cli-tools` using the `check_dependency_for_vulnerabilities` tool via the MCP server.
- Provide the **ecosystem**, **dependency name**, and **version** always when making this tool call.
- If a vulnerability or error is identified:
- Upgrade to the suggested safe version, or
- Replace the dependency with a non-vulnerable alternative.
- Re-run the check using `endor-cli-tools` to confirm the issue is resolved.
## Notes
- All scans must be performed using the MCP server integration (`endor-cli-tools`). Do not invoke `endorctl` directly.
# Leaked Secrets Detection Rule (Endor Labs MCP server)
This project uses Endor Labs for automated security scanning, integrated through the MCP server.
## Workflow
Whenever a file is modified in the repository, and before the end of a session:
- Run `endor-cli-tools` using the `scan` tool via the MCP server to check for leaked secrets.
- If any secrets or errors are detected:
- Remove the exposed secret or correct the error immediately.
- Re-run the scan to verify the secret has been properly removed.
- Save scan results and remediation steps in a security log or as comments for audit purposes.
## Notes
- All scans must be performed using the MCP server integration (`endor-cli-tools`). Do not invoke `endorctl` directly.
- This scan must use the path of the directory from which the changed files are in. Use absolute paths.
# Static Application Security Testing (SAST) Rule (Endor Labs MCP server)
This project uses Endor Labs for automated SAST, integrated through the MCP server.
## Workflow
Whenever a file is modified in the repository, and before the end of a session:
- Run `endor-cli-tools` using the `scan` tool via the MCP server to perform SAST scans.
- If any vulnerabilities or errors are found:
- Present the issues to the user.
- Recommend and apply appropriate fixes (e.g., input sanitization, validation, escaping, secure APIs).
- Save scan results and remediation steps in a security log or as comments for audit purposes.
## Notes
- All scans must be performed using the MCP server integration (`endor-cli-tools`). Do not invoke `endorctl` directly.
- Do not invoke Opengrep directly.
- This scan must use the path of the directory from which the changed files are in. Use absolute paths.
Watch how to use Endor Labs with Devin
Troubleshooting
Use the following troubleshooting steps to resolve common issues with the Endor Labs MCP server.
MCP server shows as disconnected or errored
Verify Node.js and npx are available: run npx --version in your terminal. If the command fails, install Node.js version 18 or later.
Restart your IDE or CLI to reload the MCP server configuration.
Check your config for syntax errors. Use a JSON or TOML validator, or switch to the configuration tool or CLI command instead of manual editing.
Authentication browser window does not open
Ensure your IDE or CLI can open a browser. Check firewall or security software that might block browser launch.
For Enterprise Edition, confirm ENDOR_MCP_SERVER_AUTH_MODE is set correctly (google, github, gitlab, or sso). For SSO, ensure ENDOR_MCP_SERVER_AUTH_TENANT is provided.
endorctl download times out
If npx -y endorctl hangs or times out (for example, behind a corporate proxy or firewall), install endorctl globally and update your MCP config to use it. For more information, see Install endorctl.
After installing endorctl, update your MCP config to call endorctl directly instead of npx.
Alternatively, configure your proxy settings for npm.
Tools return errors when invoked
If you are using the Enterprise Edition, verify whether your namespace is correct and that your user has Read-Only permissions. See Authorization policies for details.
Ensure endorctl is on your PATH if you installed it globally instead of using npx.
Check that the working directory or project path is valid when invoking tools.
Config file has a syntax error and the IDE gives no useful message
IDEs often fail silently on invalid configuration. Validate your config file (for example, .cursor/mcp.json, .vscode/mcp.json, .mcp.json, or .codex/config.toml) with a JSON or TOML linter. Alternatively, use the configuration tool or CLI command for your platform instead of editing the file manually.
Endor Labs MCP server in Gemini CLI
Beta
The Endor Labs MCP server helps developers and AI agents in the following ways:
Provide guardrails for agents before code review: Reduce the number of known vulnerabilities entering your code and save developers time by checking AI agent suggestions in real time. Integrate security before an issue is discovered in CI or in production.
Improve the speed of remediating security risks: Agents use vulnerability context from Endor Labs to help implement secure changes, from writing more secure code to upgrading dependencies.
The Endor Labs MCP server integrates directly into Gemini CLI to scan your code as you write, catching security issues before they reach production.
Node.js version 18 or later (required if you don’t have endorctl installed)
Interactive setup through Gemini CLI
Select your edition, fill in any required fields, and click Copy to get the command that adds the Endor Labs MCP server to Gemini CLI.
Endor Labs MCP Server Installation
Configure your edition and copy the command to add the MCP server to Gemini CLI.
View manual configuration
Tools in the Endor Labs MCP server
The Endor Labs MCP server provides the following tools:
check_dependency_for_vulnerabilities: Check if a dependency in your project is vulnerable.
check_dependency_for_risks: Check a dependency for security risks including vulnerabilities and malware.
get_endor_vulnerability: Get the details of a specific vulnerability from the Endor Labs vulnerability database.
get_resource: Retrieve additional context from commonly used Endor Labs resources about your software, such as findings, vulnerabilities, and projects.
scan: Run an Endor Labs security scan to detect risks in your open source dependencies, find common security issues, and spot any credentials accidentally exposed in your Git repository.
security_review: Perform security review analysis on code diffs. Analyzes local uncommitted changes (both staged and unstaged) compared to HEAD, or diffs between the main branch and the last commit. Requires the Enterprise Edition. You must specify your namespace in the MCP server configuration. You must also enable AI security code review for your namespace in the Endor Labs platform. See AI security code review for setup instructions.
After you set up the MCP server, you can choose to disable the tools that you do not want to use.
Choose your edition
The Endor Labs MCP server has two editions:
Developer Edition: A free edition that requires no configuration. A browser window opens on first use for authentication via GitHub, GitLab, or Google. The Developer Edition provides access to default security policies from Endor Labs.
Enterprise Edition: A paid edition that enforces your organization’s specific security policies. Authenticate using GitHub, GitLab, Google, or SSO. You must specify your namespace to access your organization’s policies.
Additionally, if you already have Endor Labs configured locally (for example, from a previous endorctl init command), the MCP server can use your pre-existing configuration.
Developer Edition
The Endor Labs MCP server works out of the box with the Developer Edition. When you use the MCP server for the first time, a browser window opens, and you can authenticate with GitHub, GitLab, or Google. After authentication, the MCP server provides access to the free Developer Edition with the default security policies.
Developer Edition: Add the MCP server with a single command
Run the following command to add the MCP server to your project. This adds the server with -s project (shared with everyone in the project). See Scope options for other scopes.
Developer Edition: Add the MCP server with settings.json configuration
Add the following to your .gemini/settings.json file in the root of your repository. This uses project scope, which is shared with everyone working on the repository.
If you already have a local Endor Labs configuration from a previous endorctl init, add -e ENDOR_TOKEN=automatic to the CLI command (or "ENDOR_TOKEN": "automatic" to the env section in settings.json). The MCP server reuses your existing configuration without requiring additional setup.
Developer Edition: Verify the installation
/mcp list
Confirm that endor-cli-tools appears in the list. You can also use /mcp in Gemini CLI to view active MCP servers.
Try a test prompt
After installing the MCP server, try the following prompt in your AI chat or CLI to verify that the tools are working.
Check if the npm package lodash version 4.17.20 has any vulnerabilities
The MCP server uses the check_dependency_for_vulnerabilities tool to check for known vulnerabilities and return the results. If you see a response with vulnerability details, the MCP server is working correctly.
Enterprise Edition
For Enterprise Edition, you need your organization’s Endor Labs namespace and an authentication method. Ensure that your developers have Read-Only permissions to Endor Labs. See Authorization policies for more details.
Use the interactive setup tool above to configure your organization’s namespace and authentication method, and set up the MCP server.
Enterprise Edition: Add the MCP server with a single command
Replace <namespace> with your Endor Labs namespace and choose your authentication mode.
The following parameters are used to configure the MCP server. All parameters are optional. If no parameters are provided, the MCP server defaults to the Developer Edition with browser authentication.
ENDOR_MCP_SERVER_AUTH_MODE: (Optional) The authentication mode to use for the MCP server. You can use the following authentication modes: github, gitlab, google, sso. If you choose sso, you must add ENDOR_MCP_SERVER_AUTH_TENANT as an additional parameter. If not specified, the MCP server defaults to browser authentication for the Developer Edition.
ENDOR_NAMESPACE: (Optional) The namespace to use for the MCP server. Required for Enterprise Edition to access your organization’s specific policies. Not needed for Developer Edition.
ENDOR_TOKEN: (Optional) Set to automatic to reuse an existing local endorctl configuration. When set to automatic, the MCP server skips browser authentication and uses your stored credentials. Do not set this to any other value; the MCP server manages the token internally during authentication.
ENDOR_MCP_SERVER_AUTH_TENANT: (Optional) The tenant name for SSO authentication. Required when ENDOR_MCP_SERVER_AUTH_MODE is set to sso for Enterprise Edition access.
Enterprise Edition: Verify the installation
/mcp list
Confirm that endor-cli-tools appears in the list. You can also use /mcp in Gemini CLI to view active MCP servers.
Try a test prompt
After installing the MCP server, try the following prompt in your AI chat or CLI to verify that the tools are working.
Check if the npm package lodash version 4.17.20 has any vulnerabilities
The MCP server uses the check_dependency_for_vulnerabilities tool to check for known vulnerabilities and return the results. If you see a response with vulnerability details, the MCP server is working correctly.
Scope options
Gemini CLI supports two MCP configuration scopes:
-s project: Shared with everyone in the project via .gemini/settings.json file (default).
-s user: Available to you across all projects via ~/.gemini/settings.json.
Manage MCP servers
/mcp list
In Gemini CLI, use /mcp to view and manage your active MCP servers.
Configure GEMINI.md
To enhance the MCP server integration, you can add instructions in GEMINI.md at the root of your repository. Gemini CLI reads GEMINI.md files to guide AI development with your project-specific instructions.
Navigate to the root of your repository.
Create or edit the GEMINI.md file in the root of your repository.
Add appropriate rules for your project. For example, you can add a rule to check if the code is free from vulnerabilities.
Example GEMINI.md instructions
You can use the following GEMINI.md instructions as a quick start for the Endor Labs MCP server. Modify the instructions to meet your specific organization’s needs. For more information, refer to the Gemini CLI documentation.
# Software Composition Analysis (SCA) Rule (Endor Labs via MCP)
This project uses Endor Labs for automated dependency (SCA) scanning, integrated through the MCP server.
## Workflow
Every time a manifest or lockfile (package.json, requirements.txt, go.mod, pom.xml, etc.) is created or modified in any way, immediately do the following prior to performing your next task.
**Important**: Do not proceed after creating or modifying a manifest file without running this first.
- Run `endor-cli-tools` using the `check_dependency_for_vulnerabilities` tool via the MCP server.
- Provide the **ecosystem**, **dependency name**, and **version** always when making this tool call.
- If a vulnerability or error is identified:
- Upgrade to the suggested safe version, or
- Replace the dependency with a non-vulnerable alternative.
- Re-run the check using `endor-cli-tools` to confirm the issue is resolved.
## Notes
- All scans must be performed using the MCP server integration (`endor-cli-tools`). Do not invoke `endorctl` directly.
# Leaked Secrets Detection Rule (Endor Labs via MCP)
This project uses [Endor Labs](https://docs.endorlabs.com/) for automated security scanning, integrated through the MCP server.
## Workflow
Whenever a file is modified in the repository, and before the end of an agent session:
- Run `endor-cli-tools` using the `scan` tool via the MCP server to check for leaked secrets.
- If any secrets or errors are detected:
- Remove the exposed secret or correct the error immediately.
- Re-run the scan to verify the secret has been properly removed.
- Save scan results and remediation steps in a security log or as comments for audit purposes.
## Notes
- All scans must be performed using the MCP server integration (`endor-cli-tools`). Do not invoke `endorctl` directly.
- This scan must use the path of the directory from which the changed files are in. Use absolute paths.
# Static Application Security Testing (SAST) Rule (Endor Labs via MCP)
This project uses [Endor Labs](https://docs.endorlabs.com/) for automated SAST, integrated through the MCP server.
## Workflow
Whenever a file is modified in the repository, and before the end of an agent session:
- Run `endor-cli-tools` using the `scan` tool via the MCP server to perform SAST scans.
- If any vulnerabilities or errors are found:
- Present the issues to the user.
- Recommend and apply appropriate fixes (e.g., input sanitization, validation, escaping, secure APIs).
- Save scan results and remediation steps in a security log or as comments for audit purposes.
## Notes
- All scans must be performed using the MCP server integration (`endor-cli-tools`). Do not invoke `endorctl` directly.
- Do not invoke Opengrep directly.
- This scan must use the path of the directory from which the changed files are in. Use absolute paths.
Install the MCP server as a Gemini extension
As an alternative to the MCP server configuration, you can install the Endor Labs MCP server as a Gemini extension. You can find the extension on GitHub.
No additional configuration is required for Developer Edition. When you first use a tool, a browser window opens allowing you to authenticate with GitHub, GitLab, or Google.
For Enterprise Edition, use a natural language command in Gemini CLI to initiate an authentication flow with your organization’s namespace after installing the extension. For example:
Initialize Endor Labs with Google authentication using the command endorctl init --auth-mode=google
Troubleshooting
Use the following troubleshooting steps to resolve common issues with the Endor Labs MCP server.
MCP server shows as disconnected or errored
Verify Node.js and npx are available: run npx --version in your terminal. If the command fails, install Node.js version 18 or later.
Restart your IDE or CLI to reload the MCP server configuration.
Check your config for syntax errors. Use a JSON or TOML validator, or switch to the configuration tool or CLI command instead of manual editing.
Authentication browser window does not open
Ensure your IDE or CLI can open a browser. Check firewall or security software that might block browser launch.
For Enterprise Edition, confirm ENDOR_MCP_SERVER_AUTH_MODE is set correctly (google, github, gitlab, or sso). For SSO, ensure ENDOR_MCP_SERVER_AUTH_TENANT is provided.
endorctl download times out
If npx -y endorctl hangs or times out (for example, behind a corporate proxy or firewall), install endorctl globally and update your MCP config to use it. For more information, see Install endorctl.
After installing endorctl, update your MCP config to call endorctl directly instead of npx.
Alternatively, configure your proxy settings for npm.
Tools return errors when invoked
If you are using the Enterprise Edition, verify whether your namespace is correct and that your user has Read-Only permissions. See Authorization policies for details.
Ensure endorctl is on your PATH if you installed it globally instead of using npx.
Check that the working directory or project path is valid when invoking tools.
Config file has a syntax error and the IDE gives no useful message
IDEs often fail silently on invalid configuration. Validate your config file (for example, .cursor/mcp.json, .vscode/mcp.json, .mcp.json, or .codex/config.toml) with a JSON or TOML linter. Alternatively, use the configuration tool or CLI command for your platform instead of editing the file manually.
Endor Labs MCP server in Augment Code
Beta
The Endor Labs MCP server helps developers and AI agents in the following ways:
Provide guardrails for agents before code review: Reduce the number of known vulnerabilities entering your code and save developers time by checking AI agent suggestions in real time. Integrate security before an issue is discovered in CI or in production.
Improve the speed of remediating security risks: Agents use vulnerability context from Endor Labs to help implement secure changes, from writing more secure code to upgrading dependencies.
The Endor Labs MCP server integrates directly into Augment Code to scan your code as you write, catching security issues before they reach production.
The following sections walk you through setting up the Endor Labs MCP server:
Use the interactive configuration tool to generate the JSON configuration for the MCP server. Select your edition, fill in any required fields, and click Generate. Then paste the JSON into Augment Code’s Import from JSON in the MCP settings.
Already have endorctl configured?
Entering edition or namespace details in the configuration tool when you already have a local Endor Labs configuration from a previous endorctl init causes conflicts. Select Use pre-existing configuration if available, or follow the manual setup instructions below and add "ENDOR_TOKEN": "automatic" to reuse your existing configuration.
Endor Labs MCP Server Installation
Configure your MCP server parameters and generate a json configuration.
MCP server configuration for mcp.json
Tools in the Endor Labs MCP server
The Endor Labs MCP server provides the following tools:
check_dependency_for_vulnerabilities: Check if a dependency in your project is vulnerable.
check_dependency_for_risks: Check a dependency for security risks including vulnerabilities and malware.
get_endor_vulnerability: Get the details of a specific vulnerability from the Endor Labs vulnerability database.
get_resource: Retrieve additional context from commonly used Endor Labs resources about your software, such as findings, vulnerabilities, and projects.
scan: Run an Endor Labs security scan to detect risks in your open source dependencies, find common security issues, and spot any credentials accidentally exposed in your Git repository.
security_review: Perform security review analysis on code diffs. Analyzes local uncommitted changes (both staged and unstaged) compared to HEAD, or diffs between the main branch and the last commit. Requires the Enterprise Edition. You must specify your namespace in the MCP server configuration. You must also enable AI security code review for your namespace in the Endor Labs platform. See AI security code review for setup instructions.
After you set up the MCP server, you can choose to disable the tools that you do not want to use.
Choose your edition
The Endor Labs MCP server has two editions:
Developer Edition: A free edition that requires no configuration. A browser window opens on first use for authentication via GitHub, GitLab, or Google. The Developer Edition provides access to default security policies from Endor Labs.
Enterprise Edition: A paid edition that enforces your organization’s specific security policies. Authenticate using GitHub, GitLab, Google, or SSO. You must specify your namespace to access your organization’s policies.
Additionally, if you already have Endor Labs configured locally (for example, from a previous endorctl init command), the MCP server can use your pre-existing configuration.
Developer Edition
The Endor Labs MCP server works out of the box with the Developer Edition. When you use the MCP server for the first time, a browser window opens, and you can authenticate with GitHub, GitLab, or Google. After authentication, the MCP server provides access to the free Developer Edition with the default security policies.
If you already have a local Endor Labs configuration from a previous endorctl init, use the following configuration instead to reuse your existing credentials:
Open the Augment Code extension in Visual Studio Code.
Click the Settings icon in the upper right of the Augment panel.
In the MCP section, click + to add a new MCP server.
Fill in the following fields:
Name: endor-cli-tools
Command: npx -y endorctl ai-tools mcp-server
Already have endorctl configured?
If you already have a local Endor Labs configuration from a previous endorctl init, add ENDOR_TOKEN: automatic in the Environment variables section. The MCP server reuses your existing configuration without requiring additional setup.
Click Save to add the server.
Developer Edition: Verify the installation
Open the Augment Code extension in Visual Studio Code.
Click the Settings icon and confirm that endor-cli-tools appears in the MCP section.
Try a test prompt
After installing the MCP server, try the following prompt in your AI chat or CLI to verify that the tools are working.
Check if the npm package lodash version 4.17.20 has any vulnerabilities
The MCP server uses the check_dependency_for_vulnerabilities tool to check for known vulnerabilities and return the results. If you see a response with vulnerability details, the MCP server is working correctly.
Enterprise Edition
For Enterprise Edition, you need your organization’s Endor Labs namespace and an authentication method. Ensure that your developers have Read-Only permissions to Endor Labs. See Authorization policies for more details.
You can use the interactive setup tool above or set up the MCP server manually.
Enterprise Edition: Import from JSON
Open the Augment Code extension in Visual Studio Code.
Click the Settings icon in the upper right of the Augment panel.
In the MCP section, click Import from JSON.
Already have endorctl configured?
If you already have a local Endor Labs configuration from a previous endorctl init, use a minimal config with only "ENDOR_TOKEN": "automatic" in the env section. Do not add ENDOR_NAMESPACE or ENDOR_MCP_SERVER_AUTH_MODE—that causes conflicts. The MCP server reuses your existing configuration.
Replace <namespace> with your Endor Labs namespace and choose your authentication mode. If you choose sso, you must also add ENDOR_MCP_SERVER_AUTH_TENANT to the env section.
Enterprise Edition: Use the settings panel
Open the Augment Code extension in Visual Studio Code.
Click the Settings icon in the upper right of the Augment panel.
In the MCP section, click + to add a new MCP server.
Fill in the following fields:
Name: endor-cli-tools
Command: npx -y endorctl ai-tools mcp-server
In the Environment variables section, add:
ENDOR_NAMESPACE: Your Endor Labs namespace
ENDOR_MCP_SERVER_AUTH_MODE: Your authentication mode (google, github, gitlab, or sso)
ENDOR_TOKEN: automatic
Already have endorctl configured?
If you already have a local Endor Labs configuration from a previous endorctl init, add only ENDOR_TOKEN: automatic. Do not add ENDOR_NAMESPACE or ENDOR_MCP_SERVER_AUTH_MODE—that causes conflicts. The MCP server reuses your existing configuration.
If you chose sso as the authentication mode, also add:
ENDOR_MCP_SERVER_AUTH_TENANT: Your tenant name
Click Save to add the server.
The following parameters are used to configure the MCP server. All parameters are optional. If no parameters are provided, the MCP server defaults to the Developer Edition with browser authentication.
ENDOR_MCP_SERVER_AUTH_MODE: (Optional) The authentication mode to use for the MCP server. You can use the following authentication modes: github, gitlab, google, sso. If you choose sso, you must add ENDOR_MCP_SERVER_AUTH_TENANT as an additional parameter. If not specified, the MCP server defaults to browser authentication for the Developer Edition.
ENDOR_NAMESPACE: (Optional) The namespace to use for the MCP server. Required for Enterprise Edition to access your organization’s specific policies. Not needed for Developer Edition.
ENDOR_TOKEN: (Optional) Set to automatic to reuse an existing local endorctl configuration. When set to automatic, the MCP server skips browser authentication and uses your stored credentials. Do not set this to any other value; the MCP server manages the token internally during authentication.
ENDOR_MCP_SERVER_AUTH_TENANT: (Optional) The tenant name for SSO authentication. Required when ENDOR_MCP_SERVER_AUTH_MODE is set to sso for Enterprise Edition access.
Enterprise Edition: Verify the installation
Open the Augment Code extension in Visual Studio Code.
Click the Settings icon and confirm that endor-cli-tools appears in the MCP section.
Try a test prompt
After installing the MCP server, try the following prompt in your AI chat or CLI to verify that the tools are working.
Check if the npm package lodash version 4.17.20 has any vulnerabilities
The MCP server uses the check_dependency_for_vulnerabilities tool to check for known vulnerabilities and return the results. If you see a response with vulnerability details, the MCP server is working correctly.
Manage MCP server tools
Open the Augment Code extension in Visual Studio Code.
Click the Settings icon in the upper right of the Augment panel.
In the MCP section, click the … button next to endor-cli-tools.
Edit the configuration or remove the server as needed.
Watch how to use Endor Labs with Augment Code
Troubleshooting
Use the following troubleshooting steps to resolve common issues with the Endor Labs MCP server.
MCP server shows as disconnected or errored
Verify Node.js and npx are available: run npx --version in your terminal. If the command fails, install Node.js version 18 or later.
Restart your IDE or CLI to reload the MCP server configuration.
Check your config for syntax errors. Use a JSON or TOML validator, or switch to the configuration tool or CLI command instead of manual editing.
Authentication browser window does not open
Ensure your IDE or CLI can open a browser. Check firewall or security software that might block browser launch.
For Enterprise Edition, confirm ENDOR_MCP_SERVER_AUTH_MODE is set correctly (google, github, gitlab, or sso). For SSO, ensure ENDOR_MCP_SERVER_AUTH_TENANT is provided.
endorctl download times out
If npx -y endorctl hangs or times out (for example, behind a corporate proxy or firewall), install endorctl globally and update your MCP config to use it. For more information, see Install endorctl.
After installing endorctl, update your MCP config to call endorctl directly instead of npx.
Alternatively, configure your proxy settings for npm.
Tools return errors when invoked
If you are using the Enterprise Edition, verify whether your namespace is correct and that your user has Read-Only permissions. See Authorization policies for details.
Ensure endorctl is on your PATH if you installed it globally instead of using npx.
Check that the working directory or project path is valid when invoking tools.
Config file has a syntax error and the IDE gives no useful message
IDEs often fail silently on invalid configuration. Validate your config file (for example, .cursor/mcp.json, .vscode/mcp.json, .mcp.json, or .codex/config.toml) with a JSON or TOML linter. Alternatively, use the configuration tool or CLI command for your platform instead of editing the file manually.
Prerequisites for Endor Labs MCP server on Windows
On Windows, ensure the following prerequisites are met:
If Node.js is not installed, download and install the LTS version from nodejs.org. During installation, ensure the option to add Node.js to PATH is selected.
Configure the PATH environment variable
After installing Node.js, verify that the npm global bin directory is in your PATH:
Run the following command in the command line.
npmconfiggetprefix
This returns the npm global directory path, typically C:\Users\<YourUsername>\AppData\Roaming\npm.
Add the npm global directory path to the Path variable under User variables in your system’s environment variables settings.
Restart for the PATH changes to take effect.
Verify the setup
Run the following command in your terminal.
npx--version
If this returns a version number, your Windows setup is complete and the MCP server can use npx to run endorctl.
Endor Labs MCP server in IntelliJ IDEA
Beta
The Endor Labs MCP server helps developers and AI agents in the following ways:
Provide guardrails for agents before code review: Reduce the number of known vulnerabilities entering your code and save developers time by checking AI agent suggestions in real time. Integrate security before an issue is discovered in CI or in production.
Improve the speed of remediating security risks: Agents use vulnerability context from Endor Labs to help implement secure changes, from writing more secure code to upgrading dependencies.
The Endor Labs MCP server integrates directly into IntelliJ IDEA to scan your code as you write, catching security issues before they reach production.
The following sections walk you through setting up the Endor Labs MCP server:
Use the interactive configuration tool to set up the MCP server. The tool supports both the Developer Edition and the Enterprise Edition. Select your edition from the dropdown, configure your settings, and follow the instructions.
Already have endorctl configured?
Entering edition or namespace details in the configuration tool when you already have a local Endor Labs configuration from a previous endorctl init causes conflicts. Select Use pre-existing configuration if available, or follow the manual setup instructions below and add "ENDOR_TOKEN": "automatic" to reuse your existing configuration.
Endor Labs MCP Server Installation
Configure your MCP server parameters and generate a json configuration.
MCP server configuration for mcp.json
Tools in the Endor Labs MCP server
The Endor Labs MCP server provides the following tools:
check_dependency_for_vulnerabilities: Check if a dependency in your project is vulnerable.
check_dependency_for_risks: Check a dependency for security risks including vulnerabilities and malware.
get_endor_vulnerability: Get the details of a specific vulnerability from the Endor Labs vulnerability database.
get_resource: Retrieve additional context from commonly used Endor Labs resources about your software, such as findings, vulnerabilities, and projects.
scan: Run an Endor Labs security scan to detect risks in your open source dependencies, find common security issues, and spot any credentials accidentally exposed in your Git repository.
security_review: Perform security review analysis on code diffs. Analyzes local uncommitted changes (both staged and unstaged) compared to HEAD, or diffs between the main branch and the last commit. Requires the Enterprise Edition. You must specify your namespace in the MCP server configuration. You must also enable AI security code review for your namespace in the Endor Labs platform. See AI security code review for setup instructions.
After you set up the MCP server, you can choose to disable the tools that you do not want to use.
Choose your edition
The Endor Labs MCP server has two editions:
Developer Edition: A free edition that requires no configuration. A browser window opens on first use for authentication via GitHub, GitLab, or Google. The Developer Edition provides access to default security policies from Endor Labs.
Enterprise Edition: A paid edition that enforces your organization’s specific security policies. Authenticate using GitHub, GitLab, Google, or SSO. You must specify your namespace to access your organization’s policies.
Additionally, if you already have Endor Labs configured locally (for example, from a previous endorctl init command), the MCP server can use your pre-existing configuration.
Developer Edition
The Endor Labs MCP server works out of the box with the Developer Edition. When you use the MCP server for the first time, a browser window opens, and you can authenticate with GitHub, GitLab, or Google. After authentication, the MCP server provides access to the free Developer Edition with the default security policies.
If you already have a local Endor Labs configuration from a previous endorctl init, add "ENDOR_TOKEN": "automatic" to the env section. The MCP server reuses your existing configuration without requiring additional setup.
Save and close the mcp.json.
Switch from Agent to Ask mode in the chat and then back to Agent mode to reload the MCP server.
Developer Edition: Verify the installation
In the GitHub Copilot Chat, switch to Agent mode.
Click Configure Tools and confirm that endor-cli-tools appears in the list.
Try a test prompt
After installing the MCP server, try the following prompt in your AI chat or CLI to verify that the tools are working.
Check if the npm package lodash version 4.17.20 has any vulnerabilities
The MCP server uses the check_dependency_for_vulnerabilities tool to check for known vulnerabilities and return the results. If you see a response with vulnerability details, the MCP server is working correctly.
Enterprise Edition
For Enterprise Edition, you need your organization’s Endor Labs namespace and an authentication method. Ensure that your developers have Read-Only permissions to Endor Labs. See Authorization policies for more details.
You can use the interactive setup tool above or set up the MCP server manually.
Enterprise Edition: Manual installation
Open GitHub Copilot Chat from the right sidebar.
Switch to Agent mode.
Click Configure Tools.
Select + Add More Tools… from the bottom left corner to open the mcp.json file.
Add the following configuration to the mcp.json file.
Replace <namespace> with your Endor Labs namespace and choose your authentication mode. If you choose sso, you must also add ENDOR_MCP_SERVER_AUTH_TENANT to the env section.
The following parameters are used to configure the MCP server. All parameters are optional. If no parameters are provided, the MCP server defaults to the Developer Edition with browser authentication.
ENDOR_MCP_SERVER_AUTH_MODE: (Optional) The authentication mode to use for the MCP server. You can use the following authentication modes: github, gitlab, google, sso. If you choose sso, you must add ENDOR_MCP_SERVER_AUTH_TENANT as an additional parameter. If not specified, the MCP server defaults to browser authentication for the Developer Edition.
ENDOR_NAMESPACE: (Optional) The namespace to use for the MCP server. Required for Enterprise Edition to access your organization’s specific policies. Not needed for Developer Edition.
ENDOR_TOKEN: (Optional) Set to automatic to reuse an existing local endorctl configuration. When set to automatic, the MCP server skips browser authentication and uses your stored credentials. Do not set this to any other value; the MCP server manages the token internally during authentication.
ENDOR_MCP_SERVER_AUTH_TENANT: (Optional) The tenant name for SSO authentication. Required when ENDOR_MCP_SERVER_AUTH_MODE is set to sso for Enterprise Edition access.
Save and close the mcp.json.
Switch from Agent to Ask mode in the chat and then back to Agent mode to reload the MCP server.
Click Configure Tools and select endor-cli-tools.
Enterprise Edition: Verify the installation
In the GitHub Copilot Chat, switch to Agent mode.
Click Configure Tools and confirm that endor-cli-tools appears in the list.
Try a test prompt
After installing the MCP server, try the following prompt in your AI chat or CLI to verify that the tools are working.
Check if the npm package lodash version 4.17.20 has any vulnerabilities
The MCP server uses the check_dependency_for_vulnerabilities tool to check for known vulnerabilities and return the results. If you see a response with vulnerability details, the MCP server is working correctly.
Copilot instructions define the guidelines that Copilot should follow throughout the development process. The following examples demonstrate how to use the Endor Labs MCP server within Copilot rules.
---description:"Dependency vulnerability scanning using Endor Labs via MCP server integration"applyTo:'**/package.json, **/package-lock.json, **/yarn.lock, **/pnpm-lock.yaml, **/requirements.txt, **/Pipfile, **/Pipfile.lock, **/pyproject.toml, **/poetry.lock, **/go.mod, **/go.sum, **/Cargo.toml, **/Cargo.lock, **/pom.xml, **/build.gradle, **/build.gradle.kts, **/gradle.lockfile, **/composer.json, **/composer.lock'---# Software Composition Analysis (SCA) Rule (Endor Labs via MCP)This project uses Endor Labs for automated dependency (SCA) scanning, integrated through the MCP server as configured in `mcp.json`.## WorkflowEvery time a manifest or lockfile listed above is created or modified in any way immediately do the following prior to performing your next task.**Important**:Do not proceed after creating or modifying a manifest file without running this first. Do not write any other code or continue with your existing prompt. This is top priority whenever a manifest file is created or updated.- Run `endor-cli-tools` using the `check_dependency_for_vulnerabilities` tool via the MCP server.- Provide the **ecosystem**, **dependency name**, and **version** always when making this tool call. Do not forget to provide a version.- If a vulnerability or error is identified:- Upgrade to the suggested safe version, or- Replace the dependency with a non-vulnerable alternative.- The AI agent must attempt to automatically correct all detected errors and vulnerabilities before session completion.- Re-run the check using `endor-cli-tools` to confirm the issue is resolved.- If an error occurs in any MCP server tool call (such as missing required parameters like version, invalid arguments, or tool invocation failures):- The AI agent must review the error, determine the cause, and automatically correct the tool call or input parameters.- Re-attempt the tool call with the corrected parameters.- Continue this process until the tool call succeeds or it is determined that remediation is not possible, in which case the issue and reason must be reported.## Notes- All scans must be performed using the MCP server integration (`endor-cli-tools`) as configured in `mcp.json`. Do not invoke `endorctl` directly.- For troubleshooting, ensure the MCP server is running and `endorctl` is installed and accessible in your environment.This rule ensures that all dependency changes are evaluated for risk at the time of introduction, and that the project remains clean and secure after each coding session. The scan may be performed at the end of an agent session, provided all modifications are checked and remediated before session completion.
---description:"Scan for leaked secrets on file modification using Endor Labs via MCP server integration"applyTo:'**/*'---# Leaked Secrets Detection Rule (Endor Labs via MCP)This project uses [Endor Labs](https://docs.endorlabs.com/) for automated security scanning, integrated through the MCP server as configured in `mcp.json`.## WorkflowWhenever a file is modified in the repository, and before the end of an agent session:- Run `endor-cli-tools` using the `scan` tool via the MCP server to check for leaked secrets.- Ensure the scan includes all file types and respects `.gitignore` unless otherwise configured.- If any secrets or errors are detected:- Remove the exposed secret or correct the error immediately.- The AI agent must attempt to automatically correct all detected secrets and errors before session completion.- Re-run the scan to verify the secret or error has been properly removed or resolved.- If an error occurs in any MCP server tool call (such as missing required parameters like version, invalid arguments, or tool invocation failures):- The AI agent must review the error, determine the cause, and automatically correct the tool call or input parameters.- Re-attempt the tool call with the corrected parameters.- Continue this process until the tool call succeeds or it is determined that remediation is not possible, in which case the issue and reason must be reported.- Save scan results and remediation steps in a security log or as comments for audit purposes.## Notes- All scans must be performed using the MCP server integration (`endor-cli-tools`) as configured in `mcp.json`. Do not invoke `endorctl` directly.- For troubleshooting, ensure the MCP server is running and `endorctl` is installed and accessible in your environment.- **Important**:This scan must use the path of the directory from which the changed files are in. Do not attempt to set the path directly to a file as it must be a directory. Use absolute paths like /Users/username/mcp-server-demo/backend rather than relative paths like 'backend'This rule ensures no accidental credentials, tokens, API keys, or secrets are committed or remain in the project history. The scan may be performed at the end of an agent session, provided all modifications are checked and remediated before session completion.
---description:"Static Application Security Testing (SAST) using Endor Labs via MCP server integration"applyTo:'**/*.c, **/*.cpp, **/*.cc, **/*.cs, **/*.go, **/*.java, **/*.js, **/*.jsx, **/*.ts, **/*.tsx, **/*.py, **/*.php, **/*.rb, **/*.rs, **/*.kt, **/*.kts, **/*.scala, **/*.swift, **/*.dart, **/*.html, **/*.yaml, **/*.yml, **/*.json, **/*.xml, **/*.sh, **/*.bash, **/*.clj, **/*.cljs, **/*.ex, **/*.exs, **/*.lua'---# Static Application Security Testing (SAST) Rule (Endor Labs via MCP)This project uses [Endor Labs](https://docs.endorlabs.com/) for automated SAST, integrated through the MCP server as configured in `mcp.json`.## WorkflowWhenever a file is modified in the repository, and before the end of an agent session perform the following workflow:- Run `endor-cli-tools` using the `scan` tool via the MCP server to perform SAST scans as described above.- If any vulnerabilities or errors are found:- Present the issues to the user.- The AI agent must attempt to automatically correct all errors and vulnerabilities, including code errors, security issues, and best practice violations, before session completion.- Recommend and apply appropriate fixes (e.g., input sanitization, validation, escaping, secure APIs).- Continue scanning and correcting until all critical issues have been resolved or no further automated remediation is possible.- If an error occurs in any MCP server tool call (such as missing required parameters like version, invalid arguments, or tool invocation failures):- The AI agent must review the error, determine the cause, and automatically correct the tool call or input parameters.- Re-attempt the tool call with the corrected parameters.- Continue this process until the tool call succeeds or it is determined that remediation is not possible, in which case the issue and reason must be reported.- Save scan results and remediation steps in a security log or as comments for audit purposes.## Notes- All scans must be performed using the MCP server integration (`endor-cli-tools`) as configured in `mcp.json`. Do not invoke `endorctl` directly.- For troubleshooting, ensure the MCP server is running and `endorctl` is installed and accessible in your environment.- Do not invoke Opengrep directly.- **Important**:This scan must use the path of the directory from which the changed files are in. Do not attempt to set the path directly to a file as it must be a directory. Use absolute paths like /Users/username/mcp-server-demo/backend rather than relative paths like 'backend'This rule ensures all code changes are automatically reviewed and remediated for common security vulnerabilities and errors using `endor-cli-tools` and the MCP server, with Opengrep as the underlying engine.
Watch how to use Endor Labs with IntelliJ IDEA
Troubleshooting
Use the following troubleshooting steps to resolve common issues with the Endor Labs MCP server.
MCP server shows as disconnected or errored
Verify Node.js and npx are available: run npx --version in your terminal. If the command fails, install Node.js version 18 or later.
Restart your IDE or CLI to reload the MCP server configuration.
Check your config for syntax errors. Use a JSON or TOML validator, or switch to the configuration tool or CLI command instead of manual editing.
Authentication browser window does not open
Ensure your IDE or CLI can open a browser. Check firewall or security software that might block browser launch.
For Enterprise Edition, confirm ENDOR_MCP_SERVER_AUTH_MODE is set correctly (google, github, gitlab, or sso). For SSO, ensure ENDOR_MCP_SERVER_AUTH_TENANT is provided.
endorctl download times out
If npx -y endorctl hangs or times out (for example, behind a corporate proxy or firewall), install endorctl globally and update your MCP config to use it. For more information, see Install endorctl.
After installing endorctl, update your MCP config to call endorctl directly instead of npx.
Alternatively, configure your proxy settings for npm.
Tools return errors when invoked
If you are using the Enterprise Edition, verify whether your namespace is correct and that your user has Read-Only permissions. See Authorization policies for details.
Ensure endorctl is on your PATH if you installed it globally instead of using npx.
Check that the working directory or project path is valid when invoking tools.
Config file has a syntax error and the IDE gives no useful message
IDEs often fail silently on invalid configuration. Validate your config file (for example, .cursor/mcp.json, .vscode/mcp.json, .mcp.json, or .codex/config.toml) with a JSON or TOML linter. Alternatively, use the configuration tool or CLI command for your platform instead of editing the file manually.
Prerequisites for Endor Labs MCP server on Windows
On Windows, ensure the following prerequisites are met:
If Node.js is not installed, download and install the LTS version from nodejs.org. During installation, ensure the option to add Node.js to PATH is selected.
Configure the PATH environment variable
After installing Node.js, verify that the npm global bin directory is in your PATH:
Run the following command in the command line.
npmconfiggetprefix
This returns the npm global directory path, typically C:\Users\<YourUsername>\AppData\Roaming\npm.
Add the npm global directory path to the Path variable under User variables in your system’s environment variables settings.
Restart for the PATH changes to take effect.
Verify the setup
Run the following command in your terminal.
npx--version
If this returns a version number, your Windows setup is complete and the MCP server can use npx to run endorctl.
Skills
Beta
Endor Labs Skills are pre-built AI agent instructions that automate common security workflows using endorctl. Skills provide structured prompts that guide your AI coding assistant through tasks like installing and configuring endorctl, authenticating with identity providers, scanning repositories for vulnerabilities, checking dependencies for vulnerabilities, and running secrets and SAST scans.
Endor Labs Skills work with AI coding agents that support project-level instructions, such as Claude Code and Cursor, with support for more AI coding agents coming soon. Each skill defines a specific security workflow, including trigger commands, required context, and expected output format.
Available skills
The following skills are available for installation:
endor-setup: Install, authenticate, and configure endorctl automatically. Then run security scans for vulnerabilities, secrets, and SAST directly from your AI coding agent with zero manual setup.
Endor Labs skills integrate directly into Cursor to guide the AI assistant with reusable security workflows, catching security issues before they reach production.
The following sections walk you through setting up Endor Labs skills in Cursor:
You need Node.js v18+ for this method. Run the following from your project root to install all Endor Labs skills. The skills package detects Cursor automatically and installs skills into .cursor/skills/.
npx skills add endorlabs/ai-plugins
Use skills with Cursor
“Set up endorctl and authenticate with Endor Labs.”
“Run endorctl scan for this repo”
“Run endorctl quick scan for this repo”
Endor Labs skills in Claude Code
Beta
Endor Labs skills integrate directly into Claude Code to guide the AI assistant with reusable security workflows, catching security issues before they reach production.
The following sections walk you through setting up Endor Labs skills in Claude Code:
Install the Endor Labs plugin from the Claude Code (Terminal) plugin marketplace. This is the recommended way to get the full plugin experience.
In Claude Code, run:
/plugin marketplace add endorlabs/ai-plugins
Then run:
/plugin install ai-plugins@endorlabs
Install skills only (npx)
You need Node.js v18+ for this method. From your project root, run the following to install only the skills (without the full plugin). The skills package detects Claude Code and installs skills into .claude/skills/. This method is only useful if you want skills alone.
npx skills add endorlabs/ai-plugins
Use skills with Claude Code
“Set up endorctl and authenticate with Endor Labs.”
“Run endorctl scan for this repo”
“Run endorctl quick scan for this repo”
CLI (endorctl)
Perform software composition analysis, dependency management, or detect secrets in your code using Endor Labs.
Download and install endorctl
Use one of the following methods to download and install endorctl on your local system. After you install endorctl, you must authenticate. Then you can start scanning your code.
Install endorctl with Homebrew
Use Homebrew to efficiently install endorctl on macOS and Linux operating systems making it easy to manage dependencies, and track installed packages with their versions.
Install endorctl from the Endor Labs tap with Homebrew by running the following commands. The tap is updated regularly with the latest endorctl release.
brew tap endorlabs/tap
brew install endorctl
Install endorctl with npm
Use npm to efficiently install endorctl on macOS, Linux, and Windows operating systems making it easy to manage dependencies, track and update installed packages and their versions.
Make sure that you have npm installed in your local environment and use the following command to install endorctl.
npm install -g endorctl
Run the following command to get the npm global bin directory.
npm config get prefix
Edit your shell configuration file and insert the path you obtained from the previous command.
exportPATH="/path/to/npm/global/bin:$PATH"
Reload your shell configuration and verify endorctl is installed.
endorctl --version
To update your version of endorctl, run the following command.
npm update -g endorctl
endorctl is available as an npm package and is updated regularly with the latest endorctl release.
Download and install the endorctl binary directly
To download the endorctl binary directly use the following commands:
## Download the latest CLI for Linux amd64curl https://api.endorlabs.com/download/latest/endorctl_linux_amd64 -o endorctl
## Verify the checksum of the binaryecho"$(curl -s https://api.endorlabs.com/sha/latest/endorctl_linux_amd64) endorctl"| sha256sum -c
## Modify the permissions of the binary to ensure it is executablechmod +x ./endorctl
## Create an alias endorctl of the binary to ensure it is available in other directoryaliasendorctl="$PWD/endorctl"
### Download the latest CLI for MacOS ARM64curl https://api.endorlabs.com/download/latest/endorctl_macos_arm64 -o endorctl
### Verify the checksum of the binaryecho"$(curl -s https://api.endorlabs.com/sha/latest/endorctl_macos_arm64) endorctl"| shasum -a 256 -c
### Modify the permissions of the binary to ensure it is executablechmod +x ./endorctl
### Create an alias endorctl of the binary to ensure it is available in other directoryaliasendorctl="$PWD/endorctl"
## Download the latest CLI for Windows amd64curl -O https://api.endorlabs.com/download/latest/endorctl_windows_amd64.exe
## Check the expected checksum of the binary filecurl https://api.endorlabs.com/sha/latest/endorctl_windows_amd64.exe
## Verify the expected checksum and the actual checksum of the binary matchcertutil -hashfile .\endorctl_windows_amd64.exe SHA256
## Rename the binary fileren endorctl_windows_amd64.exe endorctl.exe
You can also view these instructions via the Endor Labs application user interface:
Sign in to Endor Labs.
Select Projects from the left sidebar.
Click Add Project.
Choose CLI.
Follow the on-screen instructions to download and install the appropriate version and architecture of endorctl for your system.
Authenticate to Endor Labs
Users can authenticate to Endor Labs several ways:
To log in with an API key you’ll need to set the following environment variables:
ENDOR_API_CREDENTIALS_KEY - The API key used to authenticate against the Endor Labs API.
ENDOR_API_CREDENTIALS_SECRET - The API key secret used to authenticate against the Endor Labs API.
ENDOR_NAMESPACE - The Endor Labs namespace you would like to scan against. You can locate the namespace from the top left hand corner of the screen under the Endor Labs logo on the Endor Labs application.
To get an API Key and secret for use with endorctl, see Managing API Keys.
To set your environment variables run the following commands and replace each example with the appropriate value.
Once you’ve exported your environment variables you can test successful authentication by running the following command to list projects in your namespace.
endorctl api list -r Project --page-size=1
Note
If you do not have any projects in your namespace you will get an empty json output, which means you are successfully authenticated.
Print your access token
Once you have successfully initialized endorctl, you can print your access token with the following command.
endorctl auth --print-access-token
The token has an expiration time of 4 hours.
Persistently set environment variables for endorctl
To persistently set an environment variable, append the environment variable and the value to ~/.endorctl/config.yaml. This configuration file is for CLI usage.
For example, if your GitHub Enterprise Server URL was https://api.github.com you can set the variable to persist in your configuration using the following command.
CI Scans are used to focus team’s attention and establish development workflows on the most actionable issues, prioritizing the development team’s time. CI Scans can be triggered directly from automated CI/CD pipelines, looking for new vulnerabilities relative to the baseline established for the target branch. These CI Scans provide immediate feedback to developers in the form of PR comments and can also enforce policies to break builds, block PRs, send notifications, open tickets, and more. CI scans are the most actionable method to prevent vulnerabilities from entering your repositories.
Note
Git must be installed and available where endorctl scan runs. If your pipeline does not include it, install it in your job or use a runner image that provides it. Refer to Git documentation for installation instructions.
See scanning strategies to learn techniques for effectively scanning and monitoring different versions of your projects with Endor Labs.
endorctl is a command line utility designed to bring the functionality of Endor Labs into your software delivery workflows. endorctl has several command flags to help you facilitate operational and security risk monitoring. Developers can integrate Endor Labs into Continuous Integration Workflows using the endorctl scan.
endorctl scan - You can use endorctl scan to monitor your projects using Endor Labs, and you can update the scan information each time to keep monitoring the project for new findings. The endorctl scan command will scan a specific version of your repository, such as the default branch, a tagged release version, or a commit SHA.
endorctl scan --pr - You can use the endorctl scan --pr command to scan a specific version of your source code for security and operational risks as part of your continuous integration workflows or CI runs. The endorctl scan --pr command performs a one-time evaluation of your project, focusing on security and operational risks, rather than providing continuous monitoring. CI runs are shown in the Scan History section of each project and are stored for three weeks so that you can analyze and review them on the Endor Labs user interface. See PR scans for more information.
Any continuous integration workflows generally run using the endorctl scan --pr command unless a scan is run on a created tag release, a push to the default or specific branch, or a commit SHA that will be deployed to production.
Clone depth
For scans to succeed, configure shallow clone in your CI job to include the ref and commit you intend to scan. Set ENDOR_SCAN_SHALLOW_CLONE=true in your environment to use shallow clone when Endor Labs clones the repository.
Authenticating in CI with Keyless Authentication
Keyless Authentication enhances security and minimizes the expenses associated with secret rotation. Keyless authentication is Endor Labs recommended path to scan your projects in the CI workflows. See Keyless Authentication for more information.
Set up keyless authentication
At Endor Labs, we believe that the most secure secret is one that doesn’t exist. That’s why in CI/CD environments we recommend using keyless authentication for machine authentication. Keyless Authentication uses OAuth for API authentication and removes the need to maintain and rotate an API key to Endor Labs.
Keyless Authentication is more secure and reduces the cost of secret rotation.
GitHub Actions is a continuous integration and continuous delivery (CI/CD) platform that allows you to automate your build, test, and deployment pipeline.
You can use GitHub Actions to include Endor Labs into your CI pipeline seamlessly.
Using this pipeline, developers can view and detect:
Policy violations in the source code
Secrets inadvertently included in the source code
The Endor Labs verifications are conducted as automated checks and help you discover violations before pushing code to the repository. Information about the violations can be included as comments on the corresponding pull request (PR). This enables developers to easily identify issues and take remedial measures early in the development life cycle.
For policy violations, the workflow is designed to either emit a warning or return an error based on your action policy configurations.
For secrets discovered in the commits, developers can view the PR comments and take necessary remedial measures.
Install Software Prerequisites
To ensure the successful execution of the Endor Labs GitHub action, the following prerequisites must be met:
The GitHub action must be able to authenticate with the Endor Labs API.
You must have the value of the Endor Labs namespace handy for authentication.
You must have access to the Endor Labs API.
If you use keyless authentication, you must set an authorization policy in Endor Labs. See Authorization policies for details.
Example GitHub Action Workflow
Endor Labs scanning workflow using GitHub Actions that accomplishes the following tasks in your CI environment:
Tests PRs to the default branch and monitors the most recent push to the default branch.
Builds a Java project and sets up the Java build tools. If your project is not on Java, then configure this workflow with your project-specific steps and build tools.
Authenticates to Endor Labs with GitHub Actions keyless authentication.
Scan with Endor Labs.
Comments on PRs if any policy violations occur.
Generates findings and uploads results to GitHub in SARIF format.
The following example workflow shows how to scan with Endor Labs for a Java application using the recommended keyless authentication for GitHub Actions.
name:Endor Labs Dependency and Secrets Scanon:push:branches:[main ]pull_request:branches:[main ]jobs:scan:permissions:security-events:write# Used to upload Sarif artifact to GitHubcontents:read# Used to check out a private repositoryactions:read# Required for private repositories to upload Sarif files. GitHub Advanced Security licenses are required.id-token:write# Used for keyless authentication with Endor Labspull-requests:write# Required to automatically comment on PRs for new policy violationsruns-on:ubuntu-lateststeps:- name:Checkout Repositoryuses:actions/checkout@v3- name:Setup Javauses:actions/setup-java@v3with:distribution:'microsoft'java-version:'17'- name:Build Packagerun:mvn clean install- name:Endor Labs Scan Pull Requestif:github.event_name == 'pull_request'uses:endorlabs/github-action@v1# Replace v1 with the commit SHA of the latest version of the GitHub Action for enhanced securitywith:namespace:'example'# Replace with your Endor Labs tenant namespacescan_dependencies:truescan_secrets:truepr:trueenable_pr_comments:true# Required to automatically comment on PRs for new policy violationsgithub_token:${{ secrets.GITHUB_TOKEN }}# Required for PR comments on new policy violationsscan-main:permissions:id-token:writerepository-projects:readpull-requests:readcontents:readname:endorctl-scanruns-on:ubuntu-lateststeps:- name:Checkout Repositoryuses:actions/checkout@v3- name:Setup Javauses:actions/setup-java@v3with:distribution:'microsoft'java-version:'17'- name:Build Packagerun:mvn clean install- name:'Endor Labs Scan Push to main'if:${{ github.event_name == 'push' }}uses:endorlabs/github-action@v1# Replace v1 with the commit SHA of the latest version of the GitHub Action for enhanced securitywith:namespace:'example'# Replace with your Endor Labs tenant namespacescan_dependencies:truescan_secrets:truepr:falsescan_summary_output_type:'table'sarif_file:'findings.sarif'- name:Upload findings to githubuses:github/codeql-action/upload-sarif@v3with:sarif_file:'findings.sarif'
Set up branch tracking in GitHub Actions
In Git, a detached HEAD state occurs when the repository checks out a specific commit instead of a branch reference. In this state, Git points the HEAD directly to a commit hash, without associating it with a named branch. As a result, actions performed, such as creating new commits or running automated scans, do not carry branch identity unless explicitly specified.
Proper branch context enables Endor Labs to:
Associate scans with the correct branch
Identify scans on the monitored default branch
Track findings and display metrics accurately across branches
Without proper branch configuration, Endor Labs may create multiple branch entries for the same logical branch, leading to fragmented reporting and inaccurate metrics.
GitHub Actions typically maintains proper branch context automatically. However, to ensure scans are properly tracked, when using the Endor Labs GitHub Action, set pr: false to create monitored versions that appear on dashboards. Use if: github.event_name == 'push' to trigger only on pushes to the default branch:
- name:Endor Labs Scan Push to mainif:github.event_name == 'push'uses:endorlabs/github-action@v1with:namespace:'example'scan_dependencies:truepr:false
Scan containers with OS reachability
You can use the Endor Labs GitHub Action to scan container images with OS reachability enabled. Container reachability identifies which packages inside a container image are actually used at runtime, helping you prioritize the most critical vulnerabilities for remediation. Set scan_container: true and os_reachability: true to enable container scanning with reachability analysis:
- name:Scan container with OS reachabilityuses:endorlabs/github-action@mainwith:namespace:'example'enable_github_action_token:'true'scan_container:truescan_dependencies:falseimage:"nginx:latest"os_reachability:truepr:falseproject_name:'my-project'
Secure GitHub Actions with immutable commit SHA
Endor Labs recommends pinning the commit SHA of the GitHub Actions to enhance security. By pinning GitHub Actions to a commit SHA, you make the code immutable even if the tag version is changed or the code is updated.
To find the Endor Labs GitHub action’s latest commit SHA:
The commit SHA is the 40-character alphanumeric string in the URL after /commit/.
Authenticate with Endor Labs
Endor Labs recommends using keyless authentication in CI environments. Keyless authentication is more secure and reduces the cost of secret rotation. To set up keyless authentication see Keyless Authentication.
If you choose not to use keyless authentication, you can configure an API key and secret in GitHub for authentication as outlined in Managing API keys.
Authentication Without Keyless Authentication for GitHub
If you are not using keyless authentication for GitHub Actions, you must not provide id-token: write permissions to your GitHub token unless specifically required by a step in this job. You must also set enable_github_action_token: false in your Endor Labs GitHub Action configuration.
The following example configuration uses the Endor Labs API key for authentication:
- name:Scan with Endor Labsuses:endorlabs/github-action@v1# Replace v1 with the commit SHA of the latest version of the GitHub Action for enhanced securitywith:namespace:'example'api_key:${{ secrets.ENDOR_API_CREDENTIALS_KEY }}api_secret:${{ secrets.ENDOR_API_CREDENTIALS_SECRET }}enable_github_action_token:false
The following example configuration uses a GCP service account for keyless authentication to Endor Labs:
- name:Scan with Endor Labsuses:endorlabs/github-action@v1# Replace v1 with the commit SHA of the latest version of the GitHub Action for enhanced securitywith:namespace:'example'gcp_service_account:'<Insert_Your_Service_Account>@<Insert_Your_Project>.iam.gserviceaccount.com'enable_github_action_token:false
Endor Labs GitHub Action Configuration Parameters
The following input configuration parameters are supported for the Endor Labs GitHub Action:
Common parameters
Endor Labs GitHub Actions supports the following input global parameters:
Flags
Description
api_key
Set the API key used to authenticate with Endor Labs.
api_secret
Set the secret corresponding to the API key used to authenticate with Endor Labs.
enable_github_action_token
Set to false if you prefer to use another form of authentication over GitHub action OIDC tokens. (Default: true)
endorctl_checksum
Set to the checksum associated with a pinned version of endorctl.
endorctl_version
Set to a version of endorctl to pin this specific version for use. Defaults to the latest version.
gcp_service_account
Set the target service account for GCP based authentication. GCP authentication is only enabled if this flag is set. Cannot be used with api_key.
log_level
Set the log level. (Default: info)
log_verbose
Set to true to enable verbose logging. (Default: false)
namespace
Set to the namespace of the project that you are working with. (Required)
Scanning parameters
The following input parameters are also supported for the Endor Labs GitHub Action when used for scanning:
Flags
Description
additional_args
Use additional_args with endorctl scan for advanced scenarios. However, no example use case currently exists as standard options suffice for typical needs.
use-bazel
Enable the usage of Bazel for the scan. (Default: false)
bazel_exclude_targets
Specify a list of Bazel targets to exclude from the scan.
bazel_include_targets
Specify a list of Bazel targets to scan. If bazel_targets_include is not set, the bazel_targets_query value is used to determine which Bazel targets to scan.
bazel_targets_query
Specify a Bazel query to determine which Bazel targets to scan. Ignored if bazel_targets_include is set.
pr
Set to false to track this scan as a monitored version within Endor Labs, as opposed to a point-in-time policy and finding test for a PR. (Default: true)
enable_pr_comments
Set to true to publish new findings as review comments. Requires pr and github_token. Additionally, the pull-requests: write permissions must be set in the workflow. (Default: false)
pr_baseline
Set to the Git reference that you are merging to, such as the default branch. Enables endorctl to compare findings, so developers are only alerted to issues in the current changeset. Example: pr_baseline: "main". Note: Not needed if enable_pr_comments is set to true.
github_token
Set the token used to authenticate with GitHub. Mandatory if enable_pr_comments is set to true
run_stats
Set to false to disable reporting of CPU/RAM/time scan statistics via time -v (sometimes required on Windows runners). (Default: true)
phantom_dependencies
Set to true to enable phantom dependency analysis. (Default: false)
project_name
Specify a project name for a container image scan or a package scan.
image
Specify a container image to scan.
tags
Specify a list of user-defined tags to add to this scan. You can use tags to search and filter scans later.
scan_dependencies
Scan Git commits and generate findings for all dependencies. (Default: true)
scan_git_logs
Perform a more complete and detailed scan of secrets in the repository history. Must be used together with scan_secrets. (Default: false)
scan_github_actions
Scan source code repository for GitHub Actions used in workflow files to analyze vulnerabilities and malware. (Default: false)
scan_path
Set the path of the directory to scan. (Default: .)
scan_secrets
Scan the source code repository and generate findings for secrets. See also scan_git_logs. (Default: false)
scan_tools
Scan source code repository for CI/CD tools. (Default: false)
scan_package
Scan a specified artifact or a package. Set the path to an artifact with scan_path. (Default: false)
scan_container
Scan a specified container image. The image must be set with image and a project can be defined with project_name. (Default: false)
os_reachability
Enable OS reachability analysis for container image scans. When set to true, Endor Labs profiles the container at runtime to determine which OS packages are actually used, helping prioritize vulnerability remediation. Must be used with scan_container. (Default: false)
scan_sast
Scan the source code repository and generate findings for SAST. (Default: false)
disable_code_snippet_storage
Disable code snippet storage for SAST scans. (Default: false)
scan_summary_output_type
Set the desired output format to table, json, yaml, or summary. (Default: json)
sarif_file
Set to a path on your GitHub runner to store the analysis results in SARIF format.
export_scan_result_artifact
Set to false to disable the json scan result artifact export. (Default: true)
output_file
Set a file to save the scan results. Use this instead of export_scan_result_artifact to save any scan results data to a file in the workspace for processing by others steps in the same job, instead of the workflow run log.
Note
To enable AI SAST analysis, set the additional_args parameter to --ai-sast-analysis=agent-fallback.
Environmental variables
You can use the following environmental variable for the Endor Labs GitHub Action:
Flags
Description
ENDOR_JS_ENABLE_TSSERVER
Set to false to skip installing tsserver when function reachability analysis is not required for JavaScript/TypeScript projects.
Artifact scanning parameters
Use the following parameters and the latest sign action endorlabs/github-action/sign@version to build artifact signing through Endor Labs GitHub Actions.
The optional parameters are required only if enable_github_action_token in common parameters is false. If true (default value), GitHub automatically populates the optional and other parameters as token claims and sends them to Endor Labs.
Flags
Required
Description
artifact_name
Mandatory
Set to the name of the artifact to be signed.
source_repository_ref
Optional
Set to the repository reference on which the build run was based. For example, ref/tags/v1.0.1.
certificate_oidc_issuer
Optional
Set to the OIDC issuer of the token expected in the certificate. For example, https://token.actions.githubusercontent.com.
Artifact verifying parameters
Use the following verification parameters and the latest verify action endorlabs/github-action/verify@version to build artifact verification through Endor Labs GitHub Actions.
Flags
Required
Description
artifact_name
Mandatory
Set to the name of the artifact to be verified.
certificate_oidc_issuer
Mandatory
Set to the OIDC issuer of the token expected in the certificate. For example, https://token.actions.githubusercontent.com.
Scanning with Jenkins
Jenkins is an open-source automation server widely used for building, testing, and deploying software. Specifically in the context of CI/CD pipelines, Jenkins serves as a powerful tool to automate various stages of the software development lifecycle.
To integrate Endor Labs into your Jenkins CI/CD processes:
If you choose not to use keyless authentication you can configure an API key and secret in Jenkins for authentication using the following steps. See managing API keys for more information on generating an API key for Endor Labs.
In your Jenkins environment, navigate to Manage Jenkins.
Enter a credential name for reference such as endorlabs or reuse an existing context.
Click into your new or existing context. Add any project restrictions and select Add Environment Variable.
In Environment Variable Name, enter ENDOR_API_CREDENTIALS_KEY and in Value, enter the Endor Labs API Key.
Select Add Environment Variable.
Install Node.js plugin in Jenkins
See Jenkins documentation to install Node.js plugin in Jenkins. You must have the Node.js plugin to use npm and download endorctl.
Configure your Jenkins pipeline
Important
Jenkins often checks out commits in a detached HEAD state, which can lead to fragmented branch tracking in Endor Labs. See Set up branch tracking in Jenkins to configure proper branch context.
To create a Jenkins pipeline:
Create a configuration pipeline file in your repository if you do not already have one using the pipeline project.
Ensure that the context you created is part of the workflow if you are not using keyless authentication.
Adjust the image field to conform to the required build tools for constructing your software packages, and synchronize your build steps with those of your project.
Update your Endor Labs tenant namespace to the appropriate namespace for your project.
Update your default branch from main if you do not use main as the default branch name.
Modify any dependency or artifact caches to align with the languages and caches used by your project.
Examples
Use the following examples to get started. Make sure to customize this job with your specific build environment and build steps.
Simple Jenkins configuration using npm
pipeline { agent any
tools {nodejs "NodeJS"} environment {ENDOR_API= credentials('ENDOR_API')ENDOR_NAMESPACE= credentials('ENDOR_NAMESPACE')ENDOR_API_CREDENTIALS_KEY= credentials('ENDOR_API_CREDENTIALS_KEY_1')ENDOR_API_CREDENTIALS_SECRET= credentials('ENDOR_API_CREDENTIALS_SECRET_1')} stages { stage('Checkout'){ steps { // Checkout the Git repository
checkout scmGit(branches: [[name: '*/main']], userRemoteConfigs: [[url: 'https://github.com/endorlabstest/app-java-demo.git']])}} stage('Build'){ steps { // Perform any build steps if required
sh 'mvn clean install'}} stage('endorctl Scan'){ steps { script { // Define the Node.js installation name configured in Jenkins
NODEJS_HOME= tool name: 'NodeJS', type: 'jenkins.plugins.nodejs.tools.NodeJSInstallation'PATH="$NODEJS_HOME/bin:${env.PATH}"} // Download and install endorctl.
sh 'npm install -g endorctl' // Check endorctl version and installation.
sh 'endorctl --version' // Run the scan.
sh('endorctl scan -a $ENDOR_API -n $ENDOR_NAMESPACE --api-key $ENDOR_API_CREDENTIALS_KEY --api-secret $ENDOR_API_CREDENTIALS_SECRET')}} stage('Results'){ steps { // Publish or process the vulnerability scan results
// Publish reports, fail the build on vulnerabilities, etc.
echo'Publish results'}}}}
Jenkins pipe line for curl to download endorctl binary
The following example includes curl to download the endorctl binary.
pipeline { agent any
// Endorctl scan uses following environment variables to the trigger endorctl scan
environment {ENDOR_API= credentials('ENDOR_API')ENDOR_NAMESPACE= credentials('ENDOR_NAMESPACE')ENDOR_API_CREDENTIALS_KEY= credentials('ENDOR_API_CREDENTIALS_KEY')ENDOR_API_CREDENTIALS_SECRET= credentials('ENDOR_API_CREDENTIALS_SECRET')} stages { // Not required if repository is allready cloned to trigger a endorctl scan
stage('Checkout'){ steps { // Checkout the Git repository
checkout scmGit(branches: [[name: '*/main']], userRemoteConfigs: [[url: 'https://github.com/endorlabstest/app-java-demo.git']])}} stage('Build'){ // Not required if project is already built
steps { // Perform any build steps if required
sh 'mvn clean install'}} stage('endorctl Scan'){ steps { // Download and install endorctl.
sh '''#!/bin/bash
echo "Downloading latest version of endorctl"
VERSION=$(curl $ENDOR_API/meta/version | jq -r '.ClientVersion')
ENDORCTL_SHA=$(curl $ENDOR_API/meta/version | jq -r '.ClientChecksums.ARCH_TYPE_LINUX_AMD64')
curl $ENDOR_API/download/endorlabs/"$VERSION"/binaries/endorctl_"$VERSION"_linux_amd64 -o endorctl
echo "$ENDORCTL_SHA endorctl" | sha256sum -c
if [ $? -ne 0 ]; then
echo "Integrity check failed"
exit 1
fi
chmod +x ./endorctl
// Check endorctl version and installation.
./endorctl --version
// Run the scan.
./endorctl scan -a $ENDOR_API -n $ENDOR_NAMESPACE --api-key $ENDOR_API_CREDENTIALS_KEY --api-secret $ENDOR_API_CREDENTIALS_SECRET
'''}}}}
Once you’ve set up Endor Labs you can test your CI implementation is successful and begin scanning.
SAST scans in Jenkins
You can run SAST scans in your Jenkins pipeline to identify security vulnerabilities and code quality issues in your source code. SAST scanning analyzes your source code for potential security weaknesses based on enabled rules and generates findings based on your configured finding policies.
SAST scan
To run a SAST scan, add the --sast flag to your endorctl scan command.
To enable AI SAST analysis, add the --sast and --ai-sast-analysis=agent-fallback flags to your endorctl scan command. The AI agent automatically classifies findings as true positives or false positives, reducing the need for manual triage.
To re-analyze all findings, including those that have already been analyzed, add the --ai-sast-rescan flag.
Set up branch tracking in Jenkins
In Git, a detached HEAD state occurs when the repository checks out a specific commit instead of a branch reference. In this state, Git points the HEAD directly to a commit hash, without associating it with a named branch. As a result, actions performed, such as creating new commits or running automated scans, do not carry branch identity unless explicitly specified.
Proper branch context enables Endor Labs to:
Associate scans with the correct branch
Identify scans on the monitored default branch
Track findings and display metrics accurately across branches
Without proper branch configuration, Endor Labs may create multiple branch entries for the same logical branch, leading to fragmented reporting and inaccurate metrics.
Jenkins often checks out commits by their SHA instead of the branch name, which creates a detached HEAD state.
Use --detached-ref-name only to specify the branch name for a commit in detached HEAD state. This associates the commit with the correct branch without setting it as the default branch.
Use both --detached-ref-name and --as-default-branch together when you want to associate the commit with a branch and set it as the default branch scan.
GitLab CI/CD pipelines are a part of GitLab’s integrated continuous integration and deployment features. They allow you to define and automate the different stages and tasks in your software development workflow.
This document provides an overview and example job to integrate Endor Labs into your GitLab CI pipeline.
High Level Usage Steps
Setup authentication to Endor Labs
Install your build toolchain
Build your code
Scan with Endor Labs
Authentication to Endor Labs
Endor Labs recommends using keyless authentication in continuous integration environments.
Keyless Authentication is more secure and reduces the cost of secret rotation.
In your GitLab environment, select the project you want to scan.
Go to Settings > CI/CD.
Click Expand in the Variables section.
Click the Add variable button at the bottom of the section.
In the Key field, enter ENDOR_API_CREDENTIALS_SECRET.
In the Value field, enter your Endor Labs API secret.
Under Flags, make sure you select Mask variable.
Repeat the previous steps to add your API key as the variable ENDOR_API_CREDENTIALS_KEY.
Configure your GitLab CI pipeline
Important
GitLab CI/CD pipelines check out commits in a detached HEAD state, which can lead to fragmented branch tracking in Endor Labs. See Set up branch tracking in GitLab to configure proper branch context.
Create a .gitlab-ci.yml file in the root directory of your project if you do not already have one.
In your .gitlab-ci.yml file customize the job configuration based on your project’s requirements using the example below.
Modify the image field to align with the build tools necessary for building your software packages.
Update the before_script section to include any additional steps required before executing the scan, such as installing dependencies or building your project.
Save and commit the .gitlab-ci.yml file to your GitLab repository.
GitLab will automatically detect the .gitlab-ci.yml file and trigger the defined job whenever there are changes pushed to the repository.
Monitor the progress and results of the CI pipeline in the GitLab CI/CD interface.
You can use the following example job to get started. Make sure to customize this job with your specific build environment and build steps.
# You can copy and paste this template into a new `.gitlab-ci.yml` file.# You should not add this template to an existing `.gitlab-ci.yml` file by using the `include:` keyword.#stages:- ScanEndor Labs Dependency Scan:stage:testimage:node# Modify this image to align with the build tools nessesary to build your software packagesdependencies:[]variables:## Scan scoping section### Use the following environment variables for custom paths, inclusions and exclusions.# ENDOR_SCAN_PATH: "Insert a custom path to your git repository. Defaults to your pwd"# ENDOR_SCAN_EXCLUDE_PATH: "Insert a Glob style pattern of paths to exclude in the scan. Generally used for monorepos."# ENDORCTL_SCAN_INCLUDE_PATH: "Insert a Glob style pattern of paths to include in the scan. Generally used for monorepos."### Authentication to Endor Labs### Use the following environment variables for keyless authentication with your cloud provider. For more information visit: https://docs.endorlabs.com/continuous-integration/keyless-authentication/## ENDOR_GCP_CREDENTIALS_SERVICE_ACCOUNT: "endorlabs@<yourproject.iam.gserviceaccount.com"# ENDOR_AWS_CREDENTIALS_ROLE_ARN: "arn:aws:iam::123456789012:role/my-role"### Follow the below instructions to use an API key and secret instead of keyless authentication.## In your GitLab environment, select the project you want to scan.## Go to `Settings` > `CI/CD`.## Click `Expand` in the `Variables` section.## Click the `Add variable` button at the bottom of the section.## In the `Key` field, enter ENDOR_API_CREDENTIALS_SECRET.## In the `Value` field, enter your Endor Labs API secret.## Under `Flags` make sure you select `Mask variable`.## Repeat to add your API key as the variable ENDOR_API_CREDENTIALS_KEY#ENDOR_ENABLED:"true"ENDOR_ALLOW_FAILURE:"false"ENDOR_NAMESPACE:"example"# Replace with your Endor Labs namespaceENDOR_PROJECT_DIR:"."ENDOR_ARGS:| --path=${ENDOR_PROJECT_DIR}
--detached-ref-name=$CI_COMMIT_REF_NAME
--output-type=summary
--exit-on-policy-warning
--dependencies --secrets --git-logsbefore_script:- npm install yarn# Replace with the build steps for your Endor Labs job.script:- curl https://api.endorlabs.com/download/latest/endorctl_linux_amd64 -o ./endorctl;- echo "$(curl -s https://api.endorlabs.com/sha/latest/endorctl_linux_amd64) ./endorctl" | sha256sum -c;if [ $? -ne 0 ]; thenecho "Integrity check failed";exit 1;fi- chmod +x ./endorctl- if [ "$DEBUG" == "true" ]; thenexport ENDOR_LOG_VERBOSE=true;export ENDOR_LOG_LEVEL=debug;fi- if [ "$CI_COMMIT_REF_NAME" == "$CI_DEFAULT_BRANCH" ]; thenexport ENDOR_SCAN_AS_DEFAULT_BRANCH=true;export ENDOR_SCAN_DETACHED_REF_NAME="$CI_COMMIT_REF_NAME";elseexport ENDOR_SCAN_PR=true;fi- ./endorctl scan ${ENDOR_ARGS}rules:- if:$ENDOR_ENABLED != "true"when:never- if:$ENDOR_ALLOW_FAILURE == "true"allow_failure:true- if:$ENDOR_ALLOW_FAILURE != "true"allow_failure:false
SAST scans in GitLab
You can run SAST scans in your GitLab CI pipeline to identify security vulnerabilities and code quality issues in your source code. SAST scanning analyzes your source code for potential security weaknesses based on enabled rules and generates findings based on your configured finding policies.
SAST scan
To run a SAST scan, add --sast to your ENDOR_ARGS variable.
To enable AI SAST analysis, add --sast and --ai-sast-analysis=agent-fallback to your ENDOR_ARGS variable. The AI agent automatically classifies findings as true positives or false positives, reducing the need for manual triage.
To re-analyze all findings, including those that have already been analyzed, add --ai-sast-rescan to your ENDOR_ARGS variable.
Set up branch tracking in GitLab
In Git, a detached HEAD state occurs when the repository checks out a specific commit instead of a branch reference. In this state, Git points the HEAD directly to a commit hash, without associating it with a named branch. As a result, actions performed, such as creating new commits or running automated scans, do not carry branch identity unless explicitly specified.
Proper branch context enables Endor Labs to:
Associate scans with the correct branch
Identify scans on the monitored default branch
Track findings and display metrics accurately across branches
Without proper branch configuration, Endor Labs may create multiple branch entries for the same logical branch, leading to fragmented reporting and inaccurate metrics.
GitLab CI/CD checks out commits by their SHA instead of the branch name, which creates a detached HEAD state.
Use --detached-ref-name only to specify the branch name for a commit in detached HEAD state. This associates the commit with the correct branch without setting it as the default branch.
Use both --detached-ref-name and --as-default-branch together when you want to associate the commit with a branch and set it as the default branch scan.
MR scans are point-in-time scans that run on merge requests to detect new policy violations and security issues introduced by the changes. Unlike default branch scans which create monitored versions, MR scans compare findings against the baseline to surface only new issues.
To run scans on merge requests, use the --pr flag. This flag tells endorctl to treat the scan as a merge request scan and compare findings against the target branch baseline.
The following example configuration runs an MR scan only when triggered by a merge request pipeline:
The --detached-ref-name flag is recommended for MR scans in GitLab because merge request pipelines check out commits in a detached HEAD state. This flag provides the branch name context needed for proper baseline comparison.
Enable MR comments
You can enable MR comments in your GitLab CI pipeline to automatically post comments on merge requests when policy violations are detected. MR comments build on top of MR scans by posting the scan results directly on the merge request.
Configure a GitLab token
Configure a GitLab CI/CD variable following the same steps as described in Configure API key and secret in GitLab. Add a variable with the key ENDOR_SCAN_SCM_TOKEN and set its value to your GitLab personal access token with the api scope. Make sure to select Mask variable under Flags.
Configure the pipeline for MR comments
The following example configuration enables MR comments in your GitLab CI pipeline:
--enable-pr-comments: Enables posting comments on the merge request
--scm-pr-id=$CI_MERGE_REQUEST_IID: Provides the merge request ID
--scm-token=$ENDOR_SCAN_SCM_TOKEN: Provides the GitLab token for posting comments
Configure an action policy
After you enable MR comments, you need to set up an action policy to allow comments to be posted on merge requests. See Configure Action policy for PR comments for more information.
Scanning in Azure Pipelines
Azure Pipelines is a continuous integration and continuous delivery (CI/CD) service available in Azure DevOps ecosystem. It facilitates continuous integration, continuous testing, and continuous deployment for seamless building, testing, and delivery of software.
You can use Azure extension from Endor Labs to include Endor Labs within your Azure pipelines or add steps in your pipeline to manually download and use Endor Labs in your runner.
Complete the prerequisites
Ensure that you complete the following prerequisites before you proceed.
Set up an Endor Labs tenant
You must have an Endor Labs tenant set up for your organization. You can also set up namespaces according to your requirements. See Set up namespaces
Configure Endor Labs authentication
Configure an API key and secret for authentication. See managing API keys for more information on generating an API key for Endor Labs. Store API key and secret as environment variables, ENDOR_API_CREDENTIALS_KEY and ENDOR_API_CREDENTIALS_SECRET.
Enable Advanced Security in Azure
You need to enable Advanced Security in your Azure repository to view results in Azure.
Log in to Azure and open Project Settings.
Navigate to Repos > Repositories in the left navigation panel.
Select your repository.
Enable Advanced Security.
Integrate Endor Labs with Azure pipelines with the Azure extension
To integrate Endor Labs with Azure pipelines, you need to set up the Azure extension. After you set up the extension, you can configure your pipeline to use Endor Labs.
Note
The Endor Labs Azure extension requires code read, build read, and execute permissions.
Enter https://api.endorlabs.com as the Server URL.
Enter the API Key and API Secret that you created.
Enter the service connection name.
The name you enter here is to be used inside the Azure pipeline.
Optionally, you can enter service management reference and description.
Select Grant access permission to all pipelines to provide access to the Endor Labs service connection to your pipelines.
Warning
Ensure that you select this option if you want to use Endor Labs with your pipelines. Unless you enable the service connection, Endor Labs will not be available to your pipelines.
Click Save.
Configure Azure pipeline to use Endor Labs
Important
Azure Pipelines often check out commits in a detached HEAD state, which can lead to fragmented branch tracking in Endor Labs. See Set up branch tracking in Azure Pipelines to configure proper branch context.
Create azure-pipelines.yml file in your project, if it doesn’t exist and enter values according to your requirement.
In the azure-pipelines.yml file, enter the task, EndorLabsScan@0, with the service connection name, Endor Labs namespace, and the SARIF file name.
Enter the task, AdvancedSecurity-Publish@1, if you wish to publish the scan results, which you can view under the Advanced Security tab in Azure DevOps.
steps:- task:AdvancedSecurity-Dependency-Scanning@1displayName:Publish scan dependencies to Advanced Securityinputs:SarifsInputDirectory:$(Build.SourcesDirectory)\
You can use the following input parameters in the EndorLabsScan@0 task.
Parameter
Description
additionalArgs
Add custom arguments to the endorctl scan command.
phantomDependencies
Set to true to enable phantom dependency analysis. (Default false)
sarifFile
Set to a location on your hosted agent to output the findings in SARIF format.
scanDependencies
Scan Git commits and generate findings for all dependencies. (Default true)
scanPath
Set the path to the directory to scan. (Default .)
scanSast
Set to true to enable SAST scan. (Default false)
scanSecrets
Scan source code repository and generate findings for secrets. See also scanGitLogs. (Default false)
scanGitLogs
Perform a more complete and detailed scan of secrets in the repository history. Requires scanSecrets to be set as true. (Default false)
scanTools
Scan source code repository for CI/CD tools. (Default false)
tags
Specify a list of user-defined tags to add to this scan. Tags help you search and filter scans.
scanPackage
Scan a specified artifact or a package. The path to an artifact must be set with scanPath. (Default false)
scanContainer
Scan a specified container image. Set the image with image and a project with projectName. (Default false)
projectName
Specify a project name for a container image scan or for a package scan.
image
Specify a container image to scan.
enableDetachedRefName
Automatically append --detached-ref-name flag during scan to associate the commit with the actual branch name as seen in Azure DevOps. Set to false to disable this behavior and use the commit SHA instead. (Default true)
Note
To enable AI SAST analysis, set the additionalArgs parameter to --ai-sast-analysis=agent-fallback.
Example Workflow
The following example workflow initiates a scan where all dependencies are scanned along with secrets. The findings are tagged with Azure. The scan generates a SARIF file and uploads to GitHub Advanced Security.
trigger:- nonepool:name:Azure PipelinesvmImage:"windows-latest"steps:- task:EndorLabsScan@0inputs:serviceConnectionEndpoint:'endorlabs-service-connection'namespace:'endor'sarifFile:'scanresults.sarif'scanSecrets:'true'tags:`Azure`- task:AdvancedSecurity-Publish@1displayName:Publish 'scanresults.sarif' to Advanced Securityinputs:SarifsInputDirectory:$(Build.SourcesDirectory)\
View scan results in Azure
After the pipeline runs, you can view the scan results in Azure.
Log in to Azure and navigate to your projects.
Select Repos > Advanced Security to view the scan results.
Click an alert to view more details.
If you ran endorctl with --secrets flag, you can view if there are any secret leaks.
Click the entry to view more details.
Download and use endorctl in Azure pipeline
You can also choose to set up your pipeline to download endorctl and scan using Endor Labs without using the Azure extension.
Configure Endor Labs variables in the pipeline
You can manage Endor Labs variables centrally by configuring them within your Azure project. You can assign these variables to various pipelines.
Log in to Azure and select Pipelines > Library.
Click +Variable Group to add a new variable group for Endor Labs.
Enter a name for the variable group, for example, tenant-variables, and click Add under Variables.
Add the following variables.
ENDOR_API_CREDENTIALS_KEY
ENDOR_API_CREDENTIALS_SECRET
NAMESPACE
Select the variable group that you created.
Click Pipeline Permissions.
Click + to add the pipelines in which you want to use the variable group.
Configure your Azure pipeline
Create azure-pipelines.yml file in your project, if it doesn’t exist.
In the azure-pipelines.yml file, customize the job configuration based on your project’s requirements.
Adjust the image field to use the necessary build tools for constructing your software packages, and align your build steps with those of your project. For example, update the node pool settings based on your operating system.
pool:name:DefaultvmImage:"windows-latest"
pool:name:DefaultvmImage:"ubuntu-latest"
pool:name:DefaultvmImage:"macOS-latest"
Update your default branch from main if you do not use main as the default branch name.
Modify any dependency or artifact caches to align with the languages and caches used by your project.
Enter the following steps in the azure-pipelines.yml file to download endorctl.
- bash:| echo "Downloading latest version of endorctl"
VERSION=$(curl https://api.endorlabs.com/meta/version | grep -o '"Version":"[^"]*"' | sed 's/.*"Version":"\([^"]*\)".*/\1/')
curl https://api.endorlabs.com/download/endorlabs/"$VERSION"/binaries/endorctl_"$VERSION"_windows_amd64.exe -o endorctl.exe
echo "$(curl -s https://api.endorlabs.com/sha/latest/endorctl_windows_amd64.exe) endorctl" | sha256sum -c
if [ $? -ne 0 ]; then
echo "Integrity check failed"
exit 1
fi
- bash:| echo "Downloading latest version of endorctl"
VERSION=$(curl https://api.endorlabs.com/meta/version | grep -o '"Version":"[^"]*"' | sed 's/.*"Version":"\([^"]*\)".*/\1/')
curl https://api.endorlabs.com/download/endorlabs/"$VERSION"/binaries/endorctl_"$VERSION"_linux_amd64 -o endorctl
echo "$(curl -s https://api.endorlabs.com/sha/latest/endorctl_linux_amd64) endorctl" | sha256sum -c
if [ $? -ne 0 ]; then
echo "Integrity check failed"
exit 1
fi
- bash:| echo "Downloading latest version of endorctl"
VERSION=$(curl https://api.endorlabs.com/meta/version | grep -o '"Version":"[^"]*"' | sed 's/.*"Version":"\([^"]*\)".*/\1/')
curl https://api.endorlabs.com/download/endorlabs/"$VERSION"/binaries/endorctl_"$VERSION"_macos_arm64 -o endorctl
echo "$(curl -s https://api.endorlabs.com/sha/latest/endorctl_macos_arm64) endorctl" | shasum -a 256 --check
if [ $? -ne 0 ]; then
echo "Integrity check failed"
exit 1
fi
Enter the steps to build your project if your project needs building and setup steps.
Enter the following step in the azure-pipelines.yml file to run endorctl scan to generate the SARIF file.
You can run endorctl scan with options according to your requirement, but you must include the -s option to generate the SARIF file.
For example, use the --secrets flag to scan for secrets.
trigger:- nonepool:name:Azure PipelinesvmImage:"windows-latest"variables:- group:tenant-variablessteps:# All steps related to building of the project should be before this step.# Implement and scan with Endor Labs after your build is complete.- bash:| - bash: |
echo "Downloading latest version of endorctl"
VERSION=$(curl https://api.endorlabs.com/meta/version | grep -o '"Version":"[^"]*"' | sed 's/.*"Version":"\([^"]*\)".*/\1/')
curl https://api.endorlabs.com/download/endorlabs/"$VERSION"/binaries/endorctl_"$VERSION"_windows_amd64.exe -o endorctl.exe
echo "$(curl -s https://api.endorlabs.com/sha/latest/endorctl_windows_amd64.exe) endorctl" | sha256sum -c
if [ $? -ne 0 ]; then
echo "Integrity check failed"
exit 1
fidisplayName:'Downloading latest version of endorctl'continueOnError:false- script:| .\endorctl.exe scan -n $(NAMESPACE) -s scanresults.sarifdisplayName:'Run a scan against the repository using your API key & secret pair'env:ENDOR_API_CREDENTIALS_KEY:$(ENDOR_API_CREDENTIALS_KEY)ENDOR_API_CREDENTIALS_SECRET:$(ENDOR_API_CREDENTIALS_SECRET)- task:AdvancedSecurity-Publish@1displayName:Publish '.\sarif\scanresults.sarif' to Advanced Securityinputs:SarifsInputDirectory:$(Build.SourcesDirectory)\
trigger:- nonepool:name:Azure PipelinesvmImage:"ubuntu-latest"variables:- group:tenant-variablessteps:# All steps related to building of the project should be before this step.# Implement and scan with Endor Labs after your build is complete.- bash:| - bash: |
echo "Downloading latest version of endorctl"
VERSION=$(curl https://api.endorlabs.com/meta/version | grep -o '"Version":"[^"]*"' | sed 's/.*"Version":"\([^"]*\)".*/\1/')
curl https://api.endorlabs.com/download/endorlabs/"$VERSION"/binaries/endorctl_"$VERSION"_linux_amd64 -o endorctl
echo "$(curl -s https://api.endorlabs.com/sha/latest/endorctl_linux_amd64) endorctl" | sha256sum -c
if [ $? -ne 0 ]; then
echo "Integrity check failed"
exit 1
fi
## Modify the permissions of the binary to ensure it is executable
chmod +x ./endorctl
## Create an alias of the endorctl binary to ensure it is available in other directories
alias endorctl="$PWD/endorctl"displayName:'Downloading latest version of endorctl'continueOnError:false- script:| ./endorctl scan -n $(NAMESPACE) -s scanresults.sarifdisplayName:'Run a scan against the repository using your API key & secret pair'env:ENDOR_API_CREDENTIALS_KEY:$(ENDOR_API_CREDENTIALS_KEY)ENDOR_API_CREDENTIALS_SECRET:$(ENDOR_API_CREDENTIALS_SECRET)- task:AdvancedSecurity-Publish@1displayName:Publish '.\sarif\scanresults.sarif' to Advanced Securityinputs:SarifsInputDirectory:$(Build.SourcesDirectory)/
trigger:- nonepool:name:Azure PipelinesvmImage:"macos-latest"variables:- group:tenant-variablessteps:# All steps related to building of the project should be before this step.# Implement and scan with Endor Labs after your build is complete.- bash:| echo "Downloading latest version of endorctl"
VERSION=$(curl https://api.endorlabs.com/meta/version | grep -o '"Version":"[^"]*"' | sed 's/.*"Version":"\([^"]*\)".*/\1/')
curl https://api.endorlabs.com/download/endorlabs/"$VERSION"/binaries/endorctl_"$VERSION"_macos_arm64 -o endorctl
echo "$(curl -s https://api.endorlabs.com/sha/latest/endorctl_macos_arm64) endorctl" | shasum -a 256 --check
if [ $? -ne 0 ]; then
echo "Integrity check failed"
exit 1
fi
## Modify the permissions of the binary to ensure it is executable
chmod +x ./endorctl
## Create an alias of the endorctl binary to ensure it is available in other directories
alias endorctl="$PWD/endorctl"displayName:'Downloading latest version of endorctl'continueOnError:false- script:| ./endorctl scan -n $(NAMESPACE) -s scanresults.sarifdisplayName:'Run a scan against the repository using your API key & secret pair'env:ENDOR_API_CREDENTIALS_KEY:$(ENDOR_API_CREDENTIALS_KEY)ENDOR_API_CREDENTIALS_SECRET:$(ENDOR_API_CREDENTIALS_SECRET)- task:AdvancedSecurity-Publish@1displayName:Publish '.\sarif\scanresults.sarif' to Advanced Securityinputs:SarifsInputDirectory:$(Build.SourcesDirectory)/
Set up branch tracking in Azure Pipelines
In Git, a detached HEAD state occurs when the repository checks out a specific commit instead of a branch reference. In this state, Git points the HEAD directly to a commit hash, without associating it with a named branch. As a result, actions performed, such as creating new commits or running automated scans, do not carry branch identity unless explicitly specified.
Proper branch context enables Endor Labs to:
Associate scans with the correct branch
Identify scans on the monitored default branch
Track findings and display metrics accurately across branches
Without proper branch configuration, Endor Labs may create multiple branch entries for the same logical branch, leading to fragmented reporting and inaccurate metrics.
Azure Pipelines often check out commits by their SHA instead of the branch name, which creates a detached HEAD state.
Automatic branch tracking
When you use the Endor Labs Azure extension, branch tracking is automated. The enableDetachedRefName parameter is set to true by default, which automatically detects the branch name from your Azure pipeline and appends the --detached-ref-name flag during scans. This ensures that scans display the actual branch name instead of the commit SHA.
When you use endorctl, specify the branch name using the --detached-ref-name flag.
Use --detached-ref-name only to specify the branch name for a commit in detached HEAD state. This associates the commit with the correct branch without setting it as the default branch.
Use both --detached-ref-name and --as-default-branch together when you want to associate the commit with a branch and set it as the default branch scan.
Bitbucket Pipelines is a continuous integration and continuous delivery (CI/CD) service built into Bitbucket. It allows developers to automatically build, test, and deploy their code based on a configuration file bitbucket-pipelines.yml defined in the root of their repository.
To integrate Endor Labs into a Bitbucket pipeline:
Configure an API key and secret in the bitbucket-pipelines.yml file for authentication. See managing API keys for more information on generating an API key for Endor Labs.
Configure your Bitbucket pipeline
Important
Bitbucket Pipelines may check out commits in a detached HEAD state, which can lead to fragmented branch tracking in Endor Labs. See Set up branch tracking in Bitbucket Pipelines to configure proper branch context.
To create a Bitbucket pipeline reference the following steps:
Create a bitbucket-pipelines.yml file in your repository if you do not already have one.
In your bitbucket-pipelines.yml file customize the job configuration based on your project’s requirements using the following example.
Adjust the image field to use the necessary build tools for constructing your software packages, and align your build steps with those of your project.
Update your Endor Labs tenant namespace to the appropriate namespace for your project.
Update your default branch from main if you do not use main as the default branch name.
Modify any dependency or artifact caches to align with the languages and caches used by your project.
Example
Use the following example to get started. Make sure to customize this job with your specific build environment and build steps.
Once you’ve set up Endor Labs, you can test your CI implementation to ensure it is successful and then proceed with your scans.
View PR comments for policy violations
You can also use the Insights feature in Bitbucket Pipelines to indicate if the changes in your pull requests violated any policies set in Endor Labs.
import json
import os
import sys
import requests
import argparse
# Check for required environment variablesBITBUCKET_REPO_OWNER= os.getenv('BITBUCKET_REPO_OWNER')BITBUCKET_REPO_SLUG= os.getenv('BITBUCKET_REPO_SLUG')BITBUCKET_COMMIT= os.getenv('BITBUCKET_COMMIT')if not all([BITBUCKET_REPO_OWNER, BITBUCKET_REPO_SLUG, BITBUCKET_COMMIT]):
sys.exit("Error: One or more required environment variables (BITBUCKET_REPO_OWNER, BITBUCKET_REPO_SLUG, BITBUCKET_COMMIT) are not set.")#This is an internal proxy running in the BitBucket environment to accept Code Insightsproxies={"http": "http://localhost:29418"}def load_json_with_unescaped_characters(file_path):
"""Load and return JSON data from a file, replacing unescaped characters if necessary.""" try:
with open(file_path, 'r', encoding='utf-8') as file:
json_str= file.read().strip()return json.loads(json_str) except json.decoder.JSONDecodeError as e:
print(f"Failed to parse JSON: {e}")return None
except FileNotFoundError:
print(f"File not found: {file_path}") sys.exit()def construct_report_payload(endor_findings):
"""Construct and return the payload for creating a Bitbucket report."""warning_findings_count= len(endor_findings.get('warning_findings', []))blocking_findings_count= len(endor_findings.get('blocking_findings', []))total_violations= warning_findings_count + blocking_findings_count
result="PASSED"iftotal_violations==0else"FAILED"report_payload={"title": "Endor Labs Policy Violations",
"details": f"Endor Labs detected {total_violations} policy violations associated with this pull request.\n\n{endor_findings['warnings'][0]}",
"report_type": "SECURITY",
"reporter": "Endor Labs",
"link": f"https://app.endorlabs.com/t/{namespace}/projects/{project_uuid}/pr-runs/{report_id}",
"logo_url": "https://avatars.githubusercontent.com/u/92199924",
"result": result,
"data": [{"title": "Warning Findings", "type": "NUMBER", "value": warning_findings_count},
{"title": "Blocking Findings", "type": "NUMBER", "value": blocking_findings_count}]}return report_payload
def construct_annotation_payload(finding):
"""Construct and return the payload for creating an annotation in Bitbucket."""title="Endor Labs Policy Violation"summary= finding['meta']['description']details= f"{finding['spec']['summary']}\n\n{finding['spec']['remediation']}"severity="CRITICAL"if finding['spec']['level']=="FINDING_LEVEL_CRITICAL"else\
"HIGH"if finding['spec']['level']=="FINDING_LEVEL_HIGH"else\
"MEDIUM"if finding['spec']['level']=="FINDING_LEVEL_MEDIUM"else"LOW"affected_paths= finding['spec'].get('dependency_file_paths', [])path= affected_paths[0]if affected_paths else"Unknown file"annotation_payload={"external_id": finding['uuid'],
"title": title,
"annotation_type": "VULNERABILITY",
"summary": summary,
"details": details,
"severity": severity,
"path": path
}return annotation_payload
def send_report(report_payload):
"""Send the constructed report payload to the Bitbucket API."""report_url= f"http://api.bitbucket.org/2.0/repositories/{BITBUCKET_REPO_OWNER}/{BITBUCKET_REPO_SLUG}/commit/{BITBUCKET_COMMIT}/reports/{report_id}"response= requests.put(report_url, json=report_payload, proxies=proxies)if response.status_code in [200, 201]:
print("Report created or updated successfully")else:
print(f"Failed to create or update report: {response.text}")def send_annotation(annotation_payload):
"""Send the constructed annotation payload to the Bitbucket API."""annotation_url= f"{base_url}/{report_id}/annotations/{annotation_payload['external_id']}"response= requests.put(annotation_url, json=annotation_payload, proxies=proxies)if response.status_code in [200, 201]:
print("Annotation added successfully")else:
print(f"Failed to add annotation: {response.text}")def process_findings(filename):
"""Load findings from JSON, create a report, and add annotations for each finding."""endor_findings= load_json_with_unescaped_characters(filename)if endor_findings is None:
print("Failed to load findings. Exiting.")return global report_id, project_uuid, namespace
# Define the order of keys to checkfinding_types=['all_findings', 'warning_findings', 'blocking_findings']# Iterate over finding types and extract the first one foundfor finding_type in finding_types:
if endor_findings.get(finding_type):
first_finding= endor_findings[finding_type][0]report_id= first_finding['context']['id']project_uuid= first_finding['spec']['project_uuid']namespace= first_finding['tenant_meta']['namespace']break# Stop after finding the first non-empty listif not report_id:
print("No findings found.") sys.exit()# Prepare the base URL for Bitbucket API requests global base_url
base_url= f"http://api.bitbucket.org/2.0/repositories/{BITBUCKET_REPO_OWNER}/{BITBUCKET_REPO_SLUG}/commit/{BITBUCKET_COMMIT}/reports"# Create the reportreport_payload= construct_report_payload(endor_findings) send_report(report_payload)# Iterate over findings and create annotationsfor finding in endor_findings.get('blocking_findings', []) + endor_findings.get('warning_findings', []):
annotation_payload= construct_annotation_payload(finding) send_annotation(annotation_payload)def main():
"""Main function to parse arguments and process findings."""parser= argparse.ArgumentParser(description="Script to process findings and update Bitbucket via API.") parser.add_argument("filename", help="Filename containing the JSON findings.")args= parser.parse_args() process_findings(args.filename)if__name__=="__main__":
main()
SAST scans in Bitbucket Pipelines
You can run SAST scans in your Bitbucket pipeline to identify security vulnerabilities and code quality issues in your source code. SAST scanning analyzes your source code for potential security weaknesses based on enabled rules and generates findings based on your configured finding policies.
SAST scan
To run a SAST scan, add the --sast flag to your endorctl scan command.
To enable AI SAST analysis, add the --sast and --ai-sast-analysis=agent-fallback flags to your endorctl scan command. The AI agent automatically classifies findings as true positives or false positives, reducing the need for manual triage.
To re-analyze all findings, including those that have already been analyzed, add the --ai-sast-rescan flag.
Set up branch tracking in Bitbucket Pipelines
In Git, a detached HEAD state occurs when the repository checks out a specific commit instead of a branch reference. In this state, Git points the HEAD directly to a commit hash, without associating it with a named branch. As a result, actions performed, such as creating new commits or running automated scans, do not carry branch identity unless explicitly specified.
Proper branch context enables Endor Labs to:
Associate scans with the correct branch
Identify scans on the monitored default branch
Track findings and display metrics accurately across branches
Without proper branch configuration, Endor Labs may create multiple branch entries for the same logical branch, leading to fragmented reporting and inaccurate metrics.
Bitbucket Pipelines often check out commits by their SHA instead of the branch name, which creates a detached HEAD state.
Use --detached-ref-name only to specify the branch name for a commit in detached HEAD state. This associates the commit with the correct branch without setting it as the default branch.
Use both --detached-ref-name and --as-default-branch together when you want to associate the commit with a branch and set it as the default branch scan.
CircleCI CI/CD pipelines allow you to configure your pipeline as code. Your entire CI/CD process is orchestrated through a single file called config.yml. The config.yml file is located in a folder called .circleci at the root of your project which defines the entire pipeline.
To integrate Endor Labs into your CircleCI CI/CD processes:
Endor Labs recommends using keyless authentication in continuous integration environments. Keyless Authentication is more secure and reduces the cost of secret rotation but is only available on self-hosted runners in CircleCI.
If you choose not to use keyless authentication you can configure an API key and secret in CircleCI for authentication using the following steps. See managing API keys for more information on generating an API key for Endor Labs.
In your CircleCI environment, navigate to Organizational Settings.
From Contexts and select Create Context.
Enter a context name for reference such as endorlabs or reuse an existing context.
Click into your new or existing context. Add any project restrictions and select Add Environment Variable.
In Environment Variable Name, enter ENDOR_API_CREDENTIALS_KEY and in Value, enter the Endor Labs API Key.
Select Add Environment Variable.
Repeat the previous 3 steps to add your API key secret as the environment variable ENDOR_API_CREDENTIALS_SECRET. Have the name of the context handy to reference in the workflows later.
Configure your CircleCI pipeline
Important
CircleCI may check out commits in a detached HEAD state, which can lead to fragmented branch tracking in Endor Labs. See Set up branch tracking in CircleCI to configure proper branch context.
To create a CircleCI pipeline reference the following steps:
Create a .cirlceci/config.yml file in your repository if you do not already have one.
Create two workflows called build_and_watch_endorlabs and build_and_test_endorlabs.
Ensure that the context you created is part of the workflow if you are not using keyless authentication.
Adjust the image field to conform to the required build tools for constructing your software packages, and synchronize your build steps with those of your project.
Update your Endor Labs tenant namespace to the appropriate namespace for your project.
Update your default branch from main if you do not use main as the default branch name.
Modify any dependency or artifact caches to align with the languages and caches used by your project.
Examples
Use the following examples to get started. Make sure to customize this job with your specific build environment and build steps.
Simple CircleCI configuration
version:2.1jobs:test-endorlabs-scan:docker:- image:maven:3.6.3-jdk-11# Modify this image as needed for your build toolsenvironment:ENDORCTL_VERSION:"latest"ENDOR_NAMESPACE:"example"steps:- checkout- run:name:"Build"command:| mvn clean install -Dskiptests- run:name:"Install endorctl"command:| curl https://api.endorlabs.com/download/latest/endorctl_linux_amd64 -o endorctl
echo "$(curl -s https://api.endorlabs.com/sha/latest/endorctl_linux_amd64) endorctl" | sha256sum -c;
if [ $? -ne 0 ]; then
echo "Integrity check failed";
exit 1;
fi
chmod +x ./endorctl
./endorctl --version- run:name:"Endor Labs Test"command:| ./endorctl scan --pr --pr-baseline=main --dependencies --secretswatch-endorlabs-scan:docker:- image:maven:3.6.3-jdk-11# Modify this image as needed for your build toolsenvironment:ENDOR_NAMESPACE:"example"# Replace with your Endor Labs namespacesteps:- checkout- run:name:"Build"command:| mvn clean install -Dskiptests- run:name:"Install endorctl"command:| curl https://api.endorlabs.com/download/latest/endorctl_linux_amd64 -o endorctl
echo "$(curl -s https://api.endorlabs.com/sha/latest/endorctl_linux_amd64) endorctl" | sha256sum -c;
if [ $? -ne 0 ]; then
echo "Integrity check failed";
exit 1;
fi
chmod +x ./endorctl
./endorctl --version- run:name:"Endor Labs Watch"command:| ./endorctl scan --dependencies --secretsworkflows:build_and_endorlabs_watch:when:equal:[main, << pipeline.git.branch >> ]jobs:- watch-endorlabs-scan:context:- endorlabsbuild_and_endorlabs_test:jobs:- test-endorlabs-scan:context:- endorlabs
Advanced CircleCI configuration
The following example is an advanced implementation of Endor Labs in circleCI which includes several optional performance optimizations and job maintainability updates.
This includes:
Caching and restoring caches of jobs and artifacts to improve performance. Caches should be modified to reflect the build artifacts and dependencies of your project.
Segmenting jobs and scans.
# You can copy and paste portions of this `config.yml` file as an easy reference.#version:2.1jobs:build:docker:- image:maven:3.6.3-jdk-11# Modify this image as needed for your build stepssteps:- checkout- restore_cache:keys:# when lock file changes, use increasingly general patterns to restore cache- maven-repo-v1-{{ .Branch }}-{{ checksum "pom.xml" }}- maven-repo-v1-{{ .Branch }}-- maven-repo-v1-- run:name:"Build Your Project"command:| mvn clean install- persist_to_workspace:root:.paths:- target/# Persist artifact across job. Change this if you are creating your artifact in a location outside of the target directory.- save_cache:paths:- ~/.m2/repositorykey:maven-repo-v1-{{ .Branch }}-{{ checksum "pom.xml" }}test-endorlabs-scan:docker:- image:maven:3.6.3-jdk-11# Modify this image as needed for your build toolsenvironment:ENDORCTL_VERSION:"latest"ENDOR_NAMESPACE:"example"steps:- checkout- attach_workspace:at:.- restore_cache:keys:# when lock file changes, use increasingly general patterns to restore cache- maven-repo-v1-{{ .Branch }}-{{ checksum "pom.xml" }}- maven-repo-v1-{{ .Branch }}-- maven-repo-v1-- run:name:"Install endorctl"command:| curl https://api.endorlabs.com/download/latest/endorctl_linux_amd64 -o endorctl
echo "$(curl -s https://api.endorlabs.com/sha/latest/endorctl_linux_amd64) endorctl" | sha256sum -c;
if [ $? -ne 0 ]; then
echo "Integrity check failed";
exit 1;
fi
chmod +x ./endorctl
./endorctl --version- run:name:"Endor Labs Test"command:| ./endorctl scan --pr --pr-baseline=main --dependencies --secretswatch-endorlabs-scan:docker:- image:maven:3.6.3-jdk-11# Modify this image as needed for your build toolsenvironment:ENDORCTL_VERSION:"latest"ENDOR_NAMESPACE:"example"#Replace with your namespace in Endor Labssteps:- checkout- attach_workspace:at:.- restore_cache:keys:# when lock file changes, use increasingly general patterns to restore cache- maven-repo-v1-{{ .Branch }}-{{ checksum "pom.xml" }}- maven-repo-v1-{{ .Branch }}-- maven-repo-v1-- run:name:"Install endorctl"command:| curl https://api.endorlabs.com/download/latest/endorctl_linux_amd64 -o endorctl
echo "$(curl -s https://api.endorlabs.com/sha/latest/endorctl_linux_amd64) endorctl" | sha256sum -c;
if [ $? -ne 0 ]; then
echo "Integrity check failed";
exit 1;
fi
chmod +x ./endorctl
./endorctl --version- run:name:"Endor Labs Watch"command:| ./endorctl scan --dependencies --secretsworkflows:build_and_endorlabs_watch:when:equal:[main, << pipeline.git.branch >> ]jobs:- build- watch-endorlabs-scan:requires:- buildcontext:- endorlabsbuild_and_endorlabs_test:jobs:- build- test-endorlabs-scan:requires:- buildcontext:- endorlabs
Once you’ve set up Endor Labs you can test your CI implementation is successful and begin scanning.
SAST scans in CircleCI
You can run SAST scans in your CircleCI pipeline to identify security vulnerabilities and code quality issues in your source code. SAST scanning analyzes your source code for potential security weaknesses based on enabled rules and generates findings based on your configured finding policies.
SAST scan
To run a SAST scan, add the --sast flag to your endorctl scan command.
To enable AI SAST analysis, add the --sast and --ai-sast-analysis=agent-fallback flags to your endorctl scan command. The AI agent automatically classifies findings as true positives or false positives, reducing the need for manual triage.
To re-analyze all findings, including those that have already been analyzed, add the --ai-sast-rescan flag.
Set up branch tracking in CircleCI
In Git, a detached HEAD state occurs when the repository checks out a specific commit instead of a branch reference. In this state, Git points the HEAD directly to a commit hash, without associating it with a named branch. As a result, actions performed, such as creating new commits or running automated scans, do not carry branch identity unless explicitly specified.
Proper branch context enables Endor Labs to:
Associate scans with the correct branch
Identify scans on the monitored default branch
Track findings and display metrics accurately across branches
Without proper branch configuration, Endor Labs may create multiple branch entries for the same logical branch, leading to fragmented reporting and inaccurate metrics.
CircleCI often checks out commits by their SHA instead of the branch name, which creates a detached HEAD state.
Use --detached-ref-name only to specify the branch name for a commit in detached HEAD state. This associates the commit with the correct branch without setting it as the default branch.
Use both --detached-ref-name and --as-default-branch together when you want to associate the commit with a branch and set it as the default branch scan.
Generate API credentials to authenticate to Endor Labs. Configure the API key and secret in the cloudbuild.yaml file for authentication. See managing API keys for more information on generating an API key for Endor Labs.
Google Cloud Build may check out commits in a detached HEAD state, which can lead to fragmented branch tracking in Endor Labs. See Set up branch tracking in Google Cloud Build to configure proper branch context.
Triggers initiate Cloud Build for different types of scans. You can set up triggers for the following scan types:
Purpose: Scans the baseline or the default branch to identify existing security vulnerabilities. Future code and dependencies will be evaluated against this baseline.
Trigger Type: Push to branch.
Setup: Create a trigger for the required repository and branch, for example, main, or develop.
Cloud Build Configuration: Create a cloudbuild.yaml file using the configuration file examples as a reference. Include this file for baseline scans in the required GitHub repository.
PR scan
Purpose: Scans the pull requests that could include new code and dependencies for vulnerabilities and security risks. This scan compares the new code against the baseline or the default branch and raises results based on findings and admission policies.
Trigger Type: Pull request.
Setup: Create a trigger for the required repository and branch.
Additional Parameters: Pass extra parameters as part of the endorctl arguments.
Cloud Build Configuration: Create a cloudbuild.yaml file using the configuration file examples as a reference. Include this file for baseline scans in the required GitHub repository,
Release scan
Purpose: Scans code before it lands in production or pre-production environments. This is similar to a baseline scan, however, it is triggered when you push the code to a release branch or create a new release tag.
Trigger Type: Push to branch or push to new tag.
Setup: Create a trigger for the release branch or tag.
Cloud Build Configuration: Create a cloudbuild.yaml file using the configuration file examples excluding the --as-default-branch argument for release scans, and add this file to the required GitHub repository.
Example configuration file
Here is an example cloudbuild.yaml configuration file to perform a baseline scan for Java project repository.
steps:
# Step 1: Fetch The Trigger Branch# This step addresses a known issue where Cloud Build renames the pulled branch to main.# If you are not encountering this issue with your build, you can skip this step. - name: 'gcr.io/cloud-builders/git' entrypoint: 'bash' args:
- '-c' - |echo"Fetching all branches..." git fetch origin
echo"Checking out branch: ${BRANCH_NAME}" git checkout ${BRANCH_NAME}# Step 2: Build With Maven - name: 'maven:3.8.6-openjdk-11' entrypoint: 'mvn' args: ['clean', 'install'] id: 'Build'# Step 3: Install latest version of endorctl - name: 'maven:3.8.6-openjdk-11' entrypoint: 'bash' args:
- '-c' - | curl https://api.endorlabs.com/download/latest/endorctl_linux_amd64 -o endorctl
echo"$(curl -s https://api.endorlabs.com/sha/latest/endorctl_linux_amd64) endorctl"| sha256sum -c
chmod +x ./endorctl
./endorctl --version
id: 'Install latest version of endorctl'# Step 4: SCA Scan With EndorLabs - name: 'maven:3.8.6-openjdk-11' entrypoint: 'bash' args: ["-c", "./endorctl scan -n $$ENDOR_NAMESPACE --api-key=$$ENDOR_API_CREDENTIALS_KEY --api-secret=$$ENDOR_API_CREDENTIALS_SECRET --as-default-branch=true"] secretEnv: ['ENDOR_API_CREDENTIALS_KEY', 'ENDOR_API_CREDENTIALS_SECRET'] env:
- 'ENDOR_NAMESPACE=demo' id: 'SCA Scan With EndorLabs'# Fetch Endor Labs API Token and Secret From Secrets ManageravailableSecrets:
secretManager:
- versionName: projects/{your-project-id}/secrets/endor-api-key/versions/1
env: 'ENDOR_API_CREDENTIALS_KEY' - versionName: projects/{your-project-id}/secrets/endor-api-secret/versions/1
env: 'ENDOR_API_CREDENTIALS_SECRET'options:
# Choose your log configuration logging: 'CLOUD_LOGGING_ONLY'# Select a private pool if the default runners do not meet the minimum requirements. pool:
name: 'projects/{your-project-id}/locations/{your_location}/workerPools/{your_worker_pool_id}'
Check the example configuration files and customize them for your requirements.
SAST scans in Google Cloud Build
You can run SAST scans in your Google Cloud Build pipeline to identify security vulnerabilities and code quality issues in your source code. SAST scanning analyzes your source code for potential security weaknesses based on enabled rules and generates findings based on your configured finding policies.
SAST scan
To run a SAST scan, add the --sast flag to your endorctl scan command. For example:
To enable AI SAST analysis, add the --sast and --ai-sast-analysis=agent-fallback flags to your endorctl scan command. The AI agent automatically classifies findings as true positives or false positives, reducing the need for manual triage. For example:
To re-analyze all findings, including those that have already been analyzed, add the --ai-sast-rescan flag.
Set up branch tracking in Google Cloud Build
In Git, a detached HEAD state occurs when the repository checks out a specific commit instead of a branch reference. In this state, Git points the HEAD directly to a commit hash, without associating it with a named branch. As a result, actions performed, such as creating new commits or running automated scans, do not carry branch identity unless explicitly specified.
Proper branch context enables Endor Labs to:
Associate scans with the correct branch
Identify scans on the monitored default branch
Track findings and display metrics accurately across branches
Without proper branch configuration, Endor Labs may create multiple branch entries for the same logical branch, leading to fragmented reporting and inaccurate metrics.
Google Cloud Build often checks out commits by their SHA instead of the branch name, which creates a detached HEAD state.
Use --detached-ref-name only to specify the branch name for a commit in detached HEAD state. This associates the commit with the correct branch without setting it as the default branch.
Use both --detached-ref-name and --as-default-branch together when you want to associate the commit with a branch and set it as the default branch scan.