Secure your AI-powered development workflows and govern AI model usage.
AI models and machine learning components have become integral parts of modern software development. Just like traditional dependencies, these AI models can introduce operational and security risks to your organization.
Endor Labs provides comprehensive capabilities to help you gain visibility into these risks and make informed decisions about AI model usage.
Endor Labs helps you secure AI-powered development in the following ways:
MCP Server: Integrate Endor Labs into your IDE to scan both human and AI-generated code in real-time.
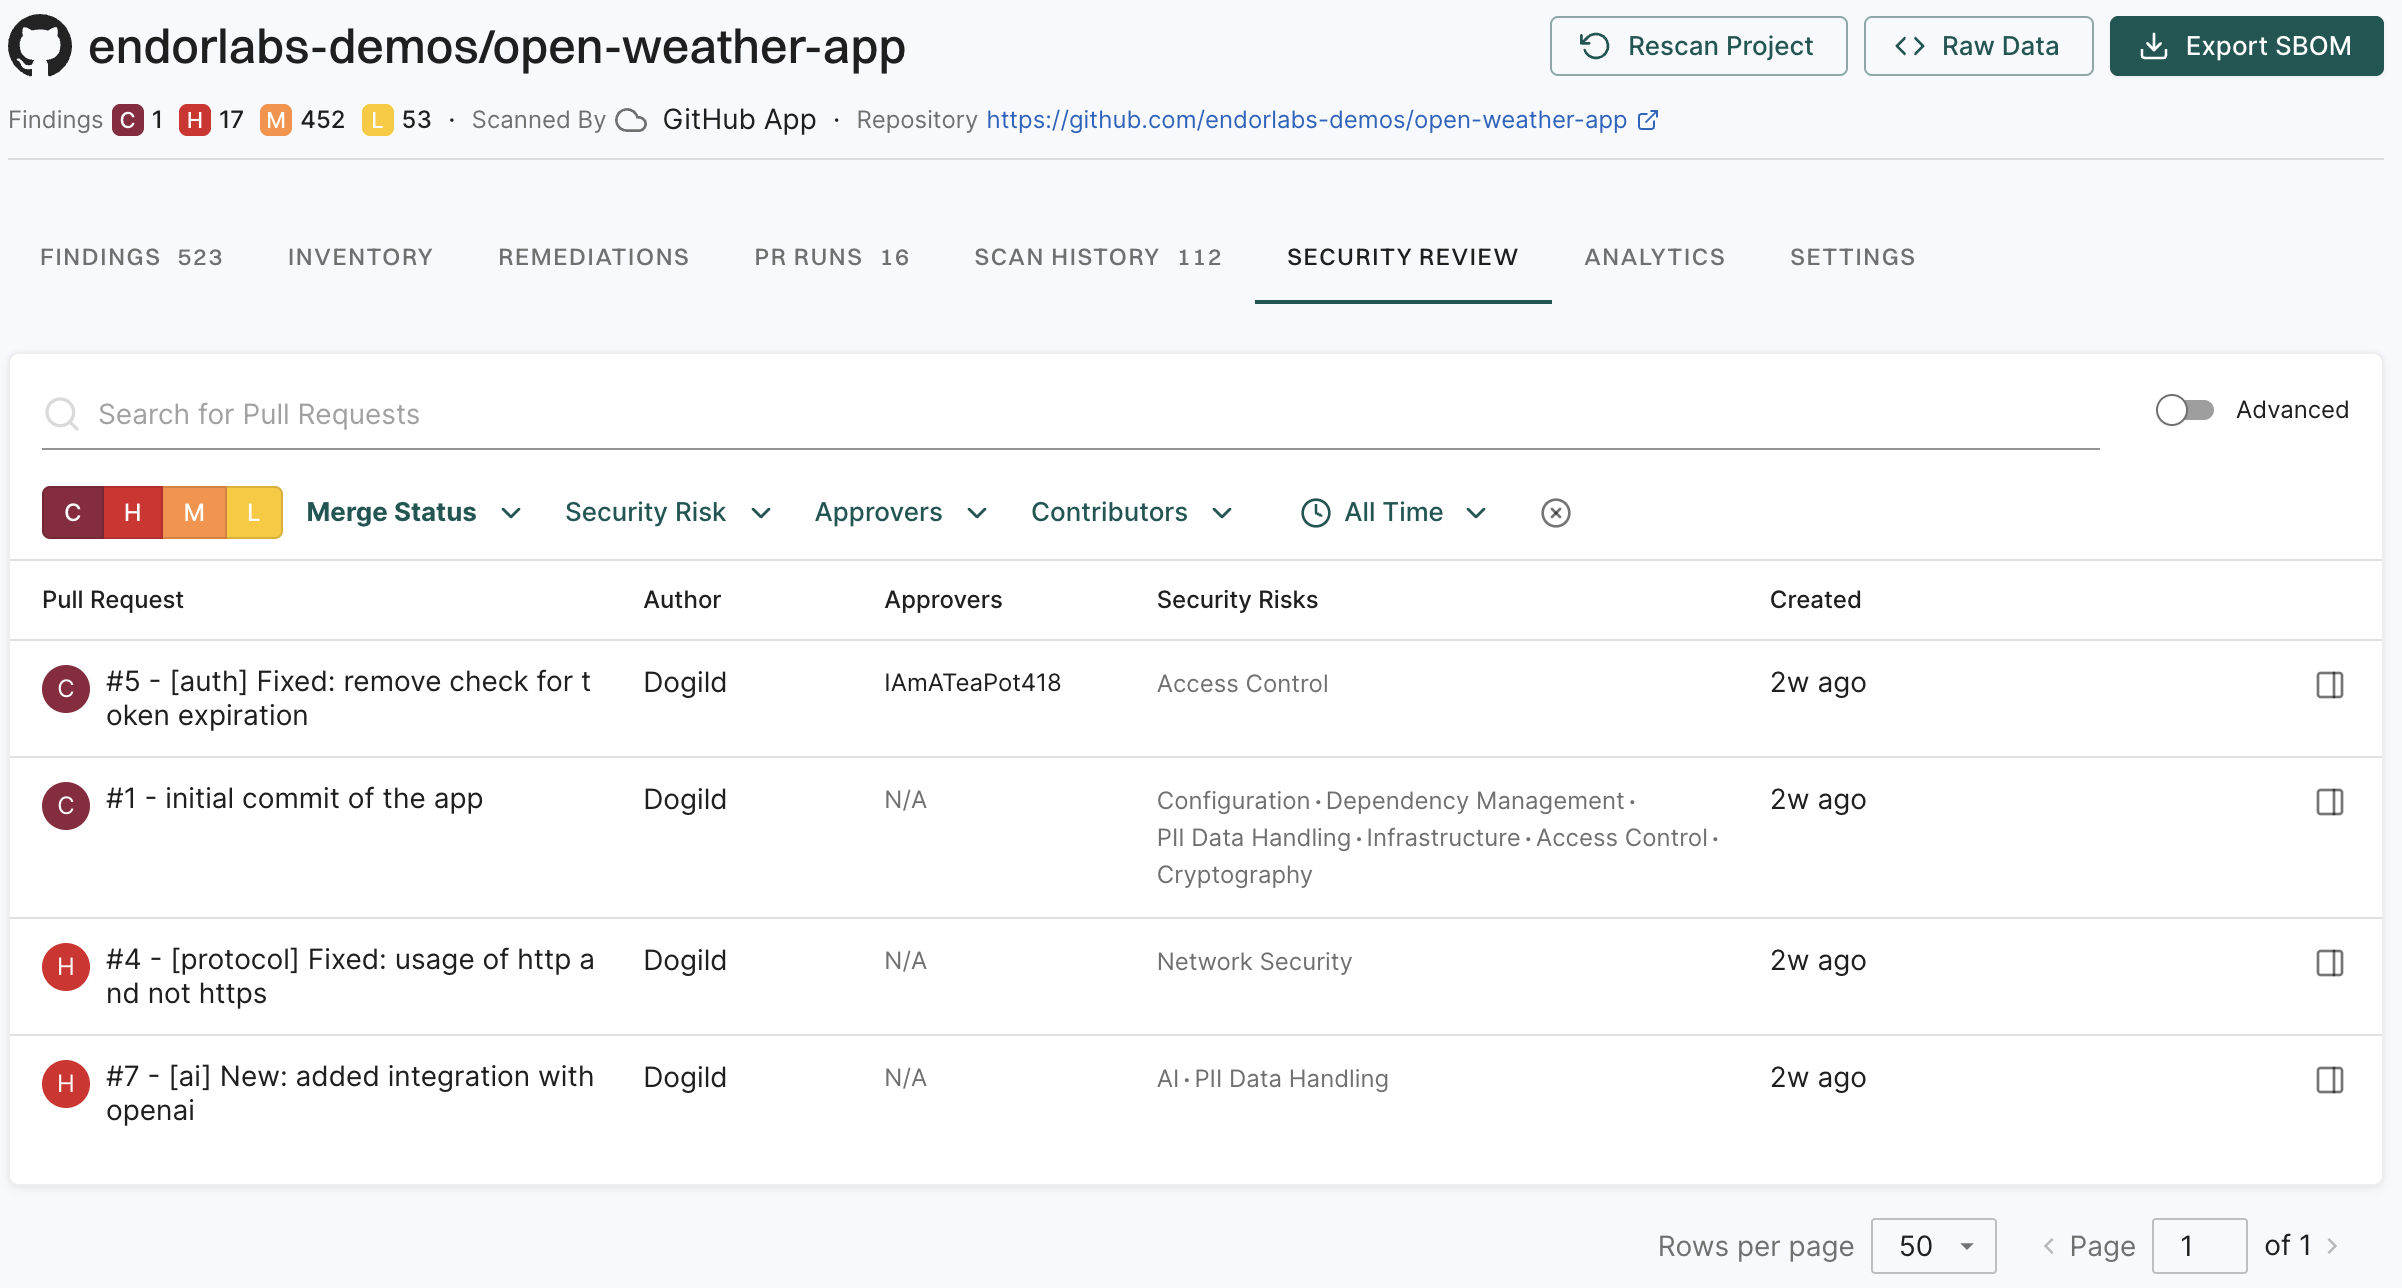
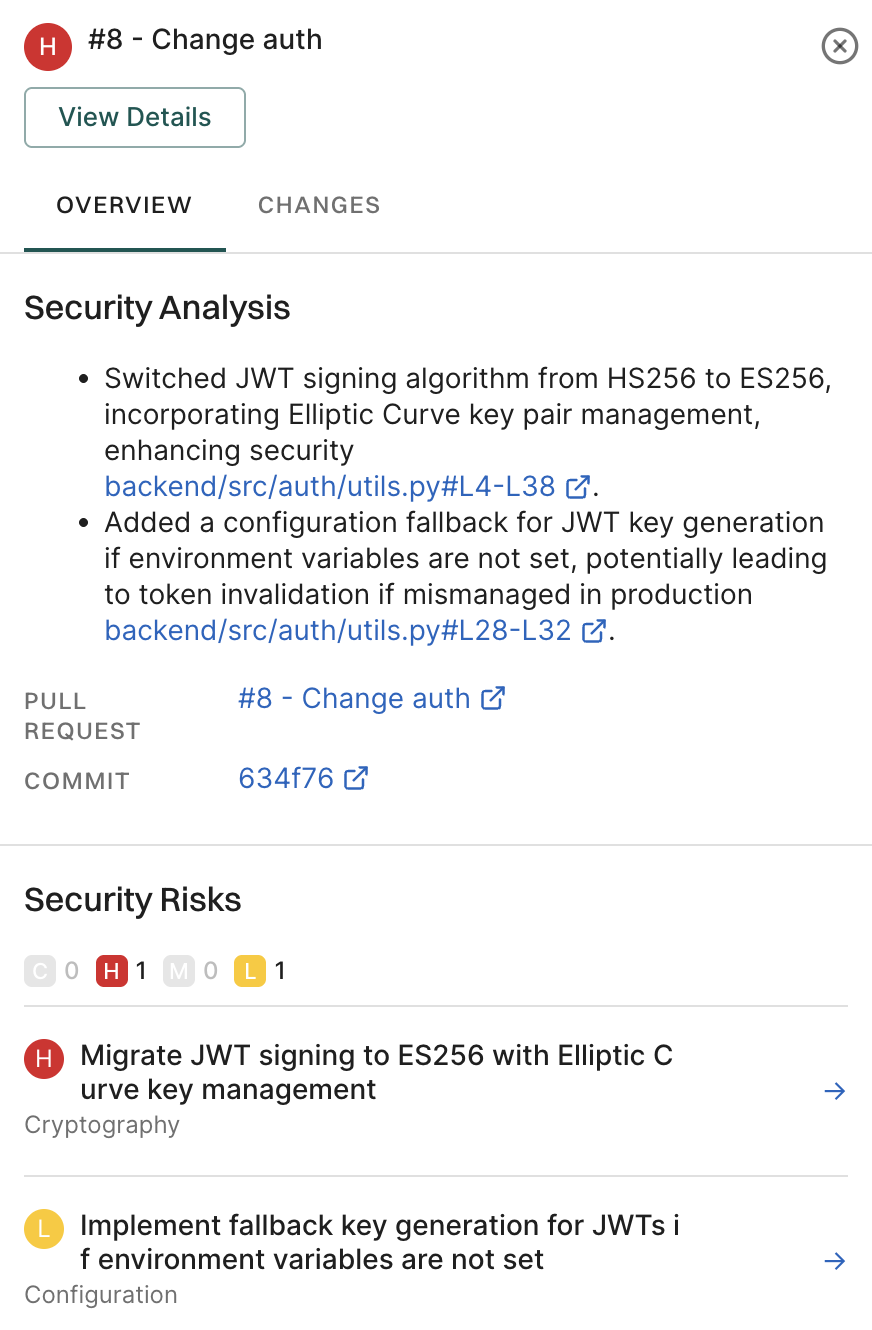
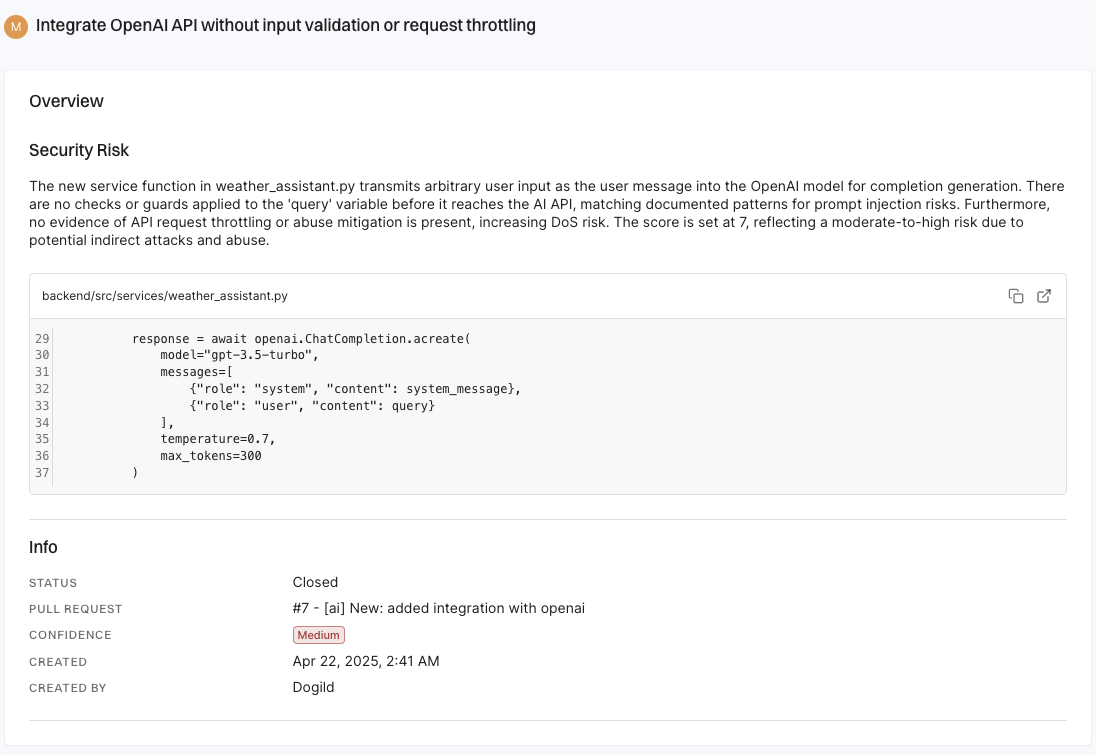
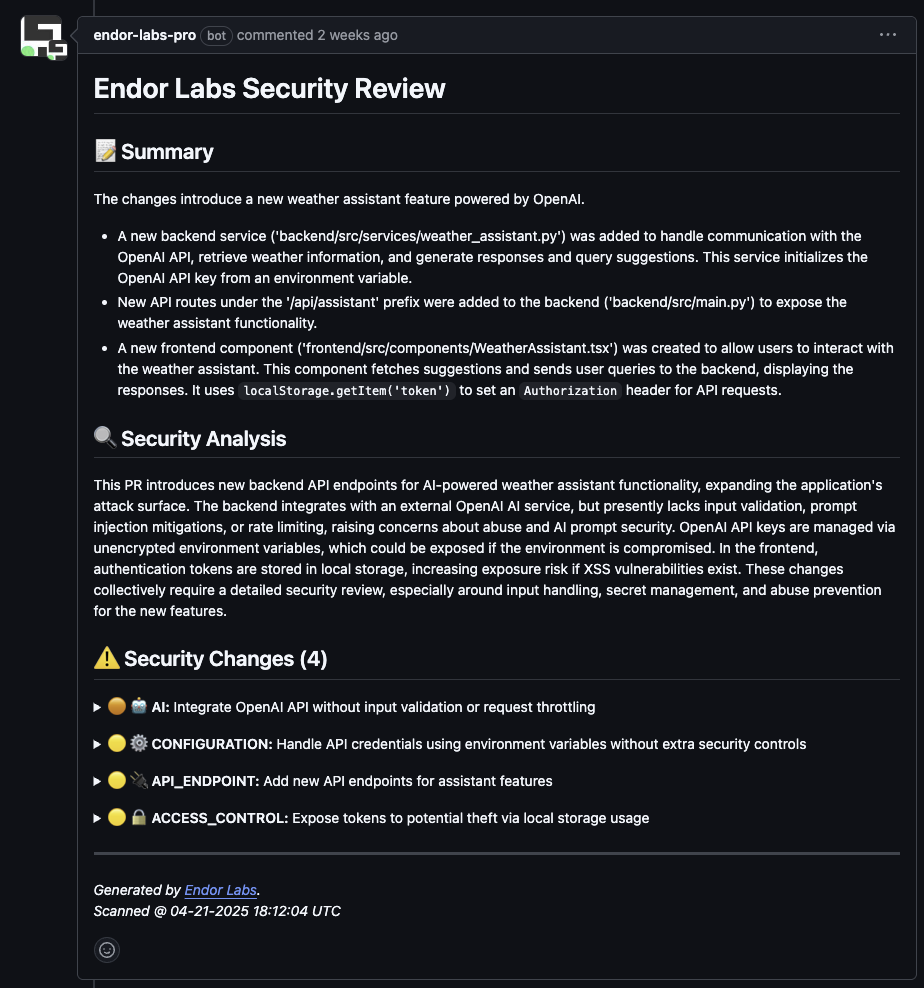
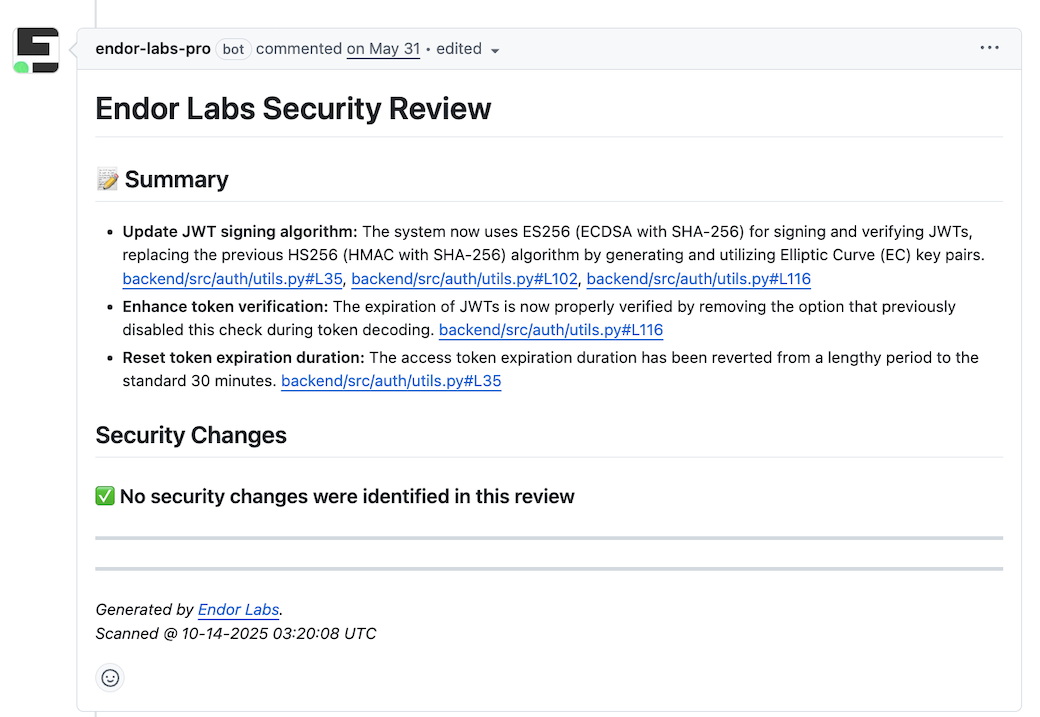
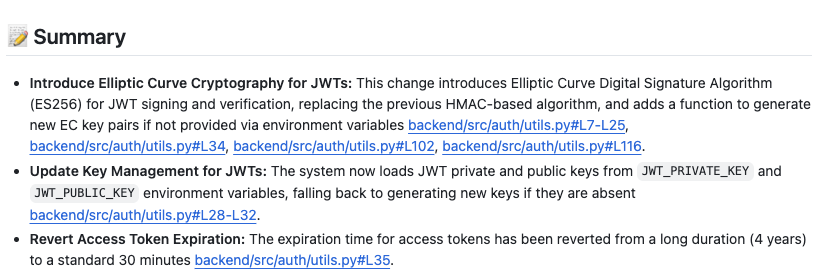
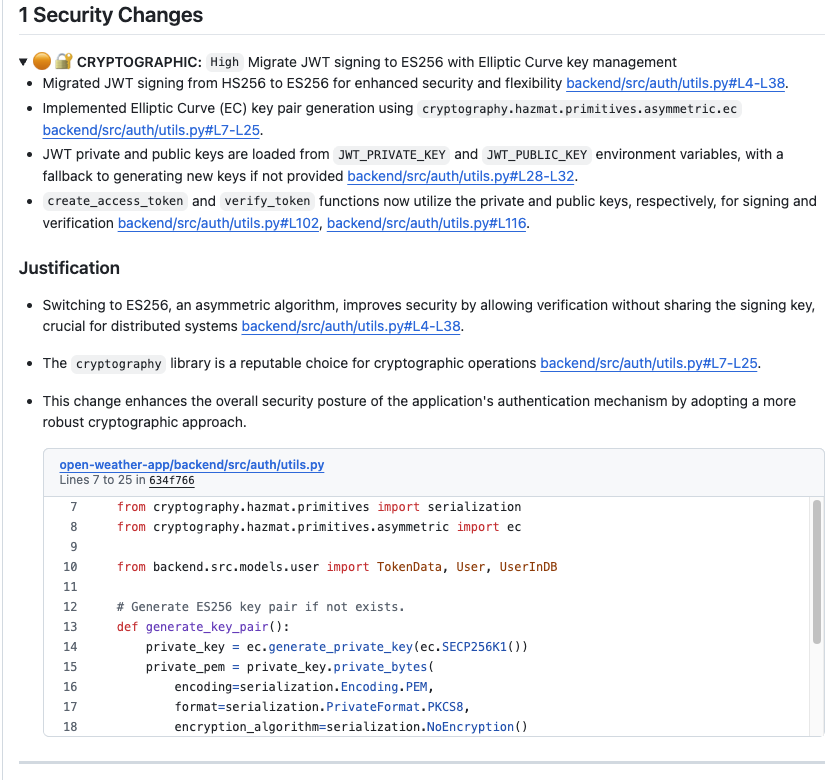
AI Security Review: Identify potential security issues in your pull requests and get recommendations to fix them.
Agentic UI (AppSec Assistant): Discover open-source components and troubleshoot scanning errors with intelligent recommendations.
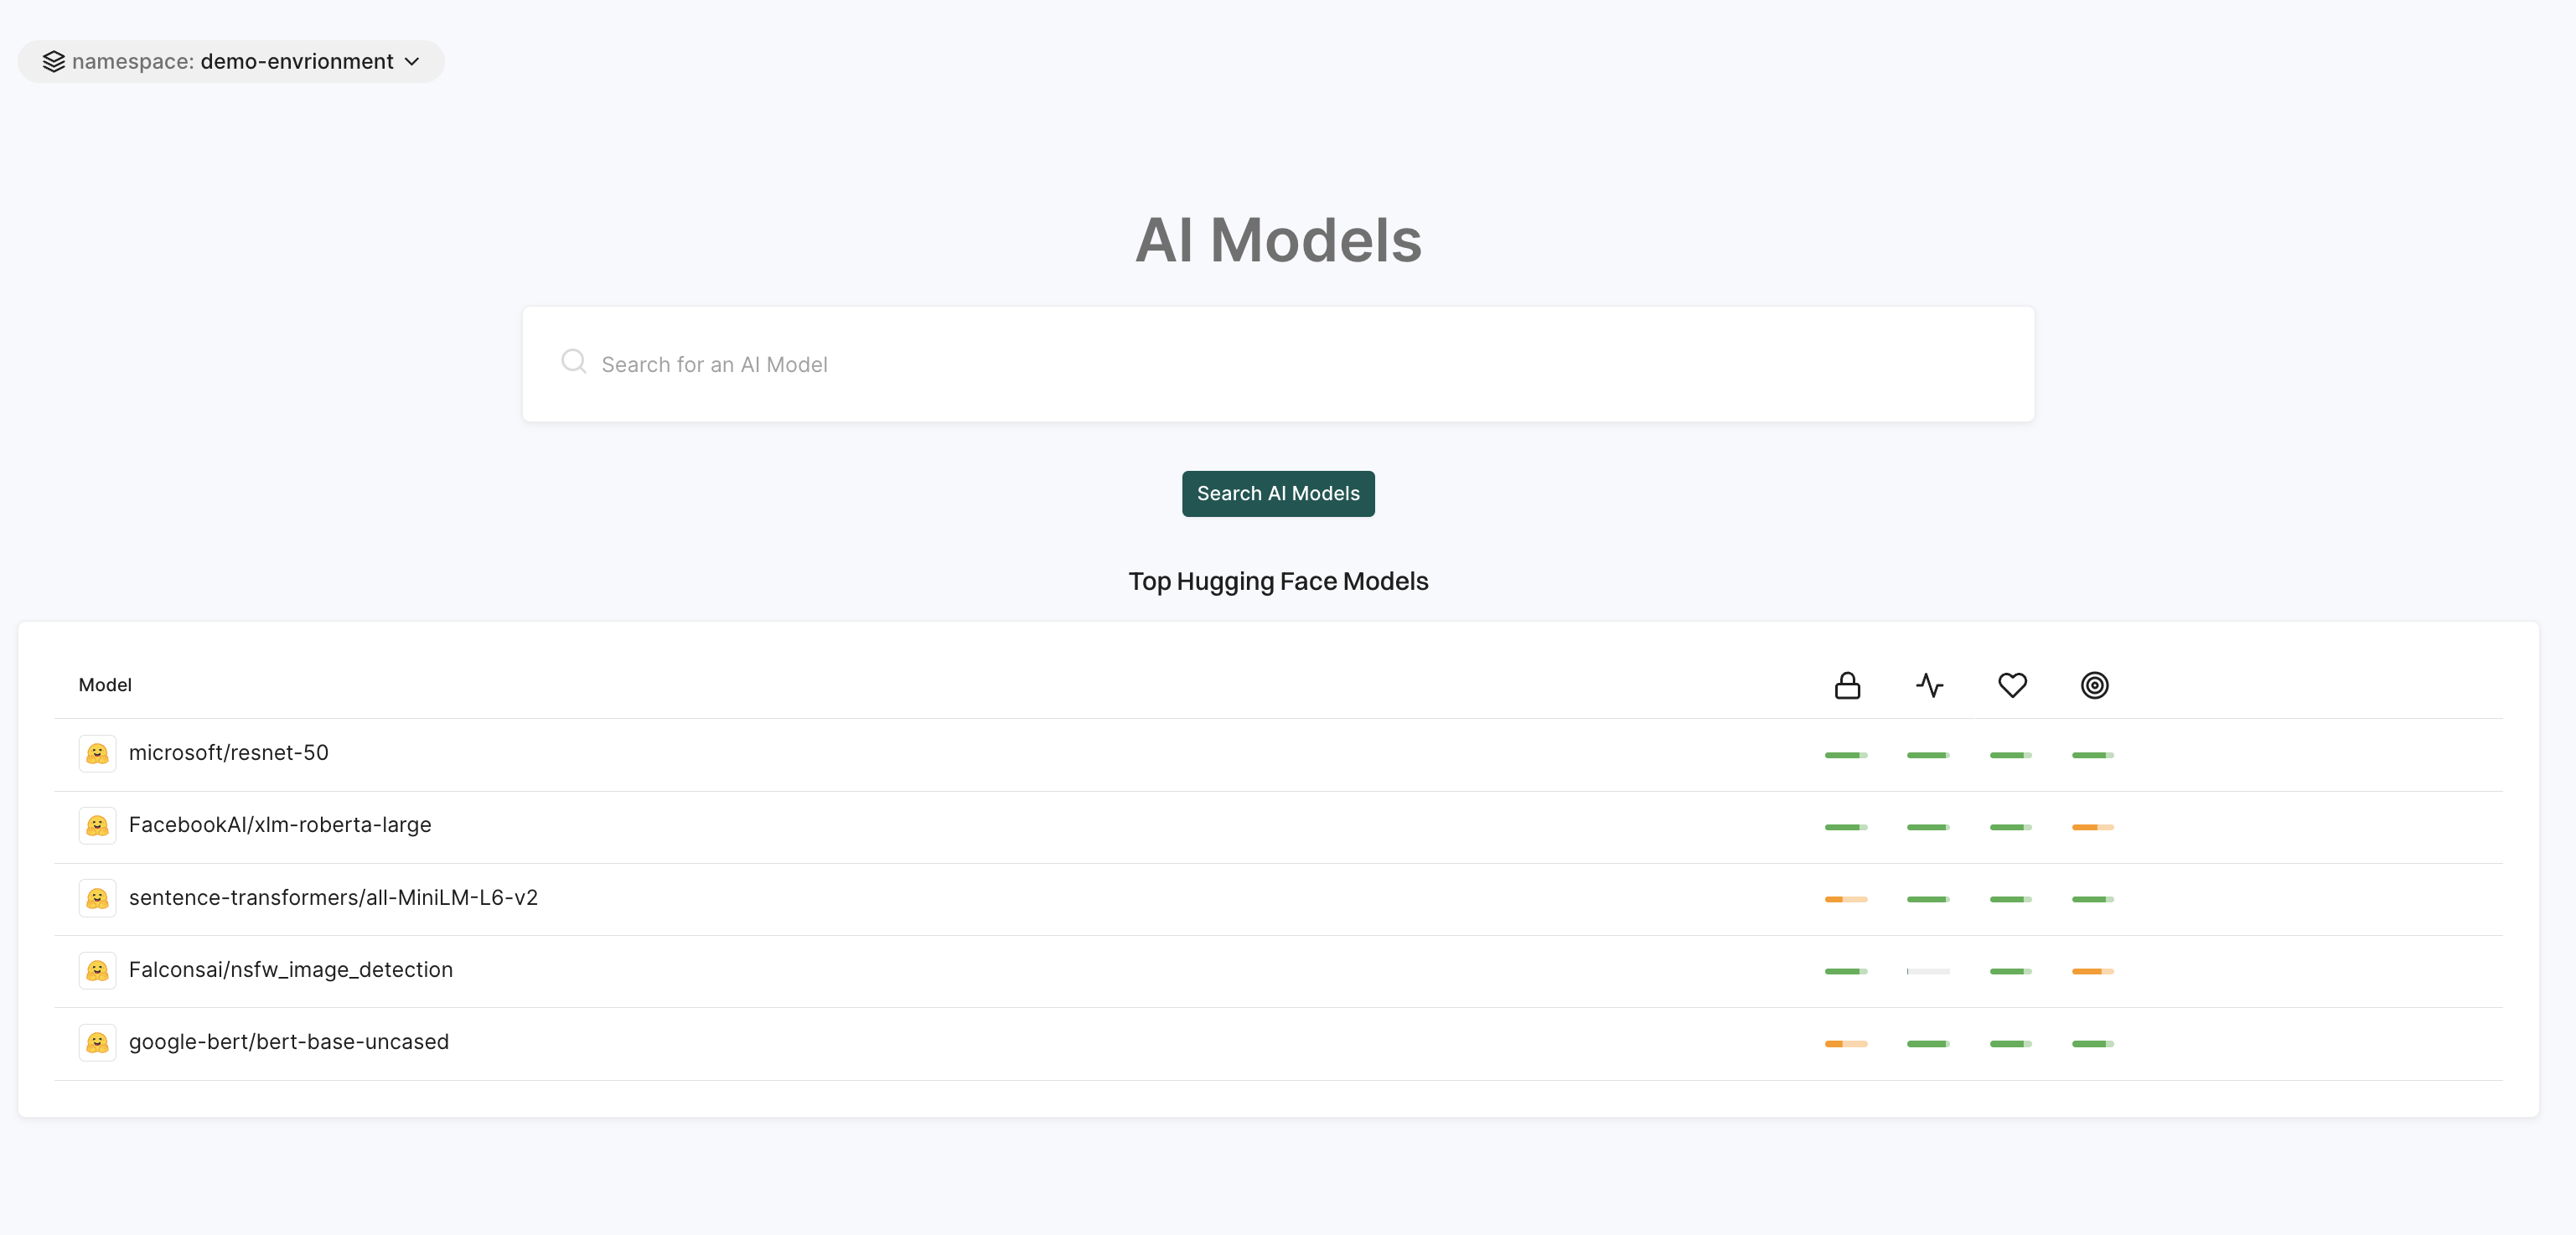
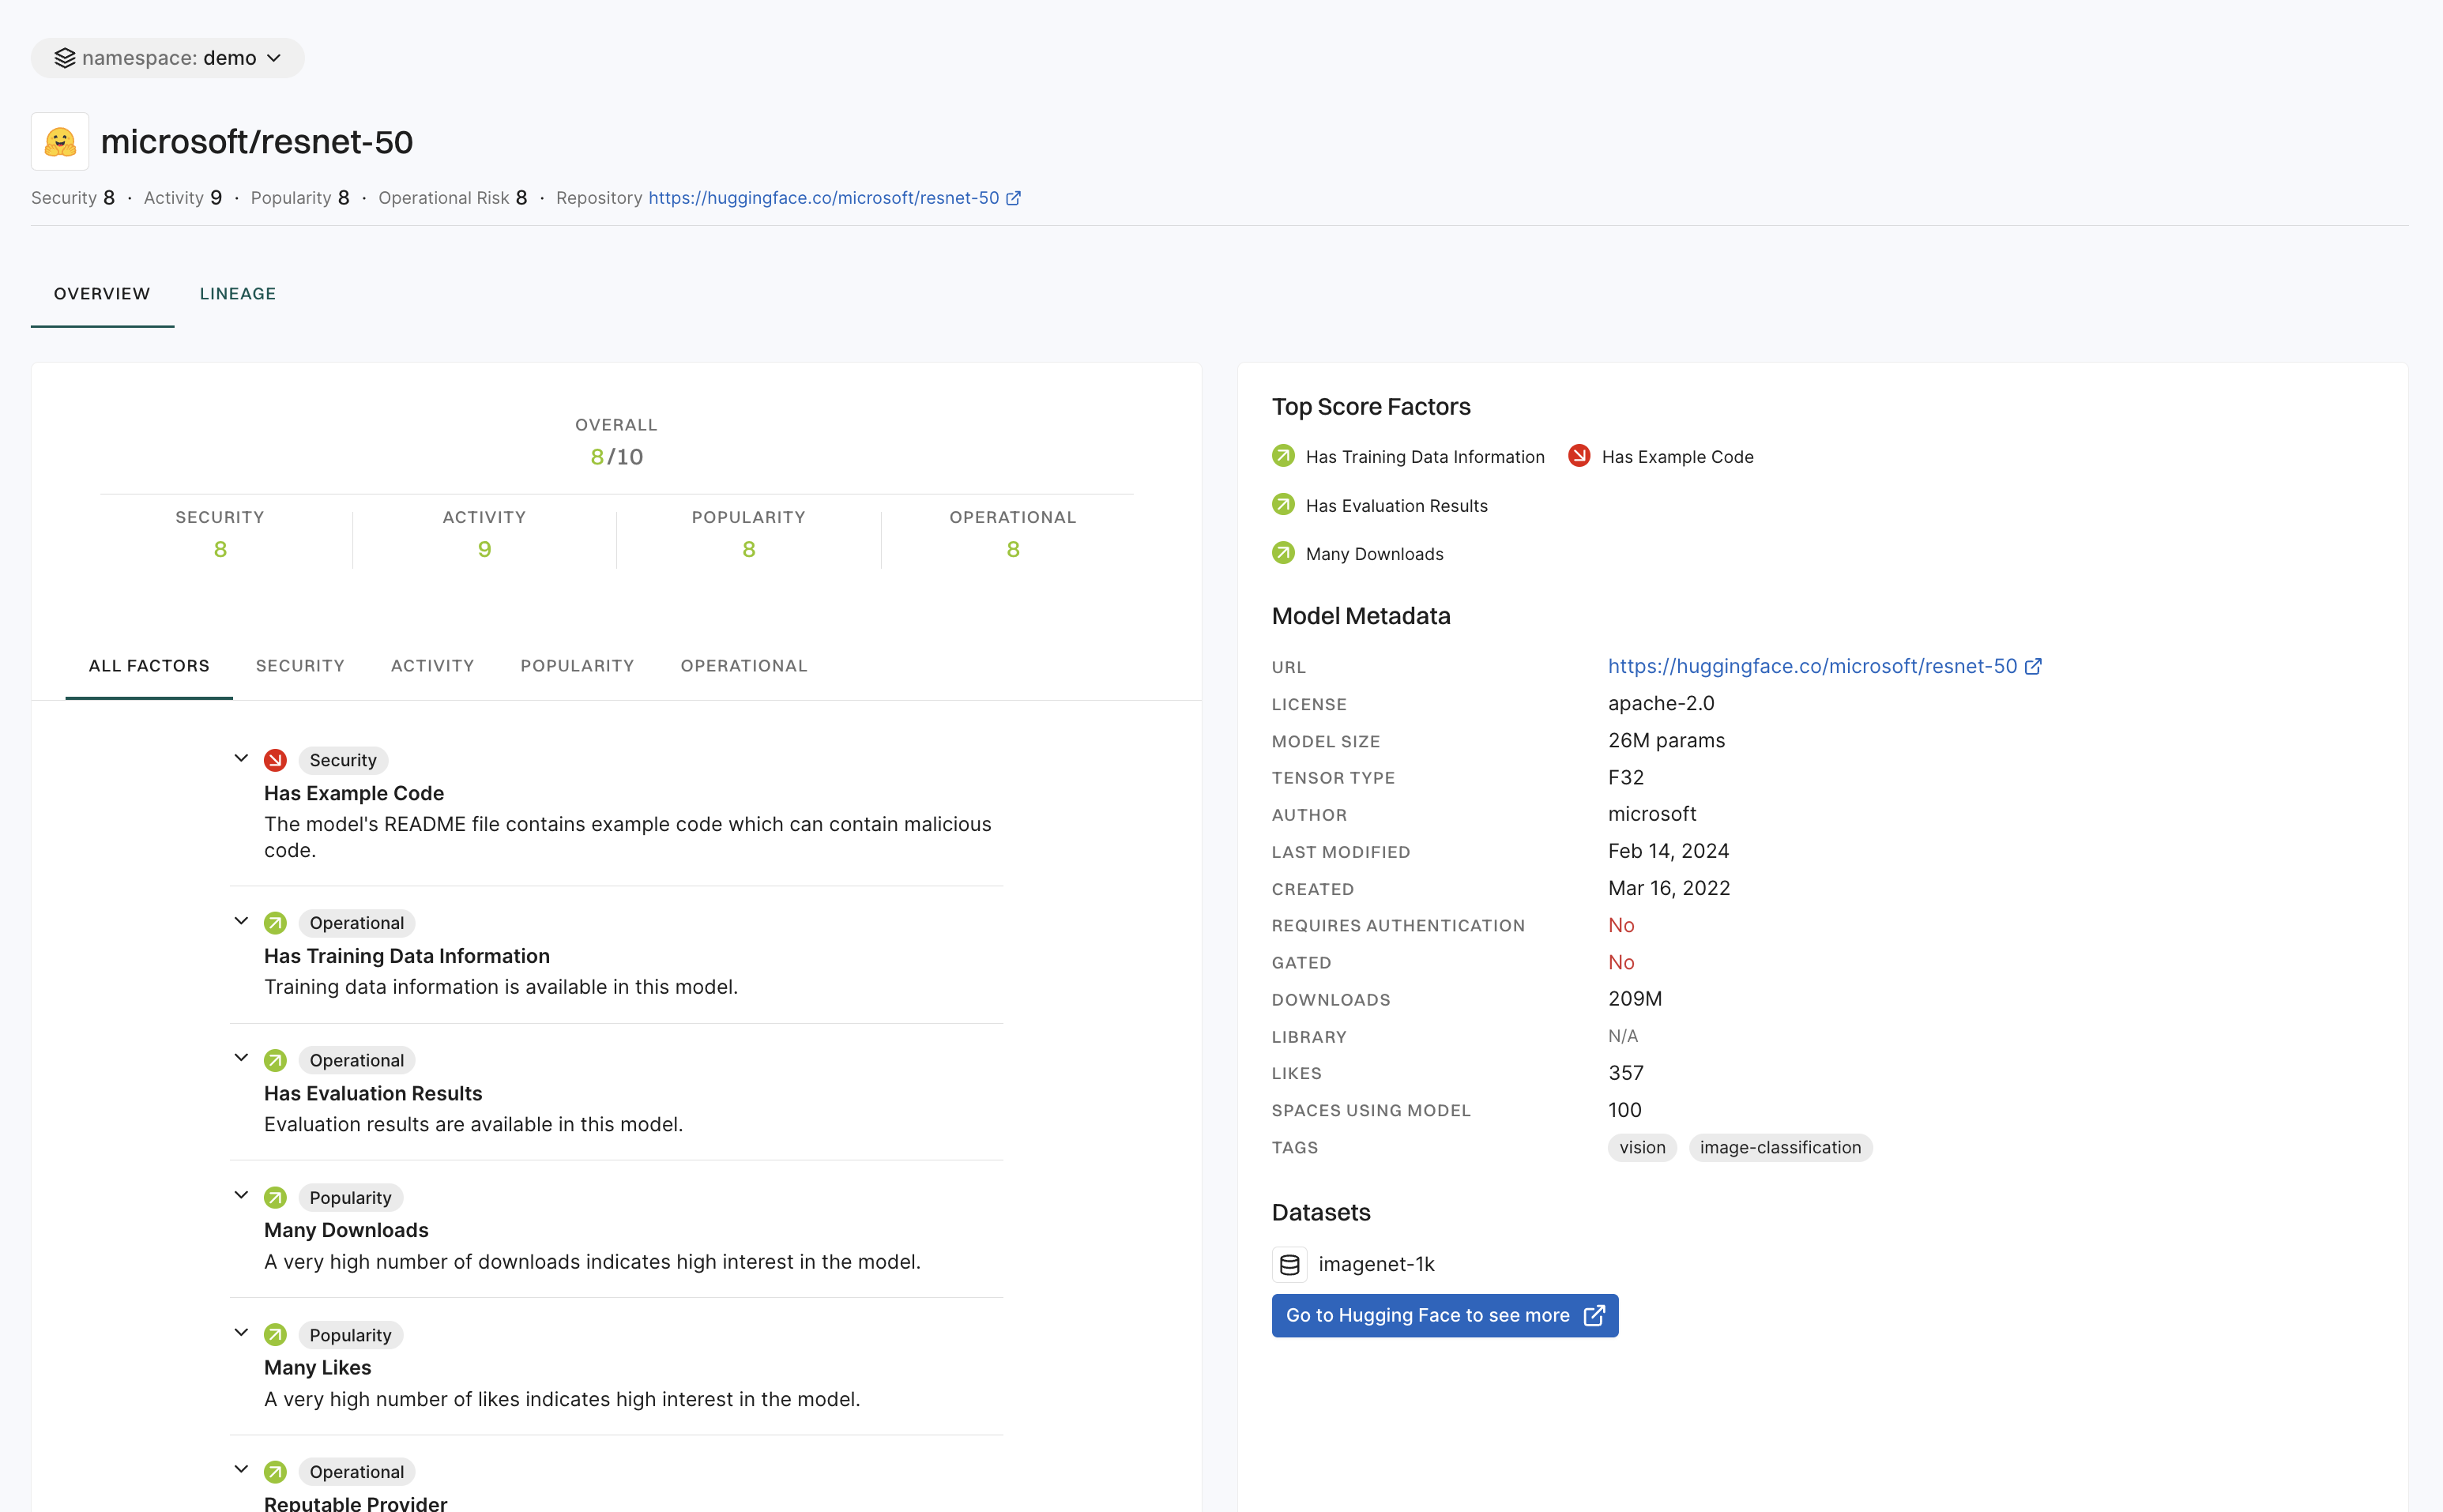
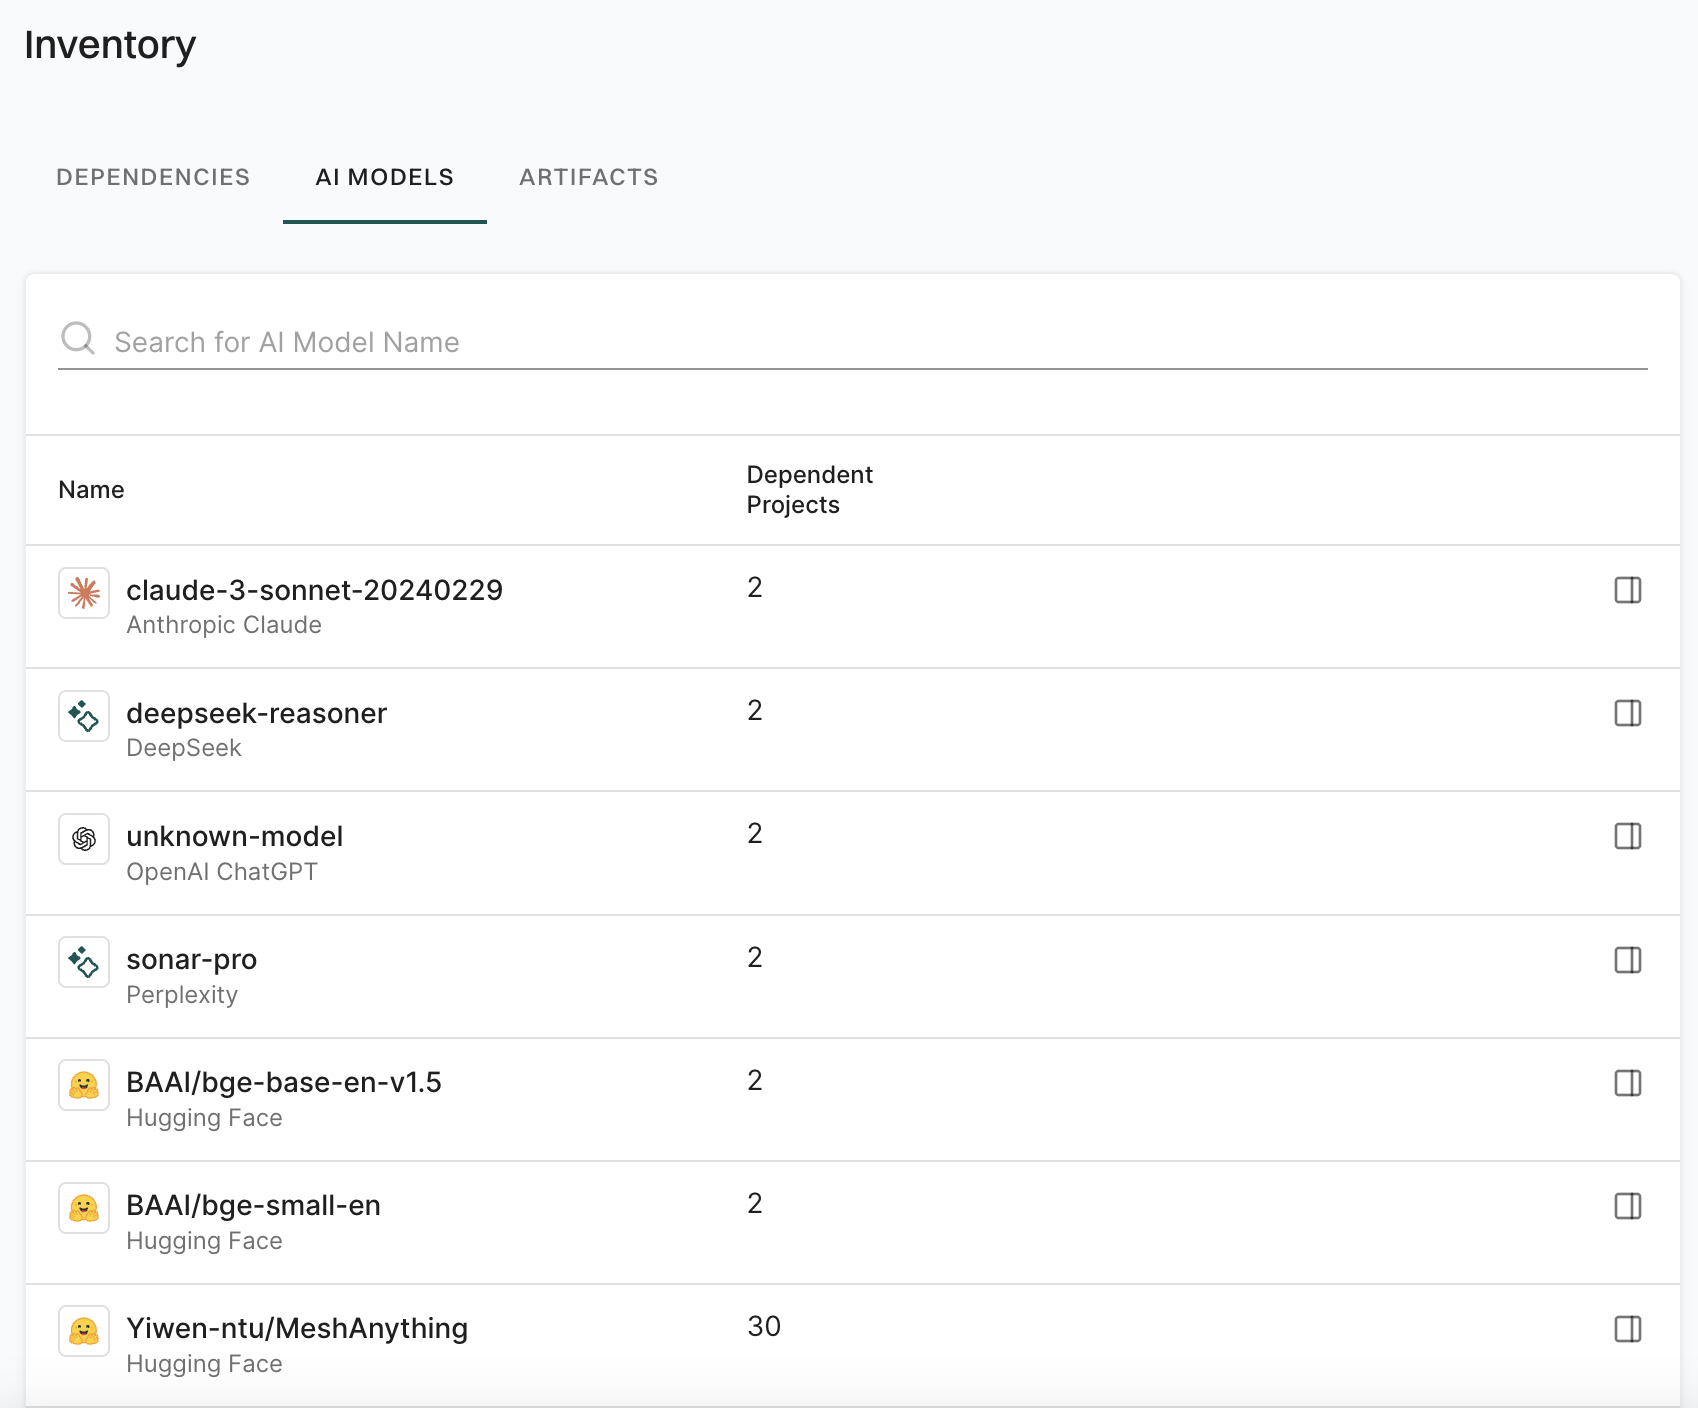
AI Model Discovery: Search and evaluate AI models from Hugging Face across security, activity, popularity, and operational integrity.
AI model scores: Understand how AI models are scored in Endor Labs.
MCP (Model Context Protocol) is an open standard that defines a consistent way for applications to share relevant context and information with Large Language Models (LLMs). MCP servers expose specific capabilities through the standardized Model Context Protocol. For more information on MCP, refer to the MCP documentation.
The Endor Labs MCP server integrates seamlessly into your development workflow, scanning your code as you write. You can catch issues long before they’re a problem in production. It plugs directly into your IDE, tightening the feedback loop for both human and AI-generated code. Thus, you can quickly secure your code from the start. With Endor Labs, you’re bringing security all the way left, getting real-time, proactive insights and automated fixes in your editor, while you build, minimizing last-minute security scrambles.
The Endor Labs MCP server runs locally on your machine as a lightweight process. Your IDE or CLI launches it automatically and communicates with it over stdio. When the AI agent needs security context, it calls the tools exposed by the server.
How Endor Labs MCP server helps your development workflow
The Endor Labs MCP server helps developers and AI agents in the following ways:
Provide guardrails for agents before code review: Reduce the number of known vulnerabilities entering your code and save developers time by checking AI agent suggestions in real time. Integrate security before an issue is discovered in CI or in production.
Improve the speed of remediating security risks: Agents use vulnerability context from Endor Labs to help implement secure changes, from writing more secure code to upgrading dependencies.
How to use the Endor Labs MCP server
The Endor Labs MCP server provides the following tools:
check_dependency_for_vulnerabilities: Check if a dependency in your project is vulnerable.
check_dependency_for_risks: Check a dependency for security risks including vulnerabilities and malware.
get_endor_vulnerability: Get the details of a specific vulnerability from the Endor Labs vulnerability database.
get_resource: Retrieve additional context from commonly used Endor Labs resources about your software, such as findings, vulnerabilities, and projects.
scan: Run an Endor Labs security scan to detect risks in your open source dependencies, find common security issues, and spot any credentials accidentally exposed in your Git repository.
security_review: Perform security review analysis on code diffs. Analyzes local uncommitted changes (both staged and unstaged) compared to HEAD, or diffs between the main branch and the last commit. Requires the Enterprise Edition. You must specify your namespace in the MCP server configuration. You must also enable AI security code review for your namespace in the Endor Labs platform. See AI security code review for setup instructions.
After you set up the MCP server, you can choose to disable the tools that you do not want to use.
The Endor Labs MCP server integrates directly into Cursor to scan your code as you write, catching security issues before they reach production.
The Endor Labs MCP server has two editions:
Developer Edition: A free edition that requires no configuration. A browser window opens on first use for authentication via GitHub, GitLab, or Google. The Developer Edition provides access to default security policies from Endor Labs.
Enterprise Edition: A paid edition that enforces your organization’s specific security policies. Authenticate using GitHub, GitLab, Google, or SSO. You must specify your namespace to access your organization’s policies.
Additionally, if you already have Endor Labs configured locally (for example, from a previous endorctl init command), the MCP server can use your pre-existing configuration.
Developer Edition
The Developer Edition is free and uses default security policies from Endor Labs. When you use the MCP server for the first time, a browser window opens for authentication through GitHub, GitLab, or Google.
For manual configuration, copy and paste the following JSON directly into a .cursor/mcp.json file in the root of your repository.
The Enterprise Edition enforces your organization’s specific security policies. You need your Endor Labs namespace and an authentication method. Ensure that your developers have Read-Only permissions to Endor Labs. See Authorization policies for more details.
Configure the Enterprise Edition using the tool.
Enterprise Edition Configuration
Select your authentication method and generate the configuration for Cursor.
For manual configuration, copy and paste the following JSON directly into a .cursor/mcp.json file in the root of your repository.
View JSON configuration
MCP server configuration for mcp.json
The following parameters are used to configure the MCP server. All parameters are optional.
ENDOR_MCP_SERVER_AUTH_MODE: The authentication mode to use for the MCP server. You can use the following authentication modes: github, gitlab, google, sso. If you choose sso, you must add ENDOR_MCP_SERVER_AUTH_TENANT as an additional parameter. If not specified, the MCP server defaults to browser authentication for the Developer Edition.
ENDOR_NAMESPACE: The namespace to use for the MCP server. Required for Enterprise Edition to access your organization’s specific policies. Not needed for Developer Edition.
ENDOR_MCP_SERVER_AUTH_TENANT: The tenant name for SSO authentication. Required when ENDOR_MCP_SERVER_AUTH_MODE is set to sso for Enterprise Edition access.
Verify the installation
After you add the MCP server configuration for either edition:
Select Settings > Cursor Settings > Tools & MCP.
Confirm endor-cli-tools appears in the list and is enabled.
Try a test prompt
After installing the MCP server, try the following prompt in your AI chat or CLI to verify that the tools are working.
Check if the npm package lodash version 4.17.20 has any vulnerabilities
The MCP server uses the check_dependency_for_vulnerabilities tool to check for known vulnerabilities and return the results. If you see a response with vulnerability details, the MCP server is working correctly.
Configure Cursor rules
To enhance the MCP server integration, you can add custom rules for your project. These rules are custom prompts specific to your project.
Navigate to the root of your repository.
In the .cursor/rules directory, create an .mdc file to add specific instructions.
Add appropriate rules for your project in the .cursor/rules/endorlabs.mdc file. For example, you can add a rule to check if the code is free from vulnerabilities.
Example Cursor rules
You can use the following Cursor rules as a quick start for the Endor Labs MCP server. Modify the rules to meet your specific organization’s needs. We recommend that you store each cursor rule in a separate file. For more information, refer to the Cursor documentation.
---description:"Ensure newly added dependencies are checked for vulnerabilities and project stays clean"globs:'**/package.json, **/package-lock.json, **/yarn.lock, **/pnpm-lock.yaml, **/requirements.txt, **/Pipfile, **/Pipfile.lock, **/pyproject.toml, **/poetry.lock, **/go.mod, **/go.sum, **/Cargo.toml, **/Cargo.lock, **/pom.xml, **/build.gradle, **/build.gradle.kts, **/gradle.lockfile, **/composer.json, **/composer.lock'alwaysApply:true---# Software Composition Analysis (SCA) Rule (Endor Labs via MCP)This project uses Endor Labs for automated dependency (SCA) scanning, integrated through the MCP server as configured in `.cursor/mcp.json`.## WorkflowEvery time a manifest or lockfile listed above is created or modified in any way immediately do the following prior to performing your next task.**Important**:Do not proceed after creating or modifying a manifest file without running this first. Do not write any other code or continue with your existing prompt. This is top priority whenever a manifest file is created or updated.- Run `endor-cli-tools` using the `check_dependency_for_vulnerabilities` tool via the MCP server.- Provide the **ecosystem**, **dependency name**, and **version** always when making this tool call. Do not forget to provide a version.- If a vulnerability or error is identified:- Upgrade to the suggested safe version, or- Replace the dependency with a non-vulnerable alternative.- The AI agent must attempt to automatically correct all detected errors and vulnerabilities before session completion.- Re-run the check using `endor-cli-tools` to confirm the issue is resolved.- If an error occurs in any MCP server tool call (such as missing required parameters like version, invalid arguments, or tool invocation failures):- The AI agent must review the error, determine the cause, and automatically correct the tool call or input parameters.- Re-attempt the tool call with the corrected parameters.- Continue this process until the tool call succeeds or it is determined that remediation is not possible, in which case the issue and reason must be reported.## Notes- All scans must be performed using the MCP server integration (`endor-cli-tools`) as configured in `.cursor/mcp.json`. Do not invoke `endorctl` directly.- For troubleshooting, ensure the MCP server is running and `endorctl` is installed and accessible in your environment.This rule ensures that all dependency changes are evaluated for risk at the time of introduction, and that the project remains clean and secure after each coding session. The scan may be performed at the end of an agent session, provided all modifications are checked and remediated before session completion.
---description:"Scan for leaked secrets on file modification"globs:'**/*'alwaysApply:true---# Leaked Secrets Detection Rule (Endor Labs via MCP)This project uses @Endor Labs for automated security scanning, integrated through the MCP server as configured in `.cursor/mcp.json`.## WorkflowWhenever a file is modified in the repository, and before the end of an agent session:- Run `endor-cli-tools` using the `scan` tool via the MCP server to check for leaked secrets.- Ensure the scan includes all file types and respects `.gitignore` unless otherwise configured.- If any secrets or errors are detected:- Remove the exposed secret or correct the error immediately.- The AI agent must attempt to automatically correct all detected secrets and errors before session completion.- Re-run the scan to verify the secret or error has been properly removed or resolved.- If an error occurs in any MCP server tool call (such as missing required parameters like version, invalid arguments, or tool invocation failures):- The AI agent must review the error, determine the cause, and automatically correct the tool call or input parameters.- Re-attempt the tool call with the corrected parameters.- Continue this process until the tool call succeeds or it is determined that remediation is not possible, in which case the issue and reason must be reported.- Save scan results and remediation steps in a security log or as comments for audit purposes.## Notes- All scans must be performed using the MCP server integration (`endor-cli-tools`) as configured in `.cursor/mcp.json`. Do not invoke `endorctl` directly.- For troubleshooting, ensure the MCP server is running and `endorctl` is installed and accessible in your environment.- **Important**:This scan must use the path of the directory from which the changed files are in. Do not attempt to set the path directly to a file as it must be a directory. Use absolute paths like /Users/username/mcp-server-demo/backend rather than relative paths like 'backend'This rule ensures no accidental credentials, tokens, API keys, or secrets are committed or remain in the project history. The scan may be performed at the end of an agent session, provided all modifications are checked and remediated before session completion.
---description:"Run SAST scan using endor-cli-tools on source code changes"globs:'**/*.c, **/*.cpp, **/*.cc, **/*.cs, **/*.go, **/*.java, **/*.js, **/*.jsx, **/*.ts, **/*.tsx, **/*.py, **/*.php, **/*.rb, **/*.rs, **/*.kt, **/*.kts, **/*.scala, **/*.swift, **/*.dart, **/*.html, **/*.yaml, **/*.yml, **/*.json, **/*.xml, **/*.sh, **/*.bash, **/*.clj, **/*.cljs, **/*.ex, **/*.exs, **/*.lua'alwaysApply:true---# Static Application Security Testing (SAST) Rule (Endor Labs via MCP)This project uses @Endor Labs for automated SAST, integrated through the MCP server as configured in `.cursor/mcp.json`.## WorkflowWhenever a file is modified in the repository, and before the end of an agent session perform the following workflow:- Run `endor-cli-tools` using the `scan` tool via the MCP server to perform SAST scans as described above.- If any vulnerabilities or errors are found:- Present the issues to the user.- The AI agent must attempt to automatically correct all errors and vulnerabilities, including code errors, security issues, and best practice violations, before session completion.- Recommend and apply appropriate fixes (e.g., input sanitization, validation, escaping, secure APIs).- Continue scanning and correcting until all critical issues have been resolved or no further automated remediation is possible.- If an error occurs in any MCP server tool call (such as missing required parameters like version, invalid arguments, or tool invocation failures):- The AI agent must review the error, determine the cause, and automatically correct the tool call or input parameters.- Re-attempt the tool call with the corrected parameters.- Continue this process until the tool call succeeds or it is determined that remediation is not possible, in which case the issue and reason must be reported.- Save scan results and remediation steps in a security log or as comments for audit purposes.## Notes- All scans must be performed using the MCP server integration (`endor-cli-tools`) as configured in `.cursor/mcp.json`. Do not invoke `endorctl` directly.- For troubleshooting, ensure the MCP server is running and `endorctl` is installed and accessible in your environment.- Do not invoke Opengrep directly.- **Important**:This scan must use the path of the directory from which the changed files are in. Do not attempt to set the path directly to a file as it must be a directory. Use absolute paths like /Users/username/mcp-server-demo/backend rather than relative paths like 'backend'This rule ensures all code changes are automatically reviewed and remediated for common security vulnerabilities and errors using `endor-cli-tools` and the MCP server, with Opengrep as the underlying engine.
How to use the Endor Labs MCP server
The Endor Labs MCP server provides the following tools:
check_dependency_for_vulnerabilities: Check if a dependency in your project is vulnerable.
check_dependency_for_risks: Check a dependency for security risks including vulnerabilities and malware.
get_endor_vulnerability: Get the details of a specific vulnerability from the Endor Labs vulnerability database.
get_resource: Retrieve additional context from commonly used Endor Labs resources about your software, such as findings, vulnerabilities, and projects.
scan: Run an Endor Labs security scan to detect risks in your open source dependencies, find common security issues, and spot any credentials accidentally exposed in your Git repository.
security_review: Perform security review analysis on code diffs. Analyzes local uncommitted changes (both staged and unstaged) compared to HEAD, or diffs between the main branch and the last commit. Requires the Enterprise Edition. You must specify your namespace in the MCP server configuration. You must also enable AI security code review for your namespace in the Endor Labs platform. See AI security code review for setup instructions.
After you set up the MCP server, you can choose to disable the tools that you do not want to use.
Troubleshooting
Use the following troubleshooting steps to resolve common issues with the Endor Labs MCP server.
MCP server shows as disconnected or errored
Verify Node.js and npx are available: run npx --version in your terminal. If the command fails, install Node.js version 18 or later.
Restart your IDE or CLI to reload the MCP server configuration.
Check your config for syntax errors. Use a JSON or TOML validator, or switch to the configuration tool or CLI command instead of manual editing.
Authentication browser window does not open
Ensure your IDE or CLI can open a browser. Check firewall or security software that might block browser launch.
For Enterprise Edition, confirm ENDOR_MCP_SERVER_AUTH_MODE is set correctly (google, github, gitlab, or sso). For SSO, ensure ENDOR_MCP_SERVER_AUTH_TENANT is provided.
endorctl download times out
If npx -y endorctl hangs or times out (for example, behind a corporate proxy or firewall), install endorctl globally and update your MCP config to use it. For more information, see Install endorctl.
After installing endorctl, update your MCP config to call endorctl directly instead of npx.
Alternatively, configure your proxy settings for npm.
Tools return errors when invoked
If you are using the Enterprise Edition, verify whether your namespace is correct and that your user has Read-Only permissions. See Authorization policies for details.
Ensure endorctl is on your PATH if you installed it globally instead of using npx.
Check that the working directory or project path is valid when invoking tools.
Config file has a syntax error and the IDE gives no useful message
IDEs often fail silently on invalid configuration. Validate your config file (for example, .cursor/mcp.json, .vscode/mcp.json, .mcp.json, or .codex/config.toml) with a JSON or TOML linter. Alternatively, use the configuration tool or CLI command for your platform instead of editing the file manually.
Prerequisites for Endor Labs MCP server on Windows
On Windows, ensure the following prerequisites are met:
Node.js is installed
npm global bin directory is in your PATH
Install Node.js
If Node.js is not installed, download and install the LTS version from nodejs.org. During installation, ensure the option to add Node.js to PATH is selected.
Configure the PATH environment variable
After installing Node.js, verify that the npm global bin directory is in your PATH:
Run the following command in the command line.
npmconfiggetprefix
This returns the npm global directory path, typically C:\Users\<YourUsername>\AppData\Roaming\npm.
Add the npm global directory path to the Path variable under User variables in your system’s environment variables settings.
Restart for the PATH changes to take effect.
Verify the setup
Run the following command in your terminal.
npx--version
If this returns a version number, your Windows setup is complete and the MCP server can use npx to run endorctl.
Endor Labs MCP server in Claude Code
Beta
The Endor Labs MCP server integrates directly into Claude Code to scan your code as you write, catching security issues before they reach production.
The Endor Labs MCP server has two editions:
Developer Edition: A free edition that requires no configuration. A browser window opens on first use for authentication via GitHub, GitLab, or Google. The Developer Edition provides access to default security policies from Endor Labs.
Enterprise Edition: A paid edition that enforces your organization’s specific security policies. Authenticate using GitHub, GitLab, Google, or SSO. You must specify your namespace to access your organization’s policies.
Additionally, if you already have Endor Labs configured locally (for example, from a previous endorctl init command), the MCP server can use your pre-existing configuration.
Developer Edition
The Developer Edition is free and uses default security policies from Endor Labs. When you use the MCP server for the first time, a browser window opens for authentication through GitHub, GitLab, or Google.
Run the following command to add the MCP server to your project. This adds the server with --scope local (available only to you in the current project). See Scope options for other scopes.
claude mcp add endor-cli-tools -- npx -y endorctl ai-tools mcp-server
Alternatively, create an .mcp.json file in the root of your repository and add the following configuration. This uses project scope, which is shared with everyone working on the repository.
The Enterprise Edition enforces your organization’s specific security policies. You need your Endor Labs namespace and an authentication method. Ensure that your developers have Read-Only permissions to Endor Labs. See Authorization policies for more details.
Configure the Enterprise Edition using the tool.
Enterprise Edition Configuration
Select your authentication method and copy the command to add the MCP server to Claude Code.
For manual configuration, copy and paste the following into your MCP configuration file.
View JSON or TOML configuration
The following parameters are used to configure the MCP server. All parameters are optional.
ENDOR_MCP_SERVER_AUTH_MODE: The authentication mode to use for the MCP server. You can use the following authentication modes: github, gitlab, google, sso. If you choose sso, you must add ENDOR_MCP_SERVER_AUTH_TENANT as an additional parameter. If not specified, the MCP server defaults to browser authentication for the Developer Edition.
ENDOR_NAMESPACE: The namespace to use for the MCP server. Required for Enterprise Edition to access your organization’s specific policies. Not needed for Developer Edition.
ENDOR_MCP_SERVER_AUTH_TENANT: The tenant name for SSO authentication. Required when ENDOR_MCP_SERVER_AUTH_MODE is set to sso for Enterprise Edition access.
Verify the installation
claude mcp list
Confirm that endor-cli-tools appears in the list. You can also use /mcp in Claude Code to view active MCP servers.
Try a test prompt
After installing the MCP server, try the following prompt in your AI chat or CLI to verify that the tools are working.
Check if the npm package lodash version 4.17.20 has any vulnerabilities
The MCP server uses the check_dependency_for_vulnerabilities tool to check for known vulnerabilities and return the results. If you see a response with vulnerability details, the MCP server is working correctly.
Scope options
Claude Code supports three MCP configuration scopes:
--scope local: Available only to you in the current project (default).
--scope project: Shared with everyone in the project via .mcp.json file.
--scope user: Available to you across all projects.
Manage MCP servers
claude mcp list
claude mcp get endor-cli-tools
claude mcp remove endor-cli-tools
In Claude Code, use /mcp to view and manage your active MCP servers.
Configure CLAUDE.md
To enhance the MCP server integration, you can add instructions in CLAUDE.md at the root of your repository. Claude Code reads CLAUDE.md files to guide AI development with your project-specific instructions.
Navigate to the root of your repository.
Create or edit the CLAUDE.md file in the root of your repository.
Add appropriate rules for your project. For example, you can add a rule to check if the code is free from vulnerabilities.
Example CLAUDE.md instructions
You can use the following CLAUDE.md instructions as a quick start for the Endor Labs MCP server. Modify the instructions to meet your specific organization’s needs. For more information, refer to the Claude Code documentation.
# Software Composition Analysis (SCA) Rule (Endor Labs via MCP)

This project uses Endor Labs for automated dependency (SCA) scanning, integrated through the MCP server.

## Workflow

Every time a manifest or lockfile (package.json, requirements.txt, go.mod, pom.xml, etc.) is created or modified in any way, immediately do the following prior to performing your next task.

**Important**: Do not proceed after creating or modifying a manifest file without running this first.

- Run `endor-cli-tools` using the `check_dependency_for_vulnerabilities` tool via the MCP server.
- Provide the **ecosystem**, **dependency name**, and **version** always when making this tool call.
- If a vulnerability or error is identified:
  - Upgrade to the suggested safe version, or
  - Replace the dependency with a non-vulnerable alternative.
- Re-run the check using `endor-cli-tools` to confirm the issue is resolved.

## Notes
- All scans must be performed using the MCP server integration (`endor-cli-tools`). Do not invoke `endorctl` directly.
# Leaked Secrets Detection Rule (Endor Labs via MCP)

This project uses [Endor Labs](https://docs.endorlabs.com/) for automated security scanning, integrated through the MCP server.

## Workflow

Whenever a file is modified in the repository, and before the end of an agent session:

- Run `endor-cli-tools` using the `scan` tool via the MCP server to check for leaked secrets.
- If any secrets or errors are detected:
  - Remove the exposed secret or correct the error immediately.
  - Re-run the scan to verify the secret has been properly removed.
- Save scan results and remediation steps in a security log or as comments for audit purposes.

## Notes
- All scans must be performed using the MCP server integration (`endor-cli-tools`). Do not invoke `endorctl` directly.
- This scan must use the path of the directory from which the changed files are in. Use absolute paths.
# Static Application Security Testing (SAST) Rule (Endor Labs via MCP)

This project uses [Endor Labs](https://docs.endorlabs.com/) for automated SAST, integrated through the MCP server.

## Workflow

Whenever a file is modified in the repository, and before the end of an agent session:

- Run `endor-cli-tools` using the `scan` tool via the MCP server to perform SAST scans.
- If any vulnerabilities or errors are found:
  - Present the issues to the user.
  - Recommend and apply appropriate fixes (e.g., input sanitization, validation, escaping, secure APIs).
- Save scan results and remediation steps in a security log or as comments for audit purposes.

## Notes
- All scans must be performed using the MCP server integration (`endor-cli-tools`). Do not invoke `endorctl` directly.
- Do not invoke Opengrep directly.
- This scan must use the path of the directory from which the changed files are in. Use absolute paths.
How to use the Endor Labs MCP server
The Endor Labs MCP server provides the following tools:
check_dependency_for_vulnerabilities: Check if a dependency in your project is vulnerable.
check_dependency_for_risks: Check a dependency for security risks including vulnerabilities and malware.
get_endor_vulnerability: Get the details of a specific vulnerability from the Endor Labs vulnerability database.
get_resource: Retrieve additional context from commonly used Endor Labs resources about your software, such as findings, vulnerabilities, and projects.
scan: Run an Endor Labs security scan to detect risks in your open source dependencies, find common security issues, and spot any credentials accidentally exposed in your Git repository.
security_review: Perform security review analysis on code diffs. Analyzes local uncommitted changes (both staged and unstaged) compared to HEAD, or diffs between the main branch and the last commit. Requires the Enterprise Edition. You must specify your namespace in the MCP server configuration. You must also enable AI security code review for your namespace in the Endor Labs platform. See AI security code review for setup instructions.
After you set up the MCP server, you can choose to disable the tools that you do not want to use.
Troubleshooting
Use the following troubleshooting steps to resolve common issues with the Endor Labs MCP server.
MCP server shows as disconnected or errored
Verify Node.js and npx are available: run npx --version in your terminal. If the command fails, install Node.js version 18 or later.
Restart your IDE or CLI to reload the MCP server configuration.
Check your config for syntax errors. Use a JSON or TOML validator, or switch to the configuration tool or CLI command instead of manual editing.
Authentication browser window does not open
Ensure your IDE or CLI can open a browser. Check firewall or security software that might block browser launch.
For Enterprise Edition, confirm ENDOR_MCP_SERVER_AUTH_MODE is set correctly (google, github, gitlab, or sso). For SSO, ensure ENDOR_MCP_SERVER_AUTH_TENANT is provided.
endorctl download times out
If npx -y endorctl hangs or times out (for example, behind a corporate proxy or firewall), install endorctl globally and update your MCP config to use it. For more information, see Install endorctl.
After installing endorctl, update your MCP config to call endorctl directly instead of npx.
Alternatively, configure your proxy settings for npm.
Tools return errors when invoked
If you are using the Enterprise Edition, verify whether your namespace is correct and that your user has Read-Only permissions. See Authorization policies for details.
Ensure endorctl is on your PATH if you installed it globally instead of using npx.
Check that the working directory or project path is valid when invoking tools.
Config file has a syntax error and the IDE gives no useful message
IDEs often fail silently on invalid configuration. Validate your config file (for example, .cursor/mcp.json, .vscode/mcp.json, .mcp.json, or .codex/config.toml) with a JSON or TOML linter. Alternatively, use the configuration tool or CLI command for your platform instead of editing the file manually.
Prerequisites for Endor Labs MCP server on Windows
On Windows, ensure the following prerequisites are met:
Node.js is installed
npm global bin directory is in your PATH
Install Node.js
If Node.js is not installed, download and install the LTS version from nodejs.org. During installation, ensure the option to add Node.js to PATH is selected.
Configure the PATH environment variable
After installing Node.js, verify that the npm global bin directory is in your PATH:
Run the following command in the command line.
npmconfiggetprefix
This returns the npm global directory path, typically C:\Users\<YourUsername>\AppData\Roaming\npm.
Add the npm global directory path to the Path variable under User variables in your system’s environment variables settings.
Restart for the PATH changes to take effect.
Verify the setup
Run the following command in your terminal.
npx--version
If this returns a version number, your Windows setup is complete and the MCP server can use npx to run endorctl.
Endor Labs MCP server in OpenAI Codex
Beta
The Endor Labs MCP server integrates directly into OpenAI Codex to scan your code as you write, catching security issues before they reach production.
The Endor Labs MCP server has two editions:
Developer Edition: A free edition that requires no configuration. A browser window opens on first use for authentication via GitHub, GitLab, or Google. The Developer Edition provides access to default security policies from Endor Labs.
Enterprise Edition: A paid edition that enforces your organization’s specific security policies. Authenticate using GitHub, GitLab, Google, or SSO. You must specify your namespace to access your organization’s policies.
Additionally, if you already have Endor Labs configured locally (for example, from a previous endorctl init command), the MCP server can use your pre-existing configuration.
Developer Edition
The Developer Edition is free and uses default security policies from Endor Labs. When you use the MCP server for the first time, a browser window opens for authentication through GitHub, GitLab, or Google.
Run the following command to add the MCP server to your project.
The Enterprise Edition enforces your organization’s specific security policies. You need your Endor Labs namespace and an authentication method. Ensure that your developers have Read-Only permissions to Endor Labs. See Authorization policies for more details.
Configure the Enterprise Edition using the tool.
Enterprise Edition Configuration
Select your authentication method and copy the command to add the MCP server to OpenAI Codex.
For manual configuration, copy and paste the following into your MCP configuration file.
View JSON or TOML configuration
The following parameters are used to configure the MCP server. All parameters are optional.
ENDOR_MCP_SERVER_AUTH_MODE: The authentication mode to use for the MCP server. You can use the following authentication modes: github, gitlab, google, sso. If you choose sso, you must add ENDOR_MCP_SERVER_AUTH_TENANT as an additional parameter. If not specified, the MCP server defaults to browser authentication for the Developer Edition.
ENDOR_NAMESPACE: The namespace to use for the MCP server. Required for Enterprise Edition to access your organization’s specific policies. Not needed for Developer Edition.
ENDOR_MCP_SERVER_AUTH_TENANT: The tenant name for SSO authentication. Required when ENDOR_MCP_SERVER_AUTH_MODE is set to sso for Enterprise Edition access.
Verify the installation
codex mcp list
Confirm that endor-cli-tools appears in the list. You can also use /mcp in the Codex TUI to view active MCP servers.
Try a test prompt
After installing the MCP server, try the following prompt in your AI chat or CLI to verify that the tools are working.
Check if the npm package lodash version 4.17.20 has any vulnerabilities
The MCP server uses the check_dependency_for_vulnerabilities tool to check for known vulnerabilities and return the results. If you see a response with vulnerability details, the MCP server is working correctly.
Manage MCP server tools
In the Codex TUI, use /mcp to see your active MCP servers. You can also disable specific tools in the config.toml file:
To enhance the MCP server integration, you can add instructions in AGENTS.md at the root of your repository. Codex reads AGENTS.md files to guide AI development with your project-specific instructions.
Navigate to the root of your repository.
Create or edit the AGENTS.md file in the root of your repository.
Add appropriate rules for your project. For example, you can add a rule to check if the code is free from vulnerabilities.
Example AGENTS.md instructions
You can use the following AGENTS.md instructions as a quick start for the Endor Labs MCP server. Modify the instructions to meet your specific organization’s needs. For more information, refer to the OpenAI Codex AGENTS.md documentation.
# Software Composition Analysis (SCA) Rule (Endor Labs via MCP)

This project uses Endor Labs for automated dependency (SCA) scanning, integrated through the MCP server.

## Workflow

Every time a manifest or lockfile (package.json, requirements.txt, go.mod, pom.xml, etc.) is created or modified in any way, immediately do the following prior to performing your next task.

**Important**: Do not proceed after creating or modifying a manifest file without running this first.

- Run `endor-cli-tools` using the `check_dependency_for_vulnerabilities` tool via the MCP server.
- Provide the **ecosystem**, **dependency name**, and **version** always when making this tool call.
- If a vulnerability or error is identified:
  - Upgrade to the suggested safe version, or
  - Replace the dependency with a non-vulnerable alternative.
- Re-run the check using `endor-cli-tools` to confirm the issue is resolved.

## Notes
- All scans must be performed using the MCP server integration (`endor-cli-tools`). Do not invoke `endorctl` directly.
# Leaked Secrets Detection Rule (Endor Labs via MCP)

This project uses [Endor Labs](https://docs.endorlabs.com/) for automated security scanning, integrated through the MCP server.

## Workflow

Whenever a file is modified in the repository, and before the end of an agent session:

- Run `endor-cli-tools` using the `scan` tool via the MCP server to check for leaked secrets.
- If any secrets or errors are detected:
  - Remove the exposed secret or correct the error immediately.
  - Re-run the scan to verify the secret has been properly removed.
- Save scan results and remediation steps in a security log or as comments for audit purposes.

## Notes
- All scans must be performed using the MCP server integration (`endor-cli-tools`). Do not invoke `endorctl` directly.
- This scan must use the path of the directory from which the changed files are in. Use absolute paths.
# Static Application Security Testing (SAST) Rule (Endor Labs via MCP)

This project uses [Endor Labs](https://docs.endorlabs.com/) for automated SAST, integrated through the MCP server.

## Workflow

Whenever a file is modified in the repository, and before the end of an agent session:

- Run `endor-cli-tools` using the `scan` tool via the MCP server to perform SAST scans.
- If any vulnerabilities or errors are found:
  - Present the issues to the user.
  - Recommend and apply appropriate fixes (e.g., input sanitization, validation, escaping, secure APIs).
- Save scan results and remediation steps in a security log or as comments for audit purposes.

## Notes
- All scans must be performed using the MCP server integration (`endor-cli-tools`). Do not invoke `endorctl` directly.
- Do not invoke Opengrep directly.
- This scan must use the path of the directory from which the changed files are in. Use absolute paths.
How to use the Endor Labs MCP server
The Endor Labs MCP server provides the following tools:
check_dependency_for_vulnerabilities: Check if a dependency in your project is vulnerable.
check_dependency_for_risks: Check a dependency for security risks including vulnerabilities and malware.
get_endor_vulnerability: Get the details of a specific vulnerability from the Endor Labs vulnerability database.
get_resource: Retrieve additional context from commonly used Endor Labs resources about your software, such as findings, vulnerabilities, and projects.
scan: Run an Endor Labs security scan to detect risks in your open source dependencies, find common security issues, and spot any credentials accidentally exposed in your Git repository.
security_review: Perform security review analysis on code diffs. Analyzes local uncommitted changes (both staged and unstaged) compared to HEAD, or diffs between the main branch and the last commit. Requires the Enterprise Edition. You must specify your namespace in the MCP server configuration. You must also enable AI security code review for your namespace in the Endor Labs platform. See AI security code review for setup instructions.
After you set up the MCP server, you can choose to disable the tools that you do not want to use.
Troubleshooting
Use the following troubleshooting steps to resolve common issues with the Endor Labs MCP server.
MCP server shows as disconnected or errored
Verify Node.js and npx are available: run npx --version in your terminal. If the command fails, install Node.js version 18 or later.
Restart your IDE or CLI to reload the MCP server configuration.
Check your config for syntax errors. Use a JSON or TOML validator, or switch to the configuration tool or CLI command instead of manual editing.
Authentication browser window does not open
Ensure your IDE or CLI can open a browser. Check firewall or security software that might block browser launch.
For Enterprise Edition, confirm ENDOR_MCP_SERVER_AUTH_MODE is set correctly (google, github, gitlab, or sso). For SSO, ensure ENDOR_MCP_SERVER_AUTH_TENANT is provided.
endorctl download times out
If npx -y endorctl hangs or times out (for example, behind a corporate proxy or firewall), install endorctl globally and update your MCP config to use it. For more information, see Install endorctl.
After installing endorctl, update your MCP config to call endorctl directly instead of npx.
Alternatively, configure your proxy settings for npm.
Tools return errors when invoked
If you are using the Enterprise Edition, verify whether your namespace is correct and that your user has Read-Only permissions. See Authorization policies for details.
Ensure endorctl is on your PATH if you installed it globally instead of using npx.
Check that the working directory or project path is valid when invoking tools.
Config file has a syntax error and the IDE gives no useful message
IDEs often fail silently on invalid configuration. Validate your config file (for example, .cursor/mcp.json, .vscode/mcp.json, .mcp.json, or .codex/config.toml) with a JSON or TOML linter. Alternatively, use the configuration tool or CLI command for your platform instead of editing the file manually.
Prerequisites for Endor Labs MCP server on Windows
On Windows, ensure the following prerequisites are met:
Node.js is installed
npm global bin directory is in your PATH
Install Node.js
If Node.js is not installed, download and install the LTS version from nodejs.org. During installation, ensure the option to add Node.js to PATH is selected.
Configure the PATH environment variable
After installing Node.js, verify that the npm global bin directory is in your PATH:
Run the following command in the command line.
npmconfiggetprefix
This returns the npm global directory path, typically C:\Users\<YourUsername>\AppData\Roaming\npm.
Add the npm global directory path to the Path variable under User variables in your system’s environment variables settings.
Restart for the PATH changes to take effect.
Verify the setup
Run the following command in your terminal.
npx--version
If this returns a version number, your Windows setup is complete and the MCP server can use npx to run endorctl.
Endor Labs MCP server in Visual Studio Code
Beta
The Endor Labs MCP server integrates directly into Visual Studio Code to scan your code as you write, catching security issues before they reach production.
The Endor Labs MCP server has two editions:
Developer Edition: A free edition that requires no configuration. A browser window opens on first use for authentication via GitHub, GitLab, or Google. The Developer Edition provides access to default security policies from Endor Labs.
Enterprise Edition: A paid edition that enforces your organization’s specific security policies. Authenticate using GitHub, GitLab, Google, or SSO. You must specify your namespace to access your organization’s policies.
Additionally, if you already have Endor Labs configured locally (for example, from a previous endorctl init command), the MCP server can use your pre-existing configuration.
Developer Edition
The Developer Edition is free and uses default security policies from Endor Labs. When you use the MCP server for the first time, a browser window opens for authentication through GitHub, GitLab, or Google.
For manual configuration, copy and paste the following JSON directly into a .vscode/mcp.json file in the root of your repository.
The Enterprise Edition enforces your organization’s specific security policies. You need your Endor Labs namespace and an authentication method. Ensure that your developers have Read-Only permissions to Endor Labs. See Authorization policies for more details.
Configure the Enterprise Edition using the tool.
Enterprise Edition Configuration
Select your authentication method and generate the configuration for Visual Studio Code.
For manual configuration, copy and paste the following JSON directly into a .vscode/mcp.json file in the root of your repository.
View JSON configuration
MCP server configuration for mcp.json
The following parameters are used to configure the MCP server. All parameters are optional.
ENDOR_MCP_SERVER_AUTH_MODE: The authentication mode to use for the MCP server. You can use the following authentication modes: github, gitlab, google, sso. If you choose sso, you must add ENDOR_MCP_SERVER_AUTH_TENANT as an additional parameter. If not specified, the MCP server defaults to browser authentication for the Developer Edition.
ENDOR_NAMESPACE: The namespace to use for the MCP server. Required for Enterprise Edition to access your organization’s specific policies. Not needed for Developer Edition.
ENDOR_MCP_SERVER_AUTH_TENANT: The tenant name for SSO authentication. Required when ENDOR_MCP_SERVER_AUTH_MODE is set to sso for Enterprise Edition access.
Verify the installation
After you add the MCP server configuration for either edition:
Open the Chat view by pressing Cmd+Option+I (macOS) or Ctrl+Alt+I (Windows/Linux).
Switch to Agent mode.
Select the Settings icon and confirm MCP Server: endor-cli-tools appears and is enabled.
Try a test prompt
After installing the MCP server, try the following prompt in your AI chat or CLI to verify that the tools are working.
Check if the npm package lodash version 4.17.20 has any vulnerabilities
The MCP server uses the check_dependency_for_vulnerabilities tool to check for known vulnerabilities and return the results. If you see a response with vulnerability details, the MCP server is working correctly.
Use the MCP server with GitHub Copilot
To use the Endor Labs MCP server with GitHub Copilot in Visual Studio Code:
Open the Chat view by pressing Cmd+Option+I (macOS) or Ctrl+Alt+I (Windows/Linux).
Switch to Agent mode.
Select the Settings icon.
Select MCP Server: endor-cli-tools from the dropdown menu.
Set up Copilot rules in .github/instructions/*.md to use the Endor Labs MCP server throughout the development process. See Example Copilot rules for more information.
You can use Endor Labs tools in your chat prompts to scan for vulnerabilities.
Example Copilot rules
Copilot instructions define the guidelines that Copilot should follow throughout the development process. The following examples demonstrate how to use the Endor Labs MCP server within Copilot rules.
---description:"Ensure newly added dependencies are checked for vulnerabilities and project stays clean"applyTo:'**/package.json, **/package-lock.json, **/yarn.lock, **/pnpm-lock.yaml, **/requirements.txt, **/Pipfile, **/Pipfile.lock, **/pyproject.toml, **/poetry.lock, **/go.mod, **/go.sum, **/Cargo.toml, **/Cargo.lock, **/pom.xml, **/build.gradle, **/build.gradle.kts, **/gradle.lockfile, **/composer.json, **/composer.lock'alwaysApply:true---# Software Composition Analysis (SCA) Rule (Endor Labs via MCP)This project uses Endor Labs for automated dependency (SCA) scanning, integrated through the MCP server as configured in `.vscode/mcp.json`.## WorkflowEvery time a manifest or lockfile listed above is created or modified in any way immediately do the following prior to performing your next task.**Important**:Do not proceed after creating or modifying a manifest file without running this first. Do not write any other code or continue with your existing prompt. This is top priority whenever a manifest file is created or updated.- Run `endor-cli-tools` using the `check_dependency_for_vulnerabilities` tool via the MCP server.- Provide the **ecosystem**, **dependency name**, and **version** always when making this tool call. Do not forget to provide a version.- If a vulnerability or error is identified:- Upgrade to the suggested safe version, or- Replace the dependency with a non-vulnerable alternative.- The AI agent must attempt to automatically correct all detected errors and vulnerabilities before session completion.- Re-run the check using `endor-cli-tools` to confirm the issue is resolved.- If an error occurs in any MCP server tool call (such as missing required parameters like version, invalid arguments, or tool invocation failures):- The AI agent must review the error, determine the cause, and automatically correct the tool call or input parameters.- Re-attempt the tool call with the corrected parameters.- Continue this process until the tool call succeeds or it is determined that remediation is not possible, in which case the issue and reason must be reported.## Notes- All scans must be performed using the MCP server integration (`endor-cli-tools`) as configured in `.vscode/mcp.json`. Do not invoke `endorctl` directly.- For troubleshooting, ensure the MCP server is running and `endorctl` is installed and accessible in your environment.This rule ensures that all dependency changes are evaluated for risk at the time of introduction, and that the project remains clean and secure after each coding session. The scan may be performed at the end of an agent session, provided all modifications are checked and remediated before session completion.
---description:"Scan for leaked secrets on file modification"applyTo:'**/*'alwaysApply:true---# Leaked Secrets Detection Rule (Endor Labs via MCP)This project uses @Endor Labs for automated security scanning, integrated through the MCP server as configured in `.vscode/mcp.json`.## WorkflowWhenever a file is modified in the repository, and before the end of an agent session:- Run `endor-cli-tools` using the `scan` tool via the MCP server to check for leaked secrets.- Ensure the scan includes all file types and respects `.gitignore` unless otherwise configured.- If any secrets or errors are detected:- Remove the exposed secret or correct the error immediately.- The AI agent must attempt to automatically correct all detected secrets and errors before session completion.- Re-run the scan to verify the secret or error has been properly removed or resolved.- If an error occurs in any MCP server tool call (such as missing required parameters like version, invalid arguments, or tool invocation failures):- The AI agent must review the error, determine the cause, and automatically correct the tool call or input parameters.- Re-attempt the tool call with the corrected parameters.- Continue this process until the tool call succeeds or it is determined that remediation is not possible, in which case the issue and reason must be reported.- Save scan results and remediation steps in a security log or as comments for audit purposes.## Notes- All scans must be performed using the MCP server integration (`endor-cli-tools`) as configured in `.vscode/mcp.json`. Do not invoke `endorctl` directly.- For troubleshooting, ensure the MCP server is running and `endorctl` is installed and accessible in your environment.- **Important**:This scan must use the path of the directory from which the changed files are in. Do not attempt to set the path directly to a file as it must be a directory. Use absolute paths like /Users/username/mcp-server-demo/backend rather than relative paths like 'backend'This rule ensures no accidental credentials, tokens, API keys, or secrets are committed or remain in the project history. The scan may be performed at the end of an agent session, provided all modifications are checked and remediated before session completion.
---description:"Run SAST scan using endor-cli-tools on source code changes"applyTo:'**/*.c, **/*.cpp, **/*.cc, **/*.cs, **/*.go, **/*.java, **/*.js, **/*.jsx, **/*.ts, **/*.tsx, **/*.py, **/*.php, **/*.rb, **/*.rs, **/*.kt, **/*.kts, **/*.scala, **/*.swift, **/*.dart, **/*.html, **/*.yaml, **/*.yml, **/*.json, **/*.xml, **/*.sh, **/*.bash, **/*.clj, **/*.cljs, **/*.ex, **/*.exs, **/*.lua'alwaysApply:true---# Static Application Security Testing (SAST) Rule (Endor Labs via MCP)This project uses @Endor Labs for automated SAST, integrated through the MCP server as configured in `.vscode/mcp.json`.## WorkflowWhenever a file is modified in the repository, and before the end of an agent session perform the following workflow:- Run `endor-cli-tools` using the `scan` tool via the MCP server to perform SAST scans as described above.- If any vulnerabilities or errors are found:- Present the issues to the user.- The AI agent must attempt to automatically correct all errors and vulnerabilities, including code errors, security issues, and best practice violations, before session completion.- Recommend and apply appropriate fixes (e.g., input sanitization, validation, escaping, secure APIs).- Continue scanning and correcting until all critical issues have been resolved or no further automated remediation is possible.- If an error occurs in any MCP server tool call (such as missing required parameters like version, invalid arguments, or tool invocation failures):- The AI agent must review the error, determine the cause, and automatically correct the tool call or input parameters.- Re-attempt the tool call with the corrected parameters.- Continue this process until the tool call succeeds or it is determined that remediation is not possible, in which case the issue and reason must be reported.- Save scan results and remediation steps in a security log or as comments for audit purposes.## Notes- All scans must be performed using the MCP server integration (`endor-cli-tools`) as configured in `.vscode/mcp.json`. Do not invoke `endorctl` directly.- For troubleshooting, ensure the MCP server is running and `endorctl` is installed and accessible in your environment.- Do not invoke Opengrep directly.- **Important**:This scan must use the path of the directory from which the changed files are in. Do not attempt to set the path directly to a file as it must be a directory. Use absolute paths like /Users/username/mcp-server-demo/backend rather than relative paths like 'backend'This rule ensures all code changes are automatically reviewed and remediated for common security vulnerabilities and errors using `endor-cli-tools` and the MCP server, with Opengrep as the underlying engine.
How to use the Endor Labs MCP server
The Endor Labs MCP server provides the following tools:
check_dependency_for_vulnerabilities: Check if a dependency in your project is vulnerable.
check_dependency_for_risks: Check a dependency for security risks including vulnerabilities and malware.
get_endor_vulnerability: Get the details of a specific vulnerability from the Endor Labs vulnerability database.
get_resource: Retrieve additional context from commonly used Endor Labs resources about your software, such as findings, vulnerabilities, and projects.
scan: Run an Endor Labs security scan to detect risks in your open source dependencies, find common security issues, and spot any credentials accidentally exposed in your Git repository.
security_review: Perform security review analysis on code diffs. Analyzes local uncommitted changes (both staged and unstaged) compared to HEAD, or diffs between the main branch and the last commit. Requires the Enterprise Edition. You must specify your namespace in the MCP server configuration. You must also enable AI security code review for your namespace in the Endor Labs platform. See AI security code review for setup instructions.
After you set up the MCP server, you can choose to disable the tools that you do not want to use.
Troubleshooting
Use the following troubleshooting steps to resolve common issues with the Endor Labs MCP server.
MCP server shows as disconnected or errored
Verify Node.js and npx are available: run npx --version in your terminal. If the command fails, install Node.js version 18 or later.
Restart your IDE or CLI to reload the MCP server configuration.
Check your config for syntax errors. Use a JSON or TOML validator, or switch to the configuration tool or CLI command instead of manual editing.
Authentication browser window does not open
Ensure your IDE or CLI can open a browser. Check firewall or security software that might block browser launch.
For Enterprise Edition, confirm ENDOR_MCP_SERVER_AUTH_MODE is set correctly (google, github, gitlab, or sso). For SSO, ensure ENDOR_MCP_SERVER_AUTH_TENANT is provided.
endorctl download times out
If npx -y endorctl hangs or times out (for example, behind a corporate proxy or firewall), install endorctl globally and update your MCP config to use it. For more information, see Install endorctl.
After installing endorctl, update your MCP config to call endorctl directly instead of npx.
Alternatively, configure your proxy settings for npm.
Tools return errors when invoked
If you are using the Enterprise Edition, verify whether your namespace is correct and that your user has Read-Only permissions. See Authorization policies for details.
Ensure endorctl is on your PATH if you installed it globally instead of using npx.
Check that the working directory or project path is valid when invoking tools.
Config file has a syntax error and the IDE gives no useful message
IDEs often fail silently on invalid configuration. Validate your config file (for example, .cursor/mcp.json, .vscode/mcp.json, .mcp.json, or .codex/config.toml) with a JSON or TOML linter. Alternatively, use the configuration tool or CLI command for your platform instead of editing the file manually.
Prerequisites for Endor Labs MCP server on Windows
On Windows, ensure the following prerequisites are met:
Node.js is installed
npm global bin directory is in your PATH
Install Node.js
If Node.js is not installed, download and install the LTS version from nodejs.org. During installation, ensure the option to add Node.js to PATH is selected.
Configure the PATH environment variable
After installing Node.js, verify that the npm global bin directory is in your PATH:
Run the following command in the command line.
npmconfiggetprefix
This returns the npm global directory path, typically C:\Users\<YourUsername>\AppData\Roaming\npm.
Add the npm global directory path to the Path variable under User variables in your system’s environment variables settings.
Restart for the PATH changes to take effect.
Verify the setup
Run the following command in your terminal.
npx--version
If this returns a version number, your Windows setup is complete and the MCP server can use npx to run endorctl.
Endor Labs MCP server in Devin
Beta
The Endor Labs MCP server integrates directly into Devin to scan your code as you write, catching security issues before they reach production.
Developer Edition not supported
The Endor Labs MCP server Developer Edition is currently not supported with Devin AI.
Prerequisites for Endor Labs MCP server
Ensure that the following prerequisites are met:
A Devin account with access to the MCP Marketplace
The Endor Labs MCP server provides the following tools:
check_dependency_for_vulnerabilities: Check if a dependency in your project is vulnerable.
check_dependency_for_risks: Check a dependency for security risks including vulnerabilities and malware.
get_endor_vulnerability: Get the details of a specific vulnerability from the Endor Labs vulnerability database.
get_resource: Retrieve additional context from commonly used Endor Labs resources about your software, such as findings, vulnerabilities, and projects.
scan: Run an Endor Labs security scan to detect risks in your open source dependencies, find common security issues, and spot any credentials accidentally exposed in your Git repository.
security_review: Perform security review analysis on code diffs. Analyzes local uncommitted changes (both staged and unstaged) compared to HEAD, or diffs between the main branch and the last commit. Requires the Enterprise Edition. You must specify your namespace in the MCP server configuration. You must also enable AI security code review for your namespace in the Endor Labs platform. See AI security code review for setup instructions.
After you set up the MCP server, you can choose to disable the tools that you do not want to use.
Add Endor Labs MCP server through the MCP Marketplace
Click the server to view its details and manage its tools.
Configure Devin Knowledge
To enhance the MCP server integration, you can add instructions through Devin Knowledge. Knowledge entries guide Devin’s AI development with your project-specific instructions.
Create a new Knowledge entry for Endor Labs security scanning.
Add appropriate instructions for your project. For example, you can add a rule to check if the code is free from vulnerabilities.
You can also create a Playbook to automate security scanning workflows with the Endor Labs MCP server.
Example Knowledge instructions
You can use the following Knowledge instructions as a quick start for the Endor Labs MCP server. Modify the instructions to meet your specific organization’s needs. For more information, refer to the Devin Knowledge documentation.
# Software Composition Analysis (SCA) Rule (Endor Labs MCP server)

This project uses Endor Labs for automated dependency (SCA) scanning, integrated through the MCP server.

## Workflow

Every time a manifest or lockfile (`package.json`, `requirements.txt`, `go.mod`, `pom.xml`, etc.) is created or modified in any way, immediately do the following prior to performing your next task.

**Important**: Do not proceed after creating or modifying a manifest file without running this first.

- Run `endor-cli-tools` using the `check_dependency_for_vulnerabilities` tool via the MCP server.
- Provide the **ecosystem**, **dependency name**, and **version** always when making this tool call.
- If a vulnerability or error is identified:
  - Upgrade to the suggested safe version, or
  - Replace the dependency with a non-vulnerable alternative.
- Re-run the check using `endor-cli-tools` to confirm the issue is resolved.

## Notes
- All scans must be performed using the MCP server integration (`endor-cli-tools`). Do not invoke `endorctl` directly.
# Leaked Secrets Detection Rule (Endor Labs MCP server)

This project uses Endor Labs for automated security scanning, integrated through the MCP server.

## Workflow

Whenever a file is modified in the repository, and before the end of a session:

- Run `endor-cli-tools` using the `scan` tool via the MCP server to check for leaked secrets.
- If any secrets or errors are detected:
  - Remove the exposed secret or correct the error immediately.
  - Re-run the scan to verify the secret has been properly removed.
- Save scan results and remediation steps in a security log or as comments for audit purposes.

## Notes
- All scans must be performed using the MCP server integration (`endor-cli-tools`). Do not invoke `endorctl` directly.
- This scan must use the path of the directory from which the changed files are in. Use absolute paths.
# Static Application Security Testing (SAST) Rule (Endor Labs MCP server)

This project uses Endor Labs for automated SAST, integrated through the MCP server.

## Workflow

Whenever a file is modified in the repository, and before the end of a session:

- Run `endor-cli-tools` using the `scan` tool via the MCP server to perform SAST scans.
- If any vulnerabilities or errors are found:
  - Present the issues to the user.
  - Recommend and apply appropriate fixes (e.g., input sanitization, validation, escaping, secure APIs).
- Save scan results and remediation steps in a security log or as comments for audit purposes.

## Notes
- All scans must be performed using the MCP server integration (`endor-cli-tools`). Do not invoke `endorctl` directly.
- Do not invoke Opengrep directly.
- This scan must use the path of the directory from which the changed files are in. Use absolute paths.
Watch how to use Endor Labs with Devin
Troubleshooting
Use the following troubleshooting steps to resolve common issues with the Endor Labs MCP server.
MCP server shows as disconnected or errored
Verify Node.js and npx are available: run npx --version in your terminal. If the command fails, install Node.js version 18 or later.
Restart your IDE or CLI to reload the MCP server configuration.
Check your config for syntax errors. Use a JSON or TOML validator, or switch to the configuration tool or CLI command instead of manual editing.
Authentication browser window does not open
Ensure your IDE or CLI can open a browser. Check firewall or security software that might block browser launch.
For Enterprise Edition, confirm ENDOR_MCP_SERVER_AUTH_MODE is set correctly (google, github, gitlab, or sso). For SSO, ensure ENDOR_MCP_SERVER_AUTH_TENANT is provided.
endorctl download times out
If npx -y endorctl hangs or times out (for example, behind a corporate proxy or firewall), install endorctl globally and update your MCP config to use it. For more information, see Install endorctl.
After installing endorctl, update your MCP config to call endorctl directly instead of npx.
Alternatively, configure your proxy settings for npm.
Tools return errors when invoked
If you are using the Enterprise Edition, verify whether your namespace is correct and that your user has Read-Only permissions. See Authorization policies for details.
Ensure endorctl is on your PATH if you installed it globally instead of using npx.
Check that the working directory or project path is valid when invoking tools.
Config file has a syntax error and the IDE gives no useful message
IDEs often fail silently on invalid configuration. Validate your config file (for example, .cursor/mcp.json, .vscode/mcp.json, .mcp.json, or .codex/config.toml) with a JSON or TOML linter. Alternatively, use the configuration tool or CLI command for your platform instead of editing the file manually.
Prerequisites for Endor Labs MCP server on Windows
On Windows, ensure the following prerequisites are met:
Node.js is installed
npm global bin directory is in your PATH
Install Node.js
If Node.js is not installed, download and install the LTS version from nodejs.org. During installation, ensure the option to add Node.js to PATH is selected.
Configure the PATH environment variable
After installing Node.js, verify that the npm global bin directory is in your PATH:
Run the following command in the command line.
npmconfiggetprefix
This returns the npm global directory path, typically C:\Users\<YourUsername>\AppData\Roaming\npm.
Add the npm global directory path to the Path variable under User variables in your system’s environment variables settings.
Restart for the PATH changes to take effect.
Verify the setup
Run the following command in your terminal.
npx--version
If this returns a version number, your Windows setup is complete and the MCP server can use npx to run endorctl.
Endor Labs MCP server in Gemini CLI
Beta
The Endor Labs MCP server integrates directly into Gemini CLI to scan your code as you write, catching security issues before they reach production.
Developer Edition: A free edition that requires no configuration. A browser window opens on first use for authentication via GitHub, GitLab, or Google. The Developer Edition provides access to default security policies from Endor Labs.
Enterprise Edition: A paid edition that enforces your organization’s specific security policies. Authenticate using GitHub, GitLab, Google, or SSO. You must specify your namespace to access your organization’s policies.
Additionally, if you already have Endor Labs configured locally (for example, from a previous endorctl init command), the MCP server can use your pre-existing configuration.
Developer Edition
The Developer Edition is free and uses default security policies from Endor Labs. When you use the MCP server for the first time, a browser window opens for authentication through GitHub, GitLab, or Google.
Run the following command to add the MCP server to your project. This adds the server with -s project (shared with everyone in the project). See Scope options for other scopes.
Alternatively, add the following to your .gemini/settings.json file in the root of your repository. This uses project scope, which is shared with everyone working on the repository.
The Enterprise Edition enforces your organization’s specific security policies. You need your Endor Labs namespace and an authentication method. Ensure that your developers have Read-Only permissions to Endor Labs. See Authorization policies for more details.
Configure the Enterprise Edition using the tool.
Enterprise Edition Configuration
Select your authentication method and copy the command to add the MCP server to Gemini CLI.
For manual configuration, copy and paste the following into your MCP configuration file.
View JSON or TOML configuration
The following parameters are used to configure the MCP server. All parameters are optional.
ENDOR_MCP_SERVER_AUTH_MODE: The authentication mode to use for the MCP server. You can use the following authentication modes: github, gitlab, google, sso. If you choose sso, you must add ENDOR_MCP_SERVER_AUTH_TENANT as an additional parameter. If not specified, the MCP server defaults to browser authentication for the Developer Edition.
ENDOR_NAMESPACE: The namespace to use for the MCP server. Required for Enterprise Edition to access your organization’s specific policies. Not needed for Developer Edition.
ENDOR_MCP_SERVER_AUTH_TENANT: The tenant name for SSO authentication. Required when ENDOR_MCP_SERVER_AUTH_MODE is set to sso for Enterprise Edition access.
Verify the installation
/mcp list
Confirm that endor-cli-tools appears in the list. You can also use /mcp in Gemini CLI to view active MCP servers.
Try a test prompt
After installing the MCP server, try the following prompt in your AI chat or CLI to verify that the tools are working.
Check if the npm package lodash version 4.17.20 has any vulnerabilities
The MCP server uses the check_dependency_for_vulnerabilities tool to check for known vulnerabilities and return the results. If you see a response with vulnerability details, the MCP server is working correctly.
Scope options
Gemini CLI supports two MCP configuration scopes:
-s project: Shared with everyone in the project via .gemini/settings.json file (default).
-s user: Available to you across all projects via ~/.gemini/settings.json.
Manage MCP servers
/mcp list
In Gemini CLI, use /mcp to view and manage your active MCP servers.
Configure GEMINI.md
To enhance the MCP server integration, you can add instructions in GEMINI.md at the root of your repository. Gemini CLI reads GEMINI.md files to guide AI development with your project-specific instructions.
Navigate to the root of your repository.
Create or edit the GEMINI.md file in the root of your repository.
Add appropriate rules for your project. For example, you can add a rule to check if the code is free from vulnerabilities.
Example GEMINI.md instructions
You can use the following GEMINI.md instructions as a quick start for the Endor Labs MCP server. Modify the instructions to meet your specific organization’s needs. For more information, refer to the Gemini CLI documentation.
# Software Composition Analysis (SCA) Rule (Endor Labs via MCP)

This project uses Endor Labs for automated dependency (SCA) scanning, integrated through the MCP server.

## Workflow

Every time a manifest or lockfile (package.json, requirements.txt, go.mod, pom.xml, etc.) is created or modified in any way, immediately do the following prior to performing your next task.

**Important**: Do not proceed after creating or modifying a manifest file without running this first.

- Run `endor-cli-tools` using the `check_dependency_for_vulnerabilities` tool via the MCP server.
- Provide the **ecosystem**, **dependency name**, and **version** always when making this tool call.
- If a vulnerability or error is identified:
  - Upgrade to the suggested safe version, or
  - Replace the dependency with a non-vulnerable alternative.
- Re-run the check using `endor-cli-tools` to confirm the issue is resolved.

## Notes
- All scans must be performed using the MCP server integration (`endor-cli-tools`). Do not invoke `endorctl` directly.
# Leaked Secrets Detection Rule (Endor Labs via MCP)

This project uses [Endor Labs](https://docs.endorlabs.com/) for automated security scanning, integrated through the MCP server.

## Workflow

Whenever a file is modified in the repository, and before the end of an agent session:

- Run `endor-cli-tools` using the `scan` tool via the MCP server to check for leaked secrets.
- If any secrets or errors are detected:
  - Remove the exposed secret or correct the error immediately.
  - Re-run the scan to verify the secret has been properly removed.
- Save scan results and remediation steps in a security log or as comments for audit purposes.

## Notes
- All scans must be performed using the MCP server integration (`endor-cli-tools`). Do not invoke `endorctl` directly.
- This scan must use the path of the directory from which the changed files are in. Use absolute paths.
# Static Application Security Testing (SAST) Rule (Endor Labs via MCP)

This project uses [Endor Labs](https://docs.endorlabs.com/) for automated SAST, integrated through the MCP server.

## Workflow

Whenever a file is modified in the repository, and before the end of an agent session:

- Run `endor-cli-tools` using the `scan` tool via the MCP server to perform SAST scans.
- If any vulnerabilities or errors are found:
  - Present the issues to the user.
  - Recommend and apply appropriate fixes (e.g., input sanitization, validation, escaping, secure APIs).
- Save scan results and remediation steps in a security log or as comments for audit purposes.

## Notes
- All scans must be performed using the MCP server integration (`endor-cli-tools`). Do not invoke `endorctl` directly.
- Do not invoke Opengrep directly.
- This scan must use the path of the directory from which the changed files are in. Use absolute paths.
Install the MCP server as a Gemini extension
As an alternative to the MCP server configuration, you can install the Endor Labs MCP server as a Gemini extension. You can find the extension on GitHub.
No additional configuration is required for Developer Edition. When you first use a tool, a browser window opens allowing you to authenticate with GitHub, GitLab, or Google.
For Enterprise Edition, use a natural language command in Gemini CLI to initiate an authentication flow with your organization’s namespace after installing the extension. For example:
Initialize Endor Labs with Google authentication using the command endorctl init --auth-mode=google
How to use the Endor Labs MCP server
The Endor Labs MCP server provides the following tools:
check_dependency_for_vulnerabilities: Check if a dependency in your project is vulnerable.
check_dependency_for_risks: Check a dependency for security risks including vulnerabilities and malware.
get_endor_vulnerability: Get the details of a specific vulnerability from the Endor Labs vulnerability database.
get_resource: Retrieve additional context from commonly used Endor Labs resources about your software, such as findings, vulnerabilities, and projects.
scan: Run an Endor Labs security scan to detect risks in your open source dependencies, find common security issues, and spot any credentials accidentally exposed in your Git repository.
security_review: Perform security review analysis on code diffs. Analyzes local uncommitted changes (both staged and unstaged) compared to HEAD, or diffs between the main branch and the last commit. Requires the Enterprise Edition. You must specify your namespace in the MCP server configuration. You must also enable AI security code review for your namespace in the Endor Labs platform. See AI security code review for setup instructions.
After you set up the MCP server, you can choose to disable the tools that you do not want to use.
Troubleshooting
Use the following troubleshooting steps to resolve common issues with the Endor Labs MCP server.
MCP server shows as disconnected or errored
Verify Node.js and npx are available: run npx --version in your terminal. If the command fails, install Node.js version 18 or later.
Restart your IDE or CLI to reload the MCP server configuration.
Check your config for syntax errors. Use a JSON or TOML validator, or switch to the configuration tool or CLI command instead of manual editing.
Authentication browser window does not open
Ensure your IDE or CLI can open a browser. Check firewall or security software that might block browser launch.
For Enterprise Edition, confirm ENDOR_MCP_SERVER_AUTH_MODE is set correctly (google, github, gitlab, or sso). For SSO, ensure ENDOR_MCP_SERVER_AUTH_TENANT is provided.
endorctl download times out
If npx -y endorctl hangs or times out (for example, behind a corporate proxy or firewall), install endorctl globally and update your MCP config to use it. For more information, see Install endorctl.
After installing endorctl, update your MCP config to call endorctl directly instead of npx.
Alternatively, configure your proxy settings for npm.
Tools return errors when invoked
If you are using the Enterprise Edition, verify whether your namespace is correct and that your user has Read-Only permissions. See Authorization policies for details.
Ensure endorctl is on your PATH if you installed it globally instead of using npx.
Check that the working directory or project path is valid when invoking tools.
Config file has a syntax error and the IDE gives no useful message
IDEs often fail silently on invalid configuration. Validate your config file (for example, .cursor/mcp.json, .vscode/mcp.json, .mcp.json, or .codex/config.toml) with a JSON or TOML linter. Alternatively, use the configuration tool or CLI command for your platform instead of editing the file manually.
Prerequisites for Endor Labs MCP server on Windows
On Windows, ensure the following prerequisites are met:
Node.js is installed
npm global bin directory is in your PATH
Install Node.js
If Node.js is not installed, download and install the LTS version from nodejs.org. During installation, ensure the option to add Node.js to PATH is selected.
Configure the PATH environment variable
After installing Node.js, verify that the npm global bin directory is in your PATH:
Run the following command in the command line.
npmconfiggetprefix
This returns the npm global directory path, typically C:\Users\<YourUsername>\AppData\Roaming\npm.
Add the npm global directory path to the Path variable under User variables in your system’s environment variables settings.
Restart for the PATH changes to take effect.
Verify the setup
Run the following command in your terminal.
npx--version
If this returns a version number, your Windows setup is complete and the MCP server can use npx to run endorctl.
Endor Labs MCP server in Augment Code
Beta
The Endor Labs MCP server integrates directly into Augment Code to scan your code as you write, catching security issues before they reach production.
The Endor Labs MCP server has two editions:
Developer Edition: A free edition that requires no configuration. A browser window opens on first use for authentication via GitHub, GitLab, or Google. The Developer Edition provides access to default security policies from Endor Labs.
Enterprise Edition: A paid edition that enforces your organization’s specific security policies. Authenticate using GitHub, GitLab, Google, or SSO. You must specify your namespace to access your organization’s policies.
Additionally, if you already have Endor Labs configured locally (for example, from a previous endorctl init command), the MCP server can use your pre-existing configuration.
Developer Edition
The Developer Edition is free and uses default security policies from Endor Labs. When you use the MCP server for the first time, a browser window opens for authentication through GitHub, GitLab, or Google.
Open the Augment Code extension in Visual Studio Code, click the Settings icon in the upper right of the Augment panel, then in the MCP section choose Import from JSON or + to add a server. For manual configuration, copy and paste the following JSON.
The Enterprise Edition enforces your organization’s specific security policies. You need your Endor Labs namespace and an authentication method. Ensure that your developers have Read-Only permissions to Endor Labs. See Authorization policies for more details.
Configure the Enterprise Edition using the tool.
Enterprise Edition Configuration
Select your authentication method and generate JSON for your MCP configuration.
For manual configuration, copy and paste the following JSON directly into your MCP configuration file.
View JSON configuration
MCP server configuration
The following parameters are used to configure the MCP server. All parameters are optional.
ENDOR_MCP_SERVER_AUTH_MODE: The authentication mode to use for the MCP server. You can use the following authentication modes: github, gitlab, google, sso. If you choose sso, you must add ENDOR_MCP_SERVER_AUTH_TENANT as an additional parameter. If not specified, the MCP server defaults to browser authentication for the Developer Edition.
ENDOR_NAMESPACE: The namespace to use for the MCP server. Required for Enterprise Edition to access your organization’s specific policies. Not needed for Developer Edition.
ENDOR_MCP_SERVER_AUTH_TENANT: The tenant name for SSO authentication. Required when ENDOR_MCP_SERVER_AUTH_MODE is set to sso for Enterprise Edition access.
Verify the installation
Open the Augment Code extension in Visual Studio Code.
Click the Settings icon and confirm that endor-cli-tools appears in the MCP section.
Try a test prompt
After installing the MCP server, try the following prompt in your AI chat or CLI to verify that the tools are working.
Check if the npm package lodash version 4.17.20 has any vulnerabilities
The MCP server uses the check_dependency_for_vulnerabilities tool to check for known vulnerabilities and return the results. If you see a response with vulnerability details, the MCP server is working correctly.
Manage MCP server tools
Open the Augment Code extension in Visual Studio Code.
Click the Settings icon in the upper right of the Augment panel.
In the MCP section, click the … button next to endor-cli-tools.
Edit the configuration or remove the server as needed.
How to use the Endor Labs MCP server
The Endor Labs MCP server provides the following tools:
check_dependency_for_vulnerabilities: Check if a dependency in your project is vulnerable.
check_dependency_for_risks: Check a dependency for security risks including vulnerabilities and malware.
get_endor_vulnerability: Get the details of a specific vulnerability from the Endor Labs vulnerability database.
get_resource: Retrieve additional context from commonly used Endor Labs resources about your software, such as findings, vulnerabilities, and projects.
scan: Run an Endor Labs security scan to detect risks in your open source dependencies, find common security issues, and spot any credentials accidentally exposed in your Git repository.
security_review: Perform security review analysis on code diffs. Analyzes local uncommitted changes (both staged and unstaged) compared to HEAD, or diffs between the main branch and the last commit. Requires the Enterprise Edition. You must specify your namespace in the MCP server configuration. You must also enable AI security code review for your namespace in the Endor Labs platform. See AI security code review for setup instructions.
After you set up the MCP server, you can choose to disable the tools that you do not want to use.
Troubleshooting
Use the following troubleshooting steps to resolve common issues with the Endor Labs MCP server.
MCP server shows as disconnected or errored
Verify Node.js and npx are available: run npx --version in your terminal. If the command fails, install Node.js version 18 or later.
Restart your IDE or CLI to reload the MCP server configuration.
Check your config for syntax errors. Use a JSON or TOML validator, or switch to the configuration tool or CLI command instead of manual editing.
Authentication browser window does not open
Ensure your IDE or CLI can open a browser. Check firewall or security software that might block browser launch.
For Enterprise Edition, confirm ENDOR_MCP_SERVER_AUTH_MODE is set correctly (google, github, gitlab, or sso). For SSO, ensure ENDOR_MCP_SERVER_AUTH_TENANT is provided.
endorctl download times out
If npx -y endorctl hangs or times out (for example, behind a corporate proxy or firewall), install endorctl globally and update your MCP config to use it. For more information, see Install endorctl.
After installing endorctl, update your MCP config to call endorctl directly instead of npx.
Alternatively, configure your proxy settings for npm.
Tools return errors when invoked
If you are using the Enterprise Edition, verify whether your namespace is correct and that your user has Read-Only permissions. See Authorization policies for details.
Ensure endorctl is on your PATH if you installed it globally instead of using npx.
Check that the working directory or project path is valid when invoking tools.
Config file has a syntax error and the IDE gives no useful message
IDEs often fail silently on invalid configuration. Validate your config file (for example, .cursor/mcp.json, .vscode/mcp.json, .mcp.json, or .codex/config.toml) with a JSON or TOML linter. Alternatively, use the configuration tool or CLI command for your platform instead of editing the file manually.
Prerequisites for Endor Labs MCP server on Windows
On Windows, ensure the following prerequisites are met:
Node.js is installed
npm global bin directory is in your PATH
Install Node.js
If Node.js is not installed, download and install the LTS version from nodejs.org. During installation, ensure the option to add Node.js to PATH is selected.
Configure the PATH environment variable
After installing Node.js, verify that the npm global bin directory is in your PATH:
Run the following command in the command line.
npmconfiggetprefix
This returns the npm global directory path, typically C:\Users\<YourUsername>\AppData\Roaming\npm.
Add the npm global directory path to the Path variable under User variables in your system’s environment variables settings.
Restart for the PATH changes to take effect.
Verify the setup
Run the following command in your terminal.
npx--version
If this returns a version number, your Windows setup is complete and the MCP server can use npx to run endorctl.
Endor Labs MCP server in IntelliJ IDEA
Beta
The Endor Labs MCP server integrates directly into IntelliJ IDEA to scan your code as you write, catching security issues before they reach production.
The Endor Labs MCP server has two editions:
Developer Edition: A free edition that requires no configuration. A browser window opens on first use for authentication via GitHub, GitLab, or Google. The Developer Edition provides access to default security policies from Endor Labs.
Enterprise Edition: A paid edition that enforces your organization’s specific security policies. Authenticate using GitHub, GitLab, Google, or SSO. You must specify your namespace to access your organization’s policies.
Additionally, if you already have Endor Labs configured locally (for example, from a previous endorctl init command), the MCP server can use your pre-existing configuration.
Developer Edition
The Developer Edition is free and uses default security policies from Endor Labs. When you use the MCP server for the first time, a browser window opens for authentication through GitHub, GitLab, or Google.
For manual configuration, open GitHub Copilot Chat, switch to Agent mode, select Configure Tools, then select + Add More Tools… to open mcp.json. Copy and paste the following JSON.
The Enterprise Edition enforces your organization’s specific security policies. You need your Endor Labs namespace and an authentication method. Ensure that your developers have Read-Only permissions to Endor Labs. See Authorization policies for more details.
Configure the Enterprise Edition using the tool.
Enterprise Edition Configuration
Select your authentication method and generate JSON for your MCP configuration.
For manual configuration, copy and paste the following JSON directly into your MCP configuration file.
View JSON configuration
MCP server configuration
The following parameters are used to configure the MCP server. All parameters are optional.
ENDOR_MCP_SERVER_AUTH_MODE: The authentication mode to use for the MCP server. You can use the following authentication modes: github, gitlab, google, sso. If you choose sso, you must add ENDOR_MCP_SERVER_AUTH_TENANT as an additional parameter. If not specified, the MCP server defaults to browser authentication for the Developer Edition.
ENDOR_NAMESPACE: The namespace to use for the MCP server. Required for Enterprise Edition to access your organization’s specific policies. Not needed for Developer Edition.
ENDOR_MCP_SERVER_AUTH_TENANT: The tenant name for SSO authentication. Required when ENDOR_MCP_SERVER_AUTH_MODE is set to sso for Enterprise Edition access.
Verify the installation
After you add the MCP server configuration for either edition:
In GitHub Copilot Chat, switch to Agent mode.
Select Configure Tools and confirm endor-cli-tools appears in the list and is enabled.
Try a test prompt
After installing the MCP server, try the following prompt in your AI chat or CLI to verify that the tools are working.
Check if the npm package lodash version 4.17.20 has any vulnerabilities
The MCP server uses the check_dependency_for_vulnerabilities tool to check for known vulnerabilities and return the results. If you see a response with vulnerability details, the MCP server is working correctly.
Copilot instructions define the guidelines that Copilot should follow throughout the development process. The following examples demonstrate how to use the Endor Labs MCP server within Copilot rules.
---description:"Dependency vulnerability scanning using Endor Labs via MCP server integration"applyTo:'**/package.json, **/package-lock.json, **/yarn.lock, **/pnpm-lock.yaml, **/requirements.txt, **/Pipfile, **/Pipfile.lock, **/pyproject.toml, **/poetry.lock, **/go.mod, **/go.sum, **/Cargo.toml, **/Cargo.lock, **/pom.xml, **/build.gradle, **/build.gradle.kts, **/gradle.lockfile, **/composer.json, **/composer.lock'---# Software Composition Analysis (SCA) Rule (Endor Labs via MCP)This project uses Endor Labs for automated dependency (SCA) scanning, integrated through the MCP server as configured in `mcp.json`.## WorkflowEvery time a manifest or lockfile listed above is created or modified in any way immediately do the following prior to performing your next task.**Important**:Do not proceed after creating or modifying a manifest file without running this first. Do not write any other code or continue with your existing prompt. This is top priority whenever a manifest file is created or updated.- Run `endor-cli-tools` using the `check_dependency_for_vulnerabilities` tool via the MCP server.- Provide the **ecosystem**, **dependency name**, and **version** always when making this tool call. Do not forget to provide a version.- If a vulnerability or error is identified:- Upgrade to the suggested safe version, or- Replace the dependency with a non-vulnerable alternative.- The AI agent must attempt to automatically correct all detected errors and vulnerabilities before session completion.- Re-run the check using `endor-cli-tools` to confirm the issue is resolved.- If an error occurs in any MCP server tool call (such as missing required parameters like version, invalid arguments, or tool invocation failures):- The AI agent must review the error, determine the cause, and automatically correct the tool call or input parameters.- Re-attempt the tool call with the corrected parameters.- Continue this process until the tool call succeeds or it is determined that remediation is not possible, in which case the issue and reason must be reported.## Notes- All scans must be performed using the MCP server integration (`endor-cli-tools`) as configured in `mcp.json`. Do not invoke `endorctl` directly.- For troubleshooting, ensure the MCP server is running and `endorctl` is installed and accessible in your environment.This rule ensures that all dependency changes are evaluated for risk at the time of introduction, and that the project remains clean and secure after each coding session. The scan may be performed at the end of an agent session, provided all modifications are checked and remediated before session completion.
---description:"Scan for leaked secrets on file modification using Endor Labs via MCP server integration"applyTo:'**/*'---# Leaked Secrets Detection Rule (Endor Labs via MCP)This project uses [Endor Labs](https://docs.endorlabs.com/) for automated security scanning, integrated through the MCP server as configured in `mcp.json`.## WorkflowWhenever a file is modified in the repository, and before the end of an agent session:- Run `endor-cli-tools` using the `scan` tool via the MCP server to check for leaked secrets.- Ensure the scan includes all file types and respects `.gitignore` unless otherwise configured.- If any secrets or errors are detected:- Remove the exposed secret or correct the error immediately.- The AI agent must attempt to automatically correct all detected secrets and errors before session completion.- Re-run the scan to verify the secret or error has been properly removed or resolved.- If an error occurs in any MCP server tool call (such as missing required parameters like version, invalid arguments, or tool invocation failures):- The AI agent must review the error, determine the cause, and automatically correct the tool call or input parameters.- Re-attempt the tool call with the corrected parameters.- Continue this process until the tool call succeeds or it is determined that remediation is not possible, in which case the issue and reason must be reported.- Save scan results and remediation steps in a security log or as comments for audit purposes.## Notes- All scans must be performed using the MCP server integration (`endor-cli-tools`) as configured in `mcp.json`. Do not invoke `endorctl` directly.- For troubleshooting, ensure the MCP server is running and `endorctl` is installed and accessible in your environment.- **Important**:This scan must use the path of the directory from which the changed files are in. Do not attempt to set the path directly to a file as it must be a directory. Use absolute paths like /Users/username/mcp-server-demo/backend rather than relative paths like 'backend'This rule ensures no accidental credentials, tokens, API keys, or secrets are committed or remain in the project history. The scan may be performed at the end of an agent session, provided all modifications are checked and remediated before session completion.
---description:"Static Application Security Testing (SAST) using Endor Labs via MCP server integration"applyTo:'**/*.c, **/*.cpp, **/*.cc, **/*.cs, **/*.go, **/*.java, **/*.js, **/*.jsx, **/*.ts, **/*.tsx, **/*.py, **/*.php, **/*.rb, **/*.rs, **/*.kt, **/*.kts, **/*.scala, **/*.swift, **/*.dart, **/*.html, **/*.yaml, **/*.yml, **/*.json, **/*.xml, **/*.sh, **/*.bash, **/*.clj, **/*.cljs, **/*.ex, **/*.exs, **/*.lua'---# Static Application Security Testing (SAST) Rule (Endor Labs via MCP)This project uses [Endor Labs](https://docs.endorlabs.com/) for automated SAST, integrated through the MCP server as configured in `mcp.json`.## WorkflowWhenever a file is modified in the repository, and before the end of an agent session perform the following workflow:- Run `endor-cli-tools` using the `scan` tool via the MCP server to perform SAST scans as described above.- If any vulnerabilities or errors are found:- Present the issues to the user.- The AI agent must attempt to automatically correct all errors and vulnerabilities, including code errors, security issues, and best practice violations, before session completion.- Recommend and apply appropriate fixes (e.g., input sanitization, validation, escaping, secure APIs).- Continue scanning and correcting until all critical issues have been resolved or no further automated remediation is possible.- If an error occurs in any MCP server tool call (such as missing required parameters like version, invalid arguments, or tool invocation failures):- The AI agent must review the error, determine the cause, and automatically correct the tool call or input parameters.- Re-attempt the tool call with the corrected parameters.- Continue this process until the tool call succeeds or it is determined that remediation is not possible, in which case the issue and reason must be reported.- Save scan results and remediation steps in a security log or as comments for audit purposes.## Notes- All scans must be performed using the MCP server integration (`endor-cli-tools`) as configured in `mcp.json`. Do not invoke `endorctl` directly.- For troubleshooting, ensure the MCP server is running and `endorctl` is installed and accessible in your environment.- Do not invoke Opengrep directly.- **Important**:This scan must use the path of the directory from which the changed files are in. Do not attempt to set the path directly to a file as it must be a directory. Use absolute paths like /Users/username/mcp-server-demo/backend rather than relative paths like 'backend'This rule ensures all code changes are automatically reviewed and remediated for common security vulnerabilities and errors using `endor-cli-tools` and the MCP server, with Opengrep as the underlying engine.
How to use the Endor Labs MCP server
The Endor Labs MCP server provides the following tools:
check_dependency_for_vulnerabilities: Check if a dependency in your project is vulnerable.
check_dependency_for_risks: Check a dependency for security risks including vulnerabilities and malware.
get_endor_vulnerability: Get the details of a specific vulnerability from the Endor Labs vulnerability database.
get_resource: Retrieve additional context from commonly used Endor Labs resources about your software, such as findings, vulnerabilities, and projects.
scan: Run an Endor Labs security scan to detect risks in your open source dependencies, find common security issues, and spot any credentials accidentally exposed in your Git repository.
security_review: Perform security review analysis on code diffs. Analyzes local uncommitted changes (both staged and unstaged) compared to HEAD, or diffs between the main branch and the last commit. Requires the Enterprise Edition. You must specify your namespace in the MCP server configuration. You must also enable AI security code review for your namespace in the Endor Labs platform. See AI security code review for setup instructions.
After you set up the MCP server, you can choose to disable the tools that you do not want to use.
Troubleshooting
Use the following troubleshooting steps to resolve common issues with the Endor Labs MCP server.
MCP server shows as disconnected or errored
Verify Node.js and npx are available: run npx --version in your terminal. If the command fails, install Node.js version 18 or later.
Restart your IDE or CLI to reload the MCP server configuration.
Check your config for syntax errors. Use a JSON or TOML validator, or switch to the configuration tool or CLI command instead of manual editing.
Authentication browser window does not open
Ensure your IDE or CLI can open a browser. Check firewall or security software that might block browser launch.
For Enterprise Edition, confirm ENDOR_MCP_SERVER_AUTH_MODE is set correctly (google, github, gitlab, or sso). For SSO, ensure ENDOR_MCP_SERVER_AUTH_TENANT is provided.
endorctl download times out
If npx -y endorctl hangs or times out (for example, behind a corporate proxy or firewall), install endorctl globally and update your MCP config to use it. For more information, see Install endorctl.
After installing endorctl, update your MCP config to call endorctl directly instead of npx.
Alternatively, configure your proxy settings for npm.
Tools return errors when invoked
If you are using the Enterprise Edition, verify whether your namespace is correct and that your user has Read-Only permissions. See Authorization policies for details.
Ensure endorctl is on your PATH if you installed it globally instead of using npx.
Check that the working directory or project path is valid when invoking tools.
Config file has a syntax error and the IDE gives no useful message
IDEs often fail silently on invalid configuration. Validate your config file (for example, .cursor/mcp.json, .vscode/mcp.json, .mcp.json, or .codex/config.toml) with a JSON or TOML linter. Alternatively, use the configuration tool or CLI command for your platform instead of editing the file manually.
Prerequisites for Endor Labs MCP server on Windows
On Windows, ensure the following prerequisites are met:
Node.js is installed
npm global bin directory is in your PATH
Install Node.js
If Node.js is not installed, download and install the LTS version from nodejs.org. During installation, ensure the option to add Node.js to PATH is selected.
Configure the PATH environment variable
After installing Node.js, verify that the npm global bin directory is in your PATH:
Run the following command in the command line.
npmconfiggetprefix
This returns the npm global directory path, typically C:\Users\<YourUsername>\AppData\Roaming\npm.
Add the npm global directory path to the Path variable under User variables in your system’s environment variables settings.
Restart for the PATH changes to take effect.
Verify the setup
Run the following command in your terminal.
npx--version
If this returns a version number, your Windows setup is complete and the MCP server can use npx to run endorctl.
Endor Labs MCP server in Google Antigravity
Beta
The Endor Labs MCP server integrates directly into Google Antigravity to scan your code as you write, catching security issues before they reach production.
The Endor Labs MCP server has two editions:
Developer Edition: A free edition that requires no configuration. A browser window opens on first use for authentication via GitHub, GitLab, or Google. The Developer Edition provides access to default security policies from Endor Labs.
Enterprise Edition: A paid edition that enforces your organization’s specific security policies. Authenticate using GitHub, GitLab, Google, or SSO. You must specify your namespace to access your organization’s policies.
Additionally, if you already have Endor Labs configured locally (for example, from a previous endorctl init command), the MCP server can use your pre-existing configuration.
Developer Edition
The Developer Edition is free and uses default security policies from Endor Labs. When you use the MCP server for the first time, a browser window opens for authentication through GitHub, GitLab, or Google.
On the agent panel, click …, then select MCP Servers > Manage MCP Servers. Click Raw Config to open the raw configuration editor and add the following JSON.
The Enterprise Edition enforces your organization’s specific security policies. You need your Endor Labs namespace and an authentication method. Ensure that your developers have Read-Only permissions to Endor Labs. See Authorization policies for more details.
Configure the Enterprise Edition using the tool.
Enterprise Edition Configuration
Select your authentication method and generate JSON for your MCP configuration.
For manual configuration, copy and paste the following JSON directly into your MCP configuration file.
View JSON configuration
MCP server configuration
The following parameters are used to configure the MCP server. All parameters are optional.
ENDOR_MCP_SERVER_AUTH_MODE: The authentication mode to use for the MCP server. You can use the following authentication modes: github, gitlab, google, sso. If you choose sso, you must add ENDOR_MCP_SERVER_AUTH_TENANT as an additional parameter. If not specified, the MCP server defaults to browser authentication for the Developer Edition.
ENDOR_NAMESPACE: The namespace to use for the MCP server. Required for Enterprise Edition to access your organization’s specific policies. Not needed for Developer Edition.
ENDOR_MCP_SERVER_AUTH_TENANT: The tenant name for SSO authentication. Required when ENDOR_MCP_SERVER_AUTH_MODE is set to sso for Enterprise Edition access.
Verify the installation
On the agent panel, click …, then select MCP Servers > Manage MCP Servers.
Confirm that endor-cli-tools appears in the list and is enabled.
Try a test prompt
After installing the MCP server, try the following prompt in your AI chat or CLI to verify that the tools are working.
Check if the npm package lodash version 4.17.20 has any vulnerabilities
The MCP server uses the check_dependency_for_vulnerabilities tool to check for known vulnerabilities and return the results. If you see a response with vulnerability details, the MCP server is working correctly.
Manage MCP servers
On the agent panel, click …, then select MCP Servers > Manage MCP Servers.
From here, you can view active MCP servers, edit configurations through Raw Config, or enable and disable individual servers.
Configure GEMINI.md
Google Antigravity reads GEMINI.md files to guide AI development with your project-specific instructions. To enhance the MCP server integration, you can add instructions in GEMINI.md at the root of your repository or globally in the ~/.gemini/ directory.
Navigate to the root of your repository.
Create or edit the GEMINI.md file in the root of your repository. For global rules that apply across all projects, create or edit ~/.gemini/GEMINI.md.
Add appropriate rules for your project. For example, you can add a rule to check if the code is free from vulnerabilities.
Example GEMINI.md instructions
You can use the following GEMINI.md instructions as a quick start for the Endor Labs MCP server. Modify the instructions to meet your specific organization’s needs. For more information, refer to the Google Antigravity documentation.
# Software Composition Analysis (SCA) Rule (Endor Labs via MCP)

This project uses Endor Labs for automated dependency (SCA) scanning, integrated through the MCP server.

## Workflow

Every time a manifest or lockfile (package.json, requirements.txt, go.mod, pom.xml, etc.) is created or modified in any way, immediately do the following prior to performing your next task.

**Important**: Do not proceed after creating or modifying a manifest file without running this first.

- Run `endor-cli-tools` using the `check_dependency_for_vulnerabilities` tool via the MCP server.
- Provide the **ecosystem**, **dependency name**, and **version** always when making this tool call.
- If a vulnerability or error is identified:
  - Upgrade to the suggested safe version, or
  - Replace the dependency with a non-vulnerable alternative.
- Re-run the check using `endor-cli-tools` to confirm the issue is resolved.

## Notes
- All scans must be performed using the MCP server integration (`endor-cli-tools`). Do not invoke `endorctl` directly.
# Leaked Secrets Detection Rule (Endor Labs via MCP)

This project uses [Endor Labs](https://docs.endorlabs.com/) for automated security scanning, integrated through the MCP server.

## Workflow

Whenever a file is modified in the repository, and before the end of an agent session:

- Run `endor-cli-tools` using the `scan` tool via the MCP server to check for leaked secrets.
- If any secrets or errors are detected:
  - Remove the exposed secret or correct the error immediately.
  - Re-run the scan to verify the secret has been properly removed.
- Save scan results and remediation steps in a security log or as comments for audit purposes.

## Notes
- All scans must be performed using the MCP server integration (`endor-cli-tools`). Do not invoke `endorctl` directly.
- This scan must use the path of the directory from which the changed files are in. Use absolute paths.
# Static Application Security Testing (SAST) Rule (Endor Labs via MCP)

This project uses [Endor Labs](https://docs.endorlabs.com/) for automated SAST, integrated through the MCP server.

## Workflow

Whenever a file is modified in the repository, and before the end of an agent session:

- Run `endor-cli-tools` using the `scan` tool via the MCP server to perform SAST scans.
- If any vulnerabilities or errors are found:
  - Present the issues to the user.
  - Recommend and apply appropriate fixes (e.g., input sanitization, validation, escaping, secure APIs).
- Save scan results and remediation steps in a security log or as comments for audit purposes.

## Notes
- All scans must be performed using the MCP server integration (`endor-cli-tools`). Do not invoke `endorctl` directly.
- Do not invoke Opengrep directly.
- This scan must use the path of the directory from which the changed files are in. Use absolute paths.
How to use the Endor Labs MCP server
The Endor Labs MCP server provides the following tools:
check_dependency_for_vulnerabilities: Check if a dependency in your project is vulnerable.
check_dependency_for_risks: Check a dependency for security risks including vulnerabilities and malware.
get_endor_vulnerability: Get the details of a specific vulnerability from the Endor Labs vulnerability database.
get_resource: Retrieve additional context from commonly used Endor Labs resources about your software, such as findings, vulnerabilities, and projects.
scan: Run an Endor Labs security scan to detect risks in your open source dependencies, find common security issues, and spot any credentials accidentally exposed in your Git repository.
security_review: Perform security review analysis on code diffs. Analyzes local uncommitted changes (both staged and unstaged) compared to HEAD, or diffs between the main branch and the last commit. Requires the Enterprise Edition. You must specify your namespace in the MCP server configuration. You must also enable AI security code review for your namespace in the Endor Labs platform. See AI security code review for setup instructions.
After you set up the MCP server, you can choose to disable the tools that you do not want to use.
Troubleshooting
Use the following troubleshooting steps to resolve common issues with the Endor Labs MCP server.
MCP server shows as disconnected or errored
Verify Node.js and npx are available: run npx --version in your terminal. If the command fails, install Node.js version 18 or later.
Restart your IDE or CLI to reload the MCP server configuration.
Check your config for syntax errors. Use a JSON or TOML validator, or switch to the configuration tool or CLI command instead of manual editing.
Authentication browser window does not open
Ensure your IDE or CLI can open a browser. Check firewall or security software that might block browser launch.
For Enterprise Edition, confirm ENDOR_MCP_SERVER_AUTH_MODE is set correctly (google, github, gitlab, or sso). For SSO, ensure ENDOR_MCP_SERVER_AUTH_TENANT is provided.
endorctl download times out
If npx -y endorctl hangs or times out (for example, behind a corporate proxy or firewall), install endorctl globally and update your MCP config to use it. For more information, see Install endorctl.
After installing endorctl, update your MCP config to call endorctl directly instead of npx.
Alternatively, configure your proxy settings for npm.
Tools return errors when invoked
If you are using the Enterprise Edition, verify whether your namespace is correct and that your user has Read-Only permissions. See Authorization policies for details.
Ensure endorctl is on your PATH if you installed it globally instead of using npx.
Check that the working directory or project path is valid when invoking tools.
Config file has a syntax error and the IDE gives no useful message
IDEs often fail silently on invalid configuration. Validate your config file (for example, .cursor/mcp.json, .vscode/mcp.json, .mcp.json, or .codex/config.toml) with a JSON or TOML linter. Alternatively, use the configuration tool or CLI command for your platform instead of editing the file manually.
Prerequisites for Endor Labs MCP server on Windows
On Windows, ensure the following prerequisites are met:
Node.js is installed
npm global bin directory is in your PATH
Install Node.js
If Node.js is not installed, download and install the LTS version from nodejs.org. During installation, ensure the option to add Node.js to PATH is selected.
Configure the PATH environment variable
After installing Node.js, verify that the npm global bin directory is in your PATH:
Run the following command in the command line.
npmconfiggetprefix
This returns the npm global directory path, typically C:\Users\<YourUsername>\AppData\Roaming\npm.
Add the npm global directory path to the Path variable under User variables in your system’s environment variables settings.
Restart for the PATH changes to take effect.
Verify the setup
Run the following command in your terminal.
npx--version
If this returns a version number, your Windows setup is complete and the MCP server can use npx to run endorctl.
Skills
Beta
Endor Labs Skills are pre-built AI agent instructions that automate common security workflows using endorctl. Skills provide structured prompts that guide your AI coding assistant through tasks like installing and configuring endorctl, authenticating with identity providers, scanning repositories for vulnerabilities, checking dependencies for vulnerabilities, and running secrets and SAST scans.
Endor Labs Skills work with AI coding agents that support project-level instructions, such as Claude Code, Cursor, Gemini CLI, and OpenAI Codex. Each skill defines a specific security workflow, including trigger commands, required context, and expected output format.
Available skills
The following skills are available for installation:
endor-setup: Install, authenticate, and configure endorctl automatically. Then run security scans for vulnerabilities, secrets, and SAST directly from your AI coding agent with zero manual setup.
Endor Labs skills integrate directly into Cursor to guide the AI assistant with reusable security workflows, catching security issues before they reach production.
The following sections walk you through setting up Endor Labs skills in Cursor:
Install the Endor Labs plugin from the Cursor plugin marketplace. This is the recommended way to get the full plugin experience.
Install skills (npx)
You need Node.js v18+ for this method. Run the following from your project root to install all Endor Labs skills. The skills package detects Cursor automatically and installs skills into .cursor/skills/ (project).
npx skills add endorlabs/ai-plugins
Use skills with Cursor
Try these example prompts:
“Set up endorctl and authenticate with Endor Labs.”
“Run endorctl scan for this repo.”
“Run endorctl quick scan for this repo.”
Endor Labs skills in Gemini CLI
Beta
Endor Labs skills integrate directly into Gemini CLI to guide the AI assistant with reusable security workflows, catching security issues before they reach production.
The following sections walk you through setting up Endor Labs skills in Gemini CLI:
You need Node.js v18+ for this method. Run the following from your project root to install all Endor Labs skills. The skills package detects Gemini CLI automatically and installs skills into .agents/skills/ (project) or ~/.gemini/skills/ (user scope).
npx skills add endorlabs/ai-plugins
Use skills with Gemini CLI
Try these example prompts:
“Set up endorctl and authenticate with Endor Labs.”
“Run endorctl scan for this repo.”
“Run endorctl quick scan for this repo.”
Endor Labs skills in OpenAI Codex
Beta
Endor Labs skills integrate directly into OpenAI Codex to guide the AI assistant with reusable security workflows, catching security issues before they reach production.
The following sections walk you through setting up Endor Labs skills in OpenAI Codex:
Use the Codex $skill-installer to install all Endor Labs skills. This is the recommended way to install Endor Labs skills in OpenAI Codex. In the Codex CLI, run:
$skill-installer endorlabs/ai-plugins
Install skills (npx)
You need Node.js v18+ for this method. Run the following from your project root to install all Endor Labs skills. The skills package detects OpenAI Codex automatically and installs skills into .agents/skills/ (project) or ~/.codex/skills/ (user scope).
npx skills add endorlabs/ai-plugins
Use skills with OpenAI Codex
Try these example prompts:
“Set up endorctl and authenticate with Endor Labs.”
“Run endorctl scan for this repo.”
“Run endorctl quick scan for this repo.”
Endor Labs skills in Claude Code
Beta
Endor Labs skills integrate directly into Claude Code to guide the AI assistant with reusable security workflows, catching security issues before they reach production.
The following sections walk you through setting up Endor Labs skills in Claude Code:
Install the Endor Labs plugin from the Claude Code (Terminal) plugin marketplace. This is the recommended way to get the full plugin experience.
In Claude Code, run:
/plugin marketplace add endorlabs/ai-plugins
Then run:
/plugin install ai-plugins@endorlabs
Install skills (npx)
You need Node.js v18+ for this method. Run the following from your project root to install all Endor Labs skills. The skills package detects Claude Code and installs skills into .claude/skills/ (project).
npx skills add endorlabs/ai-plugins
Use skills with Claude Code
Try these example prompts:
“Set up endorctl and authenticate with Endor Labs.”
“Run endorctl scan for this repo.”
“Run endorctl quick scan for this repo.”
AI Security Review
Beta
AI security code review provides automated code review capabilities using artificial intelligence to identify potential security issues in your codebase.
Availability
AI security code review is available only for GitHub. You can set up AI security code review through the Endor Labs GitHub App or using endorctl.
After you set up AI security code review, creating a pull request triggers an Endor Labs scan on the diff. Endor Labs sends the scan data to an AI model to produce a security analysis and generates a report.
You can view the report in the Endor Labs user interface. You can also enable pull request comments to get a comment on your GitHub pull request with the details of the AI security code review.
The following sections provide information on how to set up AI security code review, customize a scan profile, and view the AI security code review results.
Before you set up AI security code review, ensure that the following prerequisites are in place:
An active Endor Labs subscription with Endor Code Pro license.
Administrator access to your GitHub organization.
Access to configure scan profiles and policies.
Enable Code Segment Embeddings and LLM Processing in Data Privacy settings.
Enable Code Segment Embeddings and LLM Processing
Perform the following steps to enable code segment embeddings and LLM processing:
Select Settings from the left sidebar.
Select SYSTEM SETTINGS > Data Privacy.
Select Code Segment Embeddings and LLM Processing.
Click Save Data Privacy Settings.
Verify license and feature access
Perform the following steps to verify your license and feature access:
Select Settings > License from the left sidebar.
Verify that you have Security Review in Products and Features.
Set up AI security code review with GitHub App
To set up AI security code review, you need to complete the following tasks:
Ensure that the GitHub App is installed and configured properly. If you are using endorctl, skip this step and ensure that you have set up the environment variables required for the endorctl scan command.
Configure a scan profile for AI security code review.
Configure an action policy if you want to get comments on your GitHub pull request with the details of the AI security code review.
GitHub App Configuration
Install the GitHub App if you don’t have it already. See GitHub App for more information.
Ensure that you enable the following settings:
Pull Request Scans:Pull Request Scans allows Endor Labs to scan the pull requests. You must enable this setting so that AI security code review can proceed for a pull request.
Pull Request Comments:Pull Request Comments allows Endor Labs to comment on a pull request in GitHub. This setting is optional, and you need to enable this setting if you want a comment on your GitHub pull request with the details of the AI security code review. In addition, you also need to select Pull Request Comments in your scan profile and set up an action policy.
Configure scan profile for AI security code review
Create a scan profile for AI security code review and configure the following options:
Pull Request Scans: Mandatory. This setting allows Endor Labs to scan the pull requests.
Pull Request Comments: Optional. This setting allows Endor Labs to comment on a pull request in GitHub.
AI security code review Scans: Mandatory. This setting allows Endor Labs to scan the pull requests for AI security code review.
Disable Code Summary: Optional. This setting allows you to disable the code summary for the AI security code review.
Custom Prompt: Optional. You can enter a custom prompt to modify how AI security code review detects and categorizes security-related changes.
After you create the scan profile, assign the scan profile to the projects for which you want to set up AI security code review.
See Scan Profiles for more information on creating a scan profile.
Enable finding policy for AI security code review
Ensure that the Security Review policy is enabled under finding policies.
Select Policies & Rules from the left sidebar.
Select Finding Policies.
Search for Security Review and ensure that the policy is enabled.
Configure action policy for pull request comments
If you want to get comments on your GitHub pull requests, you need to set up an action policy.
Select Settings from the left sidebar.
Select Action Policies.
Click Create Action Policy.
Select Security Review as the Policy Template.
Choose the severity threshold to trigger the AI security code review.
You can choose from the following severity thresholds:
Any
Low
Medium
High
Critical
Select Pull Request as the Branch Type.
Choose Enforce Policy as the action, and select Warn or Break the Build depending on your preference.
Configure include and exclude patterns for the policy.
Name the policy and provide a description.
Enter tags if required for the policy.
Click Create Action Policy to save the policy.
See Action Policies for more information on setting up an action policy.
Set up AI security code review with endorctl
You can use AI security code review with endorctl and GitHub environment variables without requiring the GitHub App. This approach allows you to integrate AI security code review into your local development workflows. You can use this approach only if you have GitHub as your source control management system.
Complete the following tasks to set up AI security code review with endorctl:
After you have fetched and checked out the pull request branch, you can run the following command to scan the pull request with AI security code review.
The following table describes the flags used in the command.
Flag
Mandatory
Description
-n <namespace>
✗
Your Endor Labs namespace. If you do not specify a namespace, the command uses the default namespace.
--pr
✓
Indicates that this is a pull request scan.
--security-review
✓
Enables AI security code review.
--scm-pr-id <PR_NUMBER>
✓
The GitHub pull request number that you want to scan. Note: You can continue to use --github-pr-id flag, but it will be deprecated and removed in the future.
--scm-token
✓
Token for SCM authentication. Use the ENDOR_SCAN_SCM_TOKEN environment variable or pass the token with this flag.
--enable-pr-comments
✗
Enables comments on the GitHub pull request. Enable this flag if you want to get comments on your GitHub pull request with the details of the AI security code review. You must enable the action policy for pull request comments.
View AI security code review results
You can view the AI security code review results in the Endor Labs UI. You can also enable PR comments to get a comment on your GitHub PR with the details of the AI security code review. If you use merge queues, Endor Labs provides security review for the PRs until they are added to the merge queue. Endor Labs does a final security review on the merged commit SHA to the default branch.
View AI security code review results in Endor Labs UI
Select Projects from the left sidebar.
Select the project for which you want to view the AI security code review results.
Select Security Review.
You can view the AI security code review results for all the pull requests raised in the project. You can also search for a specific pull request and view the results.
You can filter the results by the type of the security issues, the severity of the security issues, the author of the PR, the approvers, and the creation time of the PR. You can select advanced to enter a search query to filter the results.
For example, you can filter the results to show only the critical security issues that are part of unmerged pull requests:
(spec.level in ["SECURITY_REVIEW_LEVEL_CRITICAL"] and spec.repository_pull_request_spec.merged != true)
Click on a pull request to view the detailed report.
The report appears in the right sidebar. You can view the security analysis of the PR and the list of security risks along with their severities.
You can click links against the security analysis to go directly to the lines of code that has the security risk.
You can also click the links to view the pull request and the specific commit that introduced the security risk.
Select the arrow next to a security risk to view the details of the security risk.
You can view the analysis of the security risk, the code snippet associated with the risk, and the details of the pull request.
Security review GitHub pull request comment
If you configure the action policy to get comments on your GitHub pull requests, Endor Labs comments on the pull request with the security analysis.
PR Comments for AI security code review
AI security code review PR comments provide automated feedback directly in your GitHub pull requests when potential security issues are detected in your code changes. This feature helps developers identify and fix security vulnerabilities before code is merged into the main branch.
When you create or update a pull request, Endor Labs automatically scans the diff of the pull request. The scan data is sent to a private and secure AI model for security analysis. A comment is automatically posted to your PR with the analysis. You can review the findings and make necessary changes.
If no security issues are detected, you can see a comment indicating a clean security review.
Benefits of AI security code review PR comments
You can get the following benefits with AI security code review PR comments:
Get security feedback without leaving your development workflow
Identify issues before code review or merge
Reduce the time between writing code and discovering security problems
Receive specific recommendations for fixing security issues
Understand the security implications of your code changes
Learn about security best practices through real examples
Content of AI security code review PR comment
After the analysis is complete, Endor Labs posts a comment directly on your pull request with the following information:
Summary: A summary of the code changes in the pull request along with the file name and location of the code changes.
Security Changes: A list of security changes in the pull request along with the file names and location of the security changes.
The following example shows how an AI security code review PR comment appears in a GitHub pull request.
Summary of code changes
The AI security review provides a comprehensive summary of all code changes in your pull request.
The summary includes the following information:
Detailed change analysis: What was modified, added, or removed in each file.
File paths and line numbers: Exact locations of all changes.
Technical implementation details: Specific functions, configurations, and changes made in the code.
Impact assessment: Analysis of how changes affect the overall system.
The following example shows a summary of code changes for a pull request.
Security Changes
The AI security review analyzes your code changes across different security aspects and provides detailed findings for any security-relevant changes.
The following sections describe the security changes in more detail.
Endor Labs provides AI-powered assistance to help you understand vulnerabilities, troubleshoot issues, and accelerate security triage.
Endor AI Chat
Use the Endor AI Chat to understand vulnerabilities and view recommended actions. It leverages AI to provide contextual explanations, guidance, and next steps for issues detected in your project. With AI-powered context, you can reduce time spent digging through raw data and accelerate triage and remediation.
Prerequisites
To start using Endor Ask AI chat, you must enable Code Segment Embeddings and LLM Processing in Data Privacy settings.
Select Settings from the left sidebar.
Select SYSTEM SETTINGS > Data Privacy.
Select Code Segment Embeddings and LLM Processing.
Click Save Data Privacy Settings.
Use cases
Investigate vulnerabilities: Use the AI chat to simplify technical details and generate summaries.
Summarize scan results: Analyze scans performed by endorctl over time.
Understand vulnerabilities: Ask natural-language questions about vulnerabilities in the database.
Understand packages: Get quick explanations for package resolution and reachability errors.
Example questions
Summarize this finding.
Is this vulnerability exploitable?
How do I remediate this?
Is this a true positive SAST finding?
Which issues were introduced or resolved?
Why is this considered high severity?
Data scope for AI responses
Endor Ask AI chat agents generate answers based solely on specific data available within the Endor Labs platform:
Findings
Scan results
Vulnerabilities
Package versions
If the requested information falls outside this scope, the AI may not be able to generate a response.
AI Model Discovery
An AI model is a computational system designed to simulate human intelligence by performing tasks such as recognizing patterns, making decisions, predicting outcomes, or generating content. Many open source AI models are freely available for use, modification, and distribution. Just like dependencies, these AI models can bring operational and security risks in the organization that uses them. Gaining visibility into these risks can minimize the vulnerabilities introduced by them.
Endor Labs picks the top ten thousand open source AI models available on Hugging Face and assigns Endor scores to them, so that you can make informed decisions before using them in your organization. See AI Model scores for more information.
You can search for AI models in the following ways:
View detected AI models: Select Inventory > AI Models from the left sidebar to see AI models discovered in your namespace.
Search AI models from Hugging Face: Select Discover > AI Models from the left sidebar to search and evaluate models.
Type in the search bar and click Search AI Models.
Select a result to view details such as security, activity, popularity, and quality score.
Click Go to Hugging Face to see more to open the model on the Hugging Face website.
AI model findings
Endor Labs can detect AI models and list them as dependencies when you run a scan with the --ai-models flag. You can view the detected AI models in the Inventory > AI Models section of the Endor Labs user interface.
You can define custom policies to flag the usage of specific AI providers, specific AI models, or models with low-quality scores so that their usage raises findings as part of your scan. Endor Labs provides AI model policy templates that you can use to create finding policies that are tailored to your organization’s needs. You can view these findings in Code Dependencies > AI Models on the Findings page.
Run the following command to detect AI models in your repository.
endorctl scan --ai-models
When you run a scan with the --ai-models option, Endor Labs downloads Opengrep and runs Opengrep to detect AI models.
Endor Labs detects AI models using pattern matching and can use LLM processing to improve detection accuracy. LLM processing is disabled by default.
See Supported AI model providers for the list of external AI models detected by Endor Labs. Only Hugging Face models are scored, as they are open source and provide extensive public metadata. Models from all other providers are detected but not scored due to limited metadata.
Enable LLM processing for AI model detection
To enable LLM processing in Endor Labs:
Select Settings from the left sidebar.
Select System settings > Data privacy.
Turn on Code Segment Embeddings and LLM Processing.
When you enable LLM processing, Endor Labs uses a private and isolated Azure OpenAI Service deployment, which is not accessible from the public Internet and cannot be used for LLM training.
To generate AI model findings:
Configure finding policy to detect AI models with low scores and enforce organizational restrictions on specific AI models or model providers.
To disable AI model discovery, set ENDOR_SCAN_AI_MODELS=false in your scan profile.
AI model detection
The following table lists the AI model providers currently supported by Endor Labs for model detection. For each provider, the table includes supported programming languages, if model scoring is available, and a reference link to the provider’s API documentation.
By default, AI models are discovered during SCA scans run through GitHub App, Bitbucket App, Azure DevOps App, and GitLab App. You can view the reported AI models under Inventory > AI Models in the left sidebar.
To disable AI model discovery, set ENDOR_SCAN_AI_MODELS=false as an additional environment variable in the scan profile and assign the scan profile to the project.
Detect AI models
Configure finding policies and perform an endorctl scan to detect AI models in your repositories and review the findings.
Configure finding policy to detect AI models with low scores and enforce organizational restrictions on specific AI models or model providers.
Run an endorctl scan with the following command.
endorctl scan --ai-models --dependencies
View AI models in your namespace
To view all AI models that are used in your namespace:
Select Inventory from the left sidebar, then AI Models.
Use the search bar to look for any specific models.
Select a model, and click to see its details.
You can also navigate to Findings and choose AI Models to view findings.
View AI models in a project
To view AI models that are used in a specific project:
Select Projects from the left sidebar and select a project.
Select Inventory and click AI Models under Dependencies to view findings.
View AI model findings in your namespace
To view all AI model findings in your namespace:
Select Findings from the left sidebar.
Select AI Models from the Findings page.
AI model policies
Policy templates for AI models
Endor Labs provides the following finding policy templates for detecting AI models that have low Endor score.
See Finding Policies for details on how to create policies from policy templates.
Policy template
Description
Severity
AI models with low scores
Raise a finding if the repository uses an AI model with an Endor score value that is less than the specified threshold value.
Low
Restricted AI models
Raise a finding if the repository uses an AI model that is restricted based on your organizational policy or usage context.
Low
Restricted AI model providers
Raise a finding if the repository uses an AI model provider that is restricted based on your organizational policy or usage context.
Low
AI model scores
To evaluate AI models effectively, we use a multifactor scoring system that assesses popularity, activity, operational integrity, and security.
Each model is assigned a composite score based on the following criteria:
Popularity score factors
The popularity score reflects the model’s adoption and recognition within the AI community. Higher scores indicate greater usage and community engagement.
Number of downloads: More downloads indicate widespread adoption.
Number of likes: More likes suggest a positive reception from users.
Published papers: Models with linked academic papers receive higher credibility.
GitHub repository: Models with an associated GitHub repository score higher.
Number of spaces using the model: More integrations suggest broader utility.
Scoring approach for popularity score factors
Models with many downloads, likes, citations, and integrations score higher.
Models with fewer engagements score lower.
Activity score factors
The activity score measures how actively a model is discussed and maintained.
Discussion posts: Active community discussions contribute positively.
Pull requests: Indicates ongoing maintenance and improvements.
Scoring approach for activity score factors
Models with frequent discussions and active pull requests score higher.
Models with limited activity receive lower scores.
Operational score factors
The operational score assesses the model’s reliability, transparency, and usability.
Reputable provider: Models from well-known sources score higher.
Model age: Older, well-maintained models may score higher, but outdated models may receive penalties.
Authorization requirements: Restricted-access models score lower for accessibility but may gain points for security.
Gated models: If a model requires special access, it may impact usability.
License information: Models with clear licensing receive higher scores.
License type: Open licenses (permissive, unencumbered) generally score higher than restrictive ones.
The following factors related to the availability of model metadata are also considered.
Metric information: Essential for model evaluation.
Dataset information: Transparency about training data boosts score.
Base model information: Important for derivative works.
Training data, fine-tuning, and alignment training information: Increases credibility.
Evaluation results: Demonstrates model performance.
Scoring approach for operational score factors
Models with comprehensive metadata, reputable providers, and clear licensing score higher.
Models with unclear ownership, restrictive access, or missing details score lower.
Security score factors
The security score evaluates potential risks associated with a model’s implementation and distribution.
Use of safe tensors: Secure tensor formats boost safety score.
Use of potentially unsafe files: Formats such as pickle, PyTorch, and Python code files pose security risks.
Typosquatting risks: Models that could be impersonating popular models receive lower scores.
Example code availability: Models that contain example code or code snippets can introduce potential issues and hence receive lower scores.
Scoring approach for security score factors
Models that follow best security practices such as safe tensors, clear documentation, or vetted repositories score higher.
Models receive lower scores if they use potentially unsafe formats such as pickle (.pkl) and unverified PyTorch (.pth) or show signs of typosquatting.
Final score calculation
Each category contributes to the overall model score. The final score is a weighted sum of these factors, with weights adjusted based on real-world relevance and risk impact.
Higher scores indicate well-documented, popular, actively maintained, and secure models, while lower scores highlight potential risks or lack of transparency.
This scoring system enables users to make informed decisions when selecting AI models for their projects.
Endor Labs continuously refines and expands its evaluation criteria; this document represents the current methodology snapshot.