Learn how to export findings and scan data from Endor Labs to external storage and security platforms using the export framework.
Endor Labs provides an export framework that enables you to export scan data to external platforms for archival, compliance, or integration with other security tools. You can configure exporters to automatically send data to supported destinations after each scan.
Supported export destinations
The export framework supports the following destinations.
Export findings in SARIF format to GitHub Advanced Security for viewing in the GitHub security dashboard.
Supported data types
You can configure exporters to export different types of data:
Data Type
Description
Message Type
Exporters
Findings
Security findings from scans including vulnerabilities, secrets, and SAST issues
MESSAGE_TYPE_FINDING
S3, GHAS
Action policy findings
Findings that match your configured action policies (blocked or warning)
MESSAGE_TYPE_ADMISSION_POLICY_FINDING
GHAS
Supported export formats
Format
Description
Format Type
Exporters
JSON
Export data in JSON format for flexibility and compatibility with various tools
MESSAGE_EXPORT_FORMAT_JSON
S3
SARIF
Export findings in Static Analysis Results Interchange Format for security tools integration
MESSAGE_EXPORT_FORMAT_SARIF
S3, GHAS
Export findings to GitHub Advanced Security
You can export the findings generated by Endor Labs to GitHub Advanced Security so that you can view the findings in the GitHub. Endor Labs exports the findings in the SARIF format and uploads them to GitHub. You can view the findings under Security > Vulnerability Alerts > Code Scanning in GitHub.
Warning
GitHub have several limitations for SARIF files, so you may not be able to experience the full benefits on Endor Labs. For example, GitHub limits the number of results in a SARIF file. It allows a maximum of 25000 results per file but displays the first 5000 results ranked by severity. Refer to GitHub SARIF support for code scanning for the complete list of limitations with respect to SARIF files in GitHub Advanced Security.
Prerequisites
Ensure that you meet the following prerequisites before exporting findings to GitHub Advanced Security:
Code scanning feature is enabled in your GitHub repository. Refer to Enabling code scanning for more information.
Download and install endorctl. See Install endorctl for more information.
Create a GHAS SARIF exporter
GHAS SARIF exporter allows you to export the findings generated by Endor Labs in the SARIF format. See Understanding SARIF files for more information on the SARIF format and Endor-specific extensions.
You can create a GHAS SARIF exporter using the Endor Labs API.
Run the following command to create a GHAS SARIF exporter.
Configure scan profile and project to use the GHAS SARIF exporter
You can configure the scan profile to use the GHAS SARIF exporter and associate it with your project. You can also set the scan profile as the default scan profile so that all the projects in the namespace use the scan profile by default. See Scan profiles for more information.
Configure the scan profile
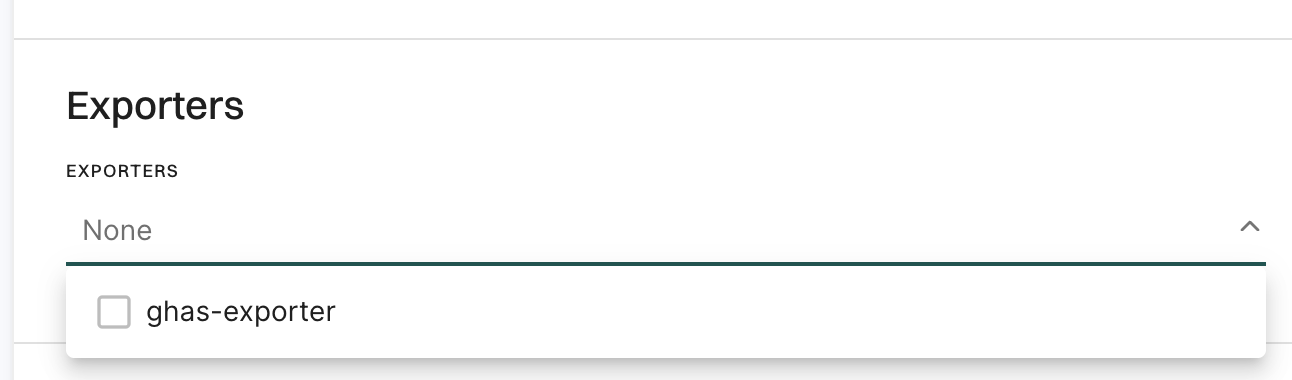
Ensure that you select the GHAS SARIF exporter in the Export section of the scan profile.
Select Settings from the left sidebar.
Select Scan Profiles.
Select the scan profile you want to configure and click Edit Scan Profile.
Select the GHAS SARIF exporter under Exporters and click Save Scan Profile.
Configure the project to use the scan profile
Ensure that you choose the scan profile with the GHAS SARIF exporter for the project.
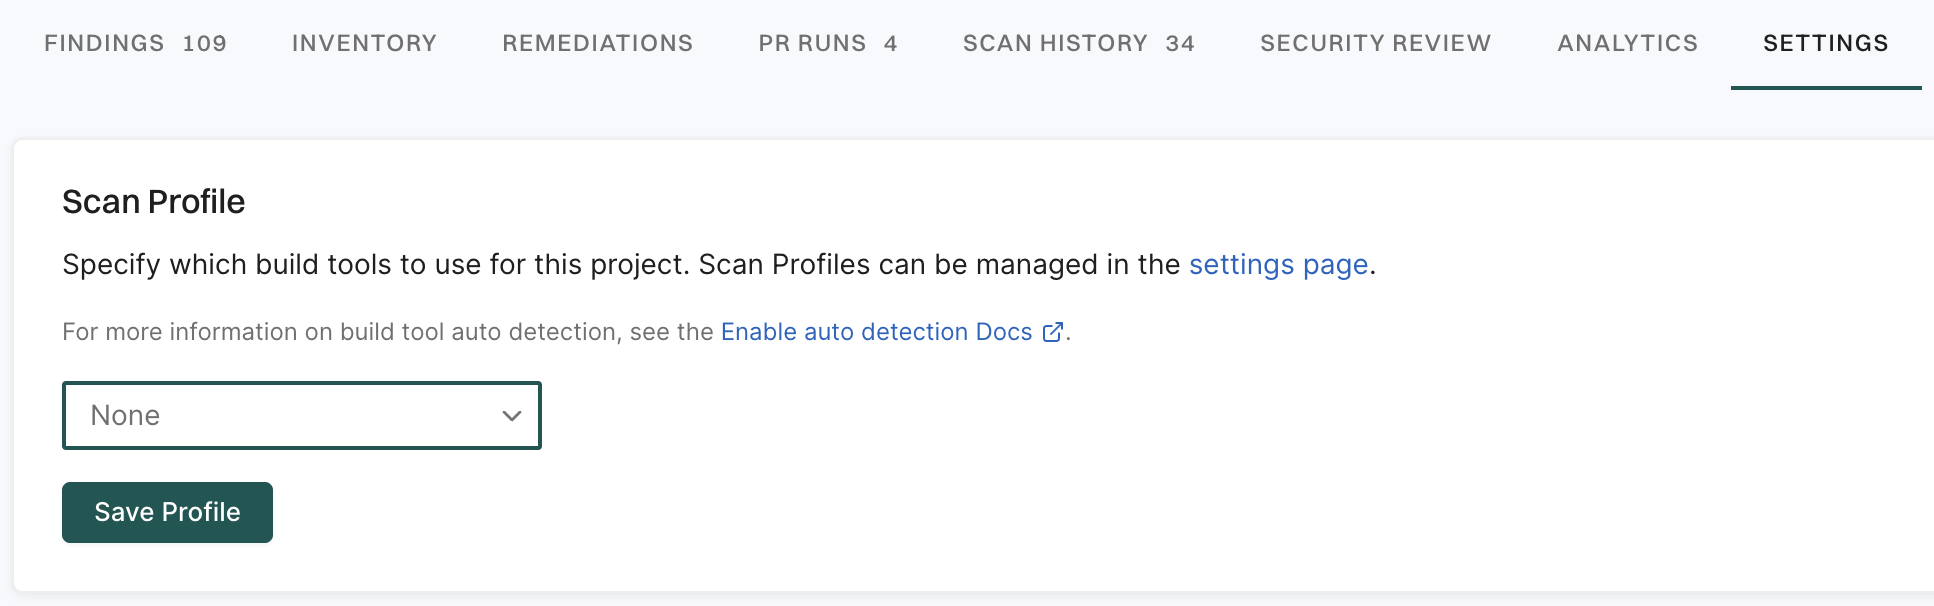
Go to the Projects page and select the project you want to configure.
Select Settings and select the scan profile you want to use under Scan Profile.
Scan projects to use the GHAS SARIF exporter
After the configuration is complete, your subsequent scans will export the findings in the SARIF format and upload them to GitHub. You can use the rescan ability to scan the project immediately instead of waiting for the next scheduled scan. See Rescan projects for more information.
If you have enabled pull request scans in your GitHub App, the GHAS SARIF exporter exports the findings for each pull request.
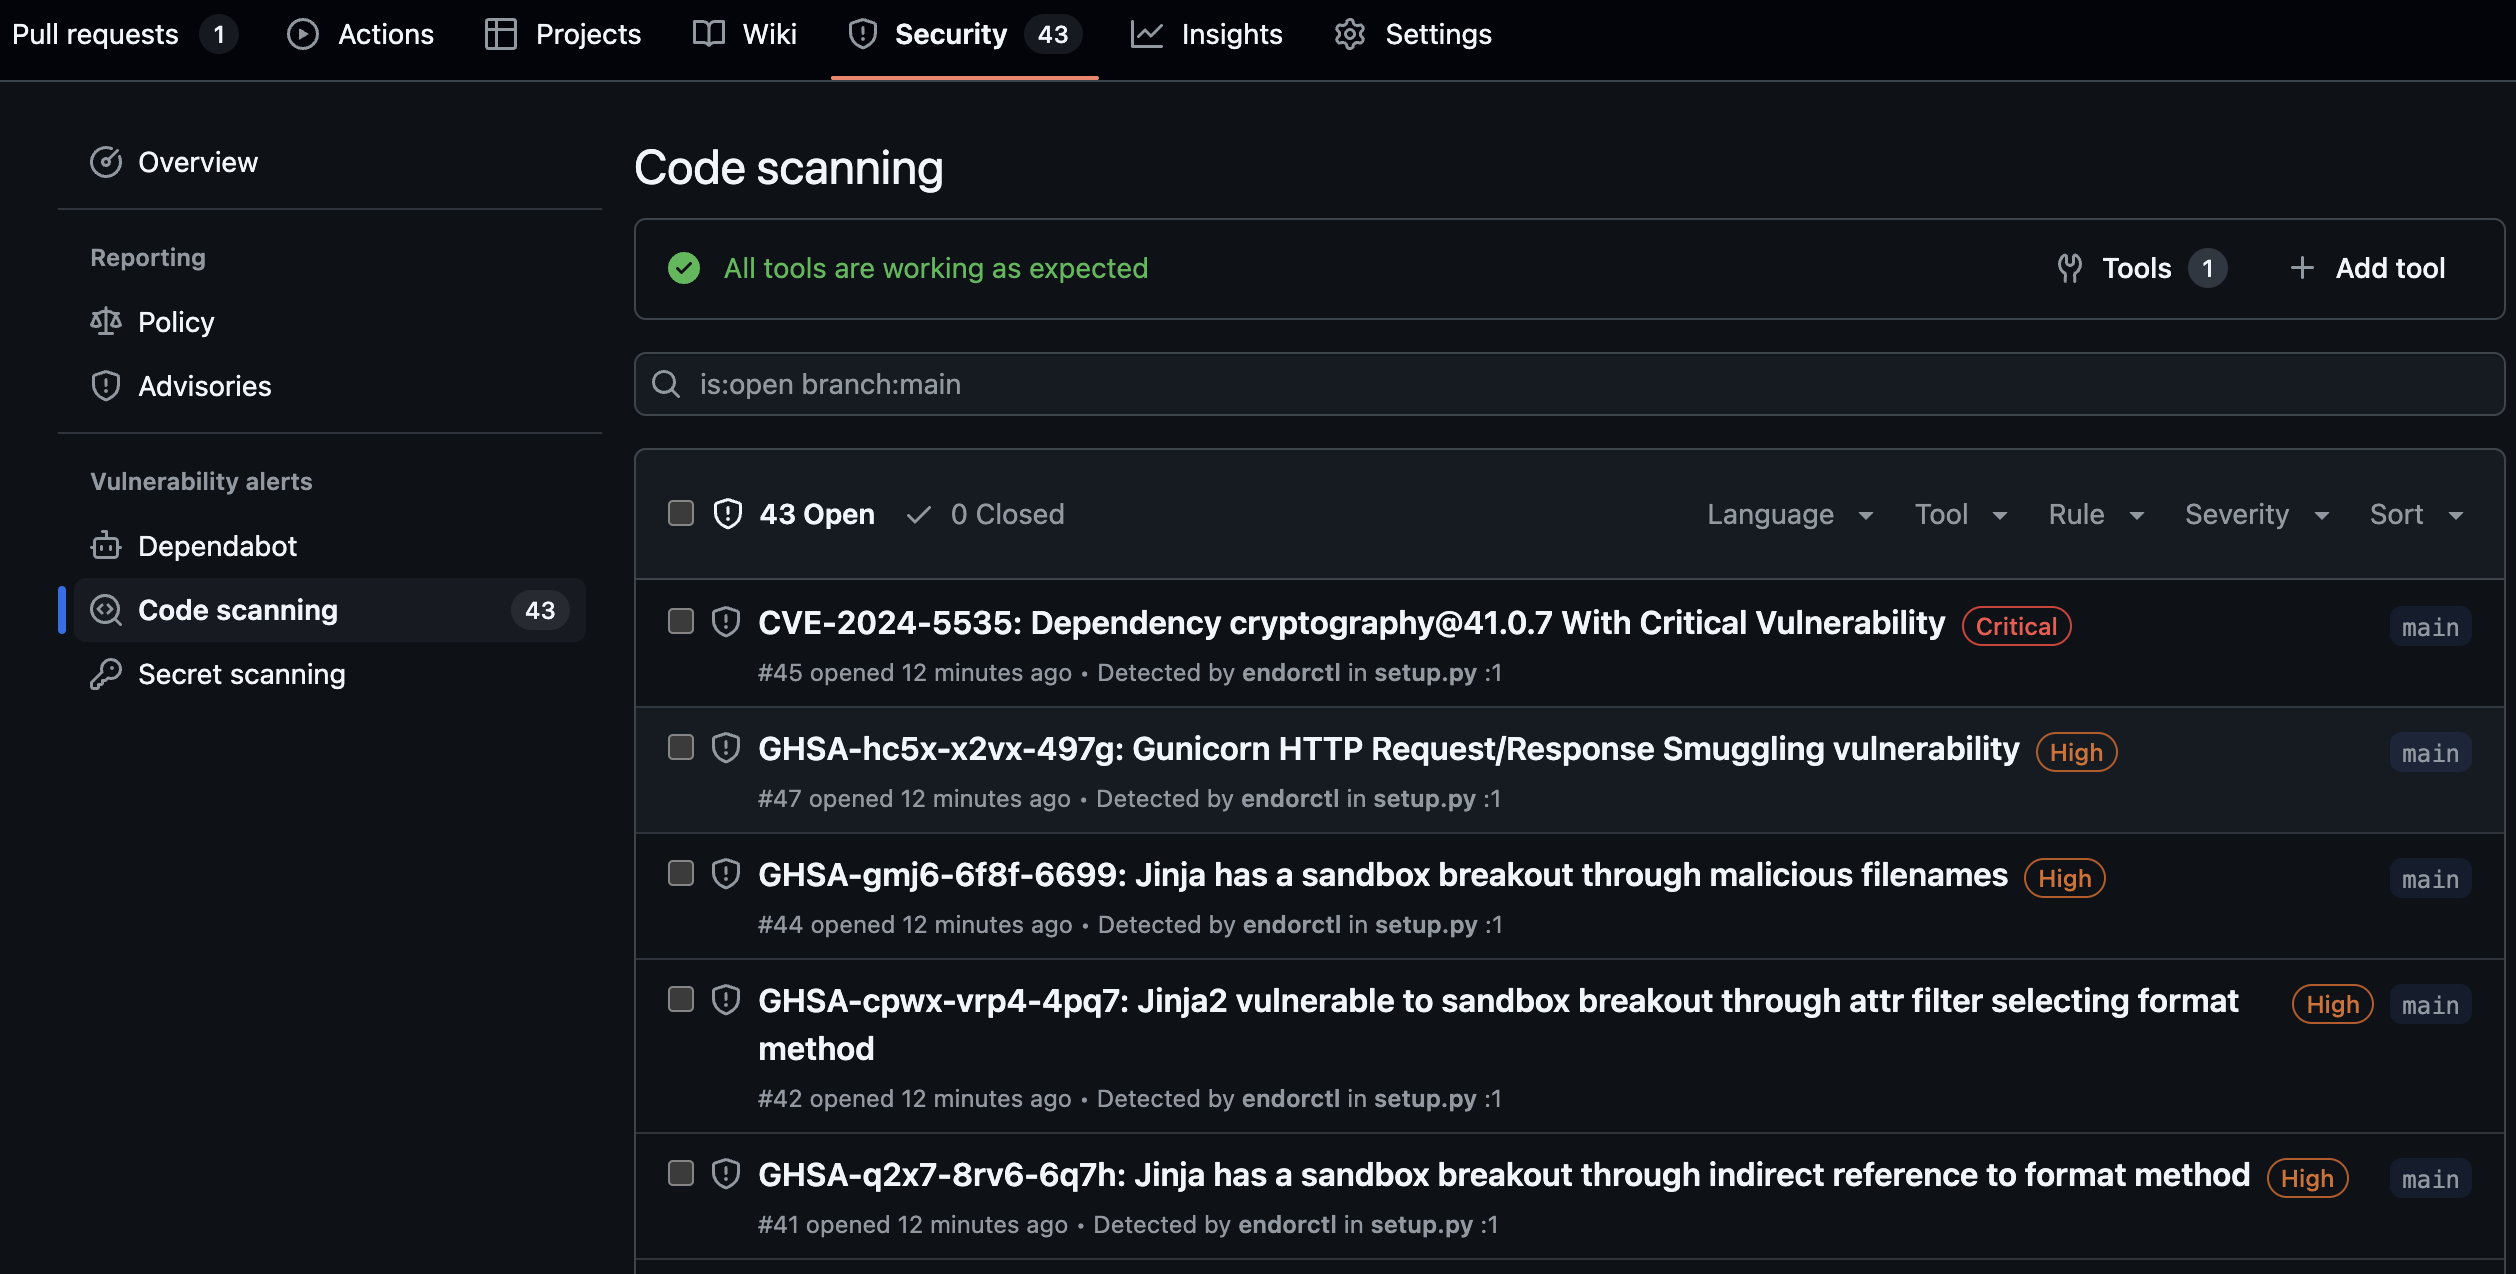
View findings in GitHub
Navigate to your GitHub repository.
Select Security.
Select Code scanning under Vulnerability Alerts.
You can use the search bar to filter the findings. You can also view findings for a specific branch and other filter criteria. You can also view the findings specific to a pull request if you have enabled pull request scans. You can filter the findings by the pull request number and view findings associated with the pull request. You can select a finding and view the commit history behind the finding.
Select Campaigns to view and create security campaigns that coordinate remediation efforts across multiple repositories. See GitHub security campaign for more information.
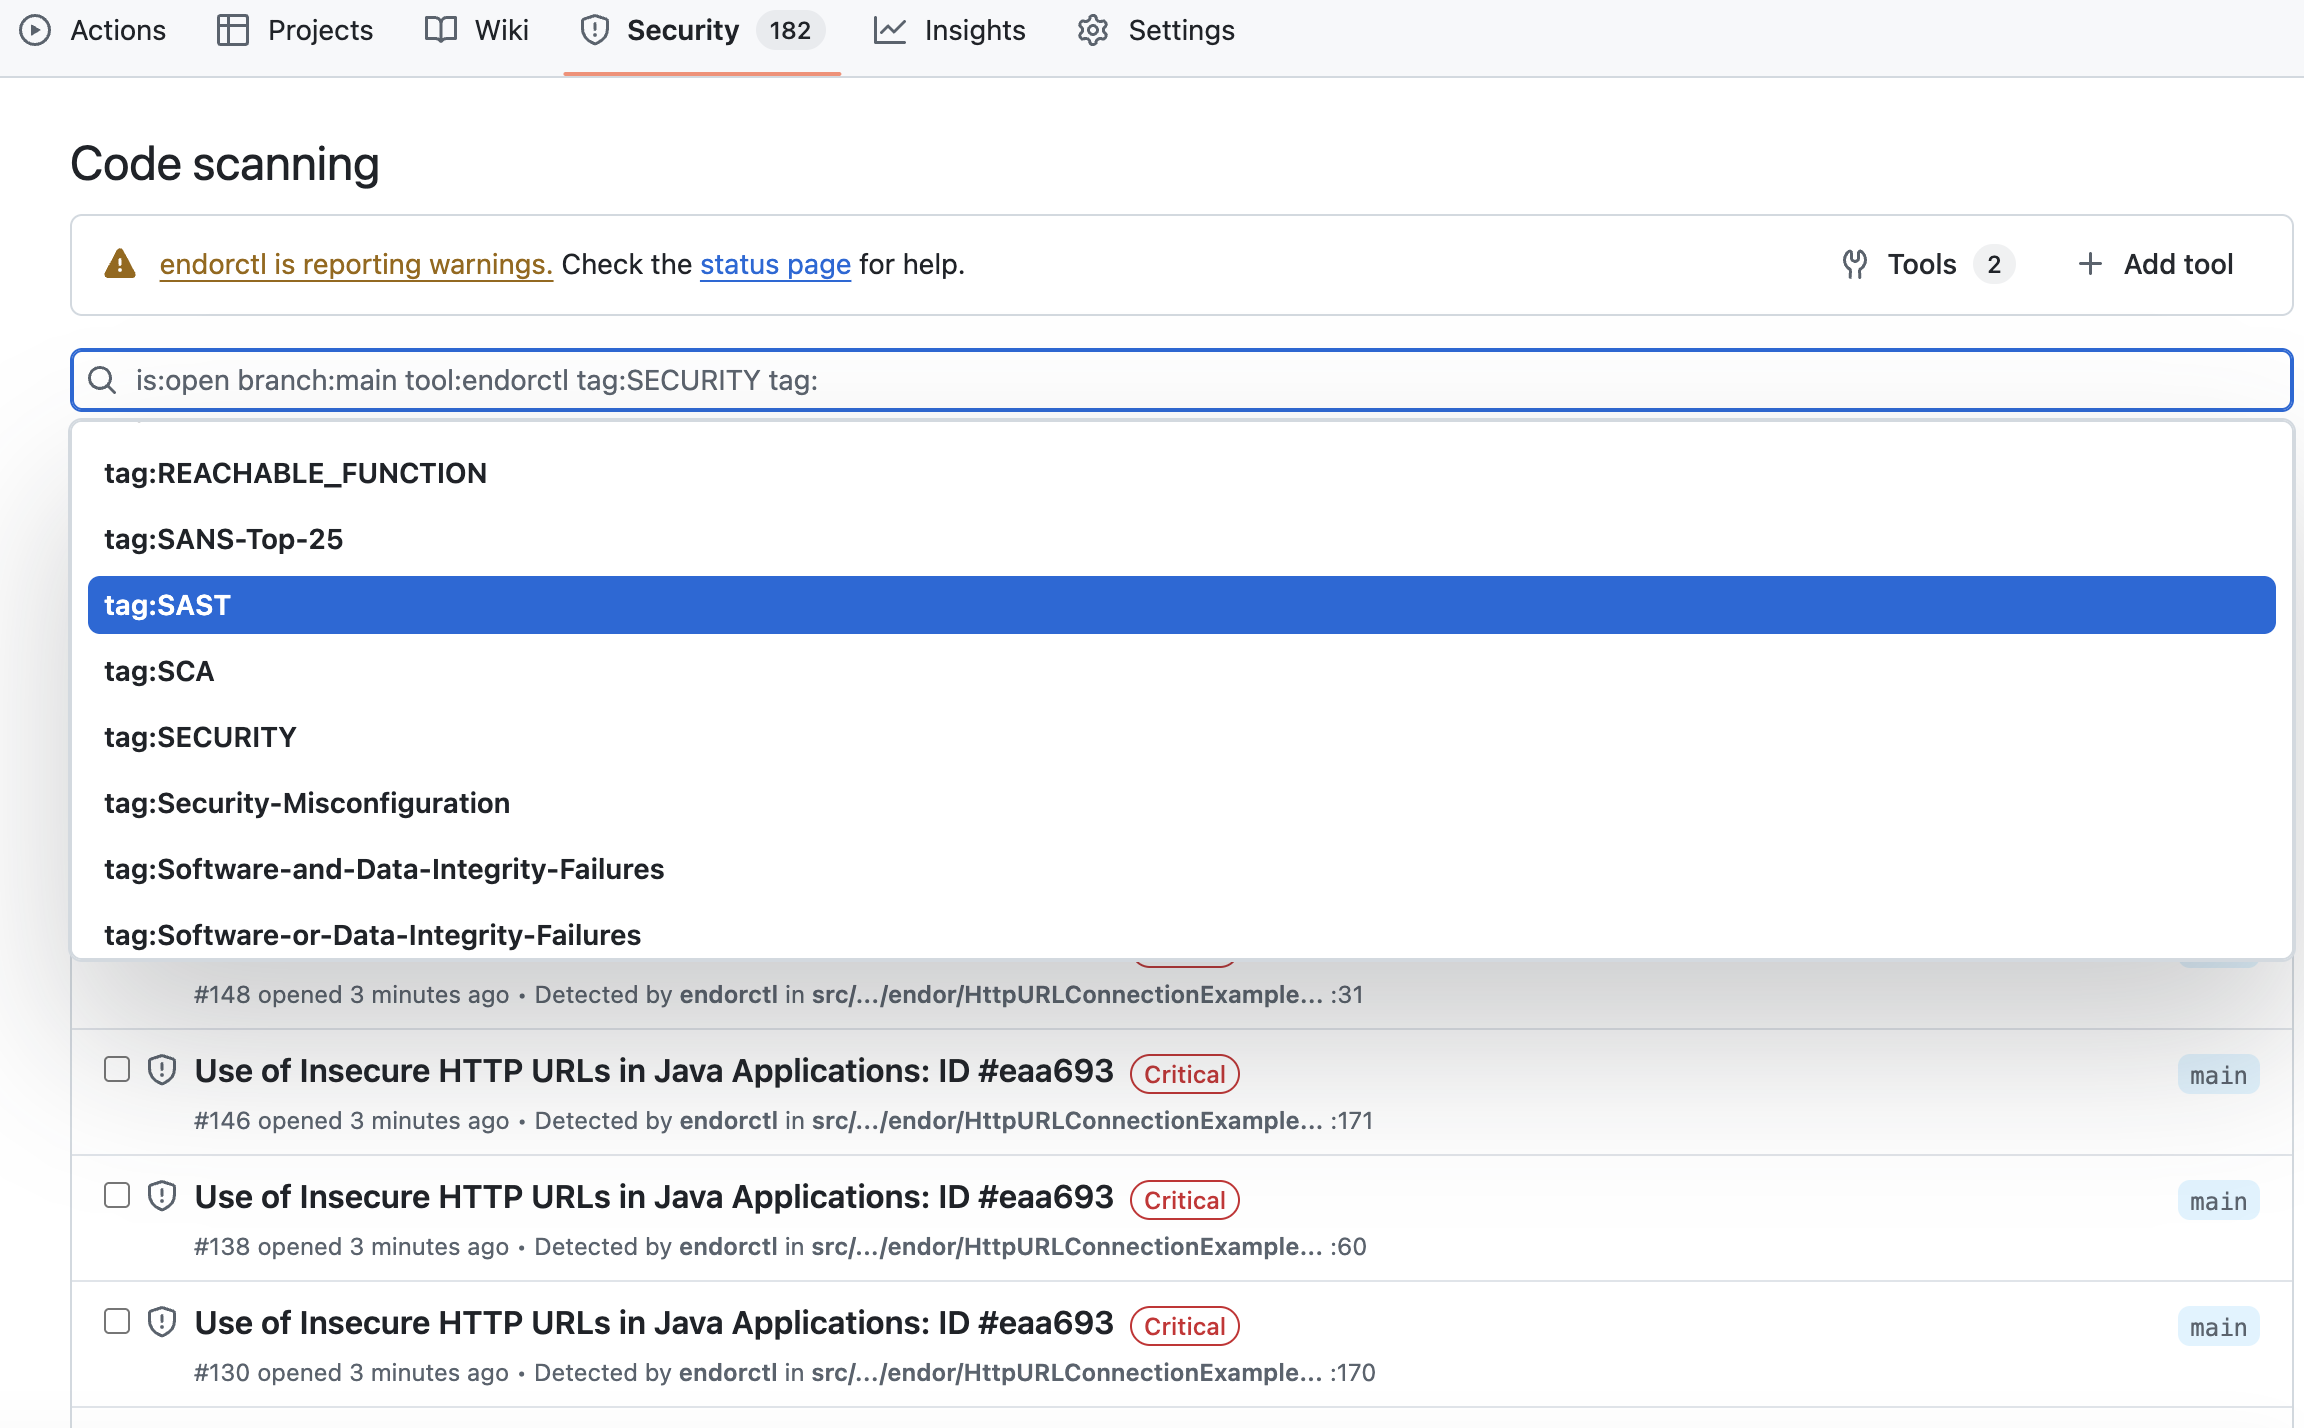
Filter findings by tags in GitHub
When findings are exported to GHAS, Endor Labs includes finding tags and categories as searchable tags in the SARIF output. These tags appear in the GitHub code scanning interface, and you can filter and identify specific types of findings.
Endor Labs exports the following types of tags to GHAS:
Finding tags: System-defined attributes such as REACHABLE_FUNCTION, FIX_AVAILABLE, EXPLOITED, DIRECT, TRANSITIVE, and others. See Finding tags for the complete list.
Finding categories: Categories such as SCA, SAST, VULNERABILITY, SECRETS, CONTAINER, CICD, GHACTIONS, LICENSE_RISK, MALWARE, OPERATIONAL, SCPM, SECURITY, SUPPLY_CHAIN, and AI_MODELS. See Finding categories for the complete list.
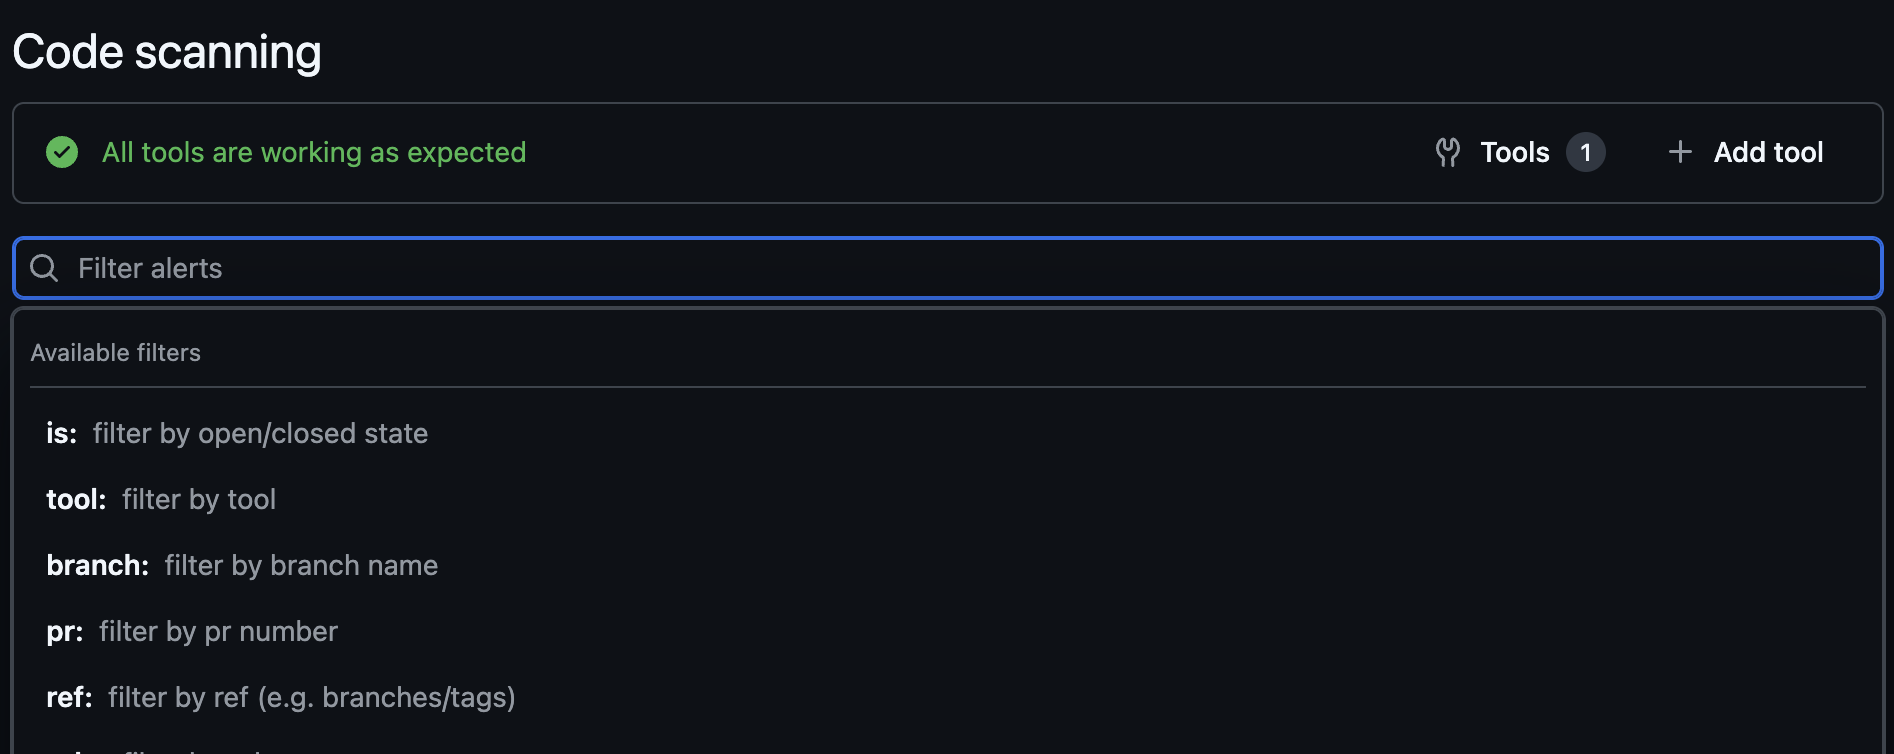
You can use the search bar to filter findings by tags. Use the tag: prefix followed by the tag name to search for specific Endor Labs tags.
Available Filter
Description
REACHABLE_FUNCTION
Show findings with reachable vulnerable functions.
FIX_AVAILABLE
Show findings where a fix is available.
EXPLOITED
Show findings for actively exploited vulnerabilities (KEV).
DIRECT
Show findings in direct dependencies.
TRANSITIVE
Show findings in transitive dependencies.
CI_BLOCKER
Show findings marked as blockers by action policies.
SCA
Show Software Composition Analysis findings.
SAST
Show SAST findings.
SECRETS
Show exposed secrets findings.
VULNERABILITY
Show vulnerability findings.
CONTAINER
Show container findings.
CICD
Show CI/CD pipeline findings.
GHACTIONS
Show GitHub Actions findings.
You can combine multiple filters to narrow down your results. For example, to find reachable vulnerabilities with available fixes:
tag:REACHABLE_FUNCTION tag:FIX_AVAILABLE
Filter findings exported to GitHub
You can control which findings are exported to GHAS by using action policies. Only findings from projects within the scope of your configured action policies will be exported to GitHub Advanced Security.
To filter findings using action policies:
Create an action policy that defines the criteria for findings you want to export, or use an existing action policy.
Assign specific projects to the scope of the action policy you want to use.
Run the following command to create a GHAS SARIF exporter that exports only findings from projects in the scope of your action policies.
Note
Use MESSAGE_TYPE_ADMISSION_POLICY_FINDING as the message_type to filter findings based on your action policies.
Export scan data generated by Endor Labs to an AWS S3 storage bucket. This enables long-term data retention for compliance requirements, integration with security information and event management (SIEM) systems, and custom analytics workflows. The export framework supports exporting findings in JSON or SARIF format, allowing flexible integration with your existing toolchain.
Amazon S3 is an object storage service provided by Amazon Web Services (AWS). It offers high durability, availability, and scalability for storing and retrieving any amount of data. S3 integrates with other AWS services and third-party tools, making it ideal for data archival, backup, and analytics workflows.
Prerequisites
Ensure that you meet the following prerequisites before exporting data to S3:
An AWS account with permissions to create IAM roles, identity providers, and S3 buckets.
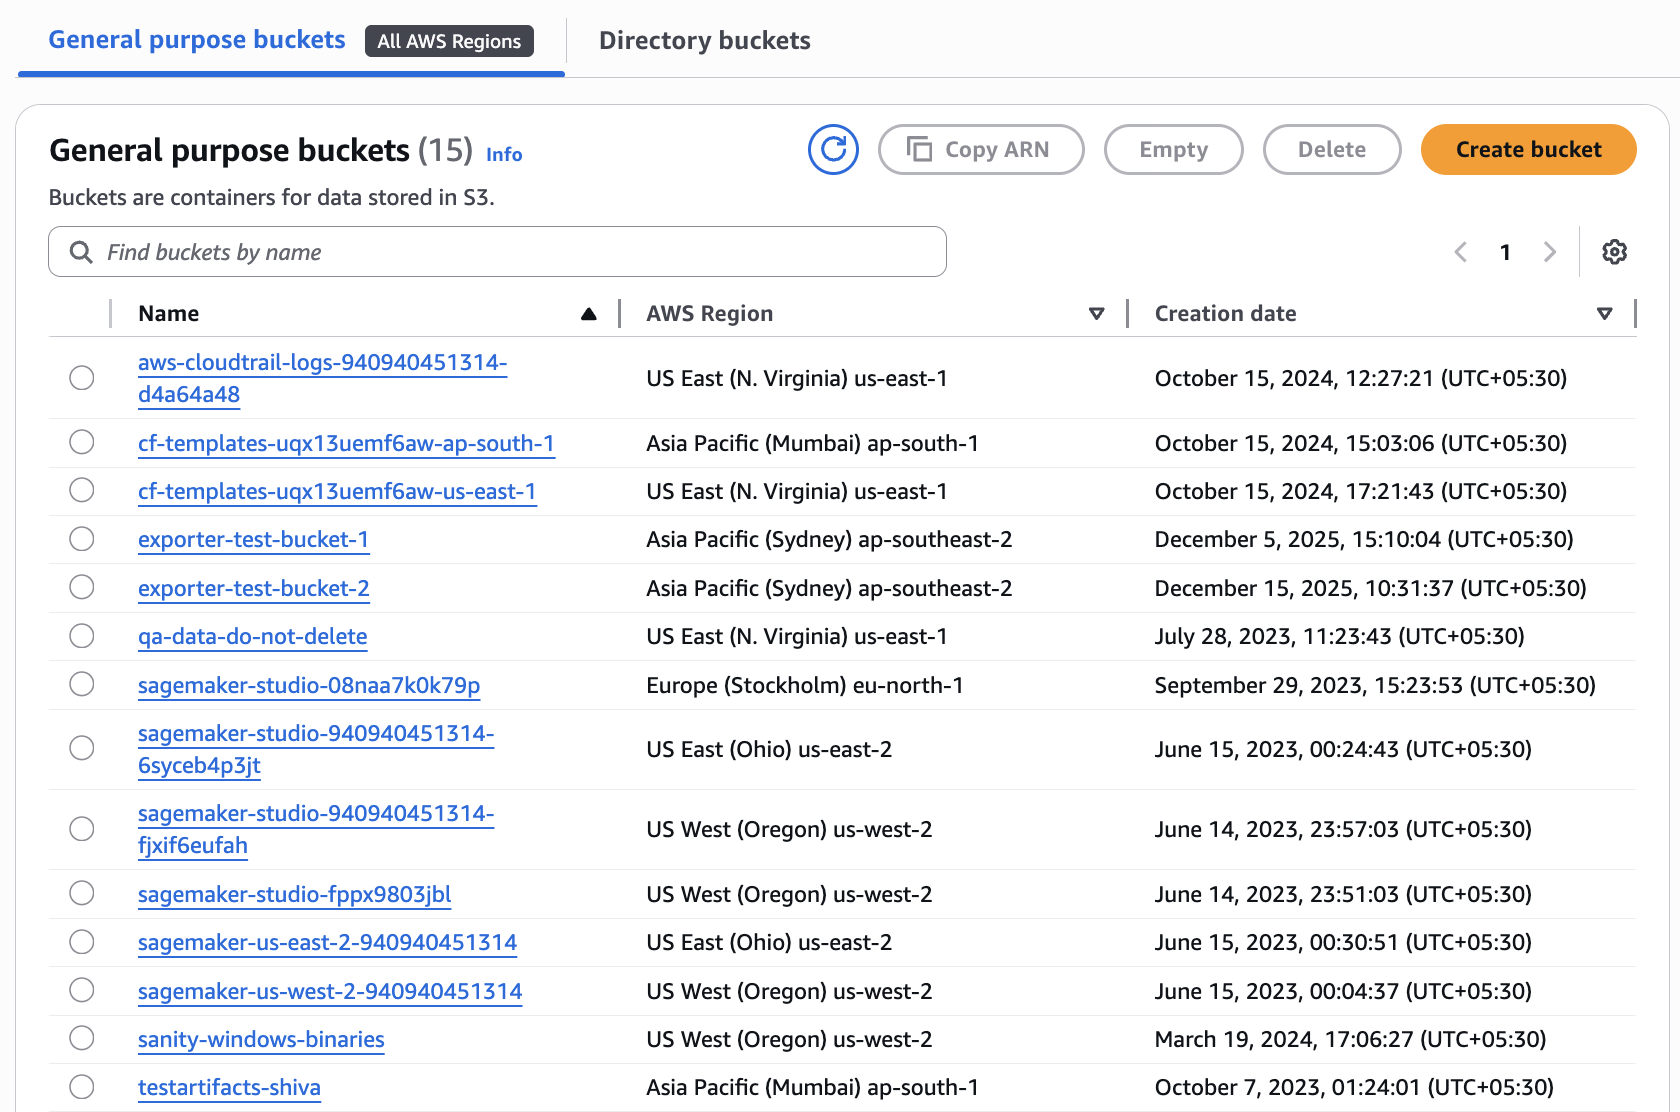
An S3 bucket is a container for storing objects in Amazon S3. Each bucket has a globally unique name and is created in a specific AWS region.
You can create a general purpose S3 bucket or reuse an existing bucket to store the exported data. Disable access control lists (ACLs) on the bucket to ensure that the access is managed through IAM policies and bucket policies, preventing unintended public access. Refer to Creating a bucket for detailed instructions on creating an S3 bucket.
Configure bucket lifecycle
You can configure S3 lifecycle rules to automatically delete exported data after a specified retention period. Exported objects do not expire unless you configure lifecycle rules.
In the AWS management console, navigate to Amazon S3 > Buckets.
Select your bucket.
Select Management and click Create lifecycle rule.
Enter a Lifecycle rule name, for example, endor-exports-expiry.
Under Filter type, select Limit the scope of this rule using one or more filters and enter endor/ as the prefix to apply the rule only to exported data.
Under Lifecycle rule actions, select Expire current versions of objects.
Under Expire current versions of objects, enter the number of days after which objects should be deleted.
Review the rule and click Create rule.
Configure access for Endor Labs
Endor Labs uses OIDC federation to assume an IAM role in your AWS account to access the S3 bucket. To allow Endor Labs to write to the bucket, configure OIDC and IAM using one of the following methods:
Use the CFT template to create the OIDC identity provider, IAM role, and S3 write policy.
Use the AWS Management console to create access by adding the OIDC identity provider and IAM role.
Create AWS resources using a CFT template
Use an AWS CloudFormation Template (CFT) to create the IAM role and S3 PutObject policy for the S3 exporter. The template can create a new OIDC identity provider for Endor Labs or reuse an existing provider in your account.
The following table lists the parameters you can set when deploying the CFT template.
Parameter
Description
OIDCUrl
Endor Labs OIDC issuer URL.
ExistingOidcProviderArn
Set this to the ARN of your existing OIDC provider for api.endorlabs.com. The template will reuse it and will not create a new OIDC provider.
OidcAudience
Audience for the OIDC trust policy. Use the same value for allowed_audience when creating the S3 exporter.
TenantNamespace
Your Endor Labs tenant namespace.
BucketName
Name of the existing S3 bucket that will receive exports.
RoleName
IAM role name that Endor Labs will assume via web identity.
PolicyName
IAM managed policy name for S3 PutObject permission.
Create a .cft file with the following template.
You can use the following template and set the parameters according to your OIDC audience, tenant namespace, bucket name, role name, and optionally an existing OIDC provider ARN.
AWSTemplateFormatVersion:"2010-09-09"Description:> Endor Labs S3 Exporter - creates IAM OIDC provider (optional), role, and minimal S3 PutObject policy.Parameters:OIDCUrl:Type:StringDefault:"https://api.endorlabs.com"Description:"Endor Labs OIDC issuer URL."ExistingOidcProviderArn:Type:StringDefault:""Description:> Optional. If your AWS account already has an OIDC provider for https://api.endorlabs.com,
set this to its ARN (for example, arn:aws:iam::<ACCOUNT_ID>:oidc-provider/api.endorlabs.com).
When set, this template will NOT create a new OIDC provider. It will reuse the existing provider
and ensure the OidcAudience is present in its ClientIdList.OidcAudience:Type:StringDefault:"s3-exporter"Description:"Specify the audience name to use in the OIDC trust policy. Set the same value in allowed_audience while creating the Endor exporter configuration."TenantNamespace:Type:StringDescription:"Root Endor Labs tenant namespace (for example, acme-corp)."BucketName:Type:StringDescription:"Existing S3 bucket name to receive exports."RoleName:Type:StringDefault:"EndorS3ExporterRole"Description:"IAM role name Endor will assume via web identity."PolicyName:Type:StringDefault:"EndorS3ExporterPolicy"Description:"IAM managed policy name for S3 PutObject permission."Conditions:CreateOidcProvider:!Equals [!Ref ExistingOidcProviderArn, ""]UseExistingOidcProvider:!Not [!Equals [!Ref ExistingOidcProviderArn, ""]]Resources:EndorOidcProvider:Type:AWS::IAM::OIDCProviderDeletionPolicy:DeleteUpdateReplacePolicy:DeleteCondition:CreateOidcProviderProperties:Url:!Ref OIDCUrlClientIdList:- !Ref OidcAudienceEndorS3PutObjectPolicy:Type:AWS::IAM::ManagedPolicyDeletionPolicy:DeleteUpdateReplacePolicy:DeleteProperties:ManagedPolicyName:!Ref PolicyNamePolicyDocument:Version:"2012-10-17"Statement:- Sid:PutObjectToBucketEffect:AllowAction:- s3:PutObjectResource:!Sub "arn:${AWS::Partition}:s3:::${BucketName}/*"EndorS3ExporterRole:Type:AWS::IAM::RoleDeletionPolicy:DeleteUpdateReplacePolicy:DeleteProperties:RoleName:!Ref RoleNameAssumeRolePolicyDocument:Version:"2012-10-17"Statement:- Sid:EndorWebIdentityEffect:AllowPrincipal:Federated:!If- CreateOidcProvider- !Ref EndorOidcProvider- !Ref ExistingOidcProviderArnAction:sts:AssumeRoleWithWebIdentityCondition:StringEquals:"api.endorlabs.com:aud": !Ref OidcAudienceStringLike:"api.endorlabs.com:sub":- !Sub "${TenantNamespace}/*"- !Sub "${TenantNamespace}.*/*"ManagedPolicyArns:- !Ref EndorS3PutObjectPolicyOutputs:OidcProviderArn:Description:"OIDC provider ARN."Value:!If- CreateOidcProvider- !Ref EndorOidcProvider- !Ref ExistingOidcProviderArnRoleArn:Description:"Role ARN to set as assume_role_arn in Endor exporter config."Value:!GetAtt EndorS3ExporterRole.ArnOidcAudienceOut:Description:"Audience to set as allowed_audience in Endor exporter config."Value:!Ref OidcAudience
Save this file with an appropriate name such as endorlabs-s3-export.cft.
Sign into AWS CloudFormation and search for Stacks.
Click Create Stack and select With new resources.
From Template source, select Upload a template file.
Click Choose file, select the file you saved, and click Next.
In Specify stack details, enter a Stack name, verify the Parameters you entered in the script and click Next.
Select the acknowledgement from Configure stack options and click Next.
From Review and Create, review the details and click Submit.
Check the progress of the creation of your resources from Stacks. Once the stack is created, you can see the status as CREATE_COMPLETE.
Create access through the Console
Create the OIDC identity provider and IAM role manually in the AWS Management Console.
1. Add an OIDC identity provider
OpenID Connect (OIDC) federation allows Endor Labs to access AWS resources without requiring long-lived credentials. This reduces the risk of credential exposure and simplifies secret rotation.
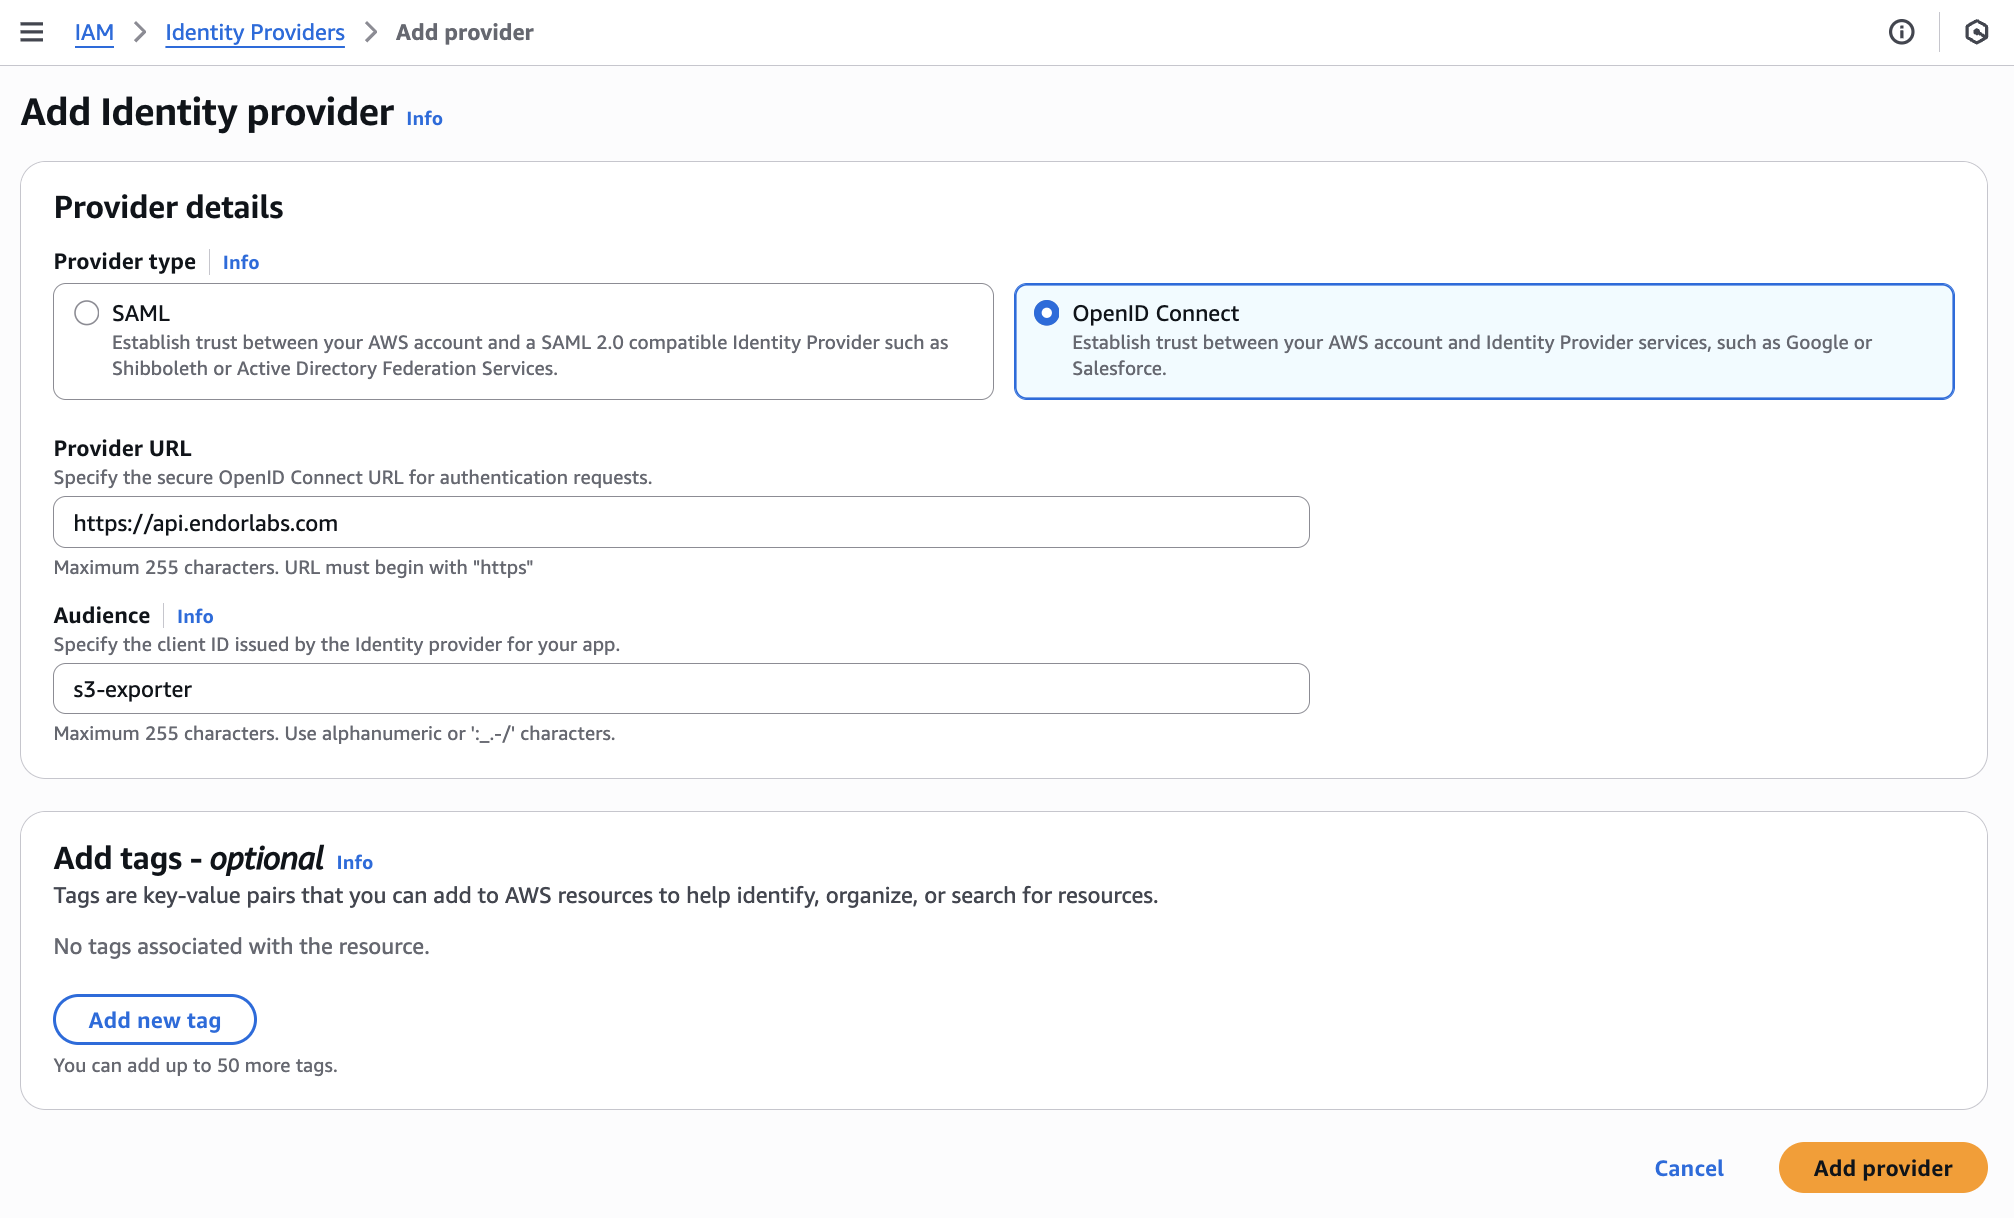
In the AWS management console, navigate to IAM > Access Management > Identity providers.
Click Add provider.
Under Provider details, select OpenID Connect.
For Provider URL, enter https://api.endorlabs.com.
For Audience, specify a unique identifier to validate incoming OIDC tokens from Endor Labs.
Optionally, add tags to help identify the provider.
Click Add provider.
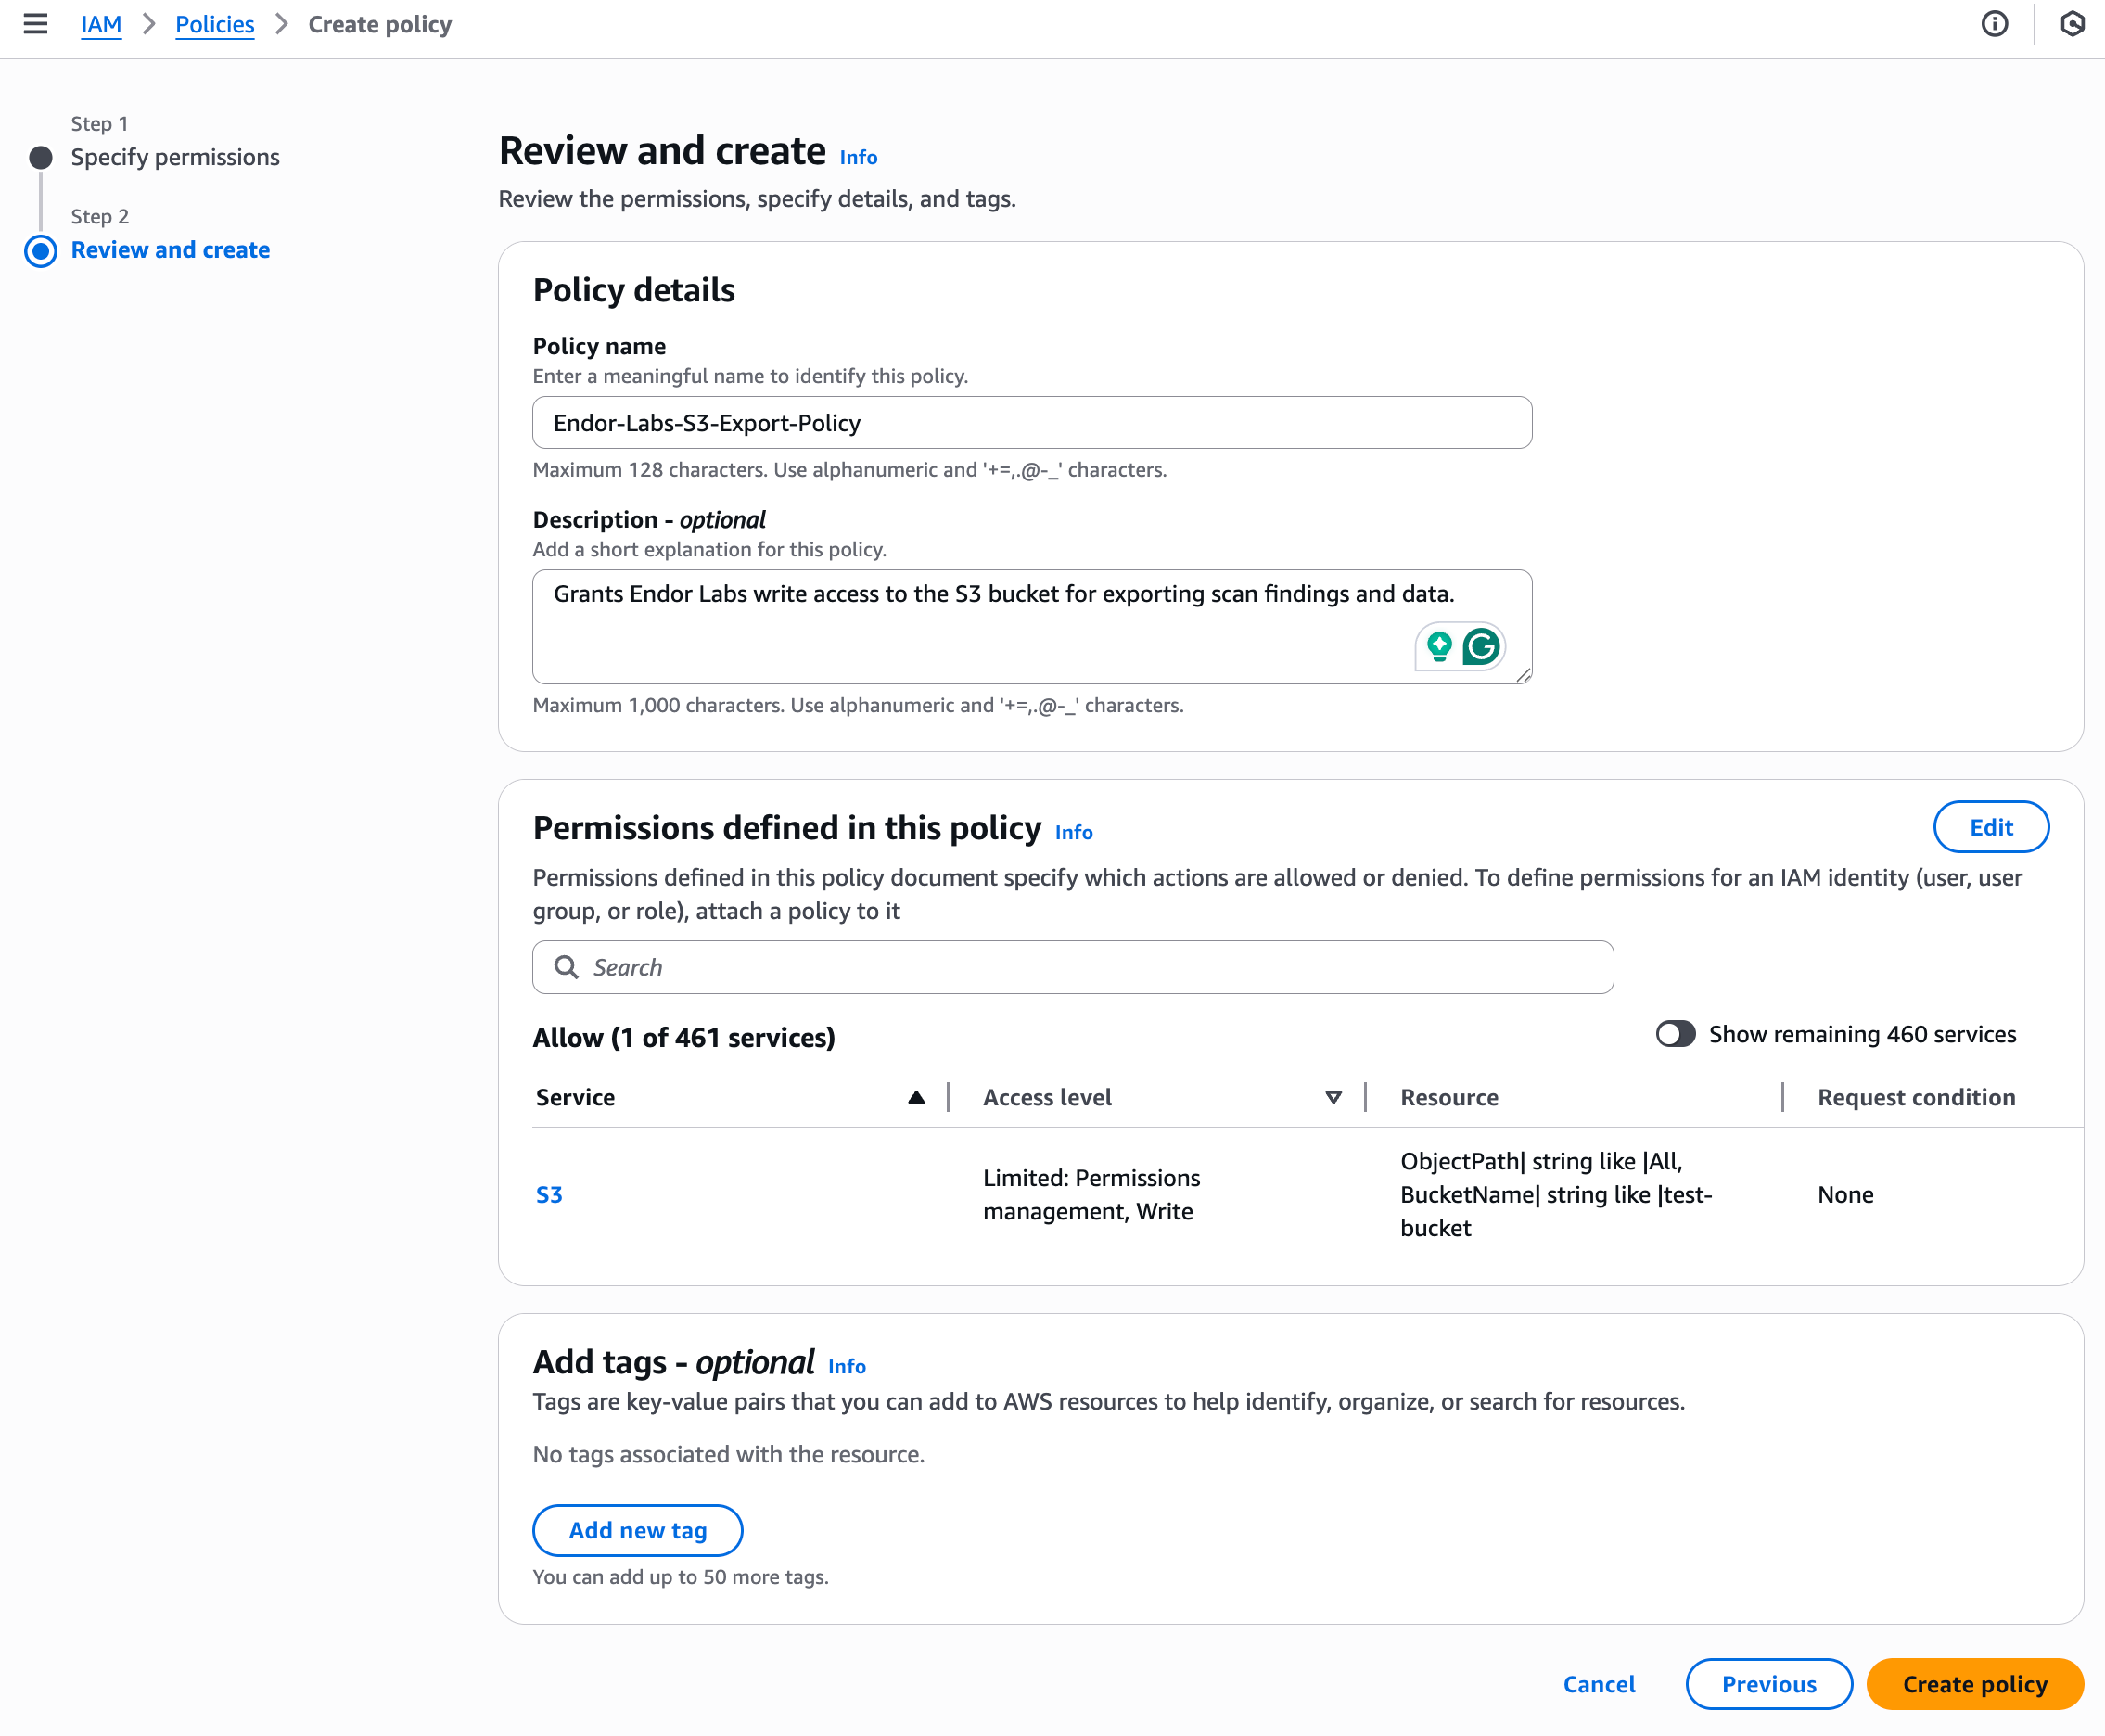
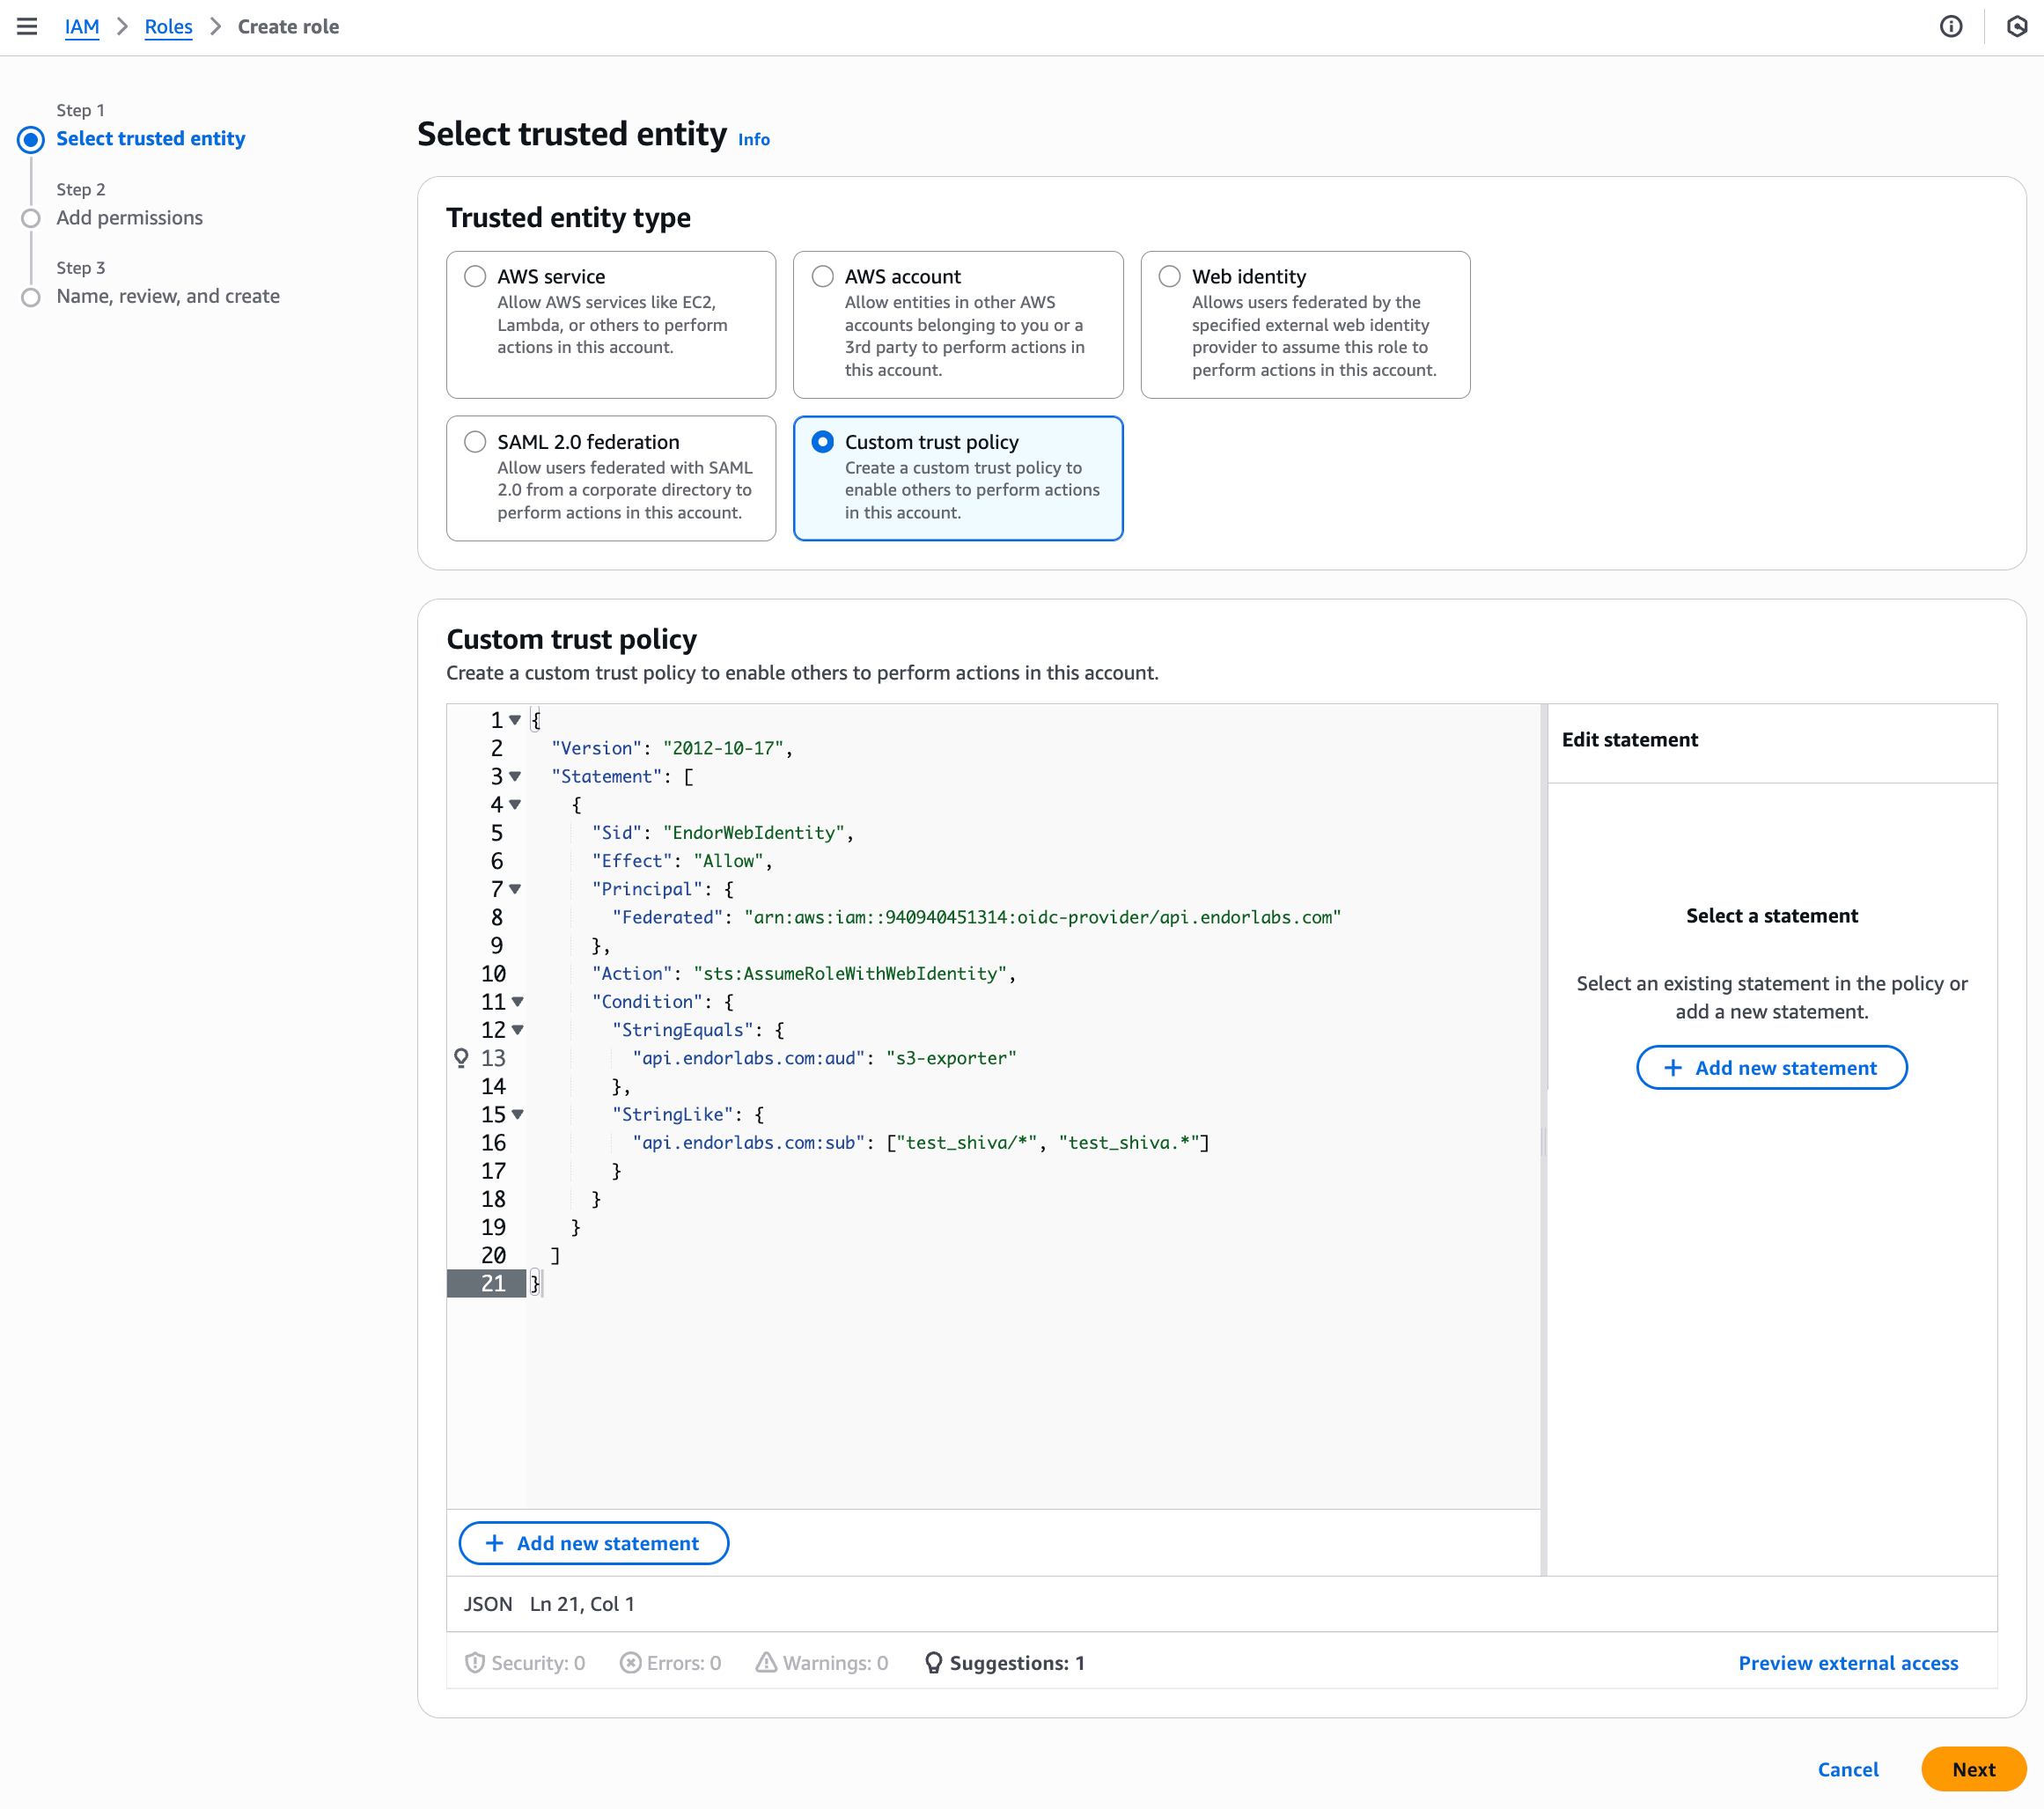
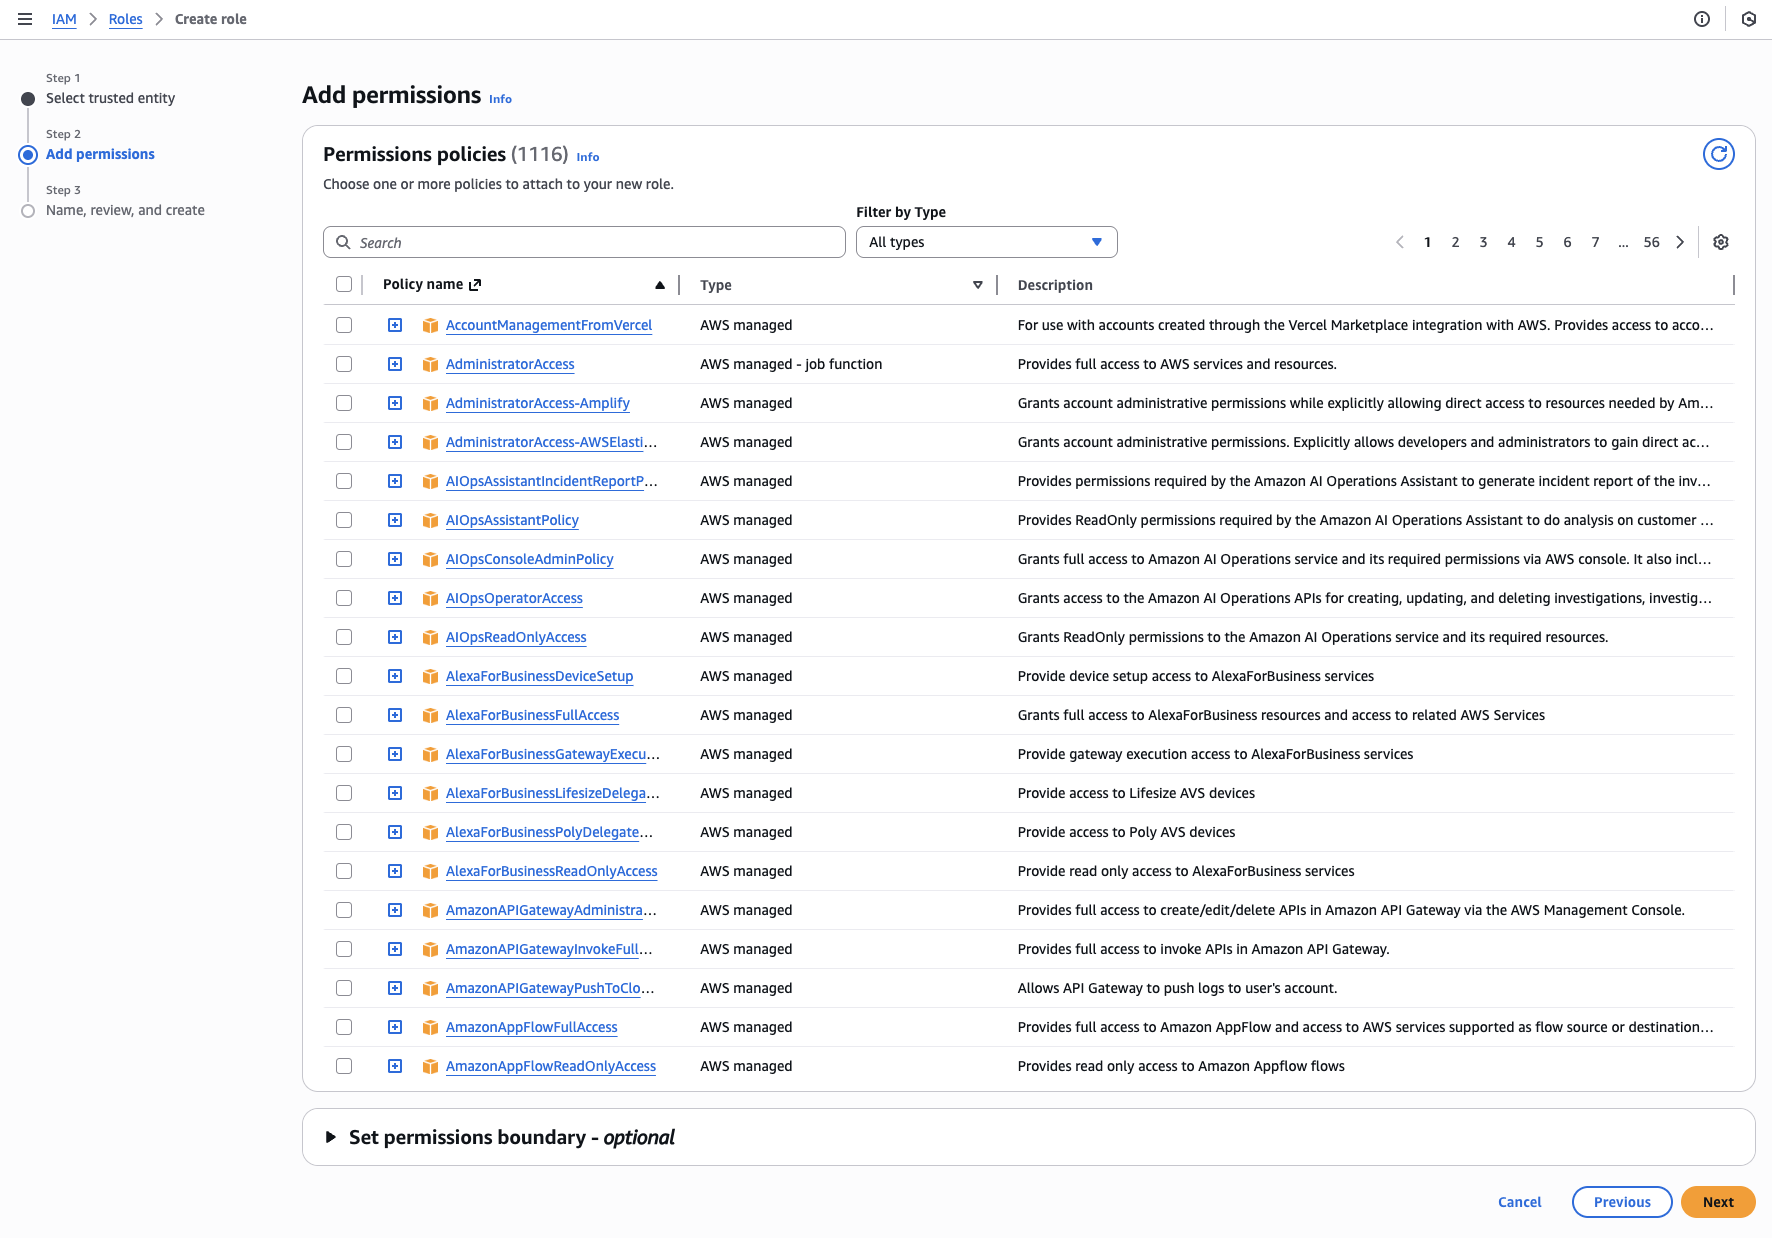
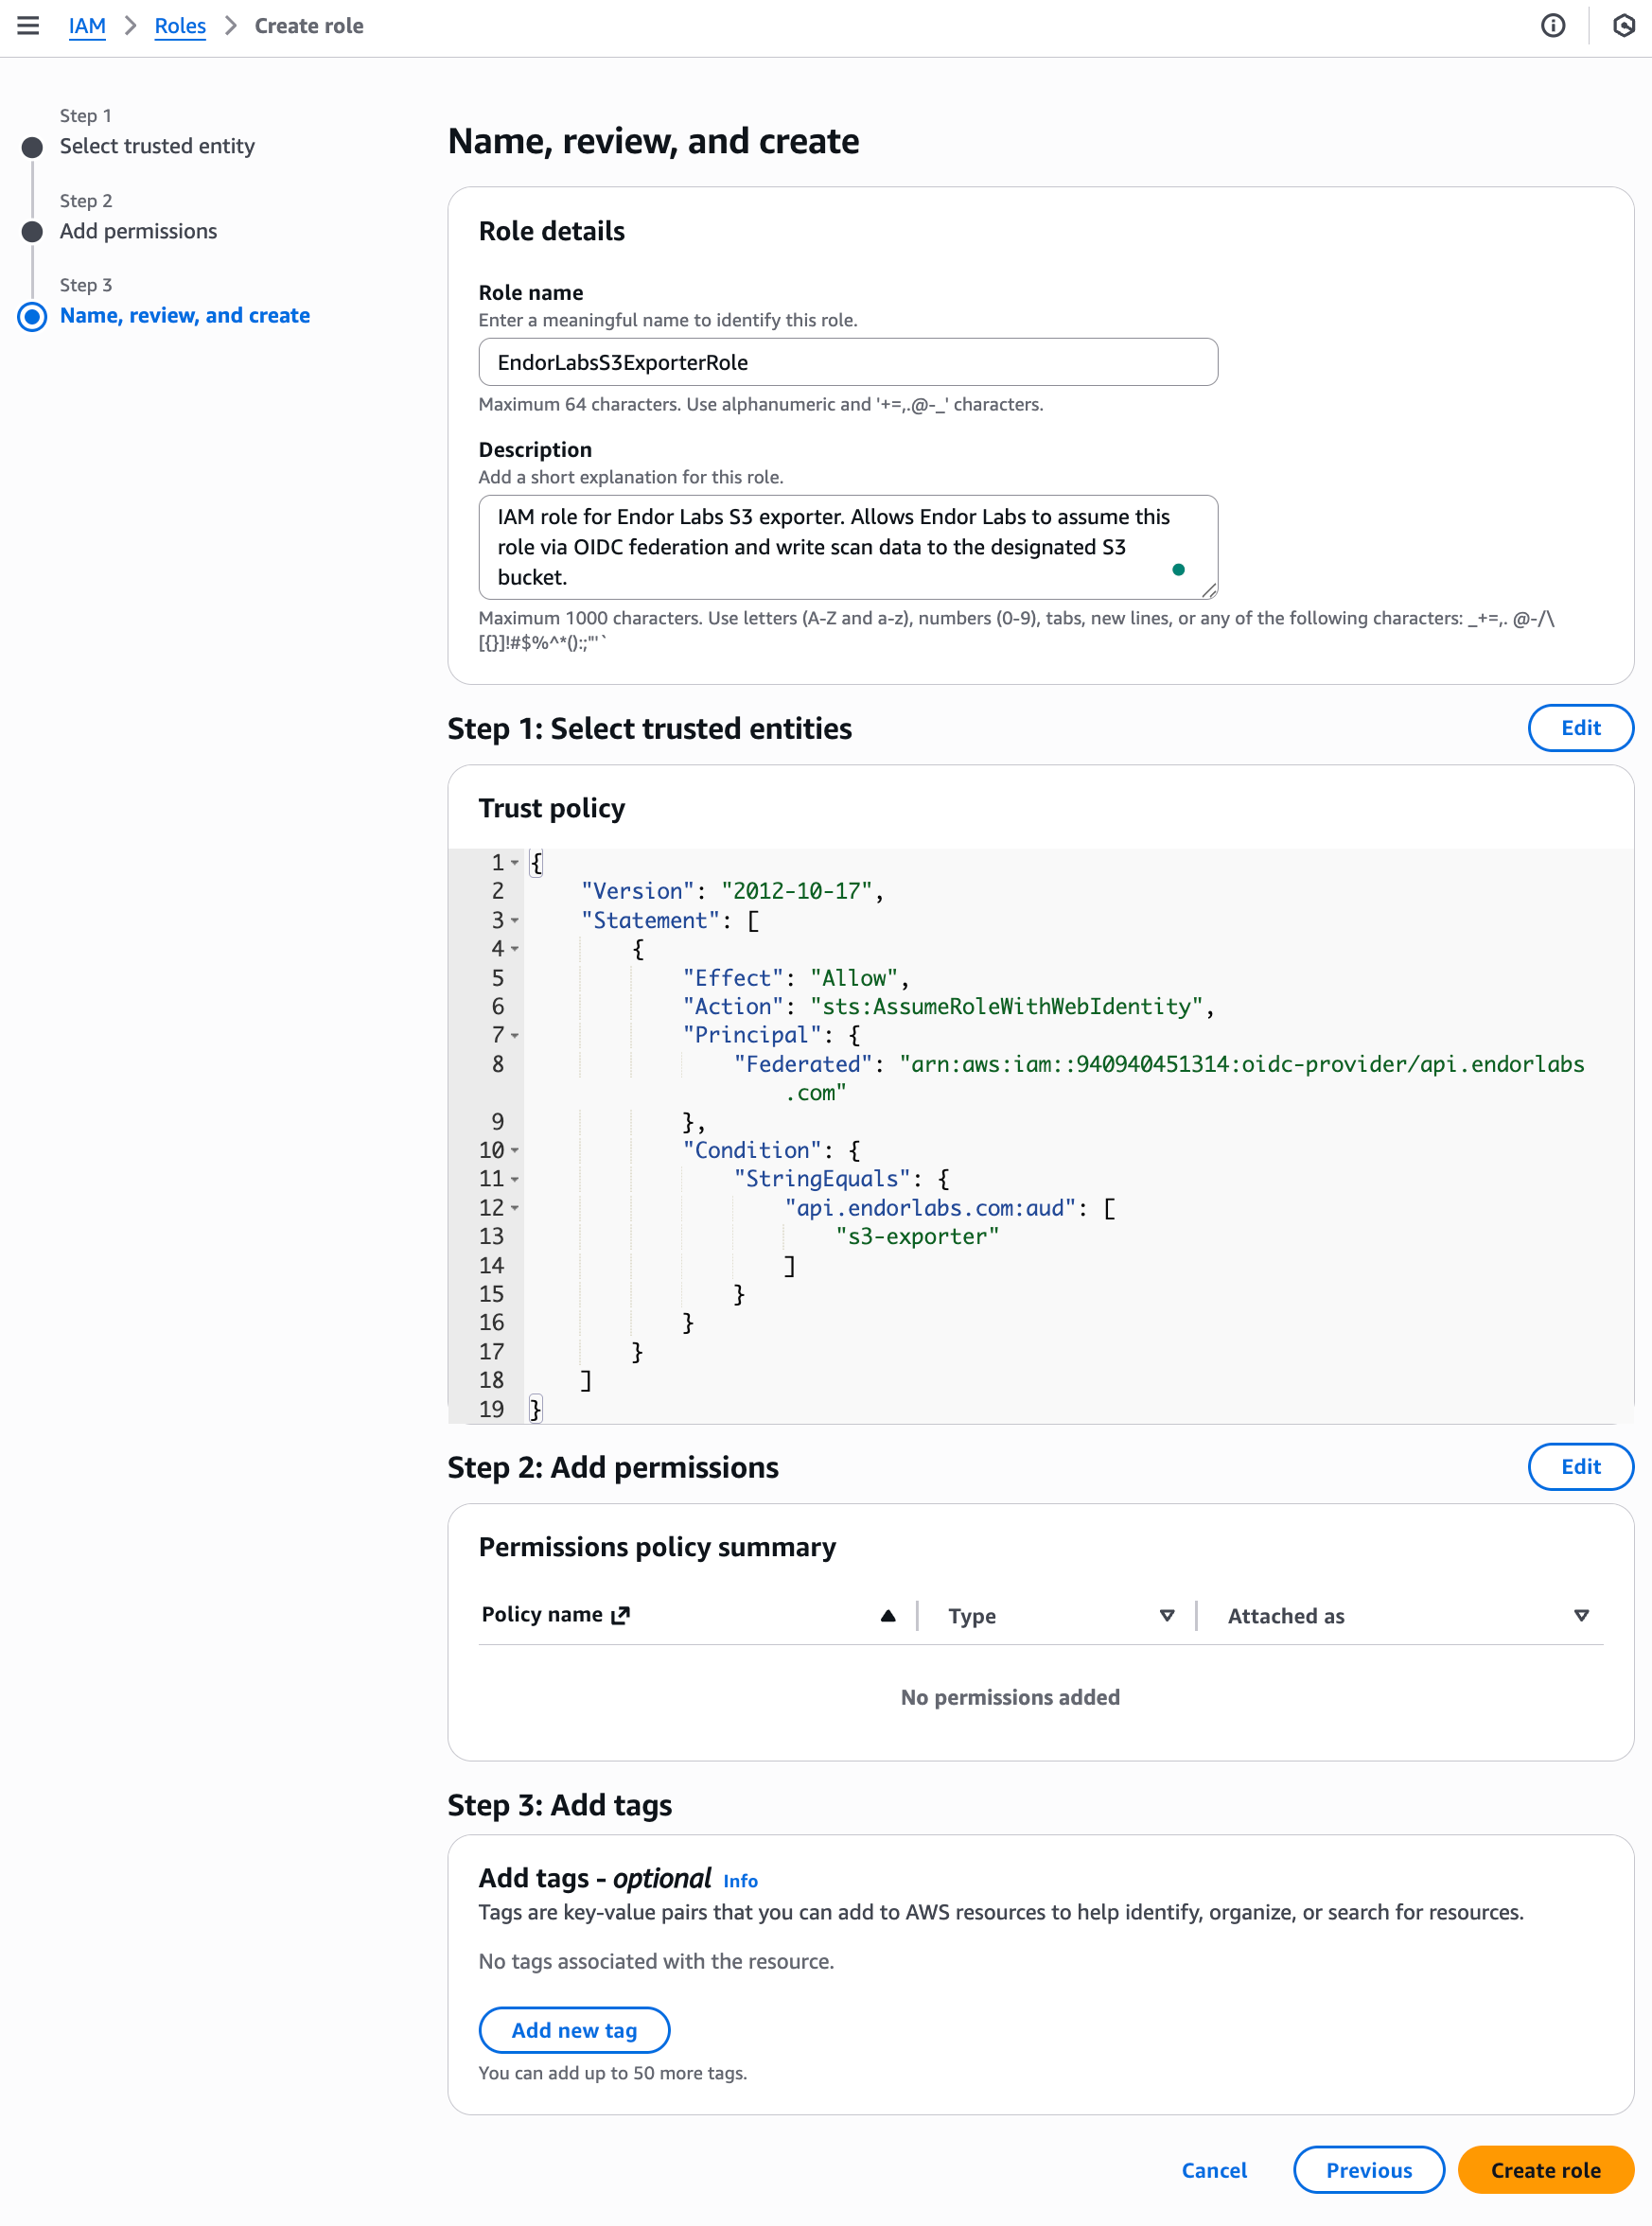
2. Create an IAM role
Create an IAM role that Endor Labs can assume to write to your S3 bucket. This involves:
For example, to create an S3 exporter named s3-findings-exporter in the namespace doe.deer that exports findings in JSON format, run the following command.
After creating the exporter, associate it with your scan profile. You can also set the scan profile as the default for your namespace so all projects use it automatically. See Scan profiles for more information.
Configure the scan profile
Select Settings from the left sidebar.
Select Scan Profiles.
Select the scan profile you want to configure and click Edit Scan Profile.
Select your exporter under Exporters and click Save Scan Profile.
Configure the project to use the scan profile
Associate your project with a scan profile to enable automatic export of scan data.
Select Projects from the left sidebar and select the project you want to configure.
Select Settings and select the scan profile you want to use under Scan Profile.
Scan projects to export data
After configuration, subsequent scans automatically export data to your S3 bucket. You can trigger a scan immediately using the rescan feature. See Rescan projects for more information.
To validate that the S3 exporter ran successfully for a scan:
Select Projects from the left sidebar and select the project associated with your exporter.
Select Scan History and select a record to view its information.
Select Logs to view the scan log and set the log level to All
The following message confirms that the S3 export is successful.
INFO: Successfully completed S3 export
Exported file structure
Endor Labs exports data to S3 using a hierarchical folder structure: