This is the multi-page printable view of this section. Click here to print.

Return to the regular view of this page.

Scan with Endor Labs

Run various types of security scans to identify vulnerabilities, secrets, license issues, and more.

This is the multi-page printable view of this section. Click here to print.

Return to the regular view of this page.

Run various types of security scans to identify vulnerabilities, secrets, license issues, and more.

Endor Labs provides comprehensive scanning capabilities to identify security issues across your software supply chain. This section covers the different types of scans available and how to configure them.

SCA (Software Composition Analysis)

Software composition analysis is the identification of the bill of materials for first-party software packages and the mapping of vulnerabilities to these software component versions. SCA helps teams to maintain compliance and get visibility into the risks of their software inventory.

Tip
Endor Labs does not scan the files and paths included in .gitignore files during SCA scans. If certain dependencies or paths are not appearing in your scan results, verify they are not excluded by your .gitignore configuration.

Endor Labs supports the following major capabilities to help teams reduce the risk and expense of software dependency management across the lifecycle of software reuse.

  • Endor Scores: Endor Labs provides a holistic risk score that includes the security, quality, popularity and activity of a package. Risk scores help in identifying leading indicators of risk in addition to if a software component is outdated, or unmaintained. Risk analysis helps teams to go beyond vulnerabilities and approach the risk of their software holistically.
  • Reachability Analysis: Reachability analysis is Endor Labs’ capability to perform static analysis on your software packages to give context to how each vulnerability may be reached in the context of your code. This includes mapping vulnerabilities back to vulnerable functions so that deep static analysis can target vulnerabilities with higher levels of granularity as well as the identification of unused software dependencies.
  • Upgrade Impact Analysis: Upgrade impact analysis allows security teams to set better expectations with their development teams by identifying breaking changes associated with an update of a direct dependency.

The resource requirements, both minimum and recommended, for build runners or workers executing scans using endorctl are listed here.

Note
Large applications may require additional resources to complete or enhance the scan performance.

Ensure that your local machine or CI/CD runner has the minimum and recommended resources to successfully scan your software.

Resource CPU Memory
Minimum 4 core 16 GB RAM
Recommended 8 core 32 GB RAM
Language SCA Endor Scores Reachability Analysis Pre-computed Reachability Analysis Phantom Dependencies Upgrade Impact Analysis Install Toolchains
Java
C/C++
Python
Rust
JavaScript
Golang
.NET (C#)
Kotlin
Scala
Ruby
Swift/Objective-C
PHP

For scanning monorepos or projects that use Bazel as the build tool (Java, Go, Python, Scala, Rust), see Bazel.

The following comprehensive matrix lists the supported languages, build tools, manifest files, and supported requirements.

Language Package Managers / Build Tool Manifest Files Extensions Supported Requirements
Java Maven pom.xml .java JDK version 11-25; Maven 3.6.1 and higher versions
Gradle build.gradle or build.gradle.kts .java JDK version 11-25; Gradle 6.0.0 and higher versions
Bazel workspace, MODULE.bazel, BUILD.bazel .java JDK version 11-25; Bazel versions 5.x.x, 6.x.x, and 7.x.x
C/C++ Not applicable Not applicable .c, .cc, .cpp, .cxx, .h, .hpp, .hxx ` Not applicable
Kotlin Maven pom.xml .kt JDK version 11-25; Maven 3.6.1 and higher versions
Gradle build.gradle or build.gradle.kts .kt JDK version 11-25; Gradle 6.0.0 and higher versions
Golang Go go.mod, go.sum .go Go 1.12 and higher versions
Bazel workspace, MODULE.bazel, BUILD.bazel .go Bazel versions 5.x.x, 6.x.x, and 7.x.x
Rust Cargo cargo.toml, cargo.lock .rs Rust 1.63.0 and higher versions
JavaScript npm package-lock.json, package.json .js npm 6.14.18 and higher versions
pnpm pnpm-lock.yaml, package.json .js pnpm 3.0.0 and higher versions
Yarn yarn.lock, package.json .js Yarn all versions
TypeScript npm package-lock.json, package.json .ts npm 6.14.18 and higher versions
pnpm pnpm-lock.yaml, package.json .ts pnpm 3.0.0 and higher versions
Yarn yarn.lock, package.json .ts Yarn all versions
Python pip requirements.txt .py Python 3.6 and higher versions; pip 10.0.0 and higher versions
Poetry pyproject.toml, poetry.lock .py
PyPI setup.py, setup.cfg, pyproject.toml .py
UV uv.lock, pyproject.toml .py Python 3.8 and higher versions
Bazel workspace, MODULE.bazel .py Bazel versions 5.x.x, 6.x.x, and 7.x.x
.NET (C#) NuGet *.csproj, package.lock.json, projects.assets.json, Directory.Build.props, Directory.Packages.props, *.props .cs .NET 5.0 and higher versions; .NET Core 1.0 and higher versions; .NET Framework 4.5 and higher versions.
Scala sbt build.sbt .sc or .scala sbt 1.3 and higher versions
Gradle build.gradle, build.gradle.kts .sc or .scala JDK version 11-25; Gradle 6.0.0 and higher versions
Bazel workspace, MODULE.bazel .sc or .scala Bazel versions 5.x.x, 6.x.x, and 7.x.x
Ruby Bundler Gemfile, *.gemspec, gemfile.lock .rb Ruby 2.6 and higher versions
Swift/Objective-C CocoaPods Podfile, Podfile.lock .swift, .h, .m CocoaPods 0.9.0 and higher versions
SwiftPM Package.swift .swift, .h, .m SwiftPM 5.0.0 and higher versions
PHP Composer composer.json, composer.lock .php PHP 5.3.2 and higher versions; Composer 2.2.0 and higher versions

Define supported languages when running endorctl scan command as a comma-separated list: c,c#,go,java,javascript,kotlin,php,python,ruby,rust,scala,swift,typescript,swifturl

Call graphs

Endor Labs has developed a systematic approach to conduct call graph analysis. Here is a structured overview:

  • Scope Expansion: Traditional methods of static analysis typically analyze a single project at a time. Endor Labs, however, expands its scope to include not only the client projects but also their dependencies, often comprising over 100 packages.

  • Enhanced Dependency Analysis: Endor Labs employs static call graphs to conduct detailed dependency analysis, enabling a comprehensive understanding of how different external components interact within client projects. By leveraging these call graphs, Endor Labs aims to minimize false positives and more accurately identify the specific locations of problems in dependencies.

  • Multiple Data Sources: Endor Labs uses both source code and binary artifacts to enrich the analysis. This approach ensures swift results without a heavy reliance on test coverage.

  • Benchmarking for Continuous Improvement: Endor Labs maintains accuracy and relevance by using dynamic call graphs internally to benchmark and refine static call graphs, thereby actively identifying and addressing gaps.

  • Scalability: Endor Labs addresses the challenge of scalability and generates call graphs not only for each project release but also for all its dependencies. This approach effectively manages large projects with multiple versions, ensuring that the analysis remains both relevant and applicable across the entire spectrum of client dependency sets.

For more information, see Visualizing the impact of call graphs on open source security.

Endor Labs uses static call graphs to perform dependency analysis at a fine-grained level. It is minimally intrusive to the developer workflow and provides results during development.

The Endor Labs user interface provides visualizations of call graphs that annotate vulnerability data and simplify it into informative call paths. This empowers developers to identify and address problematic invocations of vulnerable methods efficiently.

Endor Labs supports call paths for Java, Python, Rust, JavaScript, Golang, .NET (C#), Kotlin, and Scala.

View call paths in Endor Labs to see the sequences of functions that your program invokes during execution.

  1. Select Projects from the left sidebar.

  2. Select the project for which you want to view the call path.

  3. Select FINDINGS and select the finding from the list view.

  4. Expand a specific finding to view more details.

    Call Paths

  5. In the details section, select CALL PATHS.

    Call Paths

    A finding may have multiple call paths.

Reachability analysis

Modern software relies on complex code, external libraries, and open-source components (OSS). Managing risks requires understanding where issues come from, such as internal code, OSS, or other external dependencies.

Projects contain two types of dependencies, direct and transitive. Developers explicitly add direct dependencies, such as when they include a specific library in a project. Transitive dependencies enter the project indirectly through other libraries. While direct dependencies are easier to track and manage, transitive dependencies can introduce complexity, as they may not be immediately visible in the project’s configuration files.

Categorizing code as reachable, potentially reachable, or unreachable is another important step. Reachable code is actively invoked during normal execution. Unreachable code, on the other hand, is not used and can accumulate over time, leading to unnecessary complexity and potential issues. Identifying and managing these categories ensures that the codebase remains efficient and maintainable.

Endor Labs offers multiple types of reachability analysis to help you accurately assess vulnerability exposure in your applications. Each type provides different levels of granularity and accuracy depending on your specific use case and available analysis context.

  • Function-level reachability and Dependency-level reachability: These analyses run during a full scan, when the project builds successfully and Endor Labs generates complete call graphs. They use actual code paths and dependency metadata to provide the most precise vulnerability assessment.
  • Pre-computed reachability: A pragmatic, manifest-based analysis technique that enables you to assess whether vulnerabilities in transitive dependencies could be reachable from your direct dependencies—all without requiring code compilation, builds, or full call graph generation. With approximately 95% of vulnerabilities existing in transitive dependencies according to Endor Labs’ State of Dependency Management report, pre-computed reachability helps you deprioritize security issues that can’t be called by your application by filtering out vulnerabilities that affect functions in transitive dependencies that are not used by your direct dependencies. This approach works by analyzing how your direct dependencies interact with their transitive dependencies, providing valuable reachability insights as a fallback for full scans when builds fail, or as an optional enhancement for quick scans when you want reachability analysis without build requirements. Learn more about pre-computed reachability.

To help developers and security teams make informed decisions for SCA results, Endor Labs uses a static analysis technique called program analysis to perform function-level reachability analysis on direct and transitive dependencies. This is the most accurate way to determine exploitability in the context of your application, which is critical for determining which risks you should remediate.

The different function reachability labels include:

  • Reachable Function: Endor Labs has determined that there is a path from the developer-written code to a vulnerable function, indicating that the finding is exploitable in your environment. This is demonstrated by a call graph that illustrates each step between the source code and the vulnerable library.

  • Unreachable Function: Endor Labs determines that no risk of exploitation exists, as no path exists from the source code to the vulnerable function. A call graph supports this conclusion by demonstrating the absence of such a path.

  • Potentially Reachable Function: Endor Labs is unable to determine whether a finding is reachable or unreachable, typically because call graph analysis is unsupported for a given language or package manager. This means that the function in question may be executable in the context of the dependent project, but the analysis cannot definitively determine if it is reachable or not.

Endor Labs supports dependency-level reachability by default for all supported languages. This type of reachability analysis is more coarse-grained than function-level reachability. It indicates that the application uses the imported package somewhere but does not determine whether the source code calls the vulnerable package.

Dependency-level reachability serves as a good indicator for prioritization. If you’re not actually using the dependency at all, consider removing that dependency. Determining whether your code calls or uses a dependency provides another layer of prioritization you can add to your remediation process.

The different dependency reachability labels include:

  • Reachable Dependency: Endor Labs established that an imported package is being used somewhere in the application.

  • Unreachable Dependency: Endor Labs determined that the imported dependency is not being used. The customer can use this information to remove the dependency, which is helpful for technical debt reduction initiatives.

  • Potentially Reachable Dependency: Endor Labs cannot definitively determine whether the application uses a dependency, generally because Endor Labs does not support the given language or package manager.

The following table compares the three types of reachability analysis available in Endor Labs:

Analysis Type Requirements Coverage Use Case
Function-level Successful project build and client call graph generation Direct and transitive dependencies Precise vulnerability assessment for production applications
Dependency-level Dependency resolution and import analysis only Direct and transitive dependencies Quick dependency prioritization and cleanup
Pre-computed Dependency metadata without compilation or call graphs Transitive dependencies only Pragmatic analysis as a fallback when builds fail, and when you want reachability analysis without build requirements

Phantom dependencies are packages that your codebase uses but does not explicitly declare in your project’s manifest files, for example, package.json, or requirements.txt. These undeclared dependencies can pose significant security and operational risks, as they may contain vulnerabilities that standard dependency analysis does not track or assess. Identifying and managing phantom dependencies is crucial for accurate reachability analysis and comprehensive risk assessment.

Endor Labs’ reachability analysis conducts thorough scans of your codebase to identify functions and methods that both declared and undeclared dependencies invoke. By analyzing the actual usage of packages in your source code, the system identifies phantom dependencies—those that your code uses but does not explicitly declare. This detection ensures that all utilized code paths are assessed for potential vulnerabilities, providing a more accurate and comprehensive security evaluation.

Endor scores

Endor Labs collects and analyzes a large amount of information about open-source packages and uses it to compute scores.

  • Every open-source package is scored across different dimensions that capture both security and operation aspects of a risk.

  • Every AI model is scored on a multidimensional scoring system grouped into four main categories: security, activity, popularity, and operational integrity.

Each category’s Endor score represents the average of all contributing factors within that category. See View scorecards for more information on checking Endor scores.

See Package scores for more information on package scores.

Scanning strategies

As you deploy Endor Labs in your environment, it’s important for your team to understand key scanning strategies.

The findings, metrics, and data shown on the dashboard and the project listing page are based on scanning the default branch, which is also known as the main context.

Important recommendation
If you are scanning multiple branches, it is essential to select and set one as the default branch. When performing the endorctl scan, use the flag --as-default-branch to designate a project branch as the default branch and view its findings.
endorctl scan --as-default-branch

If you do not set the flag as-default-branch, the first branch you scan is automatically considered as the default branch. After a scan, if you switch the default branch to another using --as-default-branch, scans from the previous branches are erased, and their findings will no longer be available.

You do not need to set a default branch if you are using the Endor Labs GitHub App or not scanning multiple branches.

Across the software engineering lifecycle it is important that continuous testing is separated from what is monitored and reported on regularly. Often, engineering organizations want to test each and every change that enters a code base, but if security teams reported on each test they would quickly find themselves overwhelmed with noise. Endor Labs enables teams to separate what should be reported on relative to what should be tested but not reported on. Endor Labs allows teams to select reporting strategies for their software applications when integrated into CI/CD pipelines.

Here are the primary scanning and reporting strategies:

  • Reporting on the default branch - All pull request commits are tested and all pushes or merges to the default branch are reported on and monitored by security and management teams.
  • Reporting on the latest release - All reporting and monitoring is performed against tagged release versions. This requires each team have a mature release tagging strategy.

The endorctl scan command by default will continuously monitor a version of your code for new findings such as unmaintained, outdated or vulnerable dependencies in the bill of materials for a package. To test a version of your code without monitoring and reporting on it, use the flag --pr or environment variable ENDOR_SCAN_PR as part of your scan.

When adopting a strategy such as reporting on the default branch, you will want to run any push or merge event to the default branch without the --pr flag and run any pull_request or merged_request event with the --pr flag. This allows you to test changes before they have been approved and report what has been merged to the default branch as your closest proxy to what is in production.

Let’s use the following GitHub Actions workflow as an example! In this workflow any push event will be scanned without the --pr flag but any pull_request event is scanned as a point in time test of that specific version of your code.

name: Endor Labs Scan
on:
  push:
    branches: [main]
  pull_request:
    branches: [main]
jobs:
  scan:
    permissions:
      security-events: write # Used to upload sarif artifact to GitHub
      contents: read # Used to check out a private repository but actions/checkout.
      actions: read # Required for private repositories to upload sarif files. GitHub Advanced Security licenses are required.
      id-token: write # Used for keyless authentication to Endor Labs
    runs-on: ubuntu-latest
    steps:
      - name: Checkout Repository
        uses: actions/checkout@v3
      - name: Setup Java
        uses: actions/setup-java@v3
        with:
          distribution: 'microsoft'
          java-version: '17'
      - name: Build Package
        run: mvn clean install
      - name: Endor Labs Scan Pull Request
        if: github.event_name == 'pull_request'
        uses: endorlabs/github-action@v1.1.1
        with:
          namespace: 'example'
          pr: true
          sarif_file: 'findings.sarif'
          pr_baseline: $GITHUB_BASE_REF
      - name: Endor Labs Reporting Scan
        if: github.event_name == 'push'
        uses: endorlabs/github-action@v1.1.1
        with:
          namespace: 'example'
          pr: false
          sarif_file: 'findings.sarif'
      - name: Endor Labs Testing Scan
        if: github.event_name == 'pull_request'
        uses: endorlabs/github-action@v1.1.1
        with:
          namespace: 'example'
          pr: true
          sarif_file: 'findings.sarif'
      - name: Upload findings to github
        uses: github/codeql-action/upload-sarif@v3
        with:
          sarif_file: 'findings.sarif'

In some CI/CD based environments, each time code is pushed to the default branch the exact commit SHA is checked out as a detached Git Reference. This is notably the case with Jenkins, CircleCI and GitLab Pipelines.

In these scenarios, on push or merge events Endor Labs must be told that the reference should be monitored as the default branch. You can do this with the --detached-ref-name flag or ENDOR_SCAN_DETACHED_REF_NAME environment variable. You should also couple this flag with the --as-default-branch flag or ENDOR_SCAN_AS_DEFAULT_BRANCH environment variable. This allows you to set this version of code as a version that should be monitored as well as define the name associated with the branch.

This strategy may be used for both a strategy reporting on the default branch on push events and a strategy reporting on tag creation event for that version of code.

You can see in the below GitLab Pipelines example defining the logic to manage a detached reference on GitLab.

    - if [ "$CI_COMMIT_REF_NAME" == "$CI_DEFAULT_BRANCH" ]; then
        export ENDOR_SCAN_AS_DEFAULT_BRANCH=true;
        export ENDOR_SCAN_DETACHED_REF_NAME="$CI_COMMIT_REF_NAME";
      else
        export ENDOR_SCAN_PR=true;
      fi

You can find the full GitLab pipelines reference below:

Endor Labs Dependency Scan:
  stage: Scan
  image: node # Modify this image to align with the build tools necessary to build your software packages
  dependencies: []
  variables:
    ENDOR_ENABLED: "true"
    ENDOR_ALLOW_FAILURE: "true"
    ENDOR_NAMESPACE: "demo"
    ENDOR_SCAN_PATH: "."
    ENDOR_ARGS: |
      --show-progress=false
      --detached-ref-name=$CI_COMMIT_REF_NAME
      --output-type=summary
      --exit-on-policy-warning
      --dependencies --secrets --git-logs
  before_script:
    - npm install yarn
  script:
    - curl https://api.endorlabs.com/download/latest/endorctl_linux_amd64 -o endorctl;
    - echo "$(curl -s https://api.endorlabs.com/sha/latest/endorctl_linux_amd64)  endorctl" | sha256sum -c;
      if [ $? -ne 0 ]; then
       echo "Integrity check failed";
       exit 1;
      fi
    - chmod +x ./endorctl
    - if [ "$DEBUG" == "true" ]; then
        export ENDOR_LOG_VERBOSE=true;
        export ENDOR_LOG_LEVEL=debug;
      fi
    - if [ "$CI_COMMIT_REF_NAME" == "$CI_DEFAULT_BRANCH" ]; then
        export ENDOR_SCAN_AS_DEFAULT_BRANCH=true;
        export ENDOR_SCAN_DETACHED_REF_NAME="$CI_COMMIT_REF_NAME";
      else
        export ENDOR_SCAN_PR=true;
      fi
    - ./endorctl scan ${ENDOR_ARGS}
  rules:
  - if: $ENDOR_ENABLED != "true"
    when: never
  - if: $CI_COMMIT_TAG
    when: never
  - if: $CI_COMMIT_REF_NAME != $CI_DEFAULT_BRANCH && $ENDOR_FEATURE_BRANCH_ENABLED != "true"
    when: never
  - if: $ENDOR_ALLOW_FAILURE == "true"
    allow_failure: true
  - if: $ENDOR_ALLOW_FAILURE != "true"
    allow_failure: false

One of the common concerns software development teams have when adopting preventative controls is ownership of issues. Often, software has accrued significant technical debt, or new vulnerabilities arise that don’t directly impact their changes. Security teams want to have all known issues addressed while the development teams are focused on fixing issues or delivering core business value. They can’t be hindered each time a new issue impacts their entire code base.

To prevent new issues from entering the environment, security teams sometimes set policies that may break the build or return a non-zero exit code that can fail automated tests. This creates friction as there is no context around what changes a developer is responsible for versus what technical debt exists in a codebase on that day.

Establishing a baseline of what issues already exist in a software project and what issues may occur because of new updates is crucial to enabling preventative control adoption.

The high-level steps to establish and measure policies against a baseline scan are as follows:

  1. Establish a baseline scan of your default branch or any other branch that undergoes regular testing
  2. Integrate baseline scans into your automated workflows
  3. Evaluate policy violations within the context of the branches to which you routinely merge

Development teams often have different delivery strategies. Some merge changes to a default branch. Others merge to a release branch that is then released to their environment. While these strategies differ across organizations, a baseline scan must exist to measure against attribute ownership.

To establish a baseline scan, your team must perform regular scans on the branch to which you merge. This often means that you scan each push of your default branch to monitor your environment and you test each pull request using the --pr and --pr-baseline flags.

The --pr flag is a user’s declaration that they are testing their code as they would in a CI pipeline. The --pr-baseline flag tells Endor Labs which Git reference to measure any changes.

For this example, we will use the default branch as a merging strategy. In this strategy, you’ll want to scan the default branch on each push event to re-establish your baseline. You’ll also want to establish your CI baseline as the default branch.

The following GitHub workflow illustrates this strategy.

name: Endor Labs Scan
on:
  push:
    branches: [main]
  pull_request:
    branches: [main]
jobs:
  scan:
    permissions:
      security-events: write # Used to upload sarif artifact to GitHub
      contents: read # Used to check out a private repository but actions/checkout.
      actions: read # Required for private repositories to upload sarif files. GitHub Advanced Security licenses are required.
      id-token: write # Used for keyless authentication to Endor Labs
    runs-on: ubuntu-latest
    steps:
      - name: Checkout Repository
        uses: actions/checkout@v3
      - name: Setup Java
        uses: actions/setup-java@v3
        with:
          distribution: 'microsoft'
          java-version: '17'
      - name: Build Package
        run: mvn clean install
      - name: Endor Labs Scan Pull Request
        if: github.event_name == 'pull_request'
        uses: endorlabs/github-action@v1.1.1
        with:
          namespace: 'example'
          pr: true
          sarif_file: 'findings.sarif'
          pr_baseline: $GITHUB_BASE_REF
      - name: Endor Labs Reporting Scan
        if: github.event_name == 'push'
        uses: endorlabs/github-action@v1.1.1
        with:
          namespace: 'example'
          pr: false
          sarif_file: 'findings.sarif'
      - name: Endor Labs Testing Scan
        if: github.event_name == 'pull_request'
        uses: endorlabs/github-action@v1.1.1
        with:
          namespace: 'example'
          pr: true
          sarif_file: 'findings.sarif'
      - name: Upload findings to github
        uses: github/codeql-action/upload-sarif@v3
        with:
          sarif_file: 'findings.sarif'

Each CI environment includes default environment variables that you can use to reference CI baselines in a template. See your CI providers’ documentation on default environment variables to determine the most suitable option for your requirements.

SARIF (Static Analysis Results Interchange Format) is an OASIS standard format for reporting static analysis results.

This standardized format allows you to:

  • Integrate with multiple platforms: Upload results to GitHub Security, Azure DevOps, or other tools that support SARIF.
  • Consolidate findings: Combine results from different security tools in a unified format.
  • Automate workflows: Process and act on security findings programmatically.
  • Track remediation: Monitor the status of security issues over time.

Endor Labs generates SARIF files that contain detailed information about security findings, dependency issues, and other analysis results from your scans.

A SARIF file contains several key components:

  • Runs: Each scan execution creates a run with metadata about the scan.
  • Results: Individual findings with details about dependency vulnerabilities, SAST findings, and secrets.
  • Rules: Descriptions of the checks that were performed.
  • Artifacts: Information about the files and dependencies that were analyzed.

SARIF files standardize security findings, enabling CI/CD integration, unified dashboards, and compliance reporting. They provide PR-level feedback, support long-term monitoring, and preserve historical data for auditing and tool migration.

To generate SARIF output with Endor Labs, use the --sarif-file or -s flag with the endorctl scan command:

endorctl scan --namespace=<your-namespace> --sarif-file findings.sarif

You can specify additional scan options when generating SARIF output, for example to include dependency scanning and git history secrets detection:

endorctl scan --sarif-file findings.sarif --dependencies --secrets --git-logs

GitHub Security supports SARIF file uploads, allowing you to view Endor Labs findings directly in your repository’s Security tab. You can upload SARIF files automatically using the GitHub App (Pro), through GitHub Actions, or manually.

When you configure Endor Labs GitHub App (Pro) with a GHAS SARIF exporter, findings are automatically exported and uploaded to GitHub after each scan. See Export findings to GitHub Advanced Security for detailed setup instructions.

Use the following GitHub Actions workflow step to automatically upload SARIF files.

- name: Upload SARIF file to GitHub
  uses: github/codeql-action/upload-sarif@v3
  with:
    sarif_file: 'findings.sarif'

To manually upload a SARIF file to GitHub:

  1. Navigate to your GitHub repository.
  2. Go to Security > Code scanning > Upload SARIF.
  3. Select your SARIF file and upload it.

Endor Labs extends the standard SARIF format with custom fields that provide additional context for vulnerability analysis and remediation. These properties are included in the properties field of each SARIF result.

The following fields are available in SARIF results generated by Endor Labs:

  • action-policies-triggered: List of action policies triggered by this finding.
  • categories: List of categories the finding belongs to.
  • cvss-score: Common Vulnerability Scoring System (CVSS) score, ranging from 0.0 to 10.0.
  • cvss-vector: CVSS vector string describing the characteristics of the vulnerability.
  • cvss-version: The version of the CVSS score used.
  • epss-percentile-score: EPSS percentile score, showing how severe the vulnerability is compared to others.
  • epss-probability-score: Exploit Prediction Scoring System (EPSS) probability score, indicating likelihood of exploitation.
  • explanation: Detailed explanation of the finding and its implications.
  • finding-url: URL to view the finding in Endor Labs.
  • finding-uuid: Unique identifier for the finding.
  • impact-score: Custom impact score assigned to the finding.
  • project-uuid: Unique identifier for the project where the finding was discovered.
  • remediation: Recommended steps to fix or mitigate the finding.
  • tags: List of tags associated with the finding, used for categorization and filtering.

Here are examples of SARIF output for SCA, secrets, and SAST findings, including Endor-specific extensions.

{
  "results": [
    {
      "ruleId": "SCA-Vulnerability",
      "kind": "fail",
      "level": "error",
      "message": {
        "text": "CVE-2021-44228 in org.apache.logging.log4j:log4j-core@2.14.1 (maven) — upgrade to 2.17.1 or later."
      },
      "locations": [
        {
          "physicalLocation": {
            "artifactLocation": {
              "uri": "pom.xml"
            },
            "region": {
              "startLine": 42
            }
          }
        }
      ],
      "properties": {
        "action-policies-triggered": ["block-critical-vulns"],
        "categories": ["dependency", "security"],
        "cvss-score": 10.0,
        "cvss-vector": "CVSS:3.1/AV:N/AC:L/PR:N/UI:N/S:C/C:H/I:H/A:H",
        "cvss-version": "V3_1",
        "epss-percentile-score": 0.97,
        "epss-probability-score": 0.97576,
        "explanation": "This version of log4j-core contains CVE-2021-44228, also known as Log4Shell. This is a critical remote code execution vulnerability that allows attackers to execute arbitrary code by controlling log message content.",
        "finding-url": "https://app.endorlabs.com/findings/abc123",
        "finding-uuid": "abc123-def456",
        "impact-score": 10.0,
        "project-uuid": "proj-789",
        "remediation": "Upgrade log4j-core to version 2.17.1 or later. If immediate upgrade is not possible, set the JVM parameter -Dlog4j2.formatMsgNoLookups=true as a temporary mitigation.",
        "tags": ["CVE-2021-44228", "log4shell", "critical", "rce"]
      }
    }
  ]
}
{
  "results": [
    {
      "ruleId": "AWS Access Token",
      "message": {
        "text": "Invalid AWS Access Token: ID #3da668"
      },
      "fullDescription": {
        "text": "Invalid secrets should be audited for suspicious activity and ignored."
      },
      "help": {
        "text": "Inspect any service logs to determine if the exposed secret has been used for suspicious activity.\n\nIf you'd like to ignore this issue add the comment \"endorctl:allow\" to the secret location in your code.\n"
      },
      "shortDescription": {
        "text": "Invalid AWS Access Token: ID #3da668"
      },
      "properties": {
        "finding-url": "https://app.endorlabs.com/findings/secret-456",
        "finding-uuid": "secret-456-def",
        "project-uuid": "proj-789",
        "security-severity": "1.0",
        "tags": [
          "INVALID_SECRET",
          "NORMAL",
          "POLICY"
        ]
      }
    }
  ]
}
{
  "results": [
    {
      "level": "note",
      "locations": [
        {
          "physicalLocation": {
            "artifactLocation": {
              "uri": "BackendServer/middlewares/validateToken.js"
            },
            "region": {
              "startLine": 77
            }
          }
        }
      ],
      "message": {
        "text": "Problem:\nHardcoded JWT secret or private key was found. Hardcoding secrets like JWT signing keys poses a significant security risk. If the source code ends up in a public repository or is compromised, the secret is exposed. Attackers could then use the secret to generate forged tokens and access the system. Store it properly in an environment variable.\n\nSolution:\nHere are some recommended safe ways to access JWT secrets:\n- Use environment variables to store the secret and access it in code instead of hardcoding. This keeps it out of source control.\n- Use a secrets management service to securely store and tightly control access to the secret. Applications can request the secret at runtime.\n- For local development, use a .env file that is gitignored and access the secret from process.env.\n\nsample code snippet of accessing JWT secret from env variables\n```\nconst token = jwt.sign(payload, process.env.SECRET, { algorithm: 'HS256' });\n```\n"
      },
      "properties": {
        "explanation": "The rule detects the use of hardcoded JWT secrets or private keys in JavaScript code. Hardcoding secrets like JWT signing keys poses a significant security risk because if the source code is exposed, the secret is compromised. This allows attackers to generate forged tokens, potentially gaining unauthorized access to systems and sensitive data. The impact is high because it directly affects the confidentiality and integrity of the application.",
        "finding-url": "https://app.endorlabs.com/findings/sast-789",
        "finding-uuid": "sast-789-ghi",
        "impact-score": 8.7,
        "project-uuid": "proj-789",
        "remediation": "To remediate the use of hardcoded JWT secrets, avoid embedding secrets directly in the source code. Instead, use environment variables to store secrets securely and access them in your code. For example, in JavaScript, you can use `process.env.SECRET` to access the secret stored in an environment variable:\n\n```javascript const token = jwt.sign(payload, process.env.SECRET, { algorithm: 'HS256' }); ```\n\nAdditionally, consider using a secrets management service to securely store and manage access to secrets. For local development, use a `.env` file that is gitignored to prevent it from being included in version control.",
        "tags": [
          "A07:2021",
          "Identification-and-Authentication-Failures",
          "OWASP-Top-10",
          "SANS-Top-25"
        ]
      },
      "ruleId": "Use of hard-coded credentials in JWT"
    }
  ]
}

Java

Java is a high-level, object-oriented programming language widely used by developers. Endor Labs supports scanning and monitoring of Java projects.

Using Endor Labs, application security engineers and developers can:

  • Scan their software for potential security issues and violations of organizational policy.
  • Prioritize vulnerabilities in the context of their applications.
  • Understand the relationships between software components in their applications.

Before you proceed to run a deep scan, ensure that your system meets the following specification.

Project Size Processor Memory
Small projects 4-core processor 16 GB
Mid-size projects 8-core processor 32 GB
Large projects 16-core processor 64 GB

Endor Labs requires the following prerequisites in place for successful scans.

  • Install JDK versions between 11 and 25.0.2
  • Make sure your repository includes one or more files with .java extension.
  • Install Maven Package Manager version 3.6.1 and higher if your project uses Maven.
  • Install Gradle build system version 6.0.0 and higher, if your project uses Gradle. To support lower versions of Gradle, see Scan projects on Gradle versions between 4.7 and 6.0.0.
  • For projects not using Maven or Gradle, make sure that your project is set up properly to scan without the pom.xml file. See Scan projects without pom.xml for more information.

You must build your Java projects before running a scan. Additionally, ensure that the packages are downloaded into the local package caches and that the build artifacts are present in the standard locations.

To analyze your software built with Gradle, Endor Labs requires that the software be able to be successfully built. To perform a quick scan, dependencies must be located in the local package manager cache. The standard $GRADLE_USER_HOME/caches or /User/<username>/.gradle/caches must exist and contain successfully downloaded dependencies. To perform a deep scan the target artifact must be generated on the file system as well.

To build your project with Gradle, use the following procedure:

  1. If you would like to run a scan against a custom configuration, specify the Gradle configuration by setting an environment variable.

       export endorGradleJavaConfiguration="<configuration>"
    

    When no configuration is provided, runtimeClasspath is used by default.

    If neither the user-specified nor the default configuration exists in the project, the system falls back to the following configurations, in order:

    1. runtimeClasspath
    2. runtime
    3. compileClasspath
    4. compile

    If the listed configurations are not found in the project, the system selects the first available configuration in alphabetical order.

  2. Ensure that you can resolve the dependencies for your project without errors by running the following command:

    For Gradle wrapper:

       ./gradlew dependencies
    

    For Gradle:

       gradle dependencies
    
  3. Run ./gradlew assemble or gradle assemble to resolve dependencies and to create an artifact that may be used for deep analysis.

In a multi-build project, if you set the environment variable endorGradleJavaConfiguration=[GlobalConfiguration], the specified configuration is used for dependency resolution across all projects and subprojects in the hierarchy below.

\--- Project ':samples'
     +--- Project ':samples:compare'
     +--- Project ':samples:crawler'
     +--- Project ':samples:guide'
     +--- Project ':samples:simple-client'
     +--- Project ':samples:slack'
     +--- Project ':samples:static-server'
     +--- Project ':samples:tlssurvey'
     \--- Project ':samples:unixdomainsockets'

To override the configuration only for the :samples:crawler and :samples:guide subprojects, follow these steps:

  1. Navigate to the root workspace, where you execute endorctl scan, and run ./gradlew projects to list all projects and their names.

  2. Run the following command at the root of the workspace:

    echo ":samples:crawler=testRuntimeClasspath,:samples:guide=macroBenchMarkClasspath" >> .endorproperties
    

    This creates a new file named .endorproperties in your root directory. This enables different configurations for the specified subprojects in the file.

  3. Run endorctl scan.

At this point, all other projects will adhere to the GlobalConfiguration. However, the :samples:crawler subproject will use the testRuntimeClasspath configuration, and the :samples:guide subproject will use the macroBenchMarkClasspath configuration.

Endor Labs supports fetching and scanning dependencies from private Gradle package registries. Endor Labs will fetch resources from authenticated endpoints and perform the scan, allowing you to view the resolved dependencies and findings. See Gradle package manager integrations for more information on configuring private registries.

To analyze your software built with Maven, Endor Labs requires that the software be able to be successfully built. To perform a quick scan, dependencies must be located in the local package manager cache. The standard .m2 cache must exist and contain successfully downloaded dependencies. To perform a deep scan the target artifact must be generated on the file system as well.

To build your project with Maven, use the following procedure:

  1. Ensure that you can resolve the dependencies for your project without error by running the following command.

     mvn dependency:tree
    
  2. Run mvn install and make sure the build is successful.

info
If you want to skip the execution of tests during the build, you can use -DskipTests to quickly build and install your projects.
 mvn install -DskipTests
  1. If you have multiple Java modules not referenced in the root pom.xml file, make sure to run mvn install separately in all the directories.

Endor Labs supports fetching and scanning dependencies from private Maven package registries. Endor Labs will fetch resources from authenticated endpoints and perform the scan, allowing you to view the resolved dependencies and findings. See Maven package manager integrations for more information on configuring private registries.

Use the following options to scan your repositories. Perform a scan after building the projects.

Perform a quick scan to get quick visibility into your software composition. This scan won’t perform reachability analysis to help you prioritize vulnerabilities.

endorctl scan --quick-scan

You can perform the scan from within the root directory of the Git project repository, and save the local results to a results.json file. The results and related analysis information are available on the Endor Labs user interface.

endorctl scan --quick-scan -o json | tee /path/to/results.json

You can sign in to the Endor Labs user interface, click the Projects on the left sidebar, and find your project to review its results.

Use the deep scan to perform dependency resolution, reachability analysis, and generate call graphs. You can do this after you complete the quick scan successfully.

endorctl scan

Use the following flags to save the local results to a results.json file. The results and related analysis information are available on the Endor Labs user interface.

endorctl scan -o json | tee /path/to/results.json

When deep analysis is performed all private software dependencies are completely analyzed by default if they have not been previously scanned. This is a one-time operation and will slow down initial scans, but won’t impact subsequent scans.

Organizations might not own some parts of the software internally and the related findings are not actionable by them. They can choose to disable this analysis using the flag disable-private-package-analysis. By disabling private package analysis, teams can enhance scan performance but may lose insights into how applications interact with first-party libraries.

Use the following command flag to disable private package analysis:

endorctl scan --disable-private-package-analysis

You can sign in to the Endor Labs user interface, click the Projects on the left sidebar, and find your project to review its results.

Endor Labs supports projects that do not use Maven or Gradle, and have no pom.xml in the following cases.

Note
Run the scans with the --quick-scan parameter if you prefer to scan the project without reachability.

If there is an uber jar (fat jar) that contains all application classes and dependency jars of the project, you can set the environment variable, ENDOR_JVM_USE_ARTIFACT_SCAN as true and run the scan.


export ENDOR_JVM_USE_ARTIFACT_SCAN=true
endorctl scan --package --path=<jar/ear/war location> --project-name=<project name>

For example:


export ENDOR_JVM_USE_ARTIFACT_SCAN=true
endorctl scan --package --path=/Users/johndoe/projects/project21.jar --project-name=Project21

If you do not have an uber jar with dependencies, but only have application dependency files (like jar, war, or ear), you can set the path to these files in the environment variable, ENDOR_JVM_USE_ARTIFACT_SCAN_CLASSPATH and run the scan.


export ENDOR_JVM_USE_ARTIFACT_SCAN=true
export ENDOR_JVM_USE_ARTIFACT_SCAN_CLASSPATH=<path that contains application depedencies>
endorctl scan --package --path=<jar/ear/war location> --project-name=<project name>

For example:


export ENDOR_JVM_USE_ARTIFACT_SCAN=true
export ENDOR_JVM_USE_ARTIFACT_SCAN_CLASSPATH=/Users/johndoe/caches/modules/files-2.1
endorctl scan --package --path=/Users/johndoe/projects/project21.jar --project-name=Project21

If application class files and dependency jar files are extracted as first-party class files, you can provide the first-party files in an environment variable, ENDOR_JVM_FIRST_PARTY_PACKAGE.


export ENDOR_JVM_USE_ARTIFACT_SCAN=true
export ENDOR_JVM_FIRST_PARTY_PACKAGE="<dependency/application 1>,<dependency/application 2>,...,<dependency/application N>"
endorctl scan --package --path=<jar/ear/war location> --project-name=<project name>

For example:

Your project jar has the following structure where com.org.doe and com.org.deer are application class files and dependencies.


fawn.jar
├── com.org.doe
│   ├── A.class
│   └── B.class
├── com.org.deer
│   ├── Util.class
│   └── Utilities.class
├── com.org.dep1
│   ├── Dep1.class
│   └── Dep2.class
└── com.org.dep2
    ├── 2Dep1.class
    └── 2Dep2.class

export ENDOR_JVM_USE_ARTIFACT_SCAN=true
export ENDOR_JVM_FIRST_PARTY_PACKAGE="com.org.doe,com.org.deer"
endorctl scan --package --path=/Users/johndoe/projects/fawn.jar --project-name=Fawn

Endor Labs supports JDK versions between 11-25.0.2, however, you can scan projects on JDK 8 using the following procedure:

  1. Build your Java project on JDK 8.

  2. After building, switch your Java home to JDK 11 or higher versions.

    export JAVA_HOME=/Library/Java/JavaVirtualMachines/openjdk-11.jdk/Contents/Home
    
  3. Run a scan

To scan Java projects on Gradle versions between 4.7 and 6.0.0, make sure to

  1. Check the version of your project using:

    ./gradlew --version
    
  2. The project must have a Gradle wrapper. You can generate the Gradle wrapper using:

    --gradle-version <your required version>.
    

    Endor Labs prioritizes Gradle wrapper over Gradle and it is a recommended best practice to use Gradle Wrapper.

  3. Before executing the endorctl scan, ensure the project can be built in your required version.

    Execute ./gradlew assemble.
    
  4. Use --bypass-host-check during endorctl scan to execute scans on projects that have Gradle versions lower than 6.0.0.

Endor Labs analyzes your Java code and dependencies to detect known security issues, including open-source vulnerabilities and generates call graphs.

Endor Labs resolves the dependencies for Java packages based on the following factors:

  • For packages built using Maven, it leverages the Maven cache in the .m2 directory of your file system to resolve the package’s dependencies and mirrors Maven’s build process for the most accurate results.
  • For Maven, Endor Labs respects the configuration settings present in the settings.xml file. If this file is included in your repository, you need not provide any additional configuration.
  • For packages built using Gradle, it uses Gradle and Gradle wrapper files to build packages and resolve dependencies.
  • Endor Labs supports EAR, JAR, RAR, and WAR files.

Endor Labs performs static analysis on the Java code based on the following factors:

  • Call graphs are created for your package. These are then combined with the call graphs of the dependencies in your dependency tree to form a comprehensive call graph for the entire project.
  • Endor Labs performs an inside-out analysis of the software to determine the reachability of dependencies in your project.
  • The static analysis time may vary depending on the number of dependencies in the package and the number of packages in the project.
  • If a package can not be successfully built in the source control repository, static analysis will fail.
  • Spring dependencies are analyzed based on spring public entry points to reduce the impact of Inversion of Control (IOC) frameworks. Dependencies and functions are identified as reachable and unreachable in the context of a spring version and its entry points.
  • Annotation processing is limited only to the usage of the code they annotate.
  • Static analysis of reflection and callbacks are not supported.
  • Endor Labs requires JDK 11 to generate call graphs for Java projects. Gradle versions lacking JDK 11 support are not compatible.

Here are a few error scenarios that you can check for and attempt to resolve them.

  • Host system check failure errors:

    • Java is not installed or not present in the PATH environment variable. Install Java and try again. See Java documentation for more information.
    • The installed version of Java is lower than the required version. Install JDK versions between 11-25.0.2 and try again.
    • Java is installed but Maven or Gradle is not installed. In such cases, the dependency resolution may not be complete.
  • Unresolved dependency errors: Maven is not installed properly or the system is unable to build root pom.xml. Run mvn dependency:tree in the root of the project and try again. In such cases, the dependency resolution may not be complete.

  • Resolved dependency errors: A version of a dependency does not exist or it cannot be found. It may have been removed from the repository.

  • Gradle variant incompatibility message: Gradle performs JVM toolchain checks for subprojects or dependencies and may raise errors indicating a Java version mismatch between dependencies declared in Gradle manifest and Java home setup.

    Example error message:

    Incompatible because this component declares a component for use during compile-time, compatible with Java version 21 and the consumer needed a component for use during runtime, compatible with Java version 17 - To resolve this and taking advantage of Java’s backward compatibility, instruct Gradle to use the higher version of JDK detected in the error message. For example, for the message above, specify org.gradle.java.home=<path of java> in .gradle/gradle.properties. The path needs to be to the root of the directory bin/java. For example, if your Java is at /Users/Downloads/jdk-21/Contents/Home/bin/java, specify org.gradle.java.home=/Users/Downloads/jdk-21/Contents/Home. - If you are scanning a purely Java 8 Gradle project and if you encounter the above error, set org.gradle.java.home to point to Java 8 home, before you execute the endorctl scan. - A general guideline for determining which Java version to use, is to match the Java version specified in .gradle/gradle.properties with the one used for building your Gradle project.

  • Call graph errors: - The project can not be built because a dependency cannot be located in the repository. - Sometimes, the project is not built, if a Java version discrepancy exists between the required repository version and the version on the system running the scan. For example, the Java required version is 1.8 but the system has 12 installed. Install the required version and try again.

  • If you have a private registry and internal dependencies on other projects, you must configure the credentials of the registry. See Configure Maven private registries.

  • If you have a large repository or if the scan fails with out-of-memory issues, you may need to increase the JVM heap size before you can successfully scan. Export the ENDOR_SCAN_JVM_PARAMETERS environment variable with additional JVM parameters before performing the scan as shown below:

    export ENDOR_SCAN_JVM_PARAMETERS="-Xmx32G"
    
  • If you use a remote repository configured to authenticate with a client-side certificate, you must add the certificate through an endorctl parameter. Export the ENDOR_SCAN_JVM_PARAMETERS parameter before performing a scan. See Maven documentation for details.

    export ENDOR_SCAN_JVM_PARAMETERS="-Xmx16G,-Djavax.net.ssl.keyStorePassword=changeit,
    -Djavax.net.ssl.keyStoreType=pkcs12,
    -Djavax.net.ssl.keyStore=/Users/myuser/Documents/nexustls/client-cert1.p12"
    

Python

Python is a high-level, interpreted programming language widely used by developers. Endor Labs supports the scanning and monitoring of Python projects.

Using Endor Labs, application security engineers and developers can:

  • Scan their software for potential security issues and violations of organizational policy.
  • Prioritize vulnerabilities in the context of their applications.
  • Understand the relationships between software components in their applications.

Before you proceed to run a deep scan, ensure that your system meets the following specification.

Project Size Processor Memory
Small projects 4-core processor 16 GB
Mid-size projects 8-core processor 32 GB
Large projects 16-core processor 64 GB

Ensure that the following prerequisites are complete:

  • Install Python 3.6 or higher versions. Refer to the Python documentation for instructions on how to install Python.
  • For UV managed projects, Python 3.8 or higher is required. To enable UV support, set the environment variable ENDOR_SCAN_ENABLE_UV_PACKAGE_MANAGER=true.
  • Ensure that the package manager pip, Poetry, PDM, UV, or Pipenv is used by your projects to build your software packages.
  • If you are using pip with Python 3.12 or higher versions, install setuptools.
  • Set up any build, code generation, or other dependencies that are required to install your project’s packages.
  • Organize the project as one or more packages using setup.py, setup.cfg, pyproject.toml, or requirements.txt package manifest files.
  • Make sure your repository includes one or more files with .py extension or pass either one of requirements.txt, setup.py, setup.cfg or pyproject.toml using the --include-path flag. See Scoping scans.

Creating a virtual environment and building your Python projects before running the endorctl scan is recommended for the most accurate results. Endor Labs attempts to automatically create and configure a virtual environment when one is not provided, but this may not work for complex projects. Ensure that the packages are downloaded into the local package caches and that the build artifacts are present in the standard locations.

  1. Configure any private repositories
    • If you use dependencies from a PyPI compatible repository other than pypi.org, configure it in the Integrations section of the Endor Labs web application. See Configure private PyPI package repositories for more details.
  2. Clone the repository and optionally create a virtual environment inside it
    1. Clone the repository using git clone or an equivalent workflow.

    2. Enter the working copy root directory that’s created.

    3. Create a virtual environment based on your package manager:

      For pip or setuptools

      • Use python3 -m venv venv. Set up the virtual environment in the root folder that you want to scan and name it venv or .venv.
      • Install your project’s dependencies using venv/bin/python -m pip install -r requirements.txt or venv/bin/python -m pip install.
      • If the virtual environment is created outside the project, use one of the ways defined in Virtual environment support to specify the path of the Python virtual environment to Endor Labs.

      For Poetry projects

      • Install your project’s dependencies using poetry install.

      For PDM projects

      • Install your project’s dependencies using pdm install.

      For Pipenv projects

      • Run pipenv install in the project directory. This creates a Pipfile.lock (if it doesn’t exist) and sets up a virtual environment while installing the required packages.

Creating a virtual environment is recommended to ensure consistent and accurate scan results, and to verify that all dependencies install correctly before scanning. Automatic setup may encounter issues such as:

  • Complex dependency chains or conflicting package requirements
  • Private packages requiring authentication
  • System-level dependencies not available in the scan environment
  • Non-standard project structures or custom build scripts

Endor Labs attempts to automatically detect, create, or configure virtual environments for your projects. The behavior varies by package manager.

Poetry, Pipenv, and PDM
endorctl automatically detects and uses existing virtual environments managed by these tools.
UV
endorctl automatically creates a temporary virtual environment and deletes it after the scan is complete. UV must be installed on your system for this automatic management to work.
pip

endorctl attempts to detect virtual environments in standard locations, such as venv or .venv directories in your project root. You can also use one of the following methods to specify the virtual environment:

  • Set up the virtual environment in the root folder that you want to scan and name it venv or .venv, it is automatically picked up by the Endor Labs application.

    export PYTHONPATH=/usr/tmp/venv:/usr/tmp/another-venv
    
  • Set the environment variable ENDOR_SCAN_PYTHON_VIRTUAL_ENV to the path of the virtual environment of your Python project.

    export ENDOR_SCAN_PYTHON_VIRTUAL_ENV=/usr/tmp/venv
    
  • Set the environment variable ENDOR_SCAN_PYTHON_GLOBAL_SITE_PACKAGES to true to indicate that a virtual environment is not present and Endor Labs can use the system-wide Python installation packages and modules.

    export ENDOR_SCAN_PYTHON_GLOBAL_SITE_PACKAGES=true
    
Note
Setting both ENDOR_SCAN_PYTHON_VIRTUAL_ENV and ENDOR_SCAN_PYTHON_GLOBAL_SITE_PACKAGES environment variables at the same time is currently not supported, and the scan may not be successful.

If you do not set up the virtual environment, Endor Labs attempts to set it up with all the code dependencies, however, we recommend that you install all dependencies in a virtual environment for the most accurate results.

If you are using custom scripts without manifest files to assemble your dependencies, make sure to set up the virtual environment and install the dependencies.

Endor Labs supports fetching and scanning dependencies from private PyPI package registries. Endor Labs will fetch resources from authenticated endpoints and perform the scan, allowing you to view the resolved dependencies and findings. See PyPI package manager integrations for more information on configuring private registries.

Use the following options to scan your repositories. Perform the endorctl scan after building the projects.

Perform a quick scan to get quick visibility into your software composition and perform dependency resolution. It discovers dependencies that the package has explicitly declared. If the package’s build file is incomplete then the dependency list will also be incomplete. This scan won’t perform reachability analysis to help you prioritize vulnerabilities.

endorctl scan --quick-scan

You can perform the scan from within the root directory of the Git project repository, and save the local results to a results.json file. The results and related analysis information are available on the Endor Labs user interface.

endorctl scan --quick-scan -o json | tee /path/to/results.json

You can sign in to the Endor Labs user interface, click the Projects on the left sidebar, and find your project to review its results.

Use the deep scan to perform dependency resolution, reachability analysis, and generate call graphs. You can do this after you complete the quick scan successfully. The deep scan performs the following operations for the Python projects.

  • Discovers explicitly declared dependencies,
  • Discovers project dependent OSS packages present in the venv/global and scope/python.
  • Performs reachability analysis and generates call graphs.
  • Detects dependencies used in source code but not declared in the package’s manifest files called phantom dependencies.
endorctl scan

Use the following flags to save the local results to a results.json file. The results and related analysis information are available on the Endor Labs user interface.

endorctl scan -o json | tee /path/to/results.json

When a deep scan is performed all private software dependencies are completely analyzed by default if they have not been previously scanned. This is a one-time operation and will slow down initial scans, but won’t impact subsequent scans.

Organizations might not own some parts of the software internally and the related findings are not actionable by them. They can choose to disable this analysis using the flag disable-private-package-analysis. By disabling private package analysis, teams can enhance scan performance but may lose insights into how applications interact with first-party libraries.

You can sign in to the Endor Labs user interface, click the Projects on the left sidebar, and find your project to review its results.

Endor Labs uses the following two methods to analyze your Python code.

Endor Labs uses the results from both these methods to perform superior dependency resolution, identify security issues, detect open-source vulnerabilities, and generate call graphs.

In this method, Endor Labs analyzes the manifest files present in a project to detect and resolve dependencies. The manifest files are analyzed in the following priority.

Package manager Priority Build solution
Poetry 1 poetry.lock,pyproject.toml
Pipenv 2 Pipfile.lock,Pipfile
PDM 3 pdm.lock,pyproject.toml
UV 4 uv.lock,pyproject.toml
pip 5 setup.py,setup.cfg,requirements.txt,pyproject.toml

For Poetry, PDM, and UV, when both lock and toml files are present, both files are analyzed to detect and resolve dependencies.

For pip, the dependency resolution is as follows, where the first available file in the priority list is analyzed to detect and resolve dependencies, and others are ignored.

Build solution Priority
setup.py 1
setup.cfg 2
pyproject.toml 3
requirements.txt 4

On initialization of a scan, Endor Labs identifies the package manager by inspecting files such as the pyproject.toml, poetry.lock, pdm.lock, setup.py, and requirements.txt. When the files, poetry.lock or pyproject.tomlfiles are discovered, Endor Labs will use the Poetry package manager to build the project. When the files, pdm.lock or pyproject.toml files are discovered, Endor Labs will use the PDM package manager. Otherwise, it will use pip3.

This is an example that demonstrates scanning a Python repository from GitHub on your local system using the endorctl scan. Here we are assuming that you are running the scan on a Linux or Mac operating system environment and that you have the following Endor Labs API key and secret stored in the environment variables. See endorctl flags and variables.

  • ENDOR_API_CREDENTIALS_KEY set to the API key
  • ENDOR_API_CREDENTIALS_SECRET set to the API secret
  • ENDOR_NAMESPACE set to your namespace (you can find this when logged into Endor Labs by looking at your URL: https://app.endorlabs.com/t/NAMESPACE/...; it is typically a form of your organization’s name)
git clone https://github.com/HybirdCorp/creme_crm.git
cd creme_crm
python3 -m venv venv
source venv/bin/activate
venv/bin/python3 -m pip install
endorctl scan
git clone https://github.com/HybirdCorp/creme_crm.git
cd creme_crm
poetry lock
endorctl scan
git clone https://github.com/HybirdCorp/creme_crm.git
cd creme_crm
pdm install
endorctl scan
git clone https://github.com/example/repo.git
cd repo
endorctl scan
git clone https://github.com/example/repo.git
cd repo
pipenv install
endorctl scan

The scan for this repository is expected to be completed in a few minutes depending on the size of the project. You can now visit app.endorlabs.com, navigate to Projects, and choose the helloflas/flask-examples project to see your scan results.

In some organizations, custom file names, such as default.txt, are used for requirement files instead of the standard requirements.txt. Additionally, some repositories may include multiple requirement files with different names.

To specify custom file names as requirement files, export the file name using the ENDOR_SCAN_PYTHON_REQUIREMENTS environment variable and then run the endorctl scan.

export ENDOR_SCAN_PYTHON_REQUIREMENTS=default.txt

To resolve dependencies from multiple requirement files, export them as a comma-separated list using the ENDOR_SCAN_PYTHON_REQUIREMENTS environment variable and then run the endorctl scan.

export ENDOR_SCAN_PYTHON_REQUIREMENTS=default.txt,requirements.txt
Note
When the ENDOR_SCAN_PYTHON_REQUIREMENTS environment variable is used, only the file names specified in the variable are considered for dependency analysis. For example, if you export default.txt and also have requirements.txt in your repository, requirements.txt will not be considered.

All Python projects do not always include manifest files. A project can be a series of install statements that are assembled by custom scripts. Even when manifest files are present, the dependency information and version declared in the manifest file may be drastically different from what is used in a project.

To solve this problem, Endor Labs has developed a unique method for dependency resolution by performing a static analysis on the code, giving you complete visibility of what is used in your code.

  • Endor Labs enumerates all Python packages and recognizes the import statements within the project. An import statement is a Python code statement that is used to bring external modules or libraries into your Python script.
  • It performs a static analysis of the code to match the import statements with the pre-installed packages and recursively traverses all files to create a dependency tree with the actual versions that are installed in the virtual environment.
  • It detects the dependencies at the system level to identify which ones are resolved and retrieves the precise name and version information from the library currently in use.
  • Also, it gives you accurate visibility into your project components and helps you understand how the components depend on one another.

Through this approach, Endor Labs conducts comprehensive dependency management, assesses reachability, and generates integrated call graphs.

Note
Dependency resolution using static analysis is performed on deep scans only.
  • Endor Labs specifically looks for the requirements.txt file for a Python project using pip. If you use a different file name, it won’t be automatically discovered.
  • Python versions older than 3.7 are not supported but may work as expected.
  • If a virtual environment is not provided, Python version constraints are not assumed based on the runtime environment of CI. Dependencies are shown for all possible versions of Python at runtime. If a virtual environment is provided, Endor Labs respects what is installed in the virtual environment.
  • Symbolic links into manifest files may result in the same package being duplicated in the project.
  • If a dependency is not available in the PyPI repository or in a configured private package repository, Endor Labs will be unable to build the software and scans may fail without first building the package in the local environment successfully.
  • A project is treated as UV-managed if its pyproject.toml file contains the tool.uv key. Additionally, any member of a UV workspace is also considered UV-managed, even if its individual manifest file does not include the tool.uv key.
  • When scanning UV workspaces, Endor Labs uses the workspace-level lock file for dependency resolution. Individual workspace members are not scanned as independent projects, ensuring consistency with UV’s workspace architecture.
  • Inline script dependencies defined within Python script files are not currently detected during scanning.
  • Function calls using dispatch table calls might not be included in the call graph.
  • Function calls using unresolved variables might not be included in the call graph.
  • Dynamically modified or extended function calls used to declare methods or attributes at run time might not be included in the call graph.
  • Functions called indirectly through a function pointer and not by their direct name, might not be included in the call graph.
  • Type stubs that provide hints or type annotations for functions, methods, and variables in your Python modules or libraries have to be installed manually before performing a scan.
  • If your project has a pyproject.toml file that includes tools.pyright section, it overrides Endor Labs settings for Pyright and may result in incorrect call graph results. You will need to remove the tools.pyright section from the pyproject.toml file.

Here are a few error scenarios that you can check for and attempt to resolve them.

Virtual environment errors
You can identify the errors that may occur during virtual environment installation by looking for the following message in the error logs: failed to create virtual environment or failed to install dependencies.
Missing environment dependency
If your code depends on packages such as psycopg2, environment dependencies such as PostgreSQL are also required. The endorctl scan may fail if the environment where it is running does not have PostgreSQL installed.
Incompatible Python version
The default Python version in the environment where the endorctl scan is running is incompatible with one or more of the dependencies that are needed by the code.
Incompatible architecture
One or more dependencies are not compatible with the operating system architecture of the local system on which you are running the endorctl scan. For example, projects with dependency on PyObjC can be run on Mac-based systems, but not Linux systems. A few Python libraries are incompatible with x32 architectures and can only be run on x64 architectures.
Resolved dependency errors
A version of a dependency does not exist, or it cannot be found. It may have been removed from the repository.
Call graph errors
These errors occur if pip or Poetry are unable to build the project because a required dependency cannot be located.

Go

Go or Golang is a software development programming language widely used by developers. Endor Labs supports scanning and monitoring of Go projects.

Using Endor Labs, application security engineers and developers can:

  • Scan their software for potential security issues and violations of organizational policy.
  • Prioritize vulnerabilities in the context of their applications.
  • Understand the relationships between software components in their applications.

Before you proceed to run a deep scan, ensure that your system meets the following specification.

Project Size Processor Memory
Small projects 4-core processor 16 GB
Mid-size projects 8-core processor 32 GB
Large projects 16-core processor 64 GB
  • Make sure that you have Go 1.12 or higher versions.
  • Make sure your repository includes one or more files with .go extension.

You must build your Go projects before running the scan. Additionally, ensure that the packages are downloaded into the local package caches and that go.mod file well formed and is available in the standard location.

To ensure that your go.mod file is well formed, run the following command:

go mod tidy
go get ./

This removes any dependencies that are not required by your project and ensures to resolve the dependencies without errors.

Use the following options to scan your repositories. Perform the endorctl scan after building the projects.

Perform a quick scan to get quick visibility into your software composition. This scan won’t perform reachability analysis to help you prioritize vulnerabilities.

endorctl scan --quick-scan

You can perform the scan from within the root directory of the Git project repository, and save the local results to a results.json file. The results and related analysis information are available on the Endor Labs user interface.

endorctl scan --quick-scan -o json | tee /path/to/results.json

You can sign into the Endor Labs user interface, click the Projects on the left sidebar, and find your project to review its results.

Use the deep scan to perform dependency resolution, reachability analysis, and generate call graphs. You can do this after you complete the quick scan successfully.

endorctl scan

Use the following flags to save the local results to a results.json file. The results and related analysis information are available on the Endor Labs user interface.

endorctl scan -o json | tee /path/to/results.json

You can sign into the Endor Labs user interface, click the Projects on the left sidebar, and find your project to review its results.

Endor Labs resolves your Golang-based dependencies by leveraging built-in Go commands to replicate the way a package manager would install your dependencies.

To discover package names for Go packages Endor Labs uses the command:

GOMOD=off go list -e -mod readonly -json -m

To analyze the dependency graph of your package Endor Labs uses the command:

GOMOD=off go list -e -deps -json -mod readonly all

To assess external dependencies, specifically third-party packages or libraries that your Go project relies on, Endor Labs uses the command:

GOMOD=off go list -e -deps -json -mod vendor all

These commands allow us to assess packages’ unresolved dependencies, analyze the dependency tree, and resolve dependencies for your Go projects.

Endor Labs creates go.mod files for you when projects do not have a go.mod file. This can lead to inconsistencies with the actual package created over time and across versions of the dependencies.

Here are a few error scenarios that you can check for and attempt to resolve them.

  • Host system check failure errors:

    • Go is not installed or not present in the PATH environment variable. Install Go and try again.
    • The installed version of Go is lower than 1.12. Install Go version 1.12 or higher and try again.
  • Resolved dependency errors:

    • A version of a dependency does not exist or it cannot be found. It may have been removed from the repository.
    • If the go.mod file is not well-formed then dependency resolution may return errors. Run go mod tidy and try again.
  • Call graph errors:

    These errors often mean the project won’t build. Please ensure any generated code is in place and verify that go build ./... runs successfully.

JavaScript/TypeScript

JavaScript is a high-level, interpreted programming language primarily used for creating interactive and dynamic web content widely used by developers. Endor Labs supports the scanning and monitoring of JavaScript projects.

Using Endor Labs, application security engineers and developers can:

  • Scan their software for potential security issues and violations of organizational policy.
  • Prioritize vulnerabilities in the context of their applications.
  • Understand the relationships between software components in their applications.

Before you proceed to run a deep scan, ensure that your system meets the following specification.

Project Size Processor Memory
Small projects 4-core processor 16 GB
Mid-size projects 8-core processor 32 GB
Large projects 16-core processor 64 GB
  • Endor Labs requires the following pre-requisite software to be installed to successfully perform a scan:
    • Yarn: Any version
    • npm: 6.14.18 or higher versions
    • pnpm: 3.0.0 or higher versions
  • Make sure your repository includes one or more files with .js or .ts extension.

To run deep scanning for JavaScript and TypeScript projects make sure you have the following prerequisites installed:

  • Ensure you have endorctl version 1.7.0 or higher installed.

  • Ensure Node.js version 4.2.6 or higher is installed to support TypeScript version 4.9.

  • Ensure TypeScript version 4.9 or higher is installed.

  • Install tsserver. tsserver is included with TypeScript, so installing the appropriate TypeScript version automatically installs tsserver.

    Install the appropriate TypeScript version based on your Node.js version.

Nodejs Version TypeScript Version
Lower than 12.2 4.9 or higher
Between 12.2 and 14.17 5.0
Higher than or equal to 14.17 Latest
  • Use the following command based on your Node.js version to install typescript:
npm install -g typescript
npm install -g typescript@5.0
npm install -g typescript@4.9
  • If you’re unsure make sure you check the tsserver installation
# Run 'which tsserver' to confirm installation
which tsserver

If you are running the endorctl scan with --install-build-tools, you don’t need to install tsserver. See Configure build tools for more information.

You can choose to build your JavaScript projects before running a scan. This will ensure that either a package-lock.json, yarn.lock, or pnpm-lock.yaml file is created enhancing the scan speed.

Ensure your repository has package.json and run the following command making sure it builds the project successfully.

npm install
yarn install
pnpm install

If the project is not built, endorctl builds the project during the scan and generate either package-lock.json, yarn.lock, or pnpm-lock.yaml file. Make sure that either npm, Yarn, or pnpm is installed on your system. If your repository includes a lock file, endorctl uses the existing file for dependency resolution and does not create it again.

The npm install command may fail in a subdirectory if your project is set up with a package-lock.json file available at the root of the repository and not in the sub-packages as shown in the following example.

 .
 ├── package.json
 ├── package-lock.json
 └── sub-package/
     └── package.json

You need to instruct endorctl to use the root-level lock file to avoid scan failures in monorepo setups where dependencies are centrally managed at the root.

Set the following environment variable before you run the scan.

export ENDOR_JS_USE_ROOT_DIR_LOCK_FILE=true

When generating call graphs for JavaScript/TypeScript projects, endorctl uses tsserver to analyze the code. By default, tsserver waits 15 seconds for a response before timing out. For large or complex projects, you may need to increase this timeout.

Set the ENDOR_JS_TSSERVER_TIMEOUT environment variable to specify the timeout in seconds.

export ENDOR_JS_TSSERVER_TIMEOUT=30

Increasing the timeout might be beneficial in the following scenarios:

  • Large monorepos with many TypeScript files
  • Projects with complex type hierarchies
  • Projects with extensive type checking requirements

endorctl detects the JavaScript package manager automatically. You can override this detection by setting the ENDOR_JS_PACKAGE_MANAGER environment variable to npm, yarn, pnpm, or lerna.

For example, to use npmas the package manager run the following command.

export ENDOR_JS_PACKAGE_MANAGER=npm

This setting forces endorctl to use the specified package manager and overrides all other JavaScript package manager configuration variables.

Perform a scan to get visibility into your software composition and resolve dependencies.

endorctl scan

Dependency analysis tools analyze the lock file of an npm, yarn, or pnpm based package and attempt to resolve dependencies. To resolve dependencies from private repositories, the settings of the .npmrc file in the repository is considered.

Endor Labs surpasses mere manifest file analysis by expertly resolving JavaScript dependencies and identifies:

  • Dependencies listed in the manifest file but not used by the application
  • Dependencies used by the application but not listed in the manifest file
  • Dependencies listed in the manifest as transitive but used directly by the application
  • Dependencies categorized as test in the manifest, but used directly by the application

Developers can eliminate the false positives, false negatives, and easily identify test dependencies with this analysis. The dependencies used in source code but not declared in the package’s manifest files are tagged as Phantom.

Endor Labs also supports npm, Yarn, and pnpm workspaces out-of-the-box. If your JavaScript frameworks and packages use workspaces, Endor Labs will automatically take the dependencies from the workspace to ensure that the package successfully builds.

Scan speed is enhanced if the lock file exists in the repository. endorctl does not perform a build and uses the existing files in the repository for analysis.

Endor Labs supports fetching and scanning dependencies from private npm package registries. Endor Labs will fetch resources from authenticated endpoints and perform the scan, allowing you to view the resolved dependencies and findings. See npm package manager integrations for more information on configuring private registries.

  • Endor Labs doesn’t currently support local package references
  • If a dependency can not be resolved in the lock file, building that specific package may be unsuccessful. This package may have been removed from npm or the .npmrc file is not properly configured. Other packages in the workspace are scanned as usual.
  • Functions that are passed in as arguments to call expressions might not be included in the call graph.
  • Functions that are returned and then called might not be included in the call graph.
  • Functions that are assigned to a variable based on a runtime value might not be included in the call graph.
  • Functions that are assigned to an array element might not be included in the call graph.
  • Unresolved dependency errors: The manifest file package.json is not buildable. Try running npm install, yarn install, or pnpm install in the root project to debug this error.
  • Resolved dependency errors: A version of a dependency does not exist or it cannot be found. It may have been removed from the repository.

C/C++

Beta

C and C++ are powerful, high-performance programming languages widely used for system programming, application development, and embedded systems. Endor Labs supports scanning and monitoring of C and C++ projects.

Using Endor Labs, application security engineers and developers can:

  • Scan their software for potential security issues and violations of organizational policy.
  • Prioritize vulnerabilities in the context of their applications.
  • Understand the relationships between software components in their applications.

To scan your C and C++ repositories, run the following command.

endorctl scan --languages=c
Important
  • Ensure that the entire source code and all its dependencies are present in the scanned folder.
  • Using the --languages=c flag will scan only C and C++ projects. For a multi-language repository, ensure that you include all other languages with the flag.
  • If you are using a scan profile, make sure C/C++ is selected under Languages and included in your profile.

Use the following flags to save the local results to a results.json file. The results and related analysis information are available on the Endor Labs user interface.

endorctl scan --languages=c -o json | tee /path/to/results.json

You can sign in to the Endor Labs user interface, click the Projects on the left sidebar, and find your project to review its results.

View scan results

Endor Labs detects vulnerabilities by testing your code against its proprietary database, which is regularly updated. Endor Labs does not build your code, so all dependencies and vendor code must be included within the source. If the build process pulls in additional packages, they must also be present in the scanned directory.

Endor Labs analyzes source code using a combination of code signatures and embeddings. The system extracts source code from various data sources and applies language-specific segmentation to break the code into functions and segments. This method facilitates efficient similarity searches, helping to detect duplicated code across repositories and supporting comprehensive software composition analysis.

By comparing file hashes, segment hashes, and embeddings, Endor Labs can query data to identify matches with code segments. This capability streamlines the detection of copied code and the dependency relationships between repositories, providing insights into code components from various sources, including Git repositories, online archives, and other package distributions. Headers and code files are scanned regardless of their file extension.

To optimize performance, Endor Labs caches embeddings and signatures, making subsequent scans faster than the first scan. This means only newly added or modified files require computation, significantly reducing scan times.

Embeddings are disabled by default and require the Endor Labs AI license.

To enable embeddings go to Settings near the bottom of the left sidebar, navigate to Data Privacy under System Settings, check the box for Code Segment Embeddings and LLM Processing and click Save Data Privacy Settings.

Enable embeddings

To override the system-wide configuration for a specific scan, set ENDOR_SCAN_EMBEDDINGS to true to enable embeddings or false to disable them. This setting takes precedence over the system configuration.

export ENDOR_SCAN_EMBEDDINGS=false

Scanning binary library files such as .so and .a files is not supported.

PHP

PHP is a popular server-side scripting language primarily used for web development. Endor Labs supports the scanning and monitoring of PHP projects.

Using Endor Labs, application security engineers and developers can:

  • Scan their software for potential security issues and violations of organizational policy.
  • Prioritize vulnerabilities in the context of their applications.
  • Understand the relationships between software components in their applications.
  • One of the following prerequisites must be fulfilled:
    • The PHP project must contain a composer.json file. If the project includes the composer.lock file it is beneficial, but this is not a mandatory requirement.
    • If the composer.lock file is not present in the repository, it is necessary to have PHP and Composer installed before running a scan on your local system.
  • Make sure your repository includes one or more files with .php extension.
  • The following versions are supported for PHP and Composer:
    • PHP 5.3.2 and higher versions
    • Composer 2.2.0 and higher versions
Note
Endor Labs does not support Composer 2.9.1.

You can choose to build your PHP projects before running a scan. This will ensure that composer.lock is created.

Ensure your repository has composer.json and run the following command making sure it builds the project successfully.

composer install

If the project is not built, endorctl will build the project during the scan and generate composer.lock. If the repository includes a composer.lock, endorctl uses this file for dependency resolution and does not create it again.

Endor Labs supports fetching and scanning dependencies from private package registries. Endor Labs will fetch resources from authenticated endpoints and perform the scan, allowing you to view the resolved dependencies and findings. See package manager integrations for more information on configuring private registries.

Perform a scan to get visibility into your software composition and resolve dependencies.

endorctl scan

You can perform the scan from within the root directory of the Git project repository, and save the local results to a results.json file. The results and related analysis information are available on the Endor Labs user interface.

endorctl scan -o json | tee /path/to/results.json

You can sign into the Endor Labs user interface, click the Projects on the left sidebar, and find your project to review its results.

Endor Labs discovers all composer.json files in your PHP project and uses these files to resolve the dependencies of your packages. Composer is a PHP dependency management tool that enables you to specify the libraries your project relies on and manages the process of installing or updating them. The dependencies and findings are listed in the Endor Labs application individually for every composer.json file.

In Endor Labs’ dependency management, the resolution of dependencies is based on both composer.json and composer.lock files. The composer.lock file is generated by Composer and includes information such as resolved versions, package information, transitive dependencies, and other details. Using the composer.lock file ensures deterministic dependency installation by recording the exact versions of installed dependencies and their transitive dependencies. If the composer.lock file is not present in the repository, Endor Labs generates the composer.lock file, and uses it to analyze the operational and security risks associated with your package’s dependencies. Endor Labs fetches the dependency information and creates a comprehensive dependency graph.

Call graphs are not supported for PHP projects.

  • Unresolved dependency errors: The composer.json is not buildable. Try running composer install in the root project to debug this error.
  • Resolved dependency errors: A version of a dependency does not exist or it cannot be found. It may have been removed from the repository.

Kotlin

Kotlin is a statically typed programming language that runs on the Java Virtual Machine (JVM), known for its concise syntax, null safety, and seamless integration with Java. Endor Labs supports scanning and monitoring of Kotlin projects.

Using Endor Labs, application security engineers and developers can:

  • Scan their software for potential security issues and violations of organizational policy.
  • Prioritize vulnerabilities in the context of their applications.
  • Understand the relationships between software components in their applications.

Before you proceed to run a deep scan, ensure that your system meets the following specification.

Project Size Processor Memory
Small projects 4-core processor 16 GB
Mid-size projects 8-core processor 32 GB
Large projects 16-core processor 64 GB
  • Install JDK versions between 11 and 25.0.2.
  • Make sure your repository includes one or more files with .kt extension.
  • Install Maven version 3.6.1 and higher if your project uses Maven.
  • Install Gradle build system version 6.0.0 and higher, if your project uses Gradle.
  • Your repository must include the appropriate build manifest file:
    • pom.xml for Maven projects.
    • build.gradle or build.gradle.kts for Gradle projects.

Before initiating a scan with Endor Labs, ensure that your Kotlin projects are built successfully. Additionally, ensure that the packages are downloaded into local package caches and build artifacts are present in their standard locations. Follow the guidelines to use Gradle and Maven:

To analyze your software built with Gradle, Endor Labs requires:

  • The software must be successfully built with Gradle.
  • For quick scans, dependencies must be located in the local package manager cache. The standard $GRADLE_USER_HOME/caches or /User/<<username>>/.gradle/caches cache must exist.
  • For deep scans, the target artifact must be generated on the filesystem.

To build your project with Gradle, run the following commands:

  1. Specify the Gradle configuration by setting an environment variable.
export endorGradleKotlinConfiguration="compileClasspath"

To override the default configuration, use the command:

export endorGradleKotlinConfiguration="<configuration>"

When no configuration is provided, runtimeClasspath is used by default.

If neither the user-specified nor the default configuration exists in the project, the system falls back to the following configurations, in order:

  1. runtimeClasspath
  2. runtime
  3. compileClasspath
  4. compile

If the listed configurations are not found in the project, the system selects the first available configuration in alphabetical order.

For Android projects, you can set the configuration using:

export endorGradleAndroidConfiguration="<configuration>"

The default configuration for an Android application or library follows the structure used by Android Studio.

Applications: All possible combinations of application variants are examined.

Libraries: All possible combinations of library variants are examined.

The first variant in the alphabetically sorted list is then suffixed with RuntimeClasspath. For example, if the first variant is configA, the default configuration will be configARuntimeClasspath.

If these methods don’t yield a value, the system defaults to releaseRuntimeClasspath.

  1. Confirm an error-free dependency resolution for your project.
gradle dependencies

or, with a Gradle wrapper.

./gradlew dependencies
  1. Generate the artifact for deep analysis.
gradle assemble

or, with a Gradle wrapper.

./gradlew assemble

In a multi-build project, if you set the environment variable endorGradleKotlinConfiguration=[GlobalConfiguration] and/or endorGradleAndroidConfiguration=[GlobalConfiguration], the specified configuration is used for dependency resolution across all projects and sub-projects in the hierarchy below.

    \--- Project ':samples'
         +--- Project ':samples:compare'
        +--- Project ':samples:crawler'
        +--- Project ':samples:guide'
        +--- Project ':samples:simple-client'
        +--- Project ':samples:slack'
        +--- Project ':samples:static-server'
        +--- Project ':samples:tlssurvey'
        \--- Project ':samples:unixdomainsockets'

To override the configuration only for the :samples:crawler and :samples:guide sub-projects, follow these steps:

  1. Navigate to the root workspace, where you execute endorctl scan, and run ./gradlew projects to list all projects and their names.

  2. Run the following command at the root of the workspace:

echo ":samples:crawler=testRuntimeClasspath,:samples:guide=macroBenchMarkClasspath" >> .endorproperties

This creates a new file named .endorproperties in your root directory. This enables different configurations for the specified sub-projects in the file.

  1. Run endorctl scan as usual.

At this point, all other projects will adhere to the GlobalConfiguration. However, the :samples:crawler sub-project will use the testRuntimeClasspath configuration, and the :samples:guide sub-project will use the macroBenchMarkClasspath configuration.

To analyze your software built with Maven, Endor Labs requires:

  • The software must be successfully built with Maven.
  • For quick scans, dependencies must be located in the local package manager cache. The standard .m2 cache must exist.
  • For deep scans, the target artifact must be generated on the filesystem.

To build your project with Maven, run the following commands:

  1. Confirm an error-free dependency resolution for your project.
mvn dependency:tree
  1. Run mvn install and ensure the build is successful.
info
If you want to skip the execution of tests during the build, you can use -DskipTests to quickly build and install your projects.
mvn install -DskipTests
  1. If you have multiple Kotlin modules not referenced in the root pom.xml file, ensure to run mvn install separately in each directory.

Endor Labs supports fetching and scanning dependencies from private Maven package registries. Endor Labs will fetch resources from authenticated endpoints and perform the scan, allowing you to view the resolved dependencies and findings. See Maven package manager integrations for more information on configuring private registries.

To scan your repositories with Endor Labs, you can use the following options after building your Kotlin projects.

To quickly gain insight into your software composition, initiate a quick scan using the following command:

endorctl scan --quick-scan

This scan offers a quick overview without performing reachability analysis, helping you prioritize vulnerabilities.

To scan a Git project repository from the root directory and save the results locally in the results.json file, use the following command:

endorctl scan --quick-scan -o json | tee /path/to/results.json

This generates comprehensive results and analysis information, accessible from the Endor Labs user interface.

To access and review detailed results, sign in to the Endor Labs user interface. Navigate to Projects on the left sidebar, and locate your project for a thorough examination of the scan results.

To perform dependency resolution and reachability analysis, use deep scan with Endor Labs. This option is recommended only after successfully completion of quick scan.

endorctl scan

To save the local results to a results.json file, use the following flag.

endorctl scan -o json | tee /path/to/results.json

This generates comprehensive results and analysis information, accessible from the Endor Labs user interface.

During deep analysis, Endor Labs thoroughly analyzes all private software dependencies that have not been previously scanned. While this initial operation may slow down scans, subsequent scans remain unaffected.

If your organization does not own specific software parts and related findings are non-actionable, you can choose to disable this analysis using the disable-private-package-analysis flag. Disabling private package analysis enhances scan performance but may result in a loss of insights into how applications interact with first-party libraries.

To disable private package analysis, use the following command flag:

endorctl scan --disable-private-package-analysis

To access and review detailed results, sign in to the Endor Labs user interface. Navigate to Projects on the left sidebar, and locate your project for a thorough examination of the scan results.

While Endor Labs primarily supports JDK versions between 11-25.0.2, you can still scan projects on JDK 8 by following these steps:

  1. Build your Java project on JDK 8.
  2. After successful build, switch your Java home to JDK 11 or higher versions.
export JAVA_HOME=/Library/Java/JavaVirtualMachines/openjdk-11.jdk/Contents/Home
  1. Run a scan.

Endor Labs analyzes your Kotlin code and dependencies to identify known security issues, including open-source vulnerabilities.

Endor Labs resolves Kotlin package dependencies by considering the following factors:

  • For packages built with Maven, it leverages the Maven cache in the .m2 directory of your file system. This mirrors Maven’s build process for precise results.
  • For packages built with Maven, it respects the configuration settings present in the settings.xml file. If the file is included in your repository, any additional configuration is not necessary.
  • For packages built with Gradle, it leverages Gradle and Gradle wrapper files to build and resolve dependencies.
  • Endor Labs supports AAR, EAR, JAR, RAR, and WAR files.

Endor Labs performs static analysis on the code based on the following factors:

  • Call graphs are created for your package. These are then combined with the call graphs of the dependencies in your dependency tree to form a comprehensive call graph for the entire project.
  • Endor Labs performs an inside-out analysis of the software to determine the reachability of dependencies in your project.
  • The static analysis time may vary depending on the number of dependencies in the package and the number of packages in the project.
  • If a package can not be successfully built in the source control repository, static analysis will fail.
  • Spring dependencies are analyzed based on spring public entry points to reduce the impact of Inversion of Control (IOC) frameworks. Dependencies and functions are identified as reachable and unreachable in the context of a spring version and its entry points.
  • Annotation processing is limited only to the usage of the code they annotate.
  • Static analysis of reflection and callbacks are not supported.
  • If Endor Labs fails to resolve dependencies using default Kotlin configurations, the Kotlin configuration must be specified.
  • Static analysis for Kotlin projects using Gradle is only supported when the Kotlin plugin for Gradle versions 1.5.30 to 1.9.x

Here are a few error scenarios that you can check for and attempt to resolve them.

  • Host system check failure errors:
    • Java is not installed or not present in the PATH environment variable. Install Java and try again. See Java documentation for more information.
    • For android applications, $ANDROID_HOME must be specified as an environment variable.
    • The installed version of Java is lower than the required version. Install JDK versions between 11-25.0.2 and try again.
    • Java is installed but Maven or Gradle is not installed. In such cases, the dependency resolution may not be complete.
  • Unresolved dependency errors: Maven is not installed properly or the system is unable to build root pom.xml. Run mvn dependency:tree in the root of the project and try again. In such cases, the dependency resolution may not be complete.
  • Resolved dependency errors: A version of a dependency does not exist or it cannot be found. It may have been removed from the repository.
  • Call graph errors:
    • If the project is not compiled, call graphs are not generated. Run gradlew compileKotlin or gradlew compileReleaseKotlin for android based projects before running the scan.
    • Sometimes, the project is not compiled, if a Kotlin version discrepancy exists between the required repository version and the version on the system running the scan. For example, the Kotlin required version is 1.4 but the system has lower version installed. Install the required version and try again.
  • If you have a private registry and internal dependencies on other projects, you must configure the credentials of the registry. See Configure Maven private registries.
  • If you use a remote repository configured to authenticate with a client-side certificate, you must add the certificate through an endorctl parameter. Export the ENDOR_SCAN_JVM_PARAMETERS parameter before performing a scan. See Maven documentation for details.
export ENDOR_SCAN_JVM_PARAMETERS="-Xmx16G,-Djavax.net.ssl.keyStorePassword=changeit,
-Djavax.net.ssl.keyStoreType=pkcs12,
-Djavax.net.ssl.keyStore=/Users/myuser/Documents/nexustls/client-cert1.p12"

Scala

Scala is a general-purpose and scalable programming language widely used by developers. Endor Labs supports the scanning and monitoring of Scala projects managed by either the interactive build tool sbt or Gradle.

Using Endor Labs, application security engineers and developers can:

  • Scan their software for potential security issues and violations of organizational policy.
  • Prioritize vulnerabilities in the context of their applications.
  • Understand the relationships between software components in their applications.

Make sure that your system has a minimum 8-core processor with 32 GB RAM to successfully scan Scala projects.

  • Install JDK versions between 11 and 25.0.2.
  • Make sure your repository includes one or more files with .scala or .sc extension.
  • Install sbt version 1.4 or higher if your project uses sbt.
    • For sbt versions lower than 1.4, install the sbt-dependency-graph plugin, which is included by default in sbt 1.4 and later.
    • Ensure that the project/build.properties file specifies the required sbt version.
  • Install Gradle build system version 6.0.0 and higher, if your project uses Gradle.
  • Your repository must include the appropriate build manifest file:
    • build.sbt for sbt projects.
    • build.gradle or build.gradle.kts for Gradle projects.

Before initiating a scan with Endor Labs, ensure that your Scala projects are built successfully. Additionally, ensure that the packages are downloaded into local package caches and build artifacts are present in their standard locations. Follow the guidelines to build projects using sbt or Gradle.

To analyze your software built with Gradle, you must successfully build the software. To perform a quick scan, locate the dependencies in the local package manager cache. Ensure that the standard $GRADLE_USER_HOME/caches or /User/<username>/.gradle/caches exists and contains successfully downloaded dependencies. To perform a deep scan, generate the target artifact on the file system as well.

To build your project with Gradle, use the following procedure:

  1. To run a scan against a custom configuration, specify the Gradle configuration by setting an environment variable.

       export endorGradleScalaConfiguration="<configuration>"
    

    When no configuration is provided, runtimeClasspath is used by default.

    If neither the user-specified nor the default configuration exists in the project, the system falls back to the following configurations, in order:

    1. runtimeClasspath
    2. runtime
    3. compileClasspath
    4. compile

    If the listed configurations are not found in the project, the system selects the first available configuration in alphabetical order.

  2. Ensure that you can resolve the dependencies for your project without errors by running the following command:

    For Gradle wrapper:

       ./gradlew dependencies
    

    For Gradle:

       gradle dependencies
    
  3. Run ./gradlew assemble or gradle assemble to resolve dependencies and to create an artifact that may be used for deep analysis.

In a multi-build project, if you set the environment variable endorGradleScalaConfiguration=[GlobalConfiguration], the specified configuration is used for dependency resolution across all projects and subprojects in the hierarchy below.

\--- Project ':samples'
     +--- Project ':samples:compare'
     +--- Project ':samples:crawler'
     +--- Project ':samples:guide'
     +--- Project ':samples:simple-client'
     +--- Project ':samples:slack'
     +--- Project ':samples:static-server'
     +--- Project ':samples:tlssurvey'
     \--- Project ':samples:unixdomainsockets'

To override the configuration only for the :samples:crawler and :samples:guide subprojects, follow these steps:

  1. Navigate to the root workspace, where you execute endorctl scan, and run ./gradlew projects to list all projects and their names.

  2. Run the following command at the root of the workspace:

    echo ":samples:crawler=testRuntimeClasspath,:samples:guide=macroBenchMarkClasspath" >> .endorproperties
    

    This creates a new file named .endorproperties in your root directory. This enables different configurations for the specified subprojects in the file.

  3. Run endorctl scan.

At this point, all other projects will adhere to the GlobalConfiguration. However, the :samples:crawler subproject will use the testRuntimeClasspath configuration, and the :samples:guide subproject will use the macroBenchMarkClasspath configuration.

Endor Labs supports fetching and scanning dependencies from private Gradle package registries. Endor Labs will fetch resources from authenticated endpoints and perform the scan, allowing you to view the resolved dependencies and findings. See Gradle package manager integrations for more information on configuring private registries.

To analyze your software built with sbt, you must successfully build the software.

  • The standard .sbt cache must exist and contain all required dependencies for both quick and deep scans.
  • For deep scans, the build artifact must exist on the filesystem.
  • Make sure sbt dependencyTree runs successfully inside the project directory.

Run a quick scan to rapidly assess your dependencies using only the compiled code and cached packages.

  1. Run the following commands to build the project successfully. Ensure your repository has a build.sbt file.

    sbt compile
    
    sbt projects
    
  2. Run an endorctl scan.

Run a deep scan to enable advanced static analysis features by generating packaged artifacts.

  1. Run the following commands to build the project successfully. Ensure your repository has a build.sbt file.

    sbt package
    
    sbt projects
    
  2. Run an endorctl scan.

Run an endorctl scan to get visibility into your software composition and resolve dependencies.

endorctl scan

You can perform the scan from within the root directory of the Git project repository and save the local results to a results.json file. The results and related analysis information are available on the Endor Labs user interface.

endorctl scan -o json | tee /path/to/results.json

Sign in to the Endor Labs user interface, click Projects on the left sidebar, and find your project to review its results.

Note
If your project includes both sbt and Gradle build systems, Endor Labs scans your project using only one build system to avoid scanning the same packages multiple times. When both are present, Gradle has higher priority for dependency resolution.

Endor Labs scans Scala projects by executing sbt plugins and inspecting the build.sbt file to retrieve information about direct and transitive dependencies.

  • The build.sbt file is a configuration file used in Scala projects with sbt to define project settings, dependencies, and build tasks. This file provides the necessary configuration and instructions to sbt on resolving and managing project dependencies.
  • The sbt dependency graph plugin visualizes the dependencies between modules in a Scala project.
  • For packages built using Gradle, it uses Gradle and Gradle wrapper files to build packages and resolve dependencies.
  • Endor Labs supports EAR, JAR, RAR, and WAR files.

Endor Labs analyzes information from both these methods to determine different components, binary files, manifest files, images, and more in the Scala codebase. It presents finding policy violations, identifies dependencies, and resolves them.

Using Endor Labs, users can gain significant insights into the structure and relationships of their Scala project’s dependencies. This aids in managing dependencies effectively, identifying potential issues, and ensuring a well-organized and maintainable codebase.

Endor Labs performs static analysis based on the following factors:

  • Call graphs are created for your package. These are then combined with the call graphs of the dependencies in your dependency tree to form a comprehensive call graph for the entire project.
  • Endor Labs performs an inside-out analysis of the software to determine the reachability of dependencies in your project.
  • The static analysis time may vary depending on the number of dependencies in the package and the number of packages in the project.

Endor Labs does not currently support software composition analysis for Scala on Microsoft Windows operating systems.

Here are a few error scenarios that you can check for and attempt to resolve them.

  • Host system check failure errors: These errors occur if:
    • sbt is not installed or present in the path variable. Install sbt 1.4 or higher versions and try again.
    • The sbt version mentioned in the project or the build.properties file is lower than 1.4 and the sbt-dependency-graph plug-in is not installed. Install the sbt-dependency-graph plug-in and try again.
    • Java is not installed or not present in the PATH environment variable. Install Java and try again. See Java documentation for more information.
    • The installed version of Java is lower than the required version. Install JDK versions between 11 and 25.0.2 and try again.
    • Java is installed but sbt or Gradle is not installed. In such cases, the dependency resolution may not be complete.
  • Dependency graph errors: Scala by default imports MiniDependencyTreePlugin, which is a mini version of the sbt-dependency-graph plugin and supports only the dependencyTree command. To get complete features of the sbt-dependency-graph plugin, add DependencyTreePlugin to your project/plugins.sbt file and run the scan again. See Scala documentation for details.

.NET

.NET is a free, cross-platform, open-source developer platform for building different types of applications. Endor Labs supports the scanning and monitoring of projects built on the .NET platform.

Using Endor Labs, application security engineers and developers can:

  • Scan their software for potential security issues and violations of organizational policy.
  • Prioritize vulnerabilities in the context of their applications.
  • Understand the relationships between software components in their applications.

Before you proceed to run a deep scan, ensure that your system meets the following specification.

Project Size Processor Memory
Small projects 4-core processor 16 GB
Mid-size projects 8-core processor 32 GB
Large projects 16-core processor 64 GB

The following prerequisites must be fulfilled:

  • Make sure your repository includes one or more files with .cs extension.
  • Dependency resolution and reachability analysis is supported only for SDK-style .NET projects.
  • One or more *.csproj files must be present in your repository.
  • The .NET command or NuGet command must be installed and available on the host system.
  • At least one .NET SDK installed on the system must be compatible with the project’s global.json file settings.
Note
To check your available SDK versions you can run the command dotnet --info or dotnet --list-sdks.

Use the following options to scan your repositories. Perform a scan after building the projects.

Perform a quick scan to get quick visibility into your software composition. This scan won’t perform reachability analysis to help you prioritize vulnerabilities.

You must restore your .NET projects before running a quick scan. Additionally, ensure that the packages are downloaded into the local package caches and that the build artifacts are present in the standard locations.

  1. Run the following commands to resolve dependencies and create the necessary files to scan your .NET project.

    To ensure that the build artifacts project.assets.json file is generated and dependencies are resolved run:

    dotnet restore
    

    If you use NuGet instead run:

    nuget restore
    

    To create a packages.lock.json file if your project uses a lock file run:

    dotnet restore --use-lock-file
    

    If project.assets.json or packages.lock.json are not present and if the project is buildable, endorctl will restore the project and create a project.assets.json or a packages.lock.json file to resolve dependencies.

  2. You can run a quick scan with the following commands:

    endorctl scan --quick-scan
    

    You can perform the scan from within the root directory of the Git project repository, and save the local results to a results.json file. The results and related analysis information are available on the Endor Labs user interface.

    endorctl scan --quick-scan -o json | tee /path/to/results.json
    

    You can sign in to the Endor Labs user interface and navigate to Projects from the left sidebar to review your project results.

Use the deep scan to perform dependency resolution, reachability analysis, and generate call graphs. You can do this after you complete the quick scan successfully.

You must restore and build your .NET projects before running a deep scan. Additionally, ensure that the packages are downloaded into the local package caches and that the build artifacts are present in the standard locations.

  1. Run the following commands to restore and build your project. This may vary depending on your project’s configuration.

    dotnet restore
    dotnet build
    
  2. You can run a deep scan with the following commands:

    endorctl scan
    

    Use the following flags to save the local results to a results.json file. The results and related analysis information are available on the Endor Labs user interface.

    endorctl scan -o json | tee /path/to/results.json
    

When a deep scan is performed all private software dependencies are completely analyzed by default if they have not been previously scanned. This is a one-time operation and will slow down initial scans, but won’t impact subsequent scans.

Organizations might not own some parts of the software internally and findings are actionable by another team. These organizations can choose to disable this analysis using the flag disable-private-package-analysis. By disabling private package analysis, teams can enhance scan performance but may lose insights into how applications interact with first-party libraries.

Use the following command flag to disable private package analysis:

endorctl scan --disable-private-package-analysis

You can sign into the Endor Labs user interface and select Projects from the left sidebar to review your project results.

Endor Labs supports fetching and scanning dependencies from private NuGet package registries. Endor Labs will fetch resources from authenticated endpoints and perform the scan, allowing you to view the resolved dependencies and findings. See NuGet package manager integrations for more information on configuring private registries.

A *.csproj file is an XML-based C# project file that contains information about the project, such as its source code files, references, build settings, and other configuration details. The dependencies and findings are listed individually for every .csproj file. The scan discovers all *.csproj files and uses these files to resolve the appropriate dependency graph of your project.

(Beta) Endor Labs scans the .NET projects that are using the Central Package Management feature of NuGet for the packages declared as:

  • Package references in Directory.Build.props or Directory.Packages.props files.
  • Package references in any *.props file and the prop file is imported in the .csproj file.
  • Package references in *.Targets file.
Note

You may not be able to view the Requested version of the packages on the Endor Labs user interface

  • For the packages declared as package version in *.Targets file.
  • If you are importing the packages into the *.csproj file using MSBuild keywords in the path variables.

Endor Labs enriches your dependency graph to help you understand if your dependencies are secure, sustainable, and trustworthy. This includes Endor Labs risk analysis and scores, if a dependency is direct or transitive, and if the source code of the dependency is publicly auditable.

Software composition analysis for .NET is performed in the following ways:

The project.assets.json file is used in .NET projects to store metadata and information about the project’s dependencies and assets.

Endor Labs fetches resolved package versions, paths to the dependencies’ assets, such as assemblies and resources, and other related information from this file. If a project does not include a project.assets.json file, it is generated through the dotnet restore or the nuget restore command. This command uses all the configured sources to restore dependencies as well as project-specific tools that are specified in the project file.

Note
If the host machine has .NET Core or .NET 5+ installed, the dotnet restore command is used to generate the project.assets.json file. The nuget restore command is used to generate the project.asssets.json file for earlier versions of the .NET frameworks.

The package.lock.json file is used in .NET projects to lock dependencies and their specific versions. It is a snapshot of the exact versions of packages installed in a project, including their dependencies and sub-dependencies, requested versions, resolved versions, and contenthash. The lock file provides a more dependable, uniform, and accurate representation of the dependency graph.

In Endor Labs’ dependency management, the resolution of dependencies is primarily based on package.lock.json, which takes precedence over projects.assets.json to resolve dependencies.

Endor Labs fetches the dependency information from package.lock.json and creates a comprehensive dependency graph. The vulnerabilities associated with the dependencies are listed on the Endor Labs’ user interface.

If the package.lock.json file is not present in the repository, Endor Labs triggers the restore process to generate the package.lock.json file and uses it to perform the dependency scans.

endorctl attempts to evaluate MSBuild property values when they are composed of variables, as long as the variables are defined within the same file for example, Directory.Build.props. This enables accurate resolution of package names and versions, even if they are not explicitly declared in the .csproj file.

For example, in a setup like

test.csproj

<Project Sdk="Microsoft.NET.Sdk">
  <PropertyGroup>
    <TargetFrameworks>net8</TargetFrameworks>
  </PropertyGroup>
  <ItemGroup>
    <PackageReference Include="Newtonsoft.Json" Version="13.0.3" />
  </ItemGroup>
</Project>

Directory.Build.props

<Project>
  <PropertyGroup>
    <CompanyName>via-build-prop</CompanyName>
    <AssemblyName>$(CompanyName).$(MSBuildProjectName)</AssemblyName>
  </PropertyGroup>
</Project>

When generating package names for .NET projects, the system evaluates the AssemblyName property defined in the project’s .props file. Instead of using a generic name like test, the system applies the evaluated value, for example, via-build-prop.test. This approach enables consistent and customizable package naming based on MSBuild properties.

Endor Labs performs static analysis on the C# code based on the following factors:

  • Call graphs are created for your package. These are then combined with the call graphs of the dependencies in your dependency tree to form a comprehensive call graph for the entire project.
  • Endor Labs looks for the project’s .dll files typically located within the bin directory.
  • Endor Labs performs an inside-out analysis of the software to determine the reachability of dependencies in your project.
  • The static analysis time may vary depending on the number of dependencies in the package and the number of packages in the project.
  • When using the GitHub app, either resolve all the private and internal dependencies, or Configure private NuGet package repositories before running a scan.
  • When working with old-style MSBuild projects, we recommend scanning them through Continuous Integration (CI) after building the project to ensure that the .NET build system generates the required obj/project.assets.json file. For monitoring scans, support for restoring dependencies in Windows projects is limited. This may lead to restore or build errors, potentially causing unexpected scan results.
  • You must install .NET 7.0.1 (SDK 7.0.101) or later on the host system.
  • The following .NET programming languages are not supported for dependency resolution or call graph generation:
    • Projects written in F#
    • Projects written in Visual Basic
  • Endor Labs’ call graph support for .NET is based on Microsoft’s Common Intermediate Language (CIL). Artifacts such as .exe or .dll files must be available in the project’s standard workspace through a build and restore or a restored cache.

Here are a few error scenarios that you can check for and attempt to resolve them.

  • Host system check failure errors: .NET or NuGet is not installed or not present in the PATH environment variable. Install NuGet and try again.
  • Unresolved dependency errors: This error occurs when the .csproj file can not be parsed or if it has syntax errors.

Swift/Objective-C

CocoaPods and SwiftPM are widely adopted package managers for Swift and Objective-C. CocoaPods simplifies integration via Podfile declarations and automated installation, while SwiftPM manages dependencies through the Package.swift manifest. Endor Labs supports both systems to help secure your applications.

Using Endor Labs, application security engineers and developers can:

  • Scan their software for potential security issues and violations of organizational policy.
  • Prioritize vulnerabilities in the context of their applications.
  • Understand the relationships between software components in their applications.

The following prerequisites must be fulfilled:

  • All applications monitored by Endor Labs must be on CocoaPods versions 0.9.0 or higher, or Swift Package Manager versions 5.0.0 or higher.
  • A Podfile and a Podfile.lock must be present in your CocoaPods project.
  • A Package.swift must be present in your SwiftPM project.
  • Make sure your repository includes one or more files with .swift, .h, or .m extension.
  • The Swift toolchain must be installed on the system running the scan for SwiftPM projects. To verify the installation, run the swift --version command.

If the Podfile.lock is not present in your repository, run the following command to create the Podfile.lock for your Podfile.

pod install

Perform a scan to get visibility into your software composition and resolve dependencies.

endorctl scan

You can perform the scan from within the root directory of the Git project repository, and save the local results to a results.json file. The results and related analysis information are available on the Endor Labs user interface.

endorctl scan -o json | tee /path/to/results.json

You can sign into the Endor Labs user interface, click the Projects on the left sidebar, and find your project to review its results.

Endor Labs looks for the Podfile and Podfile.lock files to discover the dependencies used by an application.

  • A Podfile is a configuration file used in CocoaPods projects to specify the required libraries or packages for the project’s dependencies.
  • A Podfile.lock file is a CocoaPods specification file used to define the metadata and dependencies.

To successfully discover Swift and Objective-C dependencies, both Podfile and Podfile.lock files must be present in your project for each Podfile.

Endor Labs scans SwiftPM projects by locating the Package.swift manifest file, which defines the Swift package’s dependencies, targets, and metadata. Version-specific manifest files using the format Package@swift-<version>.swift, for example Package@swift-5.7.swift, are also supported.

Endor Labs supports fetching and scanning dependencies from private Swift package registries. Endor Labs will fetch resources from authenticated endpoints and perform the scan, allowing you to view the resolved dependencies and findings. See Swift package manager integrations for more information on configuring private registries.

  • Call graphs are not supported for CocoaPods and SwiftPM projects.
  • If a Podfile.lock file is not present, Endor Labs will skip analyzing the project and present a warning that the package was skipped.

Ruby

Ruby is a widely used open-source programming language. Endor Labs supports scanning and monitoring of Ruby projects.

Using Endor Labs, application security engineers and developers can:

  • Scan their software for potential security issues and violations of organizational policy.
  • Prioritize vulnerabilities in the context of their applications.
  • Understand the relationships between software components in their applications.

The following prerequisites must be fulfilled:

  • All applications monitored by Endor Labs must be on Ruby versions 2.6 or higher.
  • A Gemfile or a *.gemspec file must be present in your Ruby project.
  • Make sure your repository includes one or more files with .rb extension.

You can choose to build your Ruby projects before running a scan. This will ensure that gemfile.lock is created.

Ensure your repository has Gemfile and run the following command making sure it builds the project successfully.

bundler install

If the project is not built, endorctl will build the project during the scan and generate Gemfile.lock. If the repository includes a Gemfile.lock, endorctl uses this file for dependency resolution and does not create it again.

Endor Labs supports fetching and scanning dependencies from private RubyGems package registries. Endor Labs will fetch resources from authenticated endpoints and perform the scan, allowing you to view the resolved dependencies and findings. See RubyGems package manager integrations for more information on configuring private registries.

Perform a scan to get visibility into your software composition and resolve dependencies.

endorctl scan

You can perform the scan from within the root directory of the Git project repository, and save the local results to a results.json file. The results and related analysis information are available on the Endor Labs user interface.

endorctl scan -o json | tee /path/to/results.json

You can sign in to the Endor Labs user interface, click the Projects on the left sidebar, and find your project to review its results. Refer to Endor Labs user interface for more details.

Endor Labs looks for Gemfile, *.gemspec, and Gemfile.lock files to find and monitor the dependency activity.

  • A Gemfile is a configuration file used in Ruby projects to specify the required RubyGems (libraries or packages) for the project’s dependencies.
  • A *.gemspec file is a RubyGems specification file used to define the metadata and dependencies for a RubyGem.
  • The Gemfile.lock file is automatically generated by Bundler. Refer to Bundler documentation for more information about getting started.

If the Gemfile.lock is not present in your project, Endor Labs generates this file and stores it in a temp directory. The file is deleted after extracting dependency information.

Endor Labs’ dependency resolution mechanism assesses multiple factors, including compatibility, stability, and availability, to determine the most suitable version for usage. The resolved dependency version is used during the build or execution of your Ruby project. By utilizing the dependency graph, you can access significant information regarding the dependencies. This includes determining whether a dependency is direct or transitive, checking its reachability, verifying source availability, and more. The dependency graph provides a visual representation that allows you to examine the graphical details of these dependencies.

  • Call graphs are not supported for Ruby projects.
  • If a dependency can not be resolved in the Gemfile, building that specific package may not be successful. This package may have been removed from the Gem package manager. Other packages in the workspace are scanned.
  • Unresolved dependency errors: The Gemfile is not buildable. Try running bundler install in the root project to debug this error.
  • Resolved dependency errors: A version of a dependency does not exist or it cannot be found. It may have been removed from the repository.

Rust

Rust is a software programming language widely used by developers. Endor Labs supports scanning and monitoring of Rust projects.

Using Endor Labs, application security engineers and developers can:

  • Scan their software for potential security issues and violations of organizational policy.
  • Prioritize vulnerabilities in the context of their applications.
  • Understand the relationships between software components in their applications.

Make sure that you have a minimum system requirement specification of an 8-core processor with 32 GB RAM.

Use a system equipped with either Mac OS X or Linux operating systems to perform the scans.

  • Make sure the following prerequisites are installed: - Package Manager Cargo - Any version - Rust - Any version,
  • Make sure your repository includes one or more files with .rs extension.
  • Install Rust using the latest rustup tool.

Ensure your repository has Cargo.toml file and run the following command making sure it builds the project successfully.

cargo build

If the project is not built, endorctl will build the project during the scan and generate the Cargo.lock file. If the repository includes a Cargo.lock file, endorctl uses this file for dependency resolution and does not create it again.

Perform a scan to get visibility into your software composition and resolve dependencies.

endorctl scan

You can perform the scan from within the root directory of the Git project repository, and save the local results to a results.json file. The results and related analysis information are available on the Endor Labs user interface.

endorctl scan -o json | tee /path/to/results.json

You can sign in to the Endor Labs user interface, click the Projects on the left sidebar, and find your project to review its results. Refer to Endor Labs user interface for more details.

Endor Labs resolves dependencies for the package version when it scans Rust projects.

Endor Labs leverages the Cargo.toml file in Rust and uses this file to build the package version using cargo. Endor Labs uses the output from cargo metadata to resolve dependencies specified in Cargo.toml files and construct the dependency graph.

  • Call graphs are not supported for Rust projects.
  • Performing Endor Labs scans on the Microsoft Windows operating system is currently unsupported.
  • Host system check failure errors: These errors occur when Rust is not installed or not present in the path variable. Install Rust and try again.

Scan artifacts and binaries

You can now perform endorctl scan on your binaries and artifacts without requiring access to source code or build systems. Scan Java and Python packages that are pre-built, bundled, or downloaded into your local system by specifying a file path to your artifact or binary package.

Endor Labs scans the specified package, producing vital scan artifacts such as details about resolved dependencies and transitive dependencies, along with comprehensive call graphs. It enables you to acquire valuable insights and improve the security and reliability of the software components.

Before you proceed to run a deep scan, ensure that your system meets the following specification.

Project Size Processor Memory
Small projects 4-core processor 16 GB
Mid-size projects 8-core processor 32 GB
Large projects 16-core processor 64 GB
Language Package file formats
Java JAR, WAR, EAR, .zip, tar.gz, and tar
Python EGG(tar.gz) and Wheel(.whl)

When scanning archive formats such as .zip, tar, and .tar.gz, we support embedded package formats including .jar, .ear, .war, and .whl. We also support .tar.gz archives that contain Python package metadata such as egg-info.

You can scan JAR, WAR, and EAR package file formats built using Maven or Gradle with a pom.xml configuration file. To scan packages without a pom.xml configuration, see Scan Java packages without pom.xml.

If you have a private registry and internal dependencies on other projects, you must configure private registries for the Python and Java projects. See Configure package manager integrations for more information.

Use --package as an argument to scan artifacts or binaries. You must provide the path of your file using --path and specify a name for your project using --project-name.

endorctl scan --package --path --project-name

Use the following options to scan your repositories.

Perform a quick scan of the local packages to get quick visibility into your software composition. This scan won’t perform reachability analysis to help you prioritize vulnerabilities.

Syntax:

endorctl scan --quick-scan --package --path=<<specify-the-path-of-your-file>> --project-name=<<specify-a-name-for-the-project>>

Example:

endorctl scan --quick-scan --package --path=/Users/username/packages/logback-classic-1.4.10.jar --project-name=package-scan-for-java

Use the deep scan to perform dependency resolution, reachability analysis, and generate call graphs. You can do this after you complete the quick scan successfully.

Syntax:

endorctl scan --package --path=<<specify-the-path-of-your-file>> --project-name=<<specify-a-name-for-the-project>>

Example:

endorctl scan --package --path=/Users/username/packages/logback-classic-1.4.10.jar --project-name=java-package-scan

You can sign into the Endor Labs user interface, click the Projects on the left sidebar, and find your project using the name you entered to review its results.

You can view the list of projects created for scanning packages using the parameter Project Platform Source matches PLATFORM_SOURCE_BINARY to search on Projects.

package scan search results

Approximate scans

Endor Labs performs an approximate scan in situations where dependency resolution is impossible. This can happen due to build errors or incomplete dependency information. In such cases, an approximate scan estimates dependencies based on the available, unresolved dependency data.

Since an approximate scan relies on unresolved dependency information, it is not as accurate as a scan based on resolved dependency information. However, an approximate scan can still provide valuable insights and help you identify potential issues.

The approximate scan looks at the unresolved dependency data and estimates the resolved version based on the information available.

For example, if the version is pinned then the approximate scan uses that version. If the version is not specified, then it uses the latest version. The scan generates the findings based on these approximations.

False positives can occur if the actual resolved version is different from the approximated version, or if the same dependency is included in multiple places.

Warning

Endor Labs automatically performs an approximate scan if full dependency resolution fails. You cannot disable approximate scans, and you cannot initiate an approximate scan manually.

Review the scan logs to identify the root cause of the dependency resolution failures that resulted in the approximate scan. See Scan history for more information on investigating previous scans and dependency resolution errors.

If you know the approximate scan is inaccurate and want to ignore the findings, add an exception policy.

See create an exception policy from a template for details on how to create an exception policy.

When you create the exception policy, choose the following options:

  • Select Custom as the policy template when you Define Exception Criteria.
  • Select Yes for the Approximate Dependency option.

You can refine the exception policy by adding more criteria like Source Code Ecosystem and Dependency Scope. See exception policy templates for more information on the fields you can use to refine the exception policy. Alternatively, you can create your own exception policy from scratch.

SAST (Static Application Security Testing)

Static Application Security Testing (SAST) is an automated security analysis methodology that examines application code to identify potential security vulnerabilities.

SAST has the following characteristics:

  • White-box Testing: Provides full visibility into application internals
  • Non-runtime Analysis: Performs scans without code execution
  • Early Detection: Identifies vulnerabilities during development phases
  • Language Support: Analyzes multiple programming languages and frameworks

Endor Labs integrates Opengrep to provide SAST scan with endorctl.

Endor Labs enhances SAST scanning with AI analysis that evaluates each finding to determine whether it represents a genuine security vulnerability or a false positive. This automated classification streamlines your security workflow by eliminating the need for manual triage of every alert, allowing your team to prioritize and address real threats more efficiently. See AI analysis with SAST scan for more information.

Opengrep is an open-source, static analysis tool that finds bugs and vulnerabilities in the source code using pattern matching. Opengrep parses the source code, applies pattern matching based on rules, and reports matches based on the rule specifications. Opengrep rules are in the yaml format.

When you run a SAST scan, Endor Labs downloads Opengrep and works seamlessly. If you wish, you can use Semgrep instead of Opengrep with Endor Labs.

Warning
If you use Semgrep with Endor Labs, SAST scan is supported on macOS and Linux, and not supported on Windows.

Endor Labs includes a set of curated rules. You can create your own rules or import rules with the rule designer.

Note
Enable the default SAST finding policies to generate findings from SAST scans.

When you scan with the SAST option enabled, Endor Labs uses Opengrep to scan for weaknesses in your source code based on the enabled rules and generates results based on the configured finding policies.

Tip
Endor Labs does not scan the files included in the .gitignore files during SAST scan. You can also use the nosemgrep annotation in the code to skip SAST scan. Refer to the Semgrep Documentation for more information.

Login to Endor Labs to view the findings of a SAST scan. See SAST Findings for more information.

You can create exception policies to exclude results from the findings page. See create exception policy for more information.

You can create a finding policy using predefined templates to control which SAST results appear as findings. See SAST policies for more information.

Endor Labs determines the severity of findings by combining two factors from the SAST rule: impact and confidence. Impact measures the potential consequences if a security issue were to be exploited. Confidence represents how certain the system is that a detected pattern indicates a genuine security issue rather than a false positive.

The following matrix shows how Endor Labs resolves severity by combining impact and confidence.

High Impact Medium High Critical
Medium Impact Low Medium High
Low Impact Low Low Medium
Low Confidence Medium Confidence High Confidence

Endor Labs supports single-function analysis for the following languages through curated rules and custom user rules:

- Apex
- Bash
- C
- Cairo
- Circom
- Clojure
- C++
- C#
- Dart
- Dockerfile
- Elixir
- Generic
- Go
- Hack
- HTML
- Java
- JavaScript
- JSON
- Jsonnet
- Julia
- Kotlin
- Lisp
- Lua
- Move
- OCaml
- PHP
- PromQL
- Protobuf
- Python
- QL
- R
- Regex
- Ruby
- Rust
- Scala
- Scheme
- Solidity
- Swift
- Terraform
- TypeScript
- XML
- YAML

Endor Labs offers several ways to run SAST scans based on your project setup.

  1. AI-analyzed SAST scan with endorctl
  2. SAST scan in monitoring scans
  3. SAST scan in Endor Labs GitHub Action

You can run AI-analyzed SAST scans using endorctl by adding the --ai-sast-analysis=agent-fallback flag to your scan command. The AI agent automatically classifies findings as true positives or false positives, reducing manual triage effort. See Run a SAST scan for more information.

You can enable SAST scans when you configure monitoring or supervisory scans using the Endor Labs GitHub App, Azure DevOps App, Bitbucket App, and GitLab App. See SCM Integrations for more information. To disable the storage of code snippet in SAST scans for monitoring scans, you need to create a scan profile for your monitoring scan with disable code snippet storage as enabled. This setting applies to all scans that you use this scan profile, not just the monitoring scans.

You can also enable SAST scan in the Endor Labs GitHub Action. Set the scanning parameter, scan_sast as true. To disable code snippet storage for SAST scans, set disable_code_snippet_storage as true. See Scan with GitHub Actions for more information.

You can use the --pr-incremental flag to perform an incremental scan on your pull requests or merge requests for SAST. In monitoring scans, incremental scans are done by default for PR scans. Endor Labs only scans the files that have changed since the last scan on the baseline branch. Endor Labs computes a diff between the target branch and the baseline branch to identify the changed files. Any modified file is sent through Opengrep to fully scan for SAST issues, and unchanged files are skipped. Endor Labs does not perform chunk-level or line-level code diff analysis for SAST. If there are more than 1000 modified files, Endor Labs performs a complete scan.

SAST Rules

Endor Labs uses Semgrep-compatible rules for SAST scans. Endor Labs includes hundreds of rules for various languages, including rules created by Endor Labs and vetted third-party rules. To this end, Endor Labs reviews existing open source rules and complements them with Endor Labs rules to cover additional technologies or vulnerability types.

You can edit existing rules in your tenant to make modifications specific to your environment. You can also create new custom rules with the rule designer based on your requirements. You can also use the rule designer to add any Semgrep rule as a custom rule.

From the left sidebar, navigate to Policies & Rules and select SAST RULES to view all SAST rules in the system.

SAST rules

You can use the toggle against a rule to enable or disable the rule during the scan.

You can search for rules based on various parameters like rule name, languages, CWE, and tags.

You can create SAST rules in your tenants, and can edit, delete, or propagate them to child namespaces. But you cannot edit rules that are marked as Endor Labs or 3rd Party. You can choose to disable the rule to not apply them during scanning or clone them to modify the rules.

The following sections provide more information on the actions you can do with SAST rules.

Run a SAST scan

Run a SAST scan with endorctl to identify security vulnerabilities and code quality issues in your source code.

Ensure that you install endorctl and configure your environment to run Endor Labs scan before you proceed to do a SAST scan.

You can run a SAST scan on a project with endorctl using the following command.

endorctl scan --sast --path=/path/to/code -n <namespace>

To view the findings generated by this scan in Endor Labs, see view SAST findings.

Endor Labs uses AI Agent analysis to perform intelligent triage of SAST findings when you run a scan. The AI agent leverages a large language model (LLM) to examine code context, trace data flows, and evaluate security controls, automatically classifying each finding as either a True Positive, indicating a genuine security vulnerability, or a False Positive. This automated classification eliminates the need for manual review of every alert, allowing you to focus on addressing real security threats.

AI analysis does not process findings from test files such as unit tests and integration tests, or findings with low severity ratings. See AI triage behaviour for more information.

License requirement
AI SAST analysis features require a Code Pro license. A standard Code license covers basic SAST scanning, but AI analysis capabilities require Code Pro.

The AI analysis process uses a large language model (LLM) to systematically evaluate each finding through the following steps:

  1. Identify SAST rule match location - The LLM locates the exact code line where the SAST rule was triggered and examines the matching code patterns.

  2. Trace data flow from source to sink - The LLM follows the data flow from where it enters the application to where it is used in potentially vulnerable code to determine if user-controlled input reaches vulnerable paths.

  3. Examine function calls and security controls - The LLM reviews function calls in the data flow path, including sanitizers, validators, and other security controls that may mitigate risks.

  4. Analyze function context and application usage - The LLM understands the purpose of functions involved in the rule match, how they are used in the application, and the application context such as web application, test file, or code example.

  5. Classify findings as true or false positive - The LLM evaluates all gathered information including whether inputs are user-controlled or hard-coded, presence of sanitization functions, application context, and existing security controls to classify the finding as a true positive or false positive.

AI analysis processes only new findings and existing un-analyzed findings. If some findings are not analyzed in one run, they will be analyzed in the next scan. The analysis process runs for up to 30 minutes by default.

To modify the analysis timeout duration, set the following environment variable:

export ENDOR_SCAN_AI_SAST_ANALYSIS_TIMEOUT=10m

You can run an AI-analyzed SAST scan on a project with endorctl using the following command.

endorctl scan --sast --path=/path/to/code -n <namespace> --ai-sast-analysis=agent-fallback

AI analysis starts with the fast agent mode, but automatically falls back to deep analysis mode when a true positive is detected. This provides a balance between speed and accuracy by using detailed analysis only when needed.

To view the findings generated by this scan in Endor Labs, see AI-analyzed SAST findings.

You can control which findings are analyzed by AI triage and manage re-analysis behavior. When running AI-analyzed SAST scans, use the --ai-sast-rescan option to ensure all findings are analyzed. This option removes all existing AI analyses and re-analyzes all findings from scratch. Without this option, SAST findings that have already undergone AI triage are skipped during subsequent scans.

endorctl scan --sast --path=/path/to/code -n <namespace> --ai-sast-analysis=agent-fallback --ai-sast-rescan

The following types of findings are automatically excluded from AI triage. To include them, set the corresponding environment variable to false:

Finding Type Environment Variable
Test file findings ENDOR_SAST_IGNORE_TEST_TRIAGE
Low severity findings ENDOR_SAST_IGNORE_LOW_SEV_TRIAGE
Low confidence rule findings ENDOR_SAST_IGNORE_LOW_CONF_RULE

You can use AI Analysis Status criteria in finding policies to filter findings by their such as true positives, false positives, or both, in your findings view. Similarly, action policies can trigger actions based on AI classification, such as send notifications only for true positives.

You can run the endorctl scan --sast command with the following options.

Option Description
-n, --namespace Namespace of the project with which you are working. Mandatory.
--include-path Limit the scan to the specified file paths or directories using Glob style expressions. For example, --include-path="src/java/**”, scans all the files under src/java, including any subdirectories, while --include-path="src/java/*”, only includes the files directly under src/java. Paths must be relative to the root of the repository. Use quotes to ensure that your shell does not expand wildcards.
--exclude-path Specify one or more file paths or directories using Glob style expressions. For example, --include-path="src/java/**”, scans all the files under src/java, including any subdirectories, while --include-path="src/java/*”, only includes the files directly under src/java. Paths must be relative to the root of the repository. Use quotes to ensure that your shell does not expand wildcards.
--disable-code-snippet-storage Specify the flag to disable storing the code snippet that violates the SAST policy.
--path The path to issue the scan.
--ai-sast-analysis=agent-fallback Enable AI agent to identify and classify false positives in SAST findings. The agent-fallback mode starts with fast analysis and automatically falls back to deep analysis when needed.
--ai-sast-rescan Remove all existing AI analyses and re-analyze all findings from scratch, including those that have already undergone AI triage.

Create Exception Policy for SAST Findings

Exception policies define the conditions for applying an exception to a finding. When an exception is applied to a finding, it is tracked as an exception and action policies do not apply to it. Findings with exceptions are filtered out from Endor Labs reports by default.

See Exception Policies for more information.

Instead of creating an exception policy, you can also use the following methods to avoid findings:

  • Disable the rule under SAST Rules
  • Use the include-path and exclude-path to scan parts of the project

You can create an exception policy so that you can mark a SAST finding as an exception.

For example, you want to mark findings with the description, Detected Potential Open Redirect Vulnerability in Angular Application, as exceptions.

  1. Select Policies & Rules from the left sidebar.

  2. Select EXCEPTION POLICIES.

  3. Click Create Exception Policy to create a new exception policy.

  4. Select Standard Exception Find Attributes as the POLICY TEMPLATE.

  5. Enter Detected Potential Open Redirect Vulnerability in Angular Application in Finding Name Contains.

  6. Select from the following reasons why you are applying this exception:

    • In Triage: The finding is still being triaged for more information.
    • False Positive: The finding is a false positive.
    • Risk Accepted: The risk associated with the finding is accepted.
    • Other: Another reason applies for this exception.
  7. Select when the exception should expire.

    Options include 30, 60, 90 days, and Never.

  8. Assign Scope for which this exception policy should apply. Scopes are defined by the tags assigned to a project.

    • In Inclusions, enter the tags of the projects that you want to apply an exception to.
    • In Exclusions, enter the tags of the projects that you do not want to apply an exception to. Exclusions take precedence over the inclusions, in case of a conflict.
    • Click the link to view the projects included in the finding policy.

    See Tagging projects for more information about creating project tags.

  9. Enter a human-readable Name for your exception policy.

  10. Enter a Description for your exception policy that explains its function.

  11. Enter any Policy Tags that you want to associate with your policy. Tags can have a maximum of 63 characters and can contain letters, numbers, and characters = @ _ -

  12. Click Create Exception Policy.

You can also create exceptions directly from a finding.

  1. Select Projects from the left sidebar.
  2. Search for and select a project, and select Findings.
  3. Search for findings using advanced or basic filters.
  4. Select findings and click the vertical three dots.
  5. Select Add Exception Policy.
  6. Select a template or create the policy from scratch. The template parameters are automatically pre-filled based on the selected finding.
  7. Click Create Exception Policy.

Use this feature to specifically apply exception to findings with a specific hash value. For example, Detected Potential time of check time of use vulnerability (open/fopen): ID #e81f27. This exception policy after creation only applies to the SAST findings with this hash ID and not any others.

View SAST Findings

You can view SAST findings in the Findings page.

  1. Select Findings from the left sidebar.

  2. Select SAST under First Party Code.

    View SAST findings

  3. You can use the filters to further refine the SAST findings.

  4. Select a row to view finding details.

    View SAST finding details
  5. Select Rule to view the rule that triggered the finding.

    View SAST finding rules

  6. To export findings as a CSV file, select the findings, click the vertical three dots, and select Export Selected or Export All. See export findings to learn more.

    SAST finding export

When you run a SAST scan with --ai-sast-analysis=agent-fallback, an AI agent analyzes the findings to determine if they are true security issues or false positives. The AI agent automatically tags verified true positives with True Positive and false positives with False Positive for easy filtering.

To view AI-analyzed SAST findings:

  1. Select Findings from the left sidebar.

  2. Select SAST under First Party Code.

  3. Use the Attributes filter and select True Positive or False Positive to filter out whatever you want.

  4. Select a finding to view the details.

    • AI Analysis: Indicates the AI agent’s classification and analysis of the finding.
      • Classification: Specifies if the finding is categorized as a true positive or false positive, including the associated confidence level.
      • Analysis Summary: A brief explanation of the security issue identified, including why the finding was triggered and what type of vulnerability it represents.
      • Security Impact: The risk level and potential consequences if the vulnerability is exploited.
      • Technical Details: Technical explanation of how the vulnerability can be exploited, including the source and sink points in the code.
      • Data Flow Analysis: Traces how untrusted data flows through your code from input to the vulnerable point.
      • Security Controls: Displays what security protections exist or are missing in the code.
      • Risk Assessment: Detailed reasoning for why the finding is classified as a true positive or false positive, with supporting evidence.
      • AI Remediation: Suggested code fix to address the vulnerability.
    • Info, Rule, Explanation, and Metadata: Displays the underlying SAST rule information, detailed explanations of the security issue, remediation guidance, and metadata such as CWE classifications and security tags.
      • Info: Contains key metadata for the finding, including confidence, impact, first detected time, project, and rule ID.
      • Rule: The specific SAST rule that detected the finding, including rule description and code examples.
      • Explanation: Analysis summary, security impact, and technical details about why this is a SAST finding.
      • Remediation: General remediation guidance for addressing this type of vulnerability.
      • References: Links to relevant security references such as CWE definitions.
      • Metadata: Contains classification details such as the CWE ID, affected languages, security tags applied to the finding, and detected rule version.

    AI analysis SAST finding

Secrets Detection

Secrets are access credentials that provide access to key resources and services, such as passwords, API keys, and personal access tokens. Attackers can target vulnerabilities in places where secret information is readily accessible to many users, with the goal of gaining unauthorized entry to the services that these secrets unlock.

The exploitation of secrets can lead to various detrimental outcomes, including:

  • Data breaches through the theft of stolen secrets and credentials.
  • Unauthorized access to data and resources.
  • Financial losses due to fraudulent activities.
  • Privacy violations due to compromised credentials.
  • Legal implications and regulatory consequences.

Secret scanning helps organizations proactively identify and remediate potential security threats before they can be exploited. It is important to scan for secrets in code as developers can sometimes hard-code sensitive data such as personal access tokens or API keys directly into the code.

  • Secret Rules: Create and manage secret rules to scan and detect secrets.
  • Scan for Secrets: Scan your codebase for secrets.
  • View secret findings: View your findings after running a secrets scan.

Endor Labs scans your source code repositories for secrets so that your teams can proactively manage the potential exposure of secrets to a broader audience than their intended recipients.

Users can:

  • View findings for secrets exposed in the code and take corrective action.
  • Detect valid secrets in their code repositories so that teams can take immediate corrective action.
  • Perform regular scans to audit and get visibility into secrets that may represent security exposures in their environment.
  • Detect and view invalid secrets as a proactive security approach to audit your codebase and segregate findings that you do not need to focus on.
  • Use Git pre-commit hooks to detect secrets before being committed.

Duplicate secrets increase the attack surface and the risk of unauthorized access. Managing multiple duplicate secrets can be complex and error-prone. Endor Labs intelligently categorizes instances of identical secrets found within your application components and repositories, helping an organization achieve:

  • Efficient prioritization: Simplifies the prioritization of widely dispersed secrets, as more occurrences signify increased exposure and risk.
  • Comprehensive visibility: Ensures that you have a comprehensive view of all instances associated with a specific secret, facilitating effective management when the secret is discovered or undergoes changes.
  • Optimize issue handling: Generate a single finding for multiple secrets with details, simplifying the task of managing and addressing multiple secret-related issues simultaneously.

Manage secret rules

You can use the following rules to scan your codebase and detect secrets:

  • System rules: Endor Labs provides out-of-the-box rules for secret patterns for many public services like GitHub, GitLab, AWS, Bitbucket, Dropbox, and more.

  • Custom rules: If you are using a service that is not included in the out-of-the-box list of secret patterns provided by Endor Labs, you can build your own custom rule to scan and detect the secrets for any service.

The following table lists the most important fields of the rule definition.

Field name Description
meta.name The name of the rule.
spec.rule_id The rule identifier must be unique across all rules, both the system and the ones created in your namespace.
spec.regex The secret detection rule contains the pattern that the scanner will try to match.
spec.keywords The keywords are used for an initial check of a pattern before the full regex expression gets evaluated.
spec.validation The details about how to validate a secret.
spec.entropy The minimum Shannon entropy a regex group must have to be considered.
spec.disabled Set to false for system rules.
  1. Select Policies & Rules from the left sidebar.

  2. Select Secret Rules.

  3. Click Create Secret Rules.

    Create secret rules

  4. Enter the unique Rule Identifier and Rule Name.

  5. Enter the Description of the secret rule.

  6. Enter the regex for the secret rule in Detection Rule.

  7. Enter keywords for pre-regex check filtering as comma separated values in Keywords.

  8. Optionally, enter the minimum Shannon entropy a regex group must have to be considered in Entropy.

  9. Optionally, add validation details to validate the secret:

    • Validation URL: Enter the URL for validation.
    • Validation Method: Choose between GET and POST methods.
    • Success Response Codes: Enter valid response codes (For example, 200 for HTTP Status OK)
    • Failure Response Codes: Enter invalid response codes (For example, 401 for HTTP Status Unauthorized)
    • Authorization Details: You can choose between Authorization Header, Bearer Token, and Basic Authentication.
  10. Select Propagate this rule to all child namespaces to apply the secret rule to all child namespaces.

  11. Click Add Rule.

For example, consider a token “demo_value123” can be described using a regular expression. Here is an example of the rule specification:

"meta": {
    "name": "Demo Token"
},
"spec": {
    "disabled": false,
    "keywords": [
        "demo_"
    ],
    "regex": "demo_[0-9a-zA-Z]{20}",
    "rule_id": "demo-rule"
}

Use the following command from the CLI to create this custom rule.

$ endorctl api create -r SecretRule -n demo  \
> --data '{
> "meta": {
>     "name": "Demo Token"
> },
> "spec": {
>     "disabled": false,
>     "keywords": [
>         "demo_"
>     ],
>     "regex": "demo_[0-9a-zA-Z]{20}",
>     "rule_id": "demo-rule"
> }
> }'
INFO: Initiating host-check ...
INFO: Host-check complete
{
  "meta": {
    "create_time": "2023-09-27T17:08:18.436936Z",
    "kind": "SecretRule",
    "name": "Demo Token",
    "update_time": "2023-09-27T17:08:18.436936Z",
    "upsert_time": "2023-09-27T17:08:18.436936Z",
    "version": "v1"
  },
  "spec": {
    "disabled": false,
    "keywords": [
      "demo_"
    ],
    "regex": "demo_[0-9a-zA-Z]{20}",
    "rule_id": "demo-rule"
  },
  "tenant_meta": {
    "namespace": "demo"
  },
  "uuid": "65146182aaeeffbaf5b6b553"
}

After the rule is created, the system uses this rule to detect this category of secrets.

If you can validate the secret using an HTTP request, then you can also add validation to this rule. See the following example for creating a validation rule for a demo_test123 token.

curl -H "Authorization: Bearer "demo_test123" https://api.testserver.com/user

Then the validation specification can be:

"validation": {
    "name": "Demo secrets validator",
    "http_request": {
        "header": [
            {
                "key": "Bearer",
                "value": "{{.AuthzValue}}",
                "authz": true
            }
        ],
        "method": "GET",
        "uri": "https://api.testserver.com/user"
    },
    "http_response": {
        "failed_auth_codes": [
            401
        ],
        "successful_auth_codes": [
            200
        ]
    }
}

You can use a validator to check if a discovered secret is valid or not. The Endor Labs system rules for secrets include the necessary validator. When you validate a secret, the finding for that secret is categorized as critical, ensuring it receives higher priority compared to others.

When defining a custom rule, you can add your own validator from the command line or from the user interface. The system uses this information to send an HTTP request such as a GET or POST to the address specified by the public service for the detected secret.

For example, when a GitHub Personal Access Token named “ghp_endor123” is detected, the system sends the following HTTP request to GitHub’s address:

curl -H "Authorization: Token "ghp_endor123" https://api.github.com/user

The authentication codes defined by the service are used to mark the secrets as valid or invalid.

The validation portion of the secret rule contains the following fields:

Field Description
name The name of the validator
http_request.uri The address where the HTTP request should be sent
http_request.method The HTTP method to be used (GET or POST)
http_request.header.(key, val) A set of key/value pairs that are added to the HTTP header. See HTTP Request Header
http_response.successful_auth_codes The set of HTTP response codes that should be used to tag a secret as valid. For example, http.StatusOK (200)
http_response.failed_auth_codes The set of HTTP response codes that should be used to tag a secret as invalid. For example, http.StatusUnauthorized (401)

HTTP request header is a set of key-value pairs that should be added to the header.

{
    "key": "Content-Type",
    "value": "application/json"
}

There are cases where one needs to use a value on runtime and substitute a pattern. For example, the secret itself that needs to be substituted is one such case. This is achieved by declaring a value using the {{.Value}} pattern.

For the HTTP header section that includes the secret, the block looks like the following snippet.

{
    "key": "Token",
    "value": "{{.AuthzValue}}",
    "authz": true,
}

In this case, the scanner replaces the candidate secret that was detected and adds it to the HTTP request header in place of {{.AuthzValue}}.

The following table describes a special case where the key-value pair is marked with the authz flag and is used to craft the “Authorization” part of the header, where three options are supported.

Key Header
Basic ‘Authorization: Basic "hash{{.AuthzValue}}"’
Bearer ‘Authorization: Bearer {{.AuthzValue}}
Token ‘Authorization: Token {{.AuthzValue}}
  1. Select Policies & Rules from the left sidebar.

  2. Select Secret Rules.

    The list of all secret rules appears. Secret rules

  3. Select the rule for which you want to view the details.

    The rule details appear in the right sidebar.

    Secret rule details

Click the three vertical dots on the right side of the rule and select Clone Rule.

The cloned rule appears in the list of secret rules and you can edit it.

Click the three vertical dots on the right side of the rule and select Edit Rule.

You can only edit the custom rules that you created or the system rules that you cloned.

To fetch the Endor Labs secret scanning rules from the command line type the following commands:

endorctl api list -r SecretRule -n <your-namespace>

For example, to see the rule for the GitHub Personal Access Token, you could search by the name GitHub Personal Access Token or by the rule-id github-pat:

endorctl api get -r SecretRule -n <your-namespace> --name "GitHub Personal Access Token"
endorctl api list -r SecretRule -n <your-namespace> --filter=spec.rule_id==github-pat

Scan for secrets

Run endorctl scan --secrets to scan for leaked secrets in your source code. You can also scan for secrets with monitoring scans and CI scans. Ensure that you select Secrets as a scan type when you install the Endor Labs App for your SCM to scan for secrets during monitoring scans.

The following table lists the options available with endorctl for secrets scan.

Flag Environment Variable Description
secrets ENDOR_SCAN_SECRETS Scan source code repository and generate findings for leaked secrets. See also --git-logs, --dependencies, and --pre-commit-checks.
dependencies ENDOR_SCAN_DEPENDENCIES Use the --dependencies option in secrets scan to perform a regular scan that detects potential secrets in the dependencies.
force-rescan ENDOR_SCAN_FORCE_RESCAN Force a full rescan of the historical Git logs for all branches in the repository. Must be used together with --secrets.
git-logs ENDOR_SCAN_GIT_LOGS Audit the historical Git logs of the repository for all branches in the repository. Must be used together with --secrets.
local ENDOR_SCAN_LOCAL Scan the local filesystem. Must be used together with --secrets.
start-commit ENDOR_SCAN_START_COMMIT The start commit of the Git logs of the repository to start scanning from. Must be used together with --secrets and --end-commit.
end-commit ENDOR_SCAN_END_COMMIT The end commit of the Git logs of the repository to end scanning at. Must be used together with --secrets and --start-commit.
pre-commit-checks ENDOR_SCAN_PRE_COMMIT_CHECKS Perform Git pre-commit checks on the changeset about to be committed. Must be used together with --secrets.

You can perform the following types of scans to detect secrets:

  • Scan a specific code reference - Scan for secrets only on a defined path in the context of a checked-out branch, commit SHA or tag to identify secrets and raise findings. This helps you to identify secrets that are leaked in the context of what you are working on right now.

  • Scan complete history - Scan for secrets in all existing branches or tags to identify if a secret has ever been leaked in the history of the project and raise findings. This helps you to identify if any secret has ever been leaked even if it was not leaked in the context of what you are working on right now.

  • Scan pre-commits - Scan for secrets in the code before committing the code to your repository during the automated pre-commit checks. This helps you identify and remove sensitive information from your code files early in the development life cycle.

When starting a secrets scan, this default choice utilizes specified rules to search for patterns on the files located in the path where the scan is initiated.

Run the following command in the directory of the code reference to scan for secrets.

endorctl scan --secrets

Specify the --dependencies option in the secrets scan to perform a regular scan that also scans the dependencies.

endorctl scan --secrets --dependencies

You can scan the Git logs by using the complete history scan. The repository should be present in the scanned path. Endor Labs examines the entire repository history to search for secrets.

To perform a complete scan, include the --git-logs option in the command line.

endorctl scan --secrets --git-logs

Include the --dependencies option in the secrets scan to perform a regular dependency scan along with secret scanning.

endorctl scan --secrets --git-logs --dependencies

The --git-logs option scans the repository’s Git logs using the following logic:

  • Perform a full scan if it is the first time the repository’s Git log history is scanned.
  • Perform a full rescan if a change has been detected to any of the rules in the namespace.
  • Perform an incremental scan based on the last time a scan was performed in all the other cases.

Run the following command to force a full rescan if any of the detected secrets are no longer valid, and you want to accurately reflect the state of the secrets.

endorctl scan --secrets --force-rescan

Specify the --dependencies option in the secrets scan to perform a regular scan that also scans the dependencies.

endorctl scan --secrets --force-rescan --dependencies

You can check for secrets before committing the code to the repository as part of pre-commit hooks.

You must install and initialize endorctl before scanning the pre-commits.

  1. Create a .git/hooks/pre-commit file at the root of your Git repository to configure the pre-commit hook. It runs automatically when you make a commit and looks for secrets in your commit.

    cd .git/hooks
    touch pre-commit
    
  2. Edit the .git/hooks/pre-commit and include:

    #!/bin/bash
    #
    # Script invoked on git commit.
    #
    if ! endorctl scan --pre-commit-checks --secrets; then
       echo "Pre-commit checks failed"
       exit 1
    fi
    echo "No secrets found: Pre-commit checks succeeded"
    

    --pre-commit-checks performs a pre-commit scan and will scan only the current changes that you are committing to the repository.

  3. Set the file permissions to make it executable.

    chmod +x .git/hooks/pre-commit
    
Note
You can’t push the .git/hooks/ folder to the Git repository because it’s only recognized locally on your system. To include the pre-commit code in the Git repository, save it in a different location, like a hooks/ directory, and then copy it into .git/hooks/. This way, you can easily push the hook code to your Git repository.
  1. You can set up this hook on other systems in your organization by creating a script and running it on each system.

    sh setup-hooks.sh
    #!/bin/sh
    # Copy all hooks to .git/hooks
    cp hooks/* .git/hooks/
    chmod +x .git/hooks/*
    
Note
Endor Labs secret rules come packaged with the endorctl binary, so a local secrets scan using the --pre-commit flag does not need to connect to Endor Labs services over the internet, making the scan extremely fast. However, this also means the pre-commit scan does not include any custom secret rules added to your namespace.

Here’s an example output when no secrets are found.

No secrets

Here’s an example when secrets are detected and the commit fails.

Secrets found

There might be cases where certain lines of code or specific patterns are mistakenly flagged as potential secrets but are safe to include such as test values or non-sensitive information.

To handle such false positives, you can annotate the non-sensitive lines in your source code with endorctl:allow.

# These are test credentials, safe to commit
username = "test_user"  # endorctl:allow
password = "test_password"  # endorctl:allow

Endor Labs scans for secrets based on regular expressions that are designed to detect the presence of a secret. It then validates the discovered secrets against external APIs to identify if they are valid. Valid secrets actively provide access to a service or an application and can be used to gain unauthorized access.

Regular expressions are customized to match specific types of secrets, such as GitHub personal access tokens, OAuth access tokens, AWS access tokens, OpenAPI keys, Client IDs, Client Secrets, and more.

For example, you can describe a GitHub Personal Access Token with the following regular expression.

github_pat_[0-9a-zA-Z_]{82}

View secret findings

You can view the findings generated out of secrets, prioritize them, and take corrective action.

  1. Sign in to Endor Labs and select Projects from the left sidebar.

  2. Select the project for which you want to view the secrets.

  3. Select Secrets under First Party Code to view secret findings.

    Findings of secrets

  4. Select a finding to view the following details:

    • Project: The name of the project where the secret is found, finding policy, categories, and attributes of the project.
    • Risk Details:
      • Indicates if the identified secret is valid or invalid.
      • Explanation of the finding.
      • Remediation recommended.

Secrets findings right sidebar 
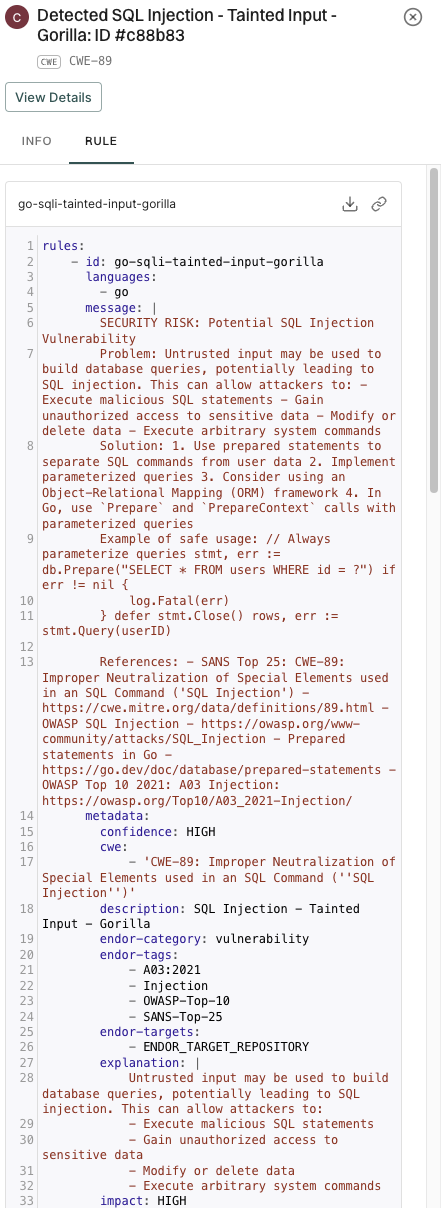
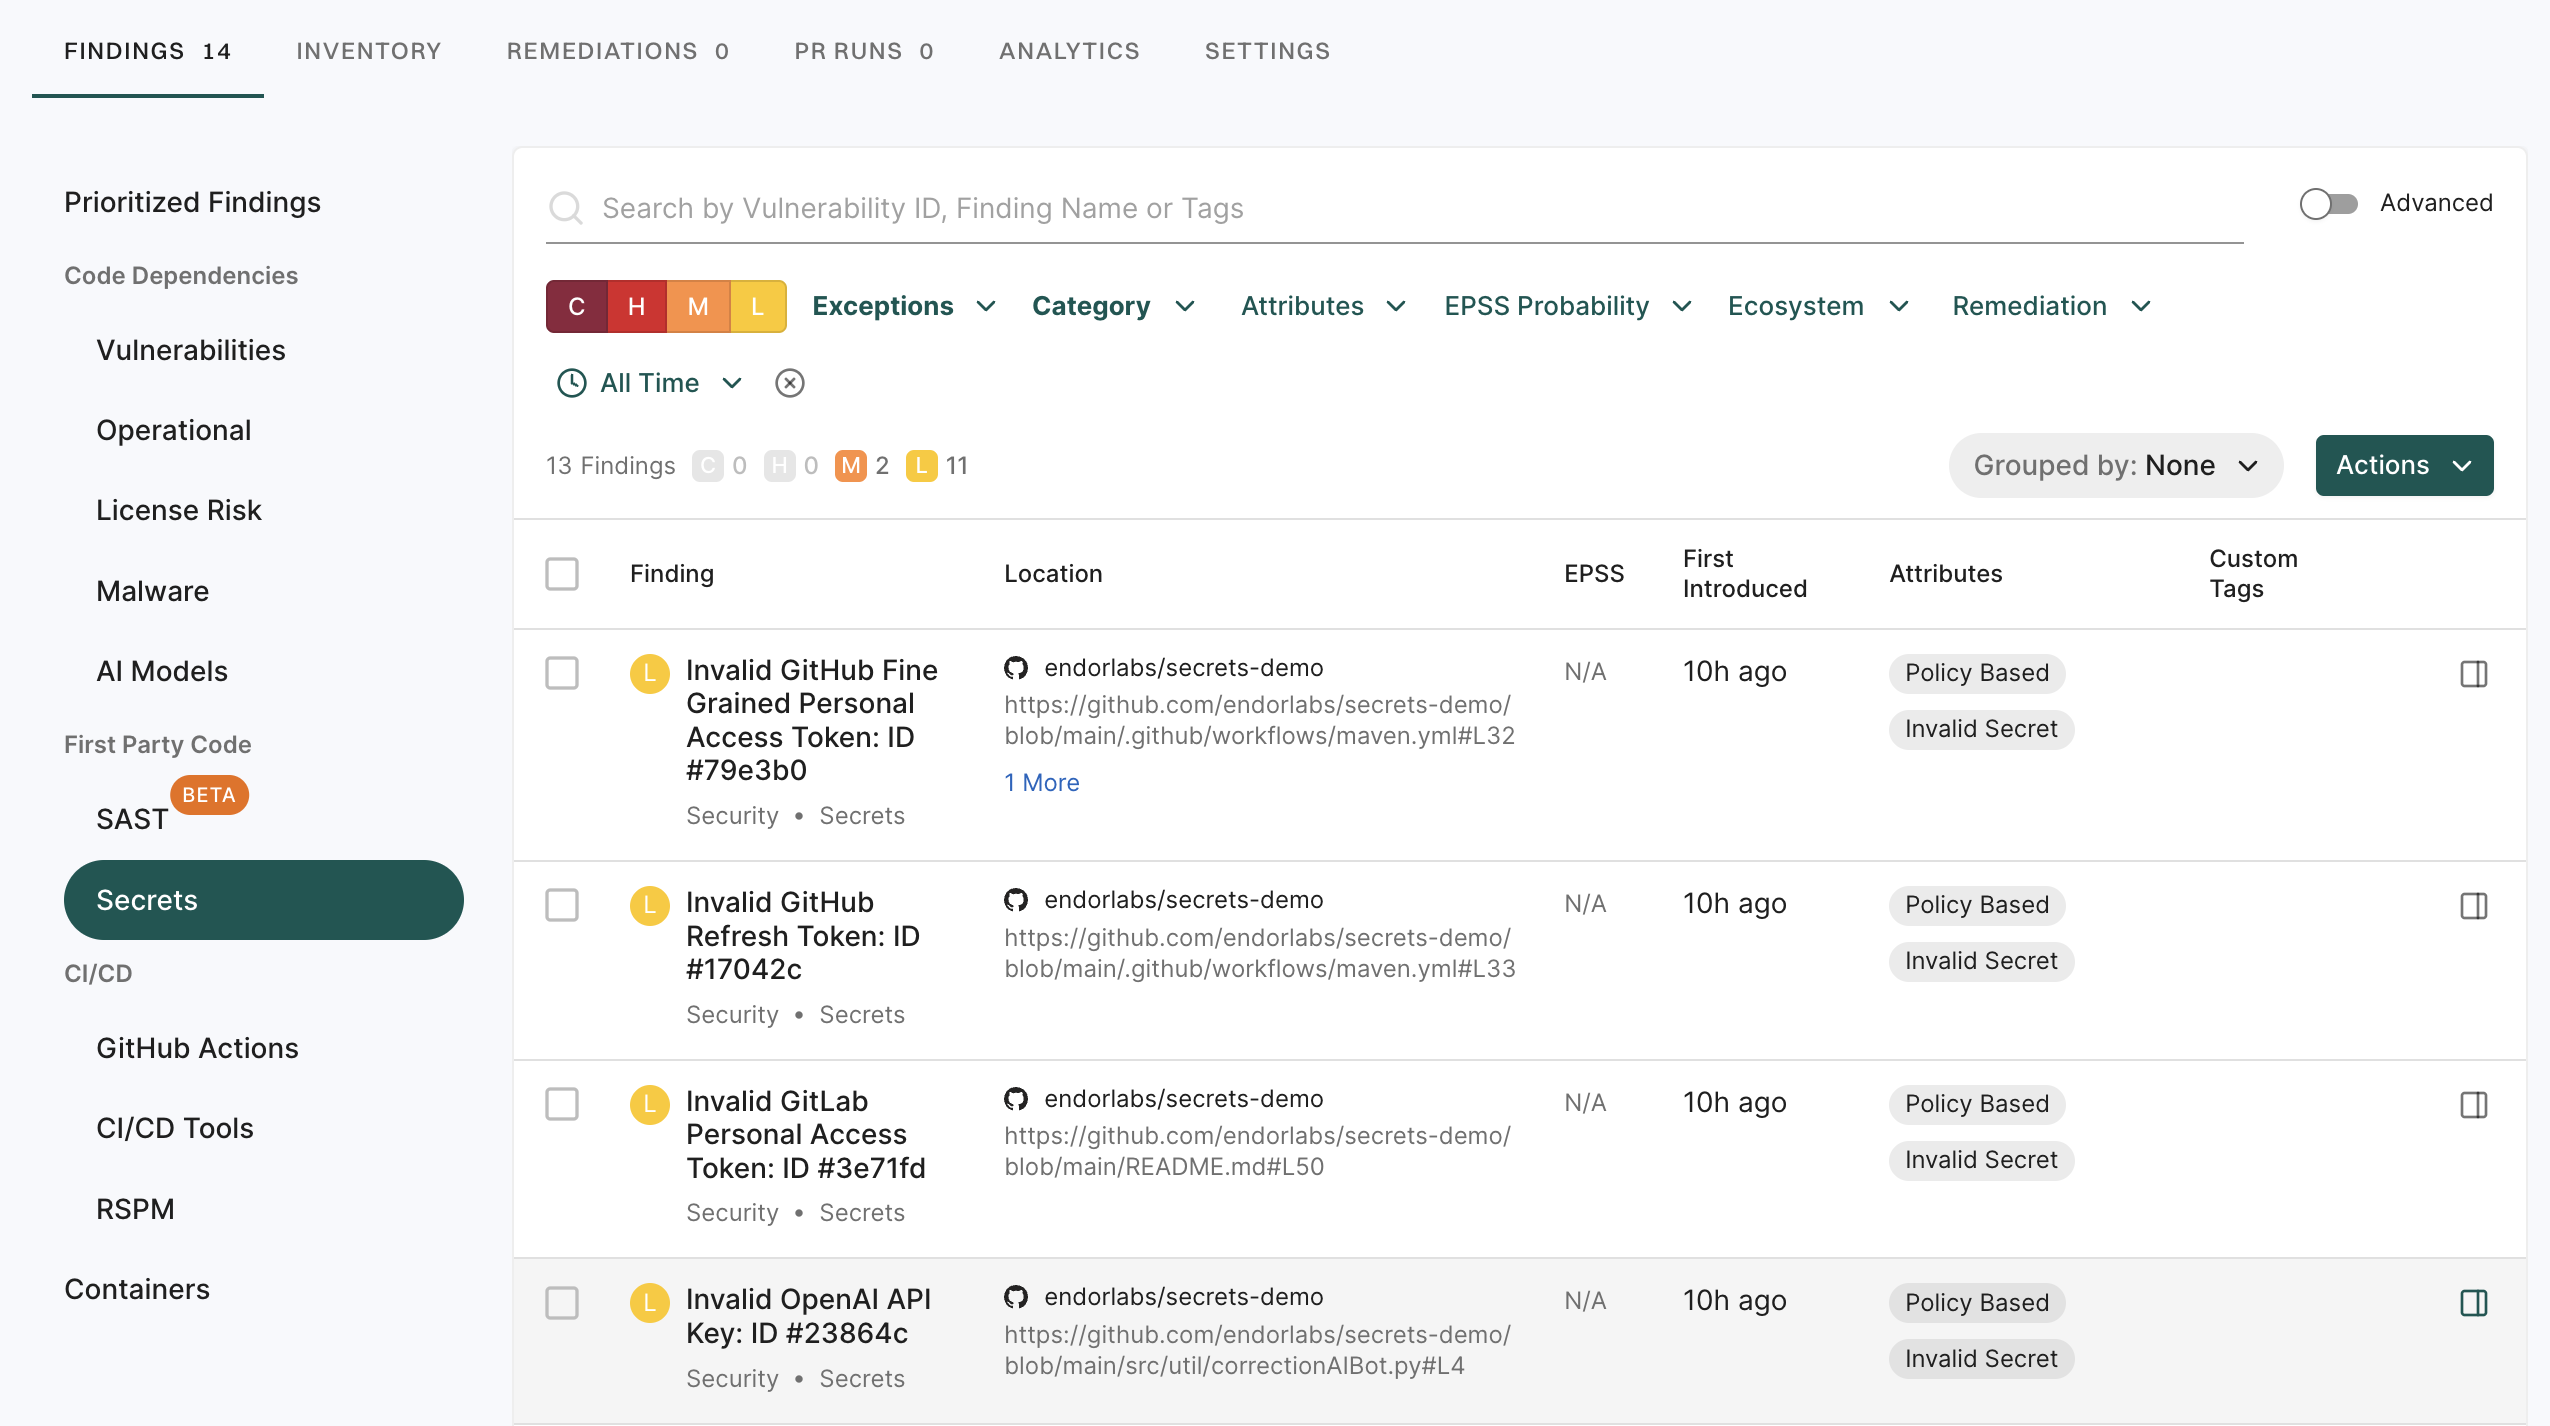
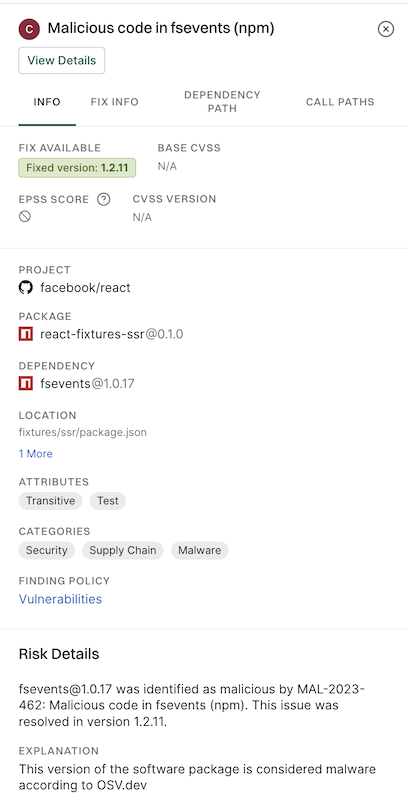
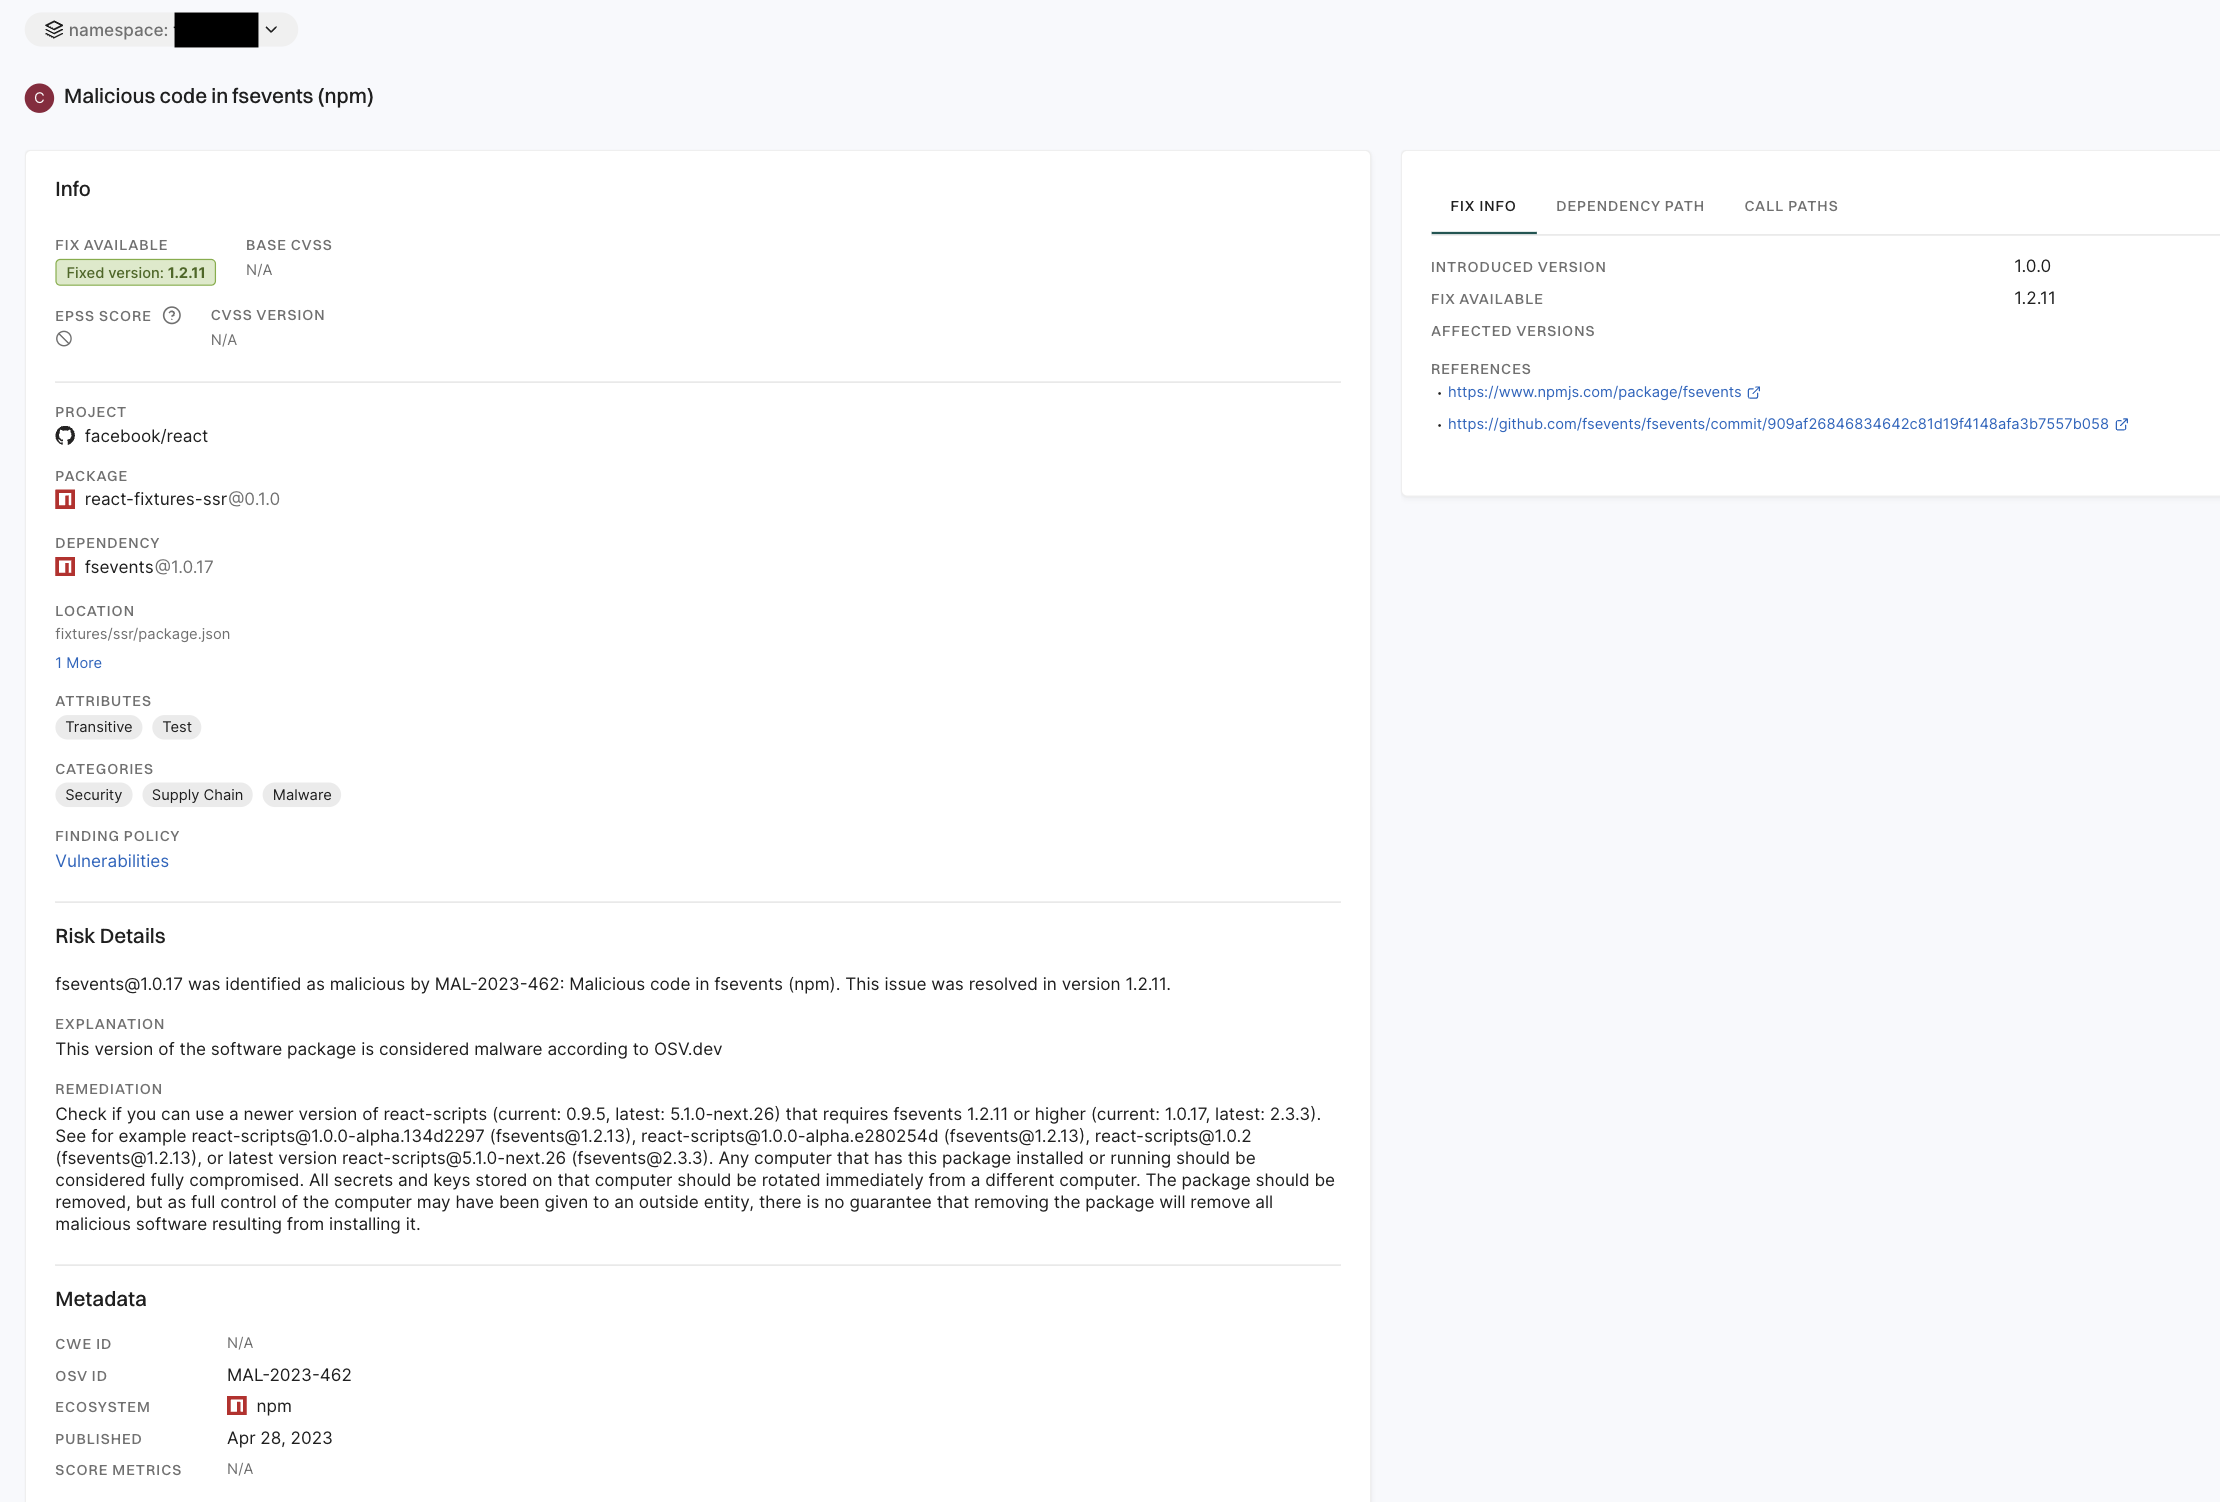
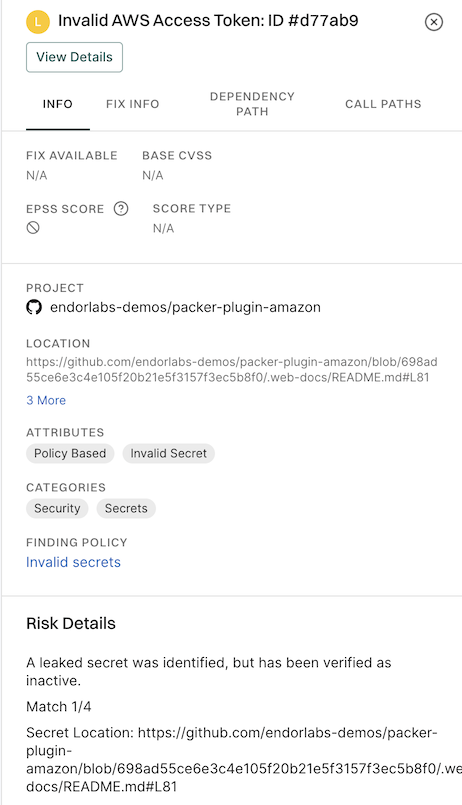
5. Click View Details to explore additional information about the secrets findings.

Container Scanning

Important

Container scanning now has its own dedicated command: endorctl container scan.

The endorctl scan --container commands are deprecated and will be removed after a three-month deprecation period.

Migrate to endorctl container scan command to ensure continued compatibility. For more details, see Container scan commands migration guide.

Containers help developers create, test, and deploy applications in a consistent environment. Container images include standalone or executable files encompassing files, libraries, and dependencies needed to run a container. They include several open-source software, making them vulnerable to open-source risks.

Gaining visibility into container images is essential to identify and prioritize risks or maintain compliance obligations.

Endor Labs container scan detects and reports known vulnerabilities and other risks in:

  • Operating system packages: Identifies packages installed through the container’s base operating system package manager.
  • Programming language packages: Identifies packages installed through language-specific package managers.
  • Libraries and dependencies: Identifies static and dynamic libraries, and runtime dependencies required by the application.

Additionally, it generates an SBOM (Software Bill of Materials) that details all components, their versions, and associated metadata, providing a complete inventory of the container’s contents.

Upgrade to endorctl version 1.6.734 or higher to ensure accurate container scan results. Sometimes, container scans performed with older endorctl versions may yield different or no results.

If the container image is in a private Docker registry, you must authenticate the container client before the scan.

Here are a few commands to authenticate the container client.

Authenticate to a Docker registry
docker login <host> -u <user_name> -p <password>

Learn more

Authenticate to a Podman registry
podman login -u <user_name> -p <password> <host>

Learn more

Endor Labs Podman troubleshooting for more information.

Authenticate with containerd

You must configure the containerd config file to authenticate with the container registry.

Learn more

Endor Labs supports the following methods of scanning container images:

Run the following command to scan a container image built in a specific repository. Specify the project path using the --path argument and the container image name using the --image argument. This associates the container with the Git repository and branch of the project.

endorctl container scan --image=<image_name:tag> --path=users/janedoe/endorlabs/npm/exampleproject

You can also scan multiple container images as part of a single repository.

endorctl container scan --image=<image_name1:tag> --path=users/janedoe/endorlabs/npm/exampleproject
endorctl container scan --image=<image_name2:tag> --path=users/janedoe/endorlabs/npm/exampleproject
endorctl container scan --image=<image_name3:tag> --path=users/janedoe/endorlabs/npm/exampleproject

You can tag findings with the corresponding container image name and tag. This lets you filter container-related findings in the user interface or through the API.

endorctl container scan --image=<image_name:tag> --path=users/janedoe/endorlabs/npm/exampleproject --finding-tags=<image_name:tag>

Run the following command to scan a container image from a registry. Specify the project name using the --project-name argument, and the container image name and tag using the --image argument.

endorctl container scan --image=<image_name:tag> --project-name=<endor_project_name>

To keep multiple versions of a container image in a container-only project, include the --as-ref flag.

endorctl container scan --image=<image_name:tag> --project-name=<endor_project_name> --as-ref

You can tag findings with the corresponding container image name and tag. This lets you filter container-related findings in the user interface or through the API.

endorctl container scan --project-name=<endor_project_name> --image=<image_name:tag> --as-ref --finding-tags=<image_name:tag>
Important
To associate a container scan with an existing SCA scan for a project, you must use the --path argument specifying the same project path used for the SCA scan. You cannot associate a container scan with an SCA scan for a project using the --project-name parameter.

You can save a container image as a tarball and scan it with endorctl to generate a report containing dependencies, SBOM details, and security findings.

  1. Ensure that you have the container image available locally.

    docker pull alpine:latest
    
  2. Export the image to a tarball file.

    docker save alpine:latest -o alpine-latest.tar
    
  3. Perform the endorctl scan.

    endorctl container scan --image=alpine:latest --project-name=<endor_project_name> --image-tar=/absolute/path/to/alpine-latest.tar
    
Note
  • --image-tar must point to the absolute path of the tarball file.
  • --image=<name:tag> is optional but recommended. It explicitly identifies the container image inside the tarball.

You can integrate container scanning into CI pipelines to automatically detect vulnerabilities and ensure the security of container images during the build and deployment process.

To perform container scanning in CI pipelines using GitHub Actions, set the scan_container parameter to true in the GitHub Actions script. Additionally, you must provide the image parameter with the container image you want to scan.

See Performing scans in CI/CD pipelines for more information.

Endor Labs fetches the container image from a container registry or loads it from a local file to scan containers. It then proceeds to extract the layers of the container image. It traverses the filesystem of each layer to identify files and directories. It looks for known package manager and metadata files to gather information about installed packages and their versions. It identifies various components and dependencies within the image and presents the findings in CLI and the Endor Labs user interface.

A container image is often built upon a base image that is a foundational layer including an operating system and other essential components. It’s crucial to understand what’s in the base image for a thorough security assessment.

You can distinguish the base image related vulnerabilities from the application layer using any of the following methods:

  • Scan Sequence - First, scan the base image. Then, scan any subsequent images built on that base image to distinguish vulnerabilities specific to the base image from those introduced by the other layers.
  • Docker file label - Set the label directly in your Dockerfile with a command such as LABEL org.opencontainers.image.base.name="openjdk:17-slim".
  • Build time label - Include the base image label during the build process with the --label flag, specifying both the base image and, optionally, its exact version via SHA256 hash. For example:
   docker build -t tictactoe:latest --label "org.opencontainers.image.base.name=openjdk@sha256:eddacbc7e24bf8799a4ed3cdcfa50d4b88a323695ad80f317b6629883b2c2a78" .

base image

Container base images from untrusted sources may lack proper security audits or fail to comply with organizational standards, increasing the risk of vulnerabilities being exploited. To address this, you can configure a finding policy to detect unauthorised base images and raise a critical finding.

For example, to allow only base images that start with gcp or ghcr, use the Container policy template and Specify Base Image Name Regex as ^gcp, ^ghcr.

See also Create a finding policy from template.

finding policy template

The dependencies associated with the following list of components are identified in the endorctl scan.

OS / Language Package Manager Packaging Version Support
Alpine apk 3.20, 3.19, 3.18, 3.17, 3.16, 3.15, 3.14, 3.12, 3.11, 3.10
Debian dpkg 8, 9, 10, 11, 12
Ubuntu dpkg 18.04, 20.04, 22.04, 24.04, 24.10
Red Hat RPM 5, 6, 7, 8, 9
Fedora RPM 40, 39
Amazon Linux RPM 1, 2, 2022, 2023
Oracle Linux RPM 7, 8, 9
.NET *.dll, *.exe
Objective-C CocoaPods
Go Go binaries
Java jar, ear, war, native-image
JavaScript package.json
PHP Composer
Python wheel, egg
Ruby gem
Rust Cargo

Endor Labs recognizes only the installed dependencies. Declared but uninstalled dependencies in the container image are not recognized.

To view findings from the container scan:

  1. Select Projects from the left sidebar.

  2. Select the project for which you want to view the container findings. container overview

  3. Select Containers from the preset filters.

  4. To view and filter dependencies based on the container images, click Container Layers and select to view All Layers, Base Image Layers Only, or Application Layers Only.

    Filter container findings

Endor Labs’ container scanning results rely on OVAL feeds from distributions, which provide accurate, vetted vulnerability data, excluding disputed or irrelevant entries. OS dependency results are based on data from distribution developers, while for language package dependencies, we complement published data with our proprietary research.

Endor Labs categorizes the severity of vulnerabilities detected in container scans as follows:

  • Use the severity assigned by the distribution, if it exists.
  • Use the NVD severity if the distribution does not provide the severity.
  • Report the vulnerability as Medium if there is no severity assigned by the distribution, or the NVD severity is not known or can’t be matched.

Endor Labs doesn’t report the following vulnerabilities:

  • Minor vulnerabilities in Debian and Ubuntu.
  • Disputed vulnerabilities withdrawn from NVD.
  • Scanning Windows containers is not supported.
  • Docker file scans are not currently supported.
  • Container registry direct integrations are not currently supported.
  • Support for scanning binary files inside a container is limited.
  • Endor scores are not calculated for findings reported in the container scan.

For securing your container images with cryptographic signatures, see Artifact Signing.

Container reachability

Beta

Endor Labs allows you to determine whether the OS packages present in a container image are actually used by your application at runtime. Use container reachability to distinguish dependencies that are merely installed from those that are actively exercised during execution, helping security teams prioritize the most critical security issues for remediation.

Note
Run the container scan using the new endorctl container scan command. The endorctl scan --container command does not support container reachability.

To perform container reachability analysis, ensure you meet the following system requirements:

  • The container must have sufficient CPU and memory resources to run successfully.

  • The container must be runnable.

  • The container must have network access if its startup process requires external communication.

  • Docker daemon dockerd must be installed on the host, must be runnable and accessible to the current user without elevated privileges. For example, docker images should work without sudo.

  • The negotiated Docker API version between the client and server must be 1.48 or higher.

  • The scan must be run on either a Linux or macOS host machine. Container reachability is supported for both amd64 and arm64 architectures.

Endor Labs determines container reachability by extracting OS packages from the container image, profiling the container’s runtime behavior, and correlating the results to identify which dependencies are actually used during execution. The steps below describe how container reachability is determined.

  1. Dependency extraction - Endor Labs extracts all packages and dependencies present in the container image by analyzing its file system to identify installed OS packages and their file path locations within the image.

  2. Dynamic profiling - Endor Labs runs the container image in a controlled environment, monitoring which OS-level files and dependencies are accessed during execution. The profiling captures runtime behavior including system calls, process IDs, and file path access patterns. It also identifies the main process that starts the container as the entry point and uses it to determine which packages are reachable through their dependency relationships.

  3. Path matching and reachability determination - Endor Labs correlates the results from both steps by comparing the extracted dependency file paths against the file access patterns captured during profiling, then assigns each dependency a reachability status based on whether it was accessed during execution.

Run the following command with the --os-reachability flag to include container reachability analysis in the scan.

endorctl container scan \
  --namespace=<your-namespace> \
  --image=<image_name:tag> \
  --project-name=<endor_project_name> \
  --os-reachability

You can also run container scans with OS reachability using GitHub Actions. See Scan containers with OS reachability for details.

Before dynamic profiling begins, Endor Labs performs a series of image qualification checks to determine if the container image is suitable for profiling. These checks include:

  • Image size - Verifies that the uncompressed image size does not exceed the configured limit. The default limit is 10 GB. Use the --profiling-max-size flag to adjust this limit.

  • Runnability - Runs the container to check that it starts without errors. If the container exits with an error, the error details are shown in the CLI output and surfaced in the Endor Labs user interface.

If the image fails any of the qualification checks, dynamic profiling is skipped and the scan proceeds without reachability analysis.

You can run the endorctl container scan --os-reachability command with the following options.

Flag Environment Variable Type Description
--volume ENDOR_CONTAINER_SCAN_VOLUME string Bind mount a volume for the container during profiling, for example, --volume=/host/path:/container/path.
--publish ENDOR_CONTAINER_SCAN_PUBLISH string Publish a container’s port to the host for profiling in the format host_port:container_port, for example, --publish=8080:80.
--env ENDOR_CONTAINER_SCAN_ENV string Set environment variables for the container during profiling.
--entrypoint ENDOR_CONTAINER_SCAN_ENTRYPOINT string Override the container entry point for profiling, for example, --entrypoint=/app/start.sh.
--profiling-max-size ENDOR_CONTAINER_SCAN_PROFILING_MAX_SIZE integer Set the maximum allowed container image size in GB for dynamic profiling, for example, --profiling-max-size=15. The default is 10 GB and the minimum is 1 GB.

The container reachability status indicates whether a dependency was used during runtime profiling or whether its usage could not be determined.

  • Reachable - The dependency is observed in runtime signals or confidently inferred through correlation analysis.

  • Potentially reachable - The dependency has not been observed during profiling, and there is no correlation evidence of its usage. However, its usage cannot be definitively ruled out without additional analysis, such as extended runtime monitoring.

  • Unreachable - The dependency was not observed during profiling and has no path from the container image’s entry point to it.

Use reachability information to prioritize vulnerability remediation effectively. The following table provides recommended actions based on the combination of vulnerability severity and reachability status.

Severity Reachability Status Recommended Action
Critical Reachable Remediate immediately to mitigate active, high-risk vulnerabilities.
High Reachable Prioritize remediation as soon as possible.
Critical Potentially Reachable Review and verify reachability before scheduling remediation.
Medium or Low Reachable Plan remediation as part of regular maintenance activities.
Medium or Low Potentially Reachable Low priority, monitor and reassess as needed.

You can filter findings across all projects by their reachability status.

  1. Select Findings from the left sidebar.
  2. Select Attributes, and in the Reachable Dependency filter, select Yes, Potentially, or No to narrow down findings by reachability status.

Keep the following limitations in mind when using container reachability analysis:

  • Code coverage - The scan does not detect dependencies accessed after the profiling window ends.

  • OS packages - Container reachability analysis applies only to OS-level packages. It identifies which OS packages are used at runtime but does not analyze specific vulnerable functions within those packages. Use Software Composition Analysis reachability to assess the runtime relevance of application dependencies.

  • Windows not supported - Container scanning and reachability are not supported on Windows.

  • Tar image paths - Dynamic profiling is not supported for container images referenced with a tar path.

Container fails to start and crashes during profiling
  • Verify that the container image runs successfully by using the docker run command.

  • Check whether the container requires specific environment variables or mounted volumes to start correctly. Use the --env and --volume flags to provide them during the scan.

  • Ensure that the container does not depend on interactive input during startup or execution.

  • Use the --entrypoint flag to override the container entry point if the default entry point causes issues.

Container profiling times out due to slow container startup or execution
  • Check the container’s startup performance to ensure it initializes within the expected time frame.

  • Verify that the container has network connectivity if it depends on external services.

  • Review the container logs to identify any errors or issues that occur during startup.

Profiling is skipped because the image is too large
  • Check whether the uncompressed image size exceeds the configured limit. The default limit is 10 GB.

  • Use the --profiling-max-size flag to increase the limit if needed.

Known active dependencies are shown as potentially reachable

Possible Causes:

  • The dependency might only be accessed after the profiling window ends.

  • The dependency may require specific HTTP endpoints or actions that are not triggered during profiling.

  • The dependency might be loading slowly or initialized only under specific conditions.

  • Startup optimizations may delay the actual use of the dependency until after profiling completes.

  • The dependency may not have a direct path from the container image’s entry point.

Solutions:

  • Review the typical application startup time to determine whether dependencies are loaded later in the process.

  • Consider whether specific operations or workflows trigger the use of these dependencies.

  • Use the --env, --volume, or --publish flags to provide the container with the configuration it may require to exercise more code paths during profiling.

  • Use container reachability results together with threat modeling to better assess overall security risk.

Sign artifacts

Endor Labs enhances software supply chain security by providing transparent mechanisms for signing and verifying software artifacts.

  • Integrity of container images and build artifacts: Using a cryptographic signature ensures that container images and other build artifacts are genuine and crafted by the organization. This adds an extra layer of security to the software supply chain, making sure that only authorized and unaltered items are scheduled for execution.

  • Traces across workflows: Beyond just verification, the framework offers thorough traceability. Users can trace the roots of container images and build artifacts, navigating through workflows and environments. Complete traceability ensures transparency, enabling organizations to validate the entire lifecycle of their software, from creation to deployment.

  • Certificate validity: Endor Labs uses a short-lived certificate with a validity period of 5 minutes to ensure that the build artifact has been signed during this time frame. To further guarantee the signing occurred within the valid window, a timestamp is added alongside the certificate and signature, confirming the signing within the specified time frame.

You can sign artifacts using the following methods.

Use the Endor Labs GitHub Actions to sign artifacts.

  1. Set up authentication to Endor Labs.
    • (Recommended) If you are using GitHub Action keyless authentication, set an authorization policy in Endor Labs to allow your organization or repository to authenticate. See Keyless Authentication for more information.
    • Alternatively, authenticate with a GCP service account setup for keyless authentication from GitHub Actions or an Endor Labs API key added as a repository secret.
  2. Checkout your code.
  3. Install your build toolchain.
  4. Build your code.
  5. Sign your artifacts with Endor Labs.

Use the GitHub Action endorlabs/github-action/sign@version to sign your artifacts. Set the following input parameters.

Options Description
artifact_name Name of the artifact. For example, ghcr.io/org/image@sha256:digest.
enable_github_action_token Fetches build information from the GitHub Action OIDC token. Endor Labs uses this information to build provenance metadata for the signed artifacts. Set to true by default.

See the following example workflows to sign an artifact.

- name: Sign artifacts with Endor Labs
  on: [push, workflow_dispatch]
  name: build
  jobs:
  ko-publish:
    name: Release ko artifact
    runs-on: ubuntu-latest
    permissions:
      id-token: write
      packages: write
      contents: read
    steps:
      - uses: actions/setup-go@v4
        with:
          go-version: '1.20.x'
      - uses: actions/checkout@v3
      - uses: ko-build/setup-ko@v0.6
      - run: ko build
      - name: Login to the GitHub Container Registry
        uses: docker/login-action@v3
        with:
          registry: ghcr.io
          username: ${{ github.repository_owner }}
          password: ${{ secrets.GITHUB_TOKEN }}
      - name: Publish
        run: KO_DOCKER_REPO=ghcr.io/endorlabs/hello-sign ko publish --bare github.com/endorlabs/hello-sign
      - name: Get Image Digest to Sign
        run: |
          IMAGE_SHA=$(docker inspect ghcr.io/endorlabs/hello-sign:latest | jq -r '.[].Id')
          SIGNING_TARGET="ghcr.io/endorlabs/hello-sign@$IMAGE_SHA"
          echo ARTIFACT="$SIGNING_TARGET" >> $GITHUB_ENV
      - name: Sign with Endor Labs
        uses: endorlabs/github-action/sign@version
        with:
          namespace: "example"
          artifact_name: ${{ env.ARTIFACT }}

The signed artifacts contain provenance metadata that describe the origin, history, and ownership of an artifact throughout its lifecycle. Including this information in signed artifacts enhances transparency, trustworthiness, and accountability.

The following provenance information is included in the signed artifacts.

Type Description Example
Build Config Digest Specific version of the top-level/initiating build instructions (workflow SHA) 729595ed884ce7600925633e585016a4f855929d
Build Config Name Name of the top-level/initiating build instructions (workflow) Release
Runner Environment Name of the platform-hosted or self-hosted infrastructure self-hosted
Source Repository The source repository that the build was based on endorlabs/monorepo
Source Repository Digest Specific version of the source code that the build was based on (commit SHA) 729595ed884ce7600925633e585016a4f855929d
Source Repository Owner Owner of the source repository that the build was based on endorlabs
Source Repository Ref Source repository ref that the build was based on refs/tags/v1.6.133
Certificate OIDC Issuer Issuer of the OIDC certificate used for verification
  • https://example.com/auth
  • https://token.actions.githubusercontent.com
Certificate Identity The identity expected in a valid certificate repo:org/monorepo:ref:refs/tags/v1.2.3

Use the endorctl CLI to sign an artifact. Ensure you have downloaded the latest endorctl binary.

To sign an artifact, run the following command.

endorctl artifact sign --name string --source-repository-ref string --certificate-oidc-issuer string

Specify the following options with the endorctl artifact sign command to include provenance information in your signed artifacts.

Options Required Description
--name string Mandatory Name of the artifact. For example, ghcr.io/org/image@sha256:digest.
--build-config-digest string Optional Specific version of top-level/initiating build instructions. For example, workflow sha.
--build-config-name string Optional Name of top-level/initiating build instructions. For example, workflow.
--runner-environment string Optional Name of platform-hosted or self-hosted infrastructure. For example, self-hosted.
--source-repository string Optional Source repository that the build was based upon. For example, org/repo.
--source-repository-digest string Optional Specific version of the source code that the build was based upon. For example, commit sha.
--source-repository-owner string Optional Owner of the source repository that the build was based upon. For example, my-org.
--source-repository-ref string Mandatory Source repository ref that the build run was based upon.
Certificate OIDC Issuer Mandatory Issuer of the OIDC certificate used for verification. For example,
  • https://example.com/auth
  • https://token.actions.githubusercontent.com
Certificate Identity Optional The identity expected in a valid certificate. For example, repo:org/monorepo:ref:refs/tags/v1.2.3.

To view the signed artifacts:

  1. Sign in to Endor Labs and select Inventory from the left sidebar.

  2. Select Artifacts. The list shows signed artifacts with Name, Created, and Last Updated details.

    View artifacts

  3. Use the search bar to find artifacts by name, description, or tags. You can use the following filters:

    • Artifact Types: Filter by artifact type, for example container image.
    • Created: Filter by when the artifact was created.
  4. Select an artifact to see its signed artifact digests in the list and provenance information. The list shows Artifact Digest, Reference, Created, and Last Updated for each digest.

  5. Select an artifact digest to open Artifact Digest Details and view the metadata, signature and certificate details, build configuration, and source repository information.

    View artifact digest details

When you run the endorctl artifact sign <image> command, Endor Labs initiates the following processes:

  • Authentication: Initiates regular authentication and retrieves a token from the OIDC or workflow provider while using an authentication option such as --enable-github-action-token or API keys.
  • Key Generation: Generates a public and private key using ECDSA-256.
  • Certificate Request: Sends a certificate request to the private Certificate Authority to obtain a short-lived certificate.
  • Provenance Inclusion: Incorporates provenance information from the token (if available) or provided with the CLI, adding it as a set of extensions to the certificate using ASN.1 encoding.
  • Image Signing: Uses the private key to actively sign the image.
  • Certificate Storage: Stores the certificate containing provenance information along with the signature in the database.
  • Timestamp: Adds a timestamp of the signing event.

To verify a signed artifact, use the following command:

endorctl artifact verify --name <artifact> --certificate-oidc-issuer <issuer>

Use the following command-line options with endorctl artifact verify:

Options Description
--name <name> Name of the artifact to verify. For example, ghcr.io/org/image@sha256:digest
--certificate-oidc-issuer <issuer> Issuer of the OIDC certificate used for verification. For example,
  • https://example.com/auth
  • https://token.actions.githubusercontent.com

When you run the endorctl artifact verify --name <artifact> --certificate-oidc-issuer string command, Endor Labs initiates the following verification processes:

  • Authentication: Initiates regular authentication and retrieves a token from the OIDC or workflow provider while using an authentication option such as --enable-github-action-token or API keys.
  • Signature Retrieval: Retrieves a signature entry from the database using the artifact name.
    • If the entry is not found, the verification process fails.
  • Certificate Authority Check: Checks for a trusted Certificate Authority.
  • Image Signature Validation: Validates the image signature using the public key from the certificate.
  • Timestamp Validation: Validates that the timestamp in the signature entry is within the certificate’s validity.
  • OIDC Issuer Verification: Checks whether the issuer provided matches the contents of the certificate.
  • Provenance Verification: Ensures that any provenance information from the CLI matches the ones in the certificate.

You can revoke a signature of a signed artifact for reasons such as a precautionary measure to safeguard against security risks, to maintain compliance, or to uphold trust and integrity.

To revoke a signature linked to an artifact and prevent its usage, use the following command:

endorctl artifact revoke-signature --name <image> --source-repository-ref "ref"

Specify the following command-line options for endorctl artifact revoke-signature:

Options Required Description
--name string Mandatory Name of the artifact whose signature needs to be revoked
--source-repository-ref string Mandatory Reference to the source repository of the artifact. For example, refs/tags/v1.0.1. This identifies the specific signature and revokes it.

Revoking the artifact signature invalidates the corresponding database entry and ensures that any attempts to verify the signature will fail.

  • While specifying the artifact name during the signing process, for the container images, adhere to the structure registry.example.com/repository/image@sha256:digest.
  • The signing process does not support tags. Ensure that you specify a SHA256 digest with the artifact you are signing to represent a cryptographic hash of the image’s content. This ensures a unique digest is created for every minor alteration in the image.

Migrate to new container scan commands

With the release of the new endorctl container scan commands, the old endorctl scan container commands and their related flags will be removed after a three-month deprecation period.

Use the new dedicated command to ensure continued compatibility.

Old New
endorctl scan --container <image> --path=<project_path> endorctl container scan --image <image> --path=<project_path>
endorctl scan --container <image> --project-name=<project_name> endorctl container scan --image <image> --project-name=<project_name>
endorctl scan --container-tar <file> endorctl container scan --image-tar <file>
endorctl scan --container-as-ref endorctl container scan --as-ref
  • To scan a basic container image:

    • Old: endorctl scan --container nginx:latest --namespace my-namespace
    • New: endorctl container scan --image nginx:latest --namespace my-namespace
  • To scan a container tar file:

    • Old: endorctl scan --container-tar /path/to/image.tar --namespace my-namespace
    • New: endorctl container scan --image-tar /path/to/image.tar --namespace my-namespace
  • To scan a container with a project name:

    • Old: endorctl scan --container nginx:latest --project-name my-nginx --namespace my-namespace
    • New: endorctl container scan --image nginx:latest --project-name my-nginx --namespace my-namespace
  • To scan a container in a reference context:

    • Old: endorctl scan --container nginx:latest --container-as-ref --namespace my-namespace
    • New: endorctl container scan --image nginx:latest --as-ref --namespace my-namespace

Malware detection

Endor Labs detects malware in dependencies by scanning the packages used in the project and recognizing known malicious patterns.

Monitoring for known malicious packages: Endor Labs scans dependencies to identify malware by cross-referencing findings with the Open Source Vulnerability (OSV) database and data from the proprietary malware feed.

Suspicious code behavior: Endor Labs uses malware detection rules and SAST rules to scan open source package dependencies for suspicious code patterns and behaviors. These rules analyze code structures, detect anomalies, and identify potential threats.

Endor Labs provides a set of malware policies designed to identify and manage malicious or suspicious code in your project, ensuring that Endor Labs detects potential security risks early.

  • The OSS finding policy detects malicious code and findings in your project. You can edit the policy to change the severity and template parameters.

  • Configure malware action policy to specify how detected malware findings should be handled automatically, including notifications, blocking actions, and workflow triggers.

  • Configure malware exception policy to exclude malware findings under defined conditions. This filters out false positives and keeps the focus on critical risks.

You can view the malware findings, prioritize them, and take corrective action.

  1. Sign in to Endor Labs and select Projects from the left sidebar.

  2. Select the project for which you want to view the malware.

  3. Select Malware under Code Dependencies to view malware findings.

    Malware Findings

  4. Select a finding to view detailed information of the malware in the right sidebar.

    The right sidebar contains the following information:

  • Project: The name of the project where Endor Labs finds the malware, finding policy, categories, and attributes of the project.

  • Risk Details:

    • Explanation of the finding.
    • Reasoning explains why Endor Labs classifies the package as malware.
    • Recommended remediation.
  • Metadata: Contains details such as the vulnerability IDs, ecosystem, package release date, and advisory publication date.

    Malware Findings Side Panel

  1. Click View Details, then select Dependency Path to view the dependency path.

    Malware Findings view details

You can check whether specific package versions are flagged as malicious by querying the Endor Labs malware database. Run the following command to make an API query. The namespace must be oss, and you can pass one or more package versions in the names list.

endorctl api create -r QueryMalware -n oss -d '{"spec":{"package_version_names":{"names":["<ecosystem>://<package>@<version>"]}}}'

For example, run the following command to check whether the MailBee@12.3.3 package version is malicious.

endorctl api create -r QueryMalware -n oss -d '{"spec":{"package_version_names":{"names":["nuget://MailBee@12.3.3"]}}}'

The command returns a json response with details about the package version and the reasons for marking it as malicious.

{
  "meta": {
    "create_time": "2025-09-02T04:40:29.773434484Z",
    "kind": "QueryMalware",
    "name": "malware for ",
    "update_time": "2025-09-02T04:40:29.773434744Z",
    "version": "v1"
  },
  "responses": {
    "values": {
      "nuget://MailBee@12.3.3": {
        "list": {
          "objects": [
            {
              "meta": {
                "create_time": "2025-06-27T07:39:08.576Z",
                "index_data": {
                  "data": [
                    "@ancestor=oss"
                  ],
                  "tenant": "oss"
                },
                "kind": "Malware",
                "name": "Malicious code in MailBee (nuget)",
                "update_time": "2025-09-02T01:41:51.930710821Z",
                "upsert_time": "2025-09-02T01:41:51.930710821Z",
                "version": "v1"
              },
              "spec": {
                "additional_notes": [
                  "\n---\n_-= Per source details. Do not edit below this line.=-_\n"
                ],
                "advisory_last_updated": "2024-06-25T13:30:02Z",
                "advisory_published": "2024-06-25T13:30:02Z",
                "aliases": [
                  "MAL-2024-4540"
                ],
                "cwe_id": "CWE-506",
                "ecosystem": "ECOSYSTEM_NUGET",
                "malware_detected_on": "2024-06-25T13:30:02Z",
                "package_name": "MailBee",
                "purl": "pkg:nuget/MailBee",
                "source": "MALWARE_SOURCE_OSV",
                "status": "MALWARE",
                "summary": "Malicious code in MailBee (nuget)",
                "version": {
                  "osv_id": "MAL-2024-4540",
                  "version": "12.3.3"
                }
              },
              "tenant_meta": {
                "namespace": "oss"
              },
              "uuid": "685e4a9c9787b3b77c7ac0c0"
            }
          ],
          "response": {
            "next_page_id": "685e4a9c9787b3b77c7ac0c0",
            "next_page_token": 1
          }
        }
      }
    }
  },
  "spec": {
    "package_version_names": {
      "names": [
        "nuget://MailBee@12.3.3"
      ]
    }
  },
  "tenant_meta": {
    "namespace": "oss"
  },
  "uuid": "68b6753d19d009449113d065"
}

Data exporters

Endor Labs provides an export framework that enables you to export scan data to external platforms for archival, compliance, or integration with other security tools. You can configure exporters to automatically send data to supported destinations after each scan.

The export framework supports the following destinations.

Destination Description
AWS S3 Export data to an Amazon S3 storage bucket for archival or integration with data analytics tools.
GitHub Advanced Security Export findings in SARIF format to GitHub Advanced Security for viewing in the GitHub security dashboard.

You can configure exporters to export different types of data:

Data Type Description Message Type Exporters
Findings Security findings from scans including vulnerabilities, secrets, and SAST issues MESSAGE_TYPE_FINDING S3, GHAS
Action policy findings Findings that match your configured action policies (blocked or warning) MESSAGE_TYPE_ADMISSION_POLICY_FINDING GHAS
Format Description Format Type Exporters
JSON Export data in JSON format for flexibility and compatibility with various tools MESSAGE_EXPORT_FORMAT_JSON S3
SARIF Export findings in Static Analysis Results Interchange Format for security tools integration MESSAGE_EXPORT_FORMAT_SARIF S3, GHAS

Export findings to GitHub Advanced Security

You can export the findings generated by Endor Labs to GitHub Advanced Security so that you can view the findings in the GitHub. Endor Labs exports the findings in the SARIF format and uploads them to GitHub. You can view the findings under Security > Vulnerability Alerts > Code Scanning in GitHub.

Warning
GitHub have several limitations for SARIF files, so you may not be able to experience the full benefits on Endor Labs. For example, GitHub limits the number of results in a SARIF file. It allows a maximum of 25000 results per file but displays the first 5000 results ranked by severity. Refer to GitHub SARIF support for code scanning for the complete list of limitations with respect to SARIF files in GitHub Advanced Security.

Ensure that you meet the following prerequisites before exporting findings to GitHub Advanced Security:

GHAS SARIF exporter allows you to export the findings generated by Endor Labs in the SARIF format. See Understanding SARIF files for more information on the SARIF format and Endor-specific extensions.

You can create a GHAS SARIF exporter using the Endor Labs API.

Run the following command to create a GHAS SARIF exporter.

endorctl api create -n <namespace> -r Exporter -d '{
  "meta": {
    "name": "<exporter-name>"
  },
  "tenant_meta": {
    "namespace": "<namespace>"
  },
  "spec": {
    "exporter_type": "EXPORTER_TYPE_GHAS",
    "message_type_configs": [
      {
        "message_type": "MESSAGE_TYPE_FINDING",
        "message_export_format": "MESSAGE_EXPORT_FORMAT_SARIF"
      }
    ]
  },
  "propagate": true
}'

For example, to create a GHAS SARIF exporter named ghas-exporter in the namespace doe.deer, run the following command.

endorctl api create -n doe.deer -r Exporter -d '{
  "meta": {
    "name": "ghas-exporter"
  },
  "tenant_meta": {
    "namespace": "doe.deer"
  },
  "spec": {
    "exporter_type": "EXPORTER_TYPE_GHAS",
    "message_type_configs": [
      {
        "message_type": "MESSAGE_TYPE_FINDING",
        "message_export_format": "MESSAGE_EXPORT_FORMAT_SARIF"
      }
    ]
  },
  "propagate": true
}'

You can configure the scan profile to use the GHAS SARIF exporter and associate it with your project. You can also set the scan profile as the default scan profile so that all the projects in the namespace use the scan profile by default. See Scan profiles for more information.

Ensure that you select the GHAS SARIF exporter in the Export section of the scan profile.

  1. Select Settings from the left sidebar.

  2. Select Scan Profiles.

  3. Select the scan profile you want to configure and click Edit Scan Profile.

  4. Select the GHAS SARIF exporter under Exporters and click Save Scan Profile.

    Scan profile

Ensure that you choose the scan profile with the GHAS SARIF exporter for the project.

  1. Go to the Projects page and select the project you want to configure.

  2. Select Settings and select the scan profile you want to use under Scan Profile.

    Scan profile for project

After the configuration is complete, your subsequent scans will export the findings in the SARIF format and upload them to GitHub. You can use the rescan ability to scan the project immediately instead of waiting for the next scheduled scan. See Rescan projects for more information.

If you have enabled pull request scans in your GitHub App, the GHAS SARIF exporter exports the findings for each pull request.

  1. Navigate to your GitHub repository.

  2. Select Security.

  3. Select Code scanning under Vulnerability Alerts.

    View findings in GitHub

    You can use the search bar to filter the findings. You can also view findings for a specific branch and other filter criteria. You can also view the findings specific to a pull request if you have enabled pull request scans. You can filter the findings by the pull request number and view findings associated with the pull request. You can select a finding and view the commit history behind the finding.

    Filter findings in GitHub

  4. Select Campaigns to view and create security campaigns that coordinate remediation efforts across multiple repositories. See GitHub security campaign for more information.

When findings are exported to GHAS, Endor Labs includes finding tags and categories as searchable tags in the SARIF output. These tags appear in the GitHub code scanning interface, and you can filter and identify specific types of findings.

Endor Labs exports the following types of tags to GHAS:

  • Finding tags: System-defined attributes such as REACHABLE_FUNCTION, FIX_AVAILABLE, EXPLOITED, DIRECT, TRANSITIVE, and others. See Finding tags for the complete list.
  • Finding categories: Categories such as SCA, SAST, VULNERABILITY, SECRETS, CONTAINER, CICD, GHACTIONS, LICENSE_RISK, MALWARE, OPERATIONAL, SCPM, SECURITY, SUPPLY_CHAIN, and AI_MODELS. See Finding categories for the complete list.

You can use the search bar to filter findings by tags. Use the tag: prefix followed by the tag name to search for specific Endor Labs tags.

Available Filter Description
REACHABLE_FUNCTION Show findings with reachable vulnerable functions.
FIX_AVAILABLE Show findings where a fix is available.
EXPLOITED Show findings for actively exploited vulnerabilities (KEV).
DIRECT Show findings in direct dependencies.
TRANSITIVE Show findings in transitive dependencies.
CI_BLOCKER Show findings marked as blockers by action policies.
SCA Show Software Composition Analysis findings.
SAST Show SAST findings.
SECRETS Show exposed secrets findings.
VULNERABILITY Show vulnerability findings.
CONTAINER Show container findings.
CICD Show CI/CD pipeline findings.
GHACTIONS Show GitHub Actions findings.

You can combine multiple filters to narrow down your results. For example, to find reachable vulnerabilities with available fixes:

tag:REACHABLE_FUNCTION tag:FIX_AVAILABLE
Filter findings by tags in GitHub

You can control which findings are exported to GHAS by using action policies. Only findings from projects within the scope of your configured action policies will be exported to GitHub Advanced Security.

To filter findings using action policies:

  1. Create an action policy that defines the criteria for findings you want to export, or use an existing action policy.
  2. Assign specific projects to the scope of the action policy you want to use.
  3. Run the following command to create a GHAS SARIF exporter that exports only findings from projects in the scope of your action policies.
Note
Use MESSAGE_TYPE_ADMISSION_POLICY_FINDING as the message_type to filter findings based on your action policies.
endorctl api create -n <namespace> -r Exporter -d '{
   "meta": {
     "name": "<exporter-name>"
   },
   "tenant_meta": {
     "namespace": "<namespace>"
   },
   "spec": {
     "exporter_type": "EXPORTER_TYPE_GHAS",
     "message_type_configs": [
       {
         "message_type": "MESSAGE_TYPE_ADMISSION_POLICY_FINDING",
         "message_export_format": "MESSAGE_EXPORT_FORMAT_SARIF"
       }
     ]
   },
   "propagate": true
 }'

Export findings to S3

Export scan data generated by Endor Labs to an AWS S3 storage bucket. This enables long-term data retention for compliance requirements, integration with security information and event management (SIEM) systems, and custom analytics workflows. The export framework supports exporting findings in JSON or SARIF format, allowing flexible integration with your existing toolchain.

Amazon S3 is an object storage service provided by Amazon Web Services (AWS). It offers high durability, availability, and scalability for storing and retrieving any amount of data. S3 integrates with other AWS services and third-party tools, making it ideal for data archival, backup, and analytics workflows.

Ensure that you meet the following prerequisites before exporting data to S3:

An S3 bucket is a container for storing objects in Amazon S3. Each bucket has a globally unique name and is created in a specific AWS region.

You can create a general purpose S3 bucket or reuse an existing bucket to store the exported data. Disable access control lists (ACLs) on the bucket to ensure that the access is managed through IAM policies and bucket policies, preventing unintended public access. Refer to Creating a bucket for detailed instructions on creating an S3 bucket.

S3 buckets

You can configure S3 lifecycle rules to automatically delete exported data after a specified retention period. Exported objects do not expire unless you configure lifecycle rules.

  1. In the AWS management console, navigate to Amazon S3 > Buckets.
  2. Select your bucket.
  3. Select Management and click Create lifecycle rule.
  4. Enter a Lifecycle rule name, for example, endor-exports-expiry.
  5. Under Filter type, select Limit the scope of this rule using one or more filters and enter endor/ as the prefix to apply the rule only to exported data.
  6. Under Lifecycle rule actions, select Expire current versions of objects.
  7. Under Expire current versions of objects, enter the number of days after which objects should be deleted.
  8. Review the rule and click Create rule.

Endor Labs uses OIDC federation to assume an IAM role in your AWS account to access the S3 bucket. To allow Endor Labs to write to the bucket, configure OIDC and IAM using one of the following methods:

  • Use the CFT template to create the OIDC identity provider, IAM role, and S3 write policy.
  • Use the AWS Management console to create access by adding the OIDC identity provider and IAM role.

Use an AWS CloudFormation Template (CFT) to create the IAM role and S3 PutObject policy for the S3 exporter. The template can create a new OIDC identity provider for Endor Labs or reuse an existing provider in your account.

The following table lists the parameters you can set when deploying the CFT template.

Parameter Description
OIDCUrl Endor Labs OIDC issuer URL.
ExistingOidcProviderArn Set this to the ARN of your existing OIDC provider for api.endorlabs.com. The template will reuse it and will not create a new OIDC provider.
OidcAudience Audience for the OIDC trust policy. Use the same value for allowed_audience when creating the S3 exporter.
TenantNamespace Your Endor Labs tenant namespace.
BucketName Name of the existing S3 bucket that will receive exports.
RoleName IAM role name that Endor Labs will assume via web identity.
PolicyName IAM managed policy name for S3 PutObject permission.
  1. Create a .cft file with the following template.

    You can use the following template and set the parameters according to your OIDC audience, tenant namespace, bucket name, role name, and optionally an existing OIDC provider ARN.

    AWSTemplateFormatVersion: "2010-09-09"
    Description: >
      Endor Labs S3 Exporter - creates IAM OIDC provider (optional), role, and minimal S3 PutObject policy.
    Parameters:
      OIDCUrl:
        Type: String
        Default: "https://api.endorlabs.com"
        Description: "Endor Labs OIDC issuer URL."
      ExistingOidcProviderArn:
        Type: String
        Default: ""
        Description: >
          Optional. If your AWS account already has an OIDC provider for https://api.endorlabs.com,
          set this to its ARN (for example, arn:aws:iam::<ACCOUNT_ID>:oidc-provider/api.endorlabs.com).
          When set, this template will NOT create a new OIDC provider. It will reuse the existing provider
          and ensure the OidcAudience is present in its ClientIdList.
      OidcAudience:
        Type: String
        Default: "s3-exporter"
        Description: "Specify the audience name to use in the OIDC trust policy. Set the same value in allowed_audience while creating the Endor exporter configuration."
      TenantNamespace:
        Type: String
        Description: "Root Endor Labs tenant namespace (for example, acme-corp)."
      BucketName:
        Type: String
        Description: "Existing S3 bucket name to receive exports."
      RoleName:
        Type: String
        Default: "EndorS3ExporterRole"
        Description: "IAM role name Endor will assume via web identity."
      PolicyName:
        Type: String
        Default: "EndorS3ExporterPolicy"
        Description: "IAM managed policy name for S3 PutObject permission."
    Conditions:
      CreateOidcProvider: !Equals [!Ref ExistingOidcProviderArn, ""]
      UseExistingOidcProvider: !Not [!Equals [!Ref ExistingOidcProviderArn, ""]]
    Resources:
      EndorOidcProvider:
        Type: AWS::IAM::OIDCProvider
        DeletionPolicy: Delete
        UpdateReplacePolicy: Delete
        Condition: CreateOidcProvider
        Properties:
          Url: !Ref OIDCUrl
          ClientIdList:
            - !Ref OidcAudience
      EndorS3PutObjectPolicy:
        Type: AWS::IAM::ManagedPolicy
        DeletionPolicy: Delete
        UpdateReplacePolicy: Delete
        Properties:
          ManagedPolicyName: !Ref PolicyName
          PolicyDocument:
            Version: "2012-10-17"
            Statement:
              - Sid: PutObjectToBucket
                Effect: Allow
                Action:
                  - s3:PutObject
                Resource: !Sub "arn:${AWS::Partition}:s3:::${BucketName}/*"
      EndorS3ExporterRole:
        Type: AWS::IAM::Role
        DeletionPolicy: Delete
        UpdateReplacePolicy: Delete
        Properties:
          RoleName: !Ref RoleName
          AssumeRolePolicyDocument:
            Version: "2012-10-17"
            Statement:
              - Sid: EndorWebIdentity
                Effect: Allow
                Principal:
                  Federated: !If
                    - CreateOidcProvider
                    - !Ref EndorOidcProvider
                    - !Ref ExistingOidcProviderArn
                Action: sts:AssumeRoleWithWebIdentity
                Condition:
                  StringEquals:
                    "api.endorlabs.com:aud": !Ref OidcAudience
                  StringLike:
                    "api.endorlabs.com:sub":
                      - !Sub "${TenantNamespace}/*"
                      - !Sub "${TenantNamespace}.*/*"
          ManagedPolicyArns:
            - !Ref EndorS3PutObjectPolicy
    Outputs:
      OidcProviderArn:
        Description: "OIDC provider ARN."
        Value: !If
          - CreateOidcProvider
          - !Ref EndorOidcProvider
          - !Ref ExistingOidcProviderArn
      RoleArn:
        Description: "Role ARN to set as assume_role_arn in Endor exporter config."
        Value: !GetAtt EndorS3ExporterRole.Arn
      OidcAudienceOut:
        Description: "Audience to set as allowed_audience in Endor exporter config."
        Value: !Ref OidcAudience
    
  2. Save this file with an appropriate name such as endorlabs-s3-export.cft.

  3. Sign into AWS CloudFormation and search for Stacks.

  4. Click Create Stack and select With new resources.

  5. From Template source, select Upload a template file.

  6. Click Choose file, select the file you saved, and click Next.

  7. In Specify stack details, enter a Stack name, verify the Parameters you entered in the script and click Next.

  8. Select the acknowledgement from Configure stack options and click Next.

  9. From Review and Create, review the details and click Submit.

Check the progress of the creation of your resources from Stacks. Once the stack is created, you can see the status as CREATE_COMPLETE.

Create the OIDC identity provider and IAM role manually in the AWS Management Console.

OpenID Connect (OIDC) federation allows Endor Labs to access AWS resources without requiring long-lived credentials. This reduces the risk of credential exposure and simplifies secret rotation.

  1. In the AWS management console, navigate to IAM > Access Management > Identity providers.
  2. Click Add provider.
  3. Under Provider details, select OpenID Connect.
  4. For Provider URL, enter https://api.endorlabs.com.
  5. For Audience, specify a unique identifier to validate incoming OIDC tokens from Endor Labs.
  6. Optionally, add tags to help identify the provider.
  7. Click Add provider.
Create identity provider

Create an IAM role that Endor Labs can assume to write to your S3 bucket. This involves:

  1. Create a permissions policy: Define the S3 write permissions.
  2. Create an IAM role: Create a role with OIDC trust and attach the policy.
  1. In the AWS management console, navigate to IAM > Access Management > Policies.

  2. Click Create policy.

  3. Under Specify permissions, toggle the Policy editor to JSON.

  4. Enter the following policy:

    {
      "Version": "2012-10-17",
      "Statement": [
        {
          "Effect": "Allow",
          "Action": [
            "s3:PutObject"
          ],
          "Resource": "arn:aws:s3:::<your-bucket-name>/*"
        }
      ]
    }
    

    Replace <your-bucket-name> with the name of your S3 bucket.

  5. Click Next.

  6. Under Review and create, enter a Policy name. For example, EndorLabsS3ExportPolicy.

  7. Review the Permissions defined in this policy section to confirm that the expected Amazon S3 write actions are included.

  8. Optionally, add a description and tags to your policy.

  9. Click Create policy.

Policy permissions
  1. In the AWS management console, navigate to IAM > Access Management > Roles.
  2. Click Create role.
  3. Under Select trusted entity, select Custom trust policy.
  4. Enter the following trust policy:
    {
      "Version": "2012-10-17",
      "Statement": [
        {
          "Sid": "EndorWebIdentity",
          "Effect": "Allow",
          "Principal": {
            "Federated": "arn:aws:iam::<aws-account-id>:oidc-provider/api.endorlabs.com"
          },
          "Action": "sts:AssumeRoleWithWebIdentity",
          "Condition": {
            "StringEquals": {
              "api.endorlabs.com:aud": "<oidc-audience>"
            },
            "StringLike": {
              "api.endorlabs.com:sub": [ "<your-namespace>/*", "<your-namespace>.*" ]
            }
          }
        }
      ]
    }
    
    Replace the placeholders with your values:
    • <aws-account-id>: Your AWS account ID
    • <oidc-audience>: The audience value you configured in the OIDC provider
    • <your-namespace>: Your Endor Labs namespace
Create IAM role
  1. Click Next.
  2. Under Add permissions, search for and select the IAM policy you created.
IAM role permissions
  1. Click Next.
  2. Under Name, review, and create, enter a Role name for the S3 exporter role. For example, EndorLabsS3ExporterRole.
IAM role name
  1. Optionally, add tags to help identify the role.
  2. Click Create role.

Create an S3 exporter using the Endor Labs API to configure the export destination and data types.

The following table lists the configuration options required to create the exporter.

Parameter Description
<namespace> Your Endor Labs namespace
<exporter-name> A descriptive name for the exporter
<your-bucket-name> The name of your S3 bucket
<aws-region> The AWS region where your bucket is located, for example us-east-1. Refer to AWS regions for a list of region codes.
<iam-role-arn> The ARN of the IAM role you created
<oidc-audience> The audience value that you configured in the OIDC provider

Run the following command to create an S3 exporter.

endorctl api create \
  --namespace=<namespace> \
  --resource=Exporter \
  --data '{
    "meta": {
      "name": "<exporter-name>"
    },
    "propagate": true,
    "spec": {
      "exporter_type": "EXPORTER_TYPE_S3",
      "s3_config": {
        "bucket_name": "<your-bucket-name>",
        "region": "<aws-region>",
        "assume_role_arn": "<iam-role-arn>",
        "allowed_audience": "<oidc-audience>"
      },
      "message_type_configs": [
        {
          "message_type": "MESSAGE_TYPE_FINDING",
          "message_export_format": "MESSAGE_EXPORT_FORMAT_JSON"
        }
      ]
    }
  }'

For example, to create an S3 exporter named s3-findings-exporter in the namespace doe.deer that exports findings in JSON format, run the following command.

endorctl api create \
  --namespace=doe.deer \
  --resource=Exporter \
  --data '{
    "meta": {
      "name": "s3-findings-exporter"
    },
    "propagate": true,
    "spec": {
      "exporter_type": "EXPORTER_TYPE_S3",
      "s3_config": {
        "bucket_name": "my-endorlabs-exports",
        "region": "us-west-2",
        "assume_role_arn": "arn:aws:iam::123456789012:role/EndorLabsS3ExportRole",
        "allowed_audience": "s3-exporter"
      },
      "message_type_configs": [
        {
          "message_type": "MESSAGE_TYPE_FINDING",
          "message_export_format": "MESSAGE_EXPORT_FORMAT_JSON"
        }
      ]
    }
  }'

After creating the exporter, associate it with your scan profile. You can also set the scan profile as the default for your namespace so all projects use it automatically. See Scan profiles for more information.

  1. Select Settings from the left sidebar.
  2. Select Scan Profiles.
  3. Select the scan profile you want to configure and click Edit Scan Profile.
  4. Select your exporter under Exporters and click Save Scan Profile.

Associate your project with a scan profile to enable automatic export of scan data.

  1. Select Projects from the left sidebar and select the project you want to configure.
  2. Select Settings and select the scan profile you want to use under Scan Profile.

After configuration, subsequent scans automatically export data to your S3 bucket. You can trigger a scan immediately using the rescan feature. See Rescan projects for more information.

To validate that the S3 exporter ran successfully for a scan:

  1. Select Projects from the left sidebar and select the project associated with your exporter.

  2. Select Scan History and select a record to view its information.

  3. Select Logs to view the scan log and set the log level to All

    The following message confirms that the S3 export is successful. INFO: Successfully completed S3 export

Endor Labs exports data to S3 using a hierarchical folder structure:

endor/
└── <exporter-uuid>-<exporter-name>/
    └── <namespace>/
        └── <project-uuid>-<project-name>/
            └── <scan-type>/
                └── <ref-or-pr>/
                    └── <timestamp>_<scan-uuid>.zip

Each path segment is defined as follows:

Level Example Description
Root endor/ Fixed prefix for all Endor exports
Exporter abc123-prod-exporter/ <exporter_uuid>-<exporter_name> - unique per exporter
Namespace acme-corp/ Your Endor Labs namespace
Project def456-my-service/ <project-uuid>-<project-name>
Scan Type schedule/ or pr/ Type of scan that triggered export
Ref or PR Number <branch-name>/ or <pr-id> Name of the branch or PR number
File 20251215T143025Z_xyz789.zip <timestamp>_<scan-uuid>.zip
my-bucket/endor/abc123-prod-exporter/acme-corp/6efgh-pythonrepo/schedule/main/20251215T143025Z_xyz789.zip

You can list, update, and delete S3 exporters using the Endor Labs API.

List exporters

Run the following command to list all exporters in your namespace.

endorctl api list --namespace=<namespace> --resource=Exporter
Update an exporter

Run the following command to update an existing exporter. Use the --field-mask parameter to specify the fields to update.

endorctl api update \
  --namespace=<namespace> \
  --resource=Exporter \
  --name=<exporter-name> \
  --field-mask "spec.s3_config.region" \
  --data '{
    "spec": {
      "s3_config": {
        "region": "us-west-2"
      }
    }
  }'
Delete an exporter
Note
You must disassociate the exporter from any linked scan profiles before deletion.

Run the following command to delete an exporter.

endorctl api delete --namespace=<namespace> --resource=Exporter --name=<exporter-name>

AI Models

An AI model is a computational system designed to simulate human intelligence by performing tasks such as recognizing patterns, making decisions, predicting outcomes, or generating content. Many open source AI models are freely available for use, modification, and distribution. Just like dependencies, these AI models can bring operational and security risks in the organization that uses them. Gaining visibility into these risks can minimize the vulnerabilities introduced by them.

Endor Labs picks the top ten thousand open source AI models available on Hugging Face and assigns Endor scores to them, so that you can make informed decisions before using them in your organization. See AI model scores for more information.

To search and evaluate AI models from Hugging Face, navigate to Discover > AI Models.

  • Type in the search bar to look for AI Models and click Search AI Models.
  • Select a search result to view more details such as its security, activity, popularity, or quality score.
  • Click Go to Hugging Face to see more to view the AI model on Hugging Face website.

For configuring policies to govern AI model usage in your organization, see AI model policies.

OSS Licenses

Open source software comes with various licenses that define how the software can be used, modified, and distributed. Managing license compliance is essential for organizations to avoid legal risks and ensure proper use of open source components.

Endor Labs provides the following policy templates for detecting open source license usage. See Finding policies for details on how to create policies from policy templates.

Policy template Description Severity
Permit only specified software licenses Use this template to define an allowed list of software licenses permitted within your organization or a subset of projects. Endor Labs will raise findings when dependencies in packages or projects have licenses that are not on the allowed list. Medium
Restricted software licenses Use this template to define a blocked list of software licenses that should be restricted from use or only used within specific contexts within your organization. Endor Labs will raise findings when dependencies in packages or projects have licenses that are on the blocked list. Medium
Restricted software license types Use this template to create an organizational policy to restrict certain license types or limit a license type to specific contexts within an organization. This is useful to identify license risks and violations in third party open source packages. The license type classification in this policy follows the industry best practice rules defined by Google license types. If no license types are specified using the input parameter, only restricted and FORBIDDEN license types are flagged. Medium

Endor Labs classifies licenses according to industry best practices:

  • Permissive: Licenses that allow broad use with minimal restrictions (for example, MIT, Apache 2.0)
  • Copyleft: Licenses that require derivative works to use the same license (for example, GPL)
  • Restricted: Licenses with significant usage restrictions
  • Forbidden: Licenses that should not be used in your organization

RSPM (Repository Security Posture Management)

Repository Security Posture Management (RSPM) helps you secure critical components of your software supply chain, including code, open source libraries, and repository configurations to ensure the security posture of your software development environment.

  • Out-of-the-box policies: Endor Labs comes with out-of-the-box finding policies that help you detect misconfigurations, enforce coding best practices, and stay compliant with industry standards such as CIS benchmarks for GitHub and more.

  • Regular updates: Endor Labs regularly updates its existing policies and includes new policies. Configure policy settings to ensure that you benefit from these regular updates.

  • Remediation guidance: The policies provide up-to-date insights into critical risks, so you can manage security threats before your projects even start. They also include remediation advice that can help you fix and mitigate issues.

RSPM is currently supported for:

Platform Support
GitHub Cloud Yes
GitHub Enterprise Server Yes
Azure DevOps No
GitLab No
Bitbucket No
  1. Review the available finding RSPM policy templates.
  2. Configure policy settings to enable automatic updates.
  3. Review findings in the and take corrective action.

Pull Request scans

Scan pull requests as soon as they are raised in your repository. PR scans detect vulnerabilities in your branch when they are introduced, making it easier to identify and fix them early.

You can perform the following types of PR scans.

You can perform PR scans during the following deployments:

You can scan pull requests or merge requests using endorctl for both GitHub and GitLab repositories.

Run the following command to scan PRs or merge requests after you commit to a pull request or merge request.

endorctl scan --pr

After you raise a pull request or merge request, the --pr flag enables scanning of the latest version of the pull request or merge request and stores the results separately from the main branches. The PR scan and its findings do not affect the main branch’s reporting.

Endor Labs stores the PR and MR scan findings in PR Runs for three weeks, after which they are erased to accommodate new PR scans.

Setting up a baseline branch is recommended to establish a Git reference against which you can compare the changes introduced in pull requests or merge requests. You must regularly scan the baseline branch for vulnerabilities by either scheduling it (using the GitHub App or GitLab App) or triggering it using the --pr-baseline flag.

Usually, the first scanned branch becomes the baseline and is continuously monitored. A successful complete scan will resolve dependencies, run analytics, and generate call graphs for supported languages. See set a default branch.

By scanning a baseline branch, you establish a qualified reference with known vulnerabilities, and understand the current state of security. This reduces the risk of introducing vulnerabilities or breaking changes to your project.

Run the following command to set a baseline branch for PR scans.

endorctl scan --pr --pr-baseline=main

In the above example, the main branch is the baseline, and all PR scans will only display findings that were not already reported when the main branch was scanned.

The --pr-incremental flag scans only the parts of the codebase and dependencies that have changed since the last complete baseline scan, rather than scanning the entire codebase every time. It focuses on new or modified code that may introduce vulnerabilities or issues. The scan reports only findings that don’t exist in the baseline and are associated with changed dependencies in the pull request.

The baseline is detected automatically for GitHub App or GitLab App scans, or when PR comments are enabled. Otherwise, you must provide it using the --pr-baseline option. You can only perform an incremental scan after scanning a baseline or the default branch.

If a finding has been fixed in the baseline by upgrading or downgrading a dependency, and a PR modifies the same package, the finding will be flagged as new. This happens because there is no matching finding in the baseline and the dependency versions don’t match. To mitigate this, rebase the PR with the latest baseline content and re-run the PR check.

To initiate an incremental PR scan:

  1. Run a complete scan successfully.

  2. Run the following command to perform an incremental scan. Replace main with your baseline branch.

    endorctl scan --pr --pr-baseline=main --pr-incremental
    

During an incremental PR scan, Endor Labs first identifies packages and their dependencies. If changes are detected, only the modified packages are scanned. If the packages remain unchanged, the scan is skipped, and the No changes found message is displayed. The results of the PR incremental scan are available in Projects > PR Runs. Call graphs are generated only for the modified packages. You can also use the --pr-incremental flag to scan your PRs for SAST issues or secret leaks. See SAST incremental scans and Incremental secret scans for more information.

Incremental scans fail in the following cases.

  • There are errors when resolving dependencies.
  • The project’s path has changes.
  • The project’s packages have failures.

In these cases, Endor Labs automatically performs a complete scan.

Configure your CI/CD tools to scan PRs and detect vulnerabilities during the workflow. You can also configure other pull request flags to enhance your PR scanning workflow.

The following example snippet shows you can set pr: true to enable PR scanning in GitHub Actions.

- name: 'Endor Labs Scan Push'
    if: ${{ github.event_name == 'push' }}
    uses: endorlabs/github-action@v1 # Replace v1 with the commit SHA of the latest version of the GitHub Action for enhanced security
    with:
    namespace: 'demo' # Replace with your Endor Labs tenant namespace
    scan_dependencies: true
    pr: true
    scan_summary_output_type: 'table'
    sarif_file: 'findings.sarif'

The following example snippet shows you can pass --pr in additionalArgs to enable PR scanning in Azure pipelines.

- task: EndorLabsScan@0
    inputs:
      serviceConnectionEndpoint: 'sanity-azure-devops-extension-staging'
      namespace: 'sanity.linux-latest'
      endorAPI: 'https://api.staging.endorlabs.com'
      logLevel: verbose
      tags: $(Build.BuildId)
      additionalArgs: '--output-type=summary --pr'
      sarifFile: scanresults.sarif

The following example snippet shows how you can enable PR scanning using endorctl in Jenkins.

stage('endorctl Scan') {
    steps {
        // Download and install endorctl.
        sh '''#!/bin/bash
            echo "Downloading latest version of endorctl"
            VERSION=$(curl $ENDOR_API/meta/version | jq -r '.ClientVersion')
            ENDORCTL_SHA=$(curl $ENDOR_API/meta/version | jq -r '.ClientChecksums.ARCH_TYPE_LINUX_AMD64')
            curl $ENDOR_API/download/endorlabs/"$VERSION"/binaries/endorctl_"$VERSION"_linux_amd64 -o endorctl
            echo "$ENDORCTL_SHA  endorctl" | sha256sum -c
            if [ $? -ne 0 ]; then
                echo "Integrity check failed"
                exit 1
            fi
            chmod +x ./endorctl
            // Check endorctl version and installation.
            ./endorctl --version
            // Run the scan.
            ./endorctl scan -a $ENDOR_API -n $ENDOR_NAMESPACE --api-key $ENDOR_API_CREDENTIALS_KEY --api-secret $ENDOR_API_CREDENTIALS_SECRET --pr $ENABLE_PR_SCAN
        '''
    }

Enable MR scans in GitLab CI pipelines by adding the --pr flag. Configure your pipeline to run only on merge requests using rules: - if: $CI_MERGE_REQUEST_IID. See Run MR scans and Enable MR comments for complete configuration examples.

The following example snippet shows how you can enable PR scanning using endorctl in Bitbucket pipelines.

pull-requests:
    '**':
      - step:
          name: "Build and Test on PR"
          script:
            - mvn install -DskipTests
            - echo "Running Endor Labs PR Scan"
            - curl https://api.endorlabs.com/download/latest/endorctl_linux_amd64 -o endorctl
            - echo "$(curl -s https://api.endorlabs.com/sha/latest/endorctl_linux_amd64)  endorctl" | sha256sum -c
            - chmod +x ./endorctl
            - ./endorctl scan --pr --pr-baseline=main --languages=java --output-type=json -n $ENDOR_NAMESPACE --api-key $ENDOR_API_CREDENTIALS_KEY --api-secret $ENDOR_API_CREDENTIALS_SECRET | tee output.json

The following example snippet shows how you can enable PR scanning using endorctl in CircleCI.

- run:
    name: "Endor Labs Scan"
    command: |
    ./endorctl scan --dependencies --pr

The following example snippet shows how you can enable PR scanning using endorctl in Google Cloud Build.

# Step 4: SCA Scan With EndorLabs
  - name: 'SCA scan'
    entrypoint: 'bash'
    args: ["-c", "./endorctl scan -n $$ENDOR_NAMESPACE --api-key=$$ENDOR_API_CREDENTIALS_KEY --api-secret=$$ENDOR_API_CREDENTIALS_SECRET --as-default-branch=true --pr"]
    secretEnv: ['ENDOR_API_CREDENTIALS_KEY', 'ENDOR_API_CREDENTIALS_SECRET']
    env:
      - 'ENDOR_NAMESPACE=demo'
    id: 'SCA Scan With EndorLabs'

See Google Cloud Build configuration example for more information.

To automatically scan the PRs when they are raised, set the pull request preferences during the installation of the GitHub App or edit the integration preferences afterward.

The Endor Labs GitHub App provides a scan report with details about scan failures. The report includes warning and error logs, recommended actions when available, and a link to the full scan history for additional context.

To view the scan report:

  1. Open the pull request where the scan failed.
  2. Click on the three vertical dots and select View Details from the Endor Labs Automated Scan to view the scan report.

View detailed results of your pull request scans in PR Runs. See PR Runs to learn more.

Pull Request comments

PR comments are automated comments added to pull requests when Endor Labs detects policy violations or security issues during scans. When a PR is raised or updated, Endor Labs runs scans on the proposed changes and adds a comment if any violations are detected based on the configured action policies.

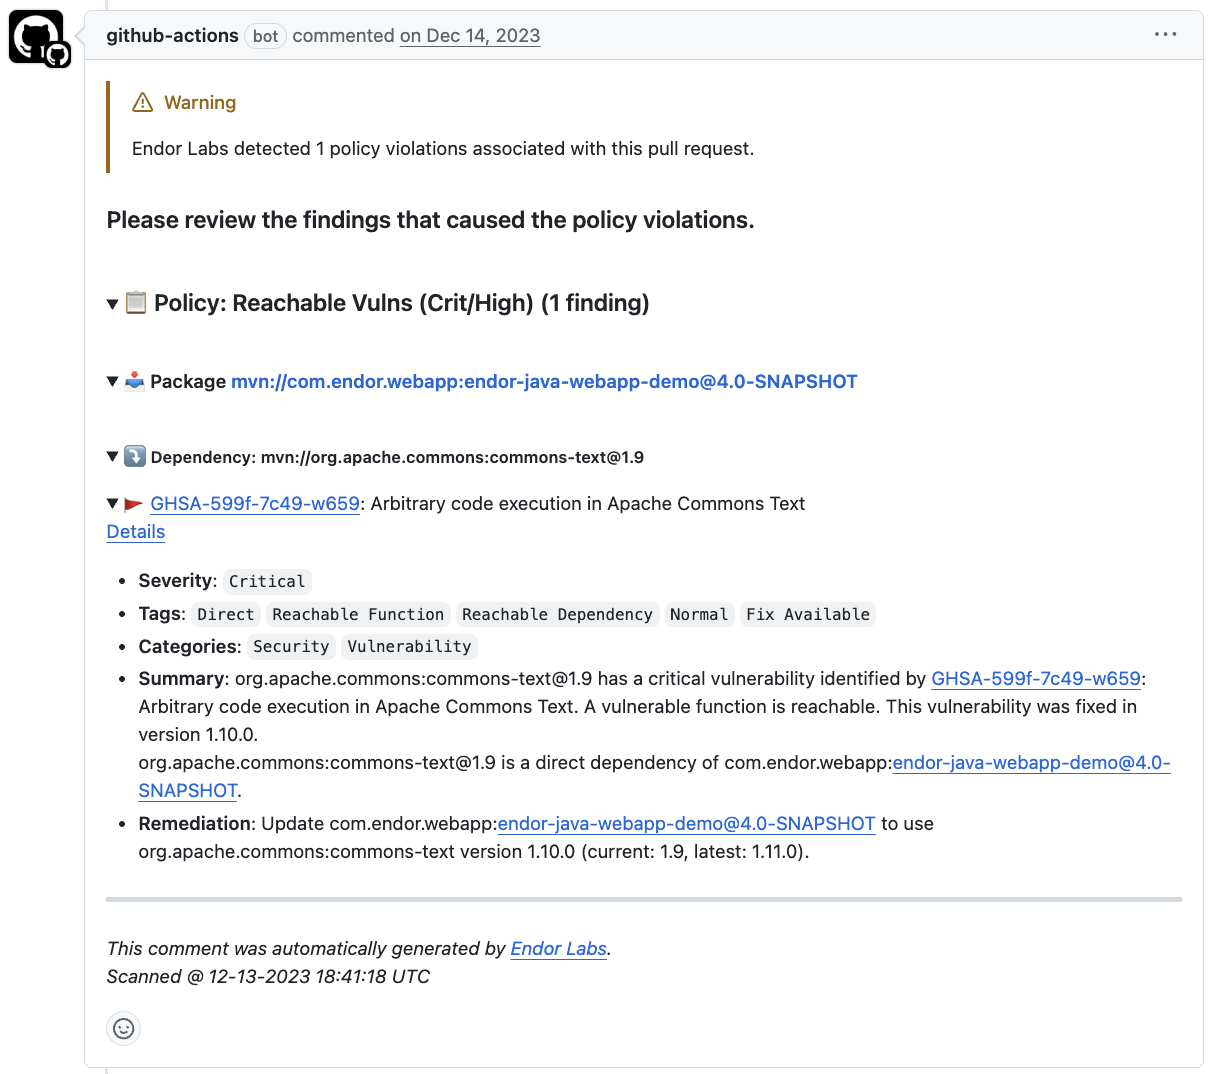
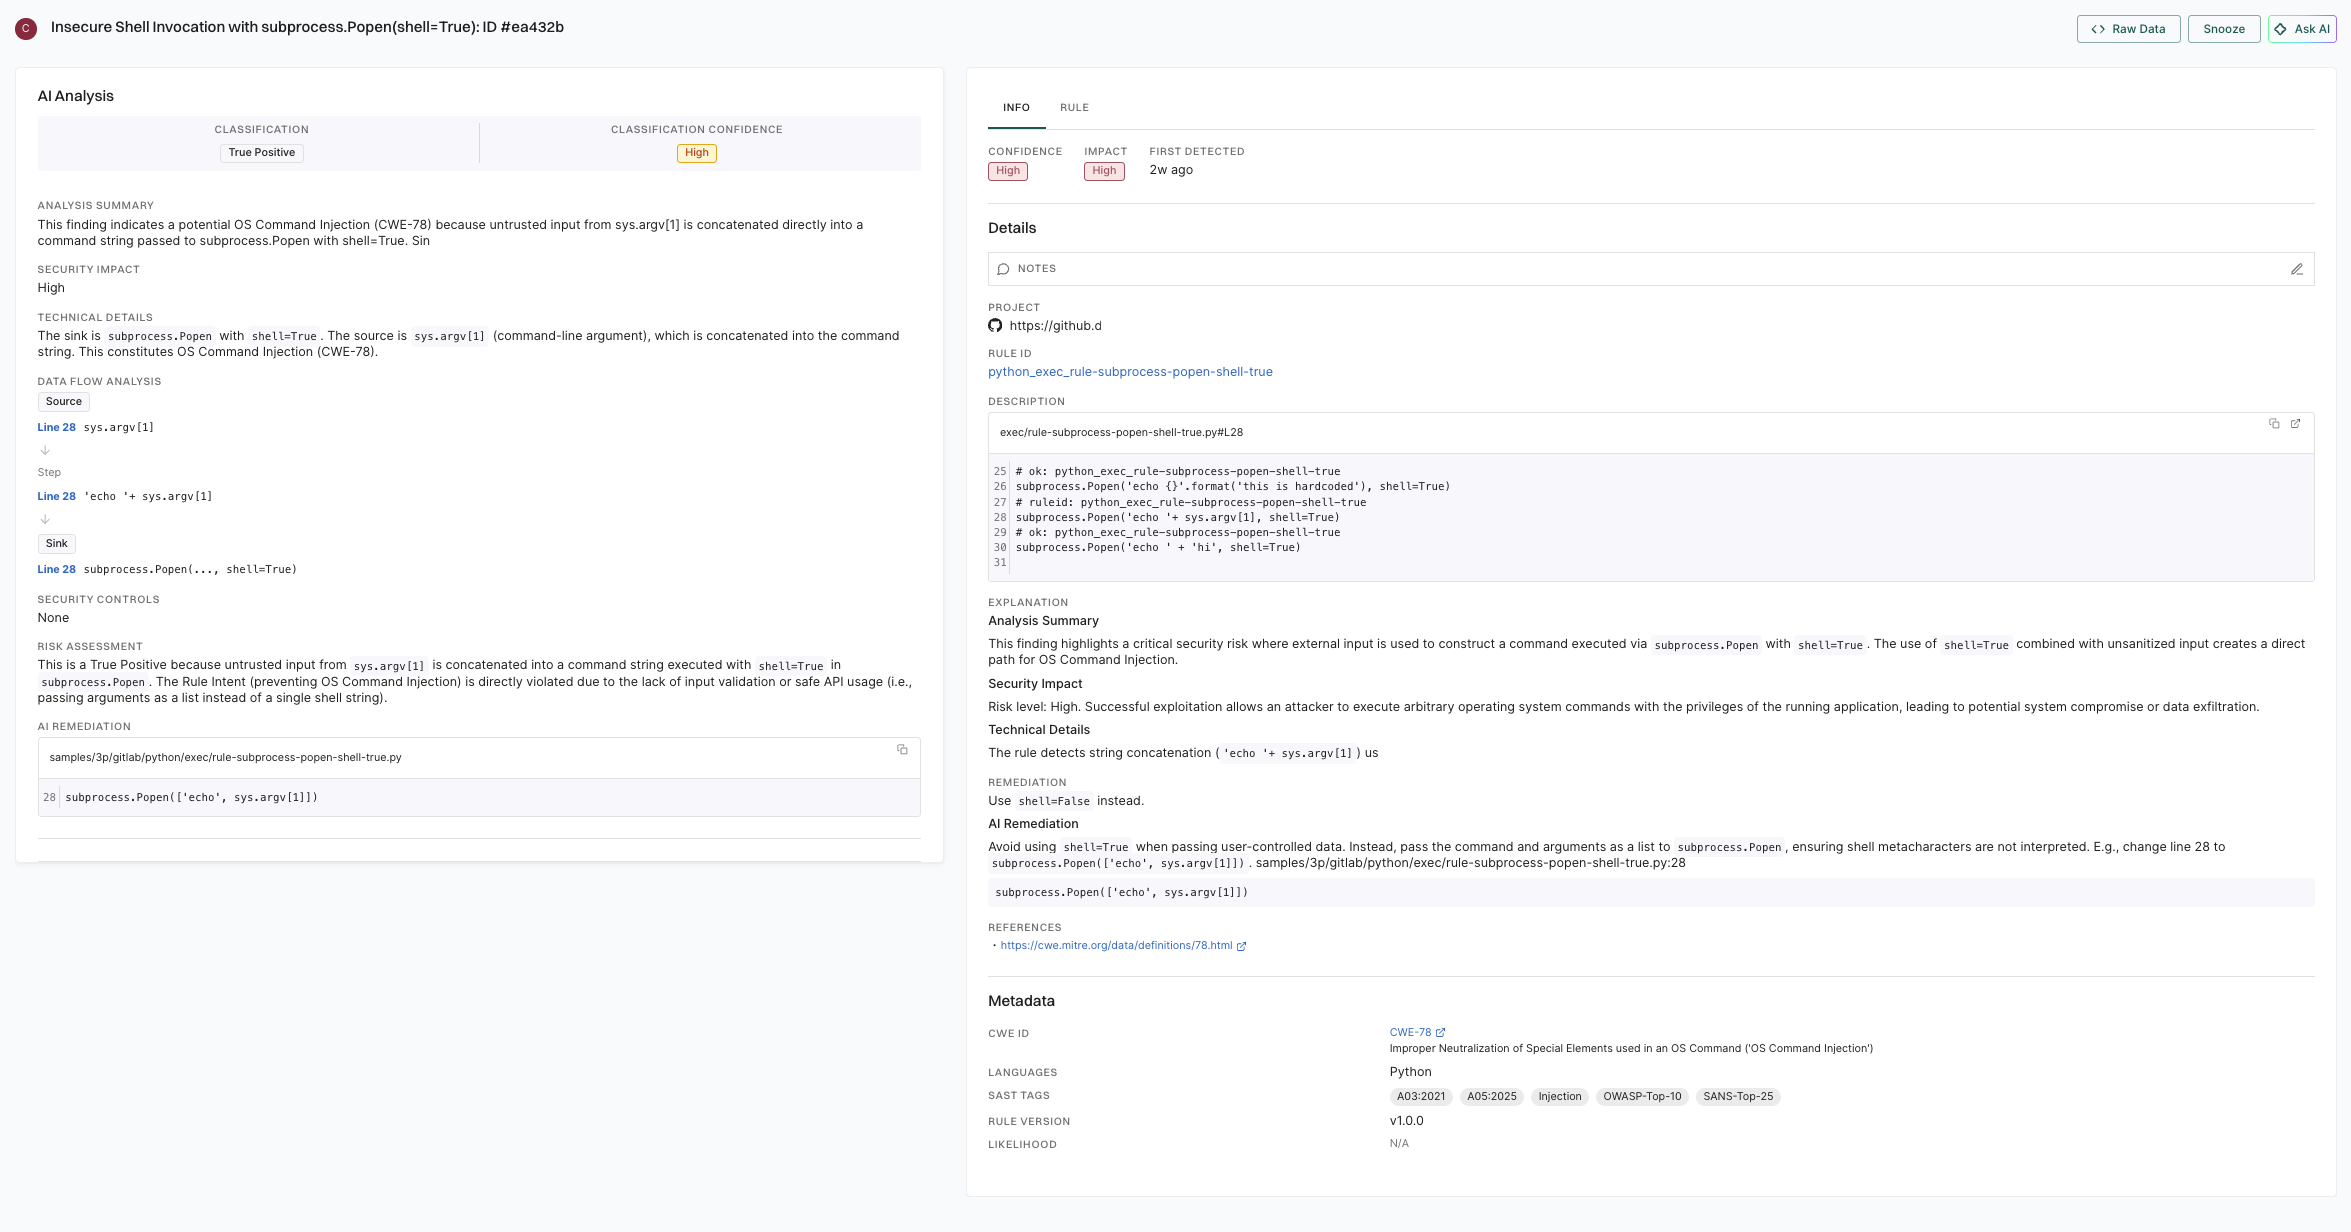
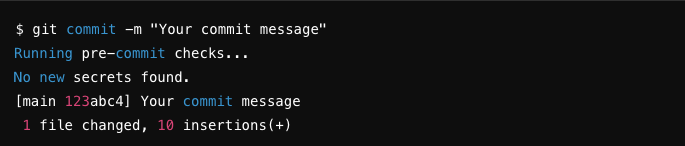
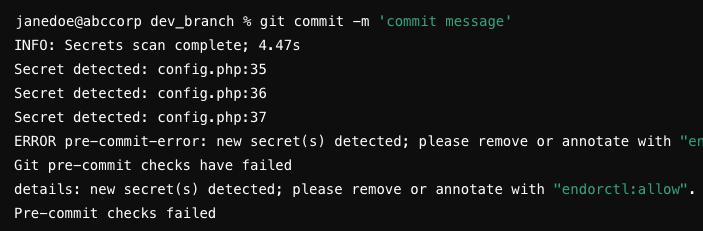
Endor Labs generates the following types of PR comments based on the nature of the findings in a scan:

  • PR comments for Secrets: For findings of type FINDING_CATEGORY_SECRETS, Endor Labs adds a comment directly on the specific line where the secret is detected, using the line number provided in the finding object. These comments remain visible even if the secret is removed in a later scan.
  • PR comments for SCA: For SCA findings, Endor Labs adds a single comment that applies to the entire PR. It summarizes all findings from the policy evaluation results. The comment is updated with each scan run to reflect only the latest findings.
  • PR comments for SAST: For findings of type FINDING_CATEGORY_SAST, Endor Labs adds a single comment that applies to the entire PR. It summarizes all SAST-related policy violations detected during the scan. The comment is updated with each run and reflects only the latest findings.

After enabling PR comments, you must Configure an action policy to allow comments to be posted on pull requests or merge requests.

You can enable PR comments for GitHub through one of the following methods.

You can enable PR comments during the initial setup of the GitHub App or GitHub App (Pro), or by editing an existing integration. Once enabled, Endor Labs automatically adds comments to pull requests when policy violations are detected.

You can configure GitHub Actions to comment on PRs if there are any policy violations. Make sure that your GitHub Actions workflow includes the following configuration.

  • The workflow must have a with clause including: enable_pr_comments to true to publish new findings as review comments and github_token: ${{ secrets.GITHUB_TOKEN }}. This token is automatically provisioned by GitHub when using GitHub Actions. See GitHub configuration parameters for more information.
  • To grant Endor Labs the ability to comment on PRs you must include the permission pull-requests: write.

The following example configuration comments on PRs if a policy violation is detected.

      - name: Endor Labs Scan PR to Default Branch
        if: github.event_name == 'pull_request'
        uses: endorlabs/github-action@v1 # Replace v1 with the commit SHA of the latest version of the GitHub Action for enhanced security
        with:
          namespace: 'example' # Update with your Endor Labs namespace
          scan_summary_output_type: 'table'
          scan_dependencies: true
          scan_secrets: true
          pr: true
          enable_pr_comments: true
          github_token: ${{ secrets.GITHUB_TOKEN }}

The main.yaml file in this sample repository contains the following configuration to enable PR comments.

name: Build Release
on:
  pull_request:
    branches: [main]
  workflow_dispatch:
  push:
    branches: [main]
  schedule:
    - cron: "23 23 * * 0"
jobs:
  build:
    permissions:
      pull-requests: write
      security-events: write
      contents: read
      id-token: write
      actions: read
    runs-on: ubuntu-latest
    env:
      ENDOR_NAMESPACE: "endorlabs-hearts-github"
    steps:
      - name: Endor Labs Scan PR to Default Branch
        if: github.event_name == 'pull_request'
        uses: endorlabs/github-action@v1 # Replace v1 with the commit SHA of the latest version of the GitHub Action for enhanced security
        with:
          namespace: ${{ env.ENDOR_NAMESPACE }}
          pr: true
          enable_pr_comments: true
          github_token: ${{ secrets.GITHUB_TOKEN }}

The PR #10 introduced a reachable vulnerability. Since the workflow has enable_pr_comments set as true, a comment is added to the PR on the policy violation.

You can expand the comment to view the following details:

  • Issue type: Describes the category of the security or policy violation
  • Severity: Indicates how critical the issue is.
  • Impacted files or dependencies: Specifies the files and packages affected by the issue.
  • Remediation steps: Specifies the required fix to resolve the detected issue.

PR Comment Details

You can generate PR comments using the CLI by including the following flags in the endorctl scan command.

endorctl scan \
  --pr \
  --enable-pr-comments \
  --github-token <your-token> \
  --scm-pr-id <pull-request-id> \
  --namespace <your-namespace>

Ensure that you set the following parameters:

  • Set --enable-pr-comments to activate PR comment generation.
  • Use --scm-pr-id to specify the pull request to comment on.
  • Use --github-token and set the pull-requests permission to write for the token.
Note
You can continue to use --github-pr-id flag, but it will be deprecated and removed in the future.

You can enable MR comments for GitLab through one of the following methods.

You can enable MR comments during the initial setup of the GitLab App or by editing an existing integration. Once enabled, Endor Labs automatically adds comments to merge requests when policy violations are detected. See GitLab MR comments for more information.

You can configure GitLab CI pipelines to comment on merge requests when policy violations are detected. Add --enable-pr-comments, --scm-pr-id=$CI_MERGE_REQUEST_IID, and --scm-token=$ENDOR_SCAN_SCM_TOKEN to your scan command. Configure a GitLab CI/CD variable ENDOR_SCAN_SCM_TOKEN with your GitLab personal access token with the api scope. See Enable MR comments for complete configuration examples.

You can generate MR comments with endorctl by including the following flags in the endorctl scan command.

endorctl scan \
  --pr \
  --enable-pr-comments \
  --scm-token <your-token> \
  --scm-pr-id <merge-request-id> \
  --namespace <your-namespace>

Ensure that you set the following parameters:

  • Set --enable-pr-comments to activate MR comment generation.
  • Use --scm-pr-id to specify the merge request to comment on.
  • Use --scm-token. The token takes priority over installation PATs.
Note
Security review comments for GitLab merge requests are not yet supported.

You must create an Action policy to receive comments on your pull request after enabling PR comments.

  1. Create an Action policy.
  2. Set the Branch Type to Pull Request so the policy applies specifically to pull request scans.
  3. Under Action, select Enforce Policy, then choose:
    • Warn to post a comment without breaking the build.
    • Break the Build to fail the build and block the pull request.
  4. Define the scope of the policy using tags. Only projects that match the specified tags will receive PR comments.

Endor Labs provides a default template with standard information that will be included in your pull requests as comments. You can use the default template, or you can choose to edit and customize this template to fit your organization’s specific requirements. You can also create custom templates using Go Templates.

  1. Select Integrations from the left sidebar.
  2. Click Edit Template next to GitHub PR comments under Notifications.
  3. Make the required changes and click Save Template.

To create custom templates for PR comments, you must understand the data supplied to the template.

See the following protobuf specification for the GithubCommentData message that this template uses.

syntax = "proto3";

package internal.endor.ai.endor.v1;

import "google/protobuf/wrappers.proto";
import "protoc-gen-openapiv2/options/annotations.proto";
import "spec/internal/endor/v1/common.proto";
import "spec/internal/endor/v1/finding.proto";
import "spec/internal/endor/v1/package_version.proto";
import "spec/internal/endor/v1/security_review_pull_request.proto";

option go_package = "github.com/endorlabs/monorepo/src/golang/spec/internal.endor.ai/endor/v1";
option java_package = "ai.endor.internal.spec";

// The list of finding UUIDs.
message FindingUuids {
  repeated string uuids = 1;
}

// The map of dependency name to findings.
message DependencyToFindings {
  map<string, FindingUuids> dependency_to_findings = 1;
}

// The map of PackageVersion UUID to DependencyToFindings.
message PackageToDependencies {
  map<string, DependencyToFindings> package_to_dependencies = 1;
}

message GithubCommentData {
  // The header of the PR comment. Identifies the PR comment published by Endor Labs.
  // It should always be at top of the template.
  google.protobuf.StringValue comment_header = 1;

  // The footer of the PR comment.
  google.protobuf.StringValue comment_footer = 2;

  // The map of finding UUID to finding object.
  map<string, internal.endor.ai.endor.v1.Finding> findings_map = 3;

  // The map of policy UUID to policy name.
  // This will contain only the policies that are triggered or violated.
  map<string, string> policies_map = 4;

  // The map of policy UUID to the list of finding UUIDs.
  map<string, FindingUuids> policy_findings_map = 5;

  // The map of PackageVersion UUID to PackageVersion object.
  map<string, internal.endor.ai.endor.v1.PackageVersion> package_versions_map = 6;

  // The data needs to be grouped as follows:
  //
  // - Policy 1
  // 		- Package 1
  //			- Dependency Package 1
  //				- Finding 1
  //				- Finding 2
  //			- Dependency Package 2
  //				- Finding 3
  //				- Finding 4
  // 		- Package 2
  //			- Dependency Package 1
  //				- Finding 1
  //				- Finding 5
  // - Policy 2
  //		....
  //
  //		Map 0[PolicyUUID]/Map 1[PkgVerUUID]/Map 2 [Dep Names]/Finding UUID
  map<string, PackageToDependencies> data_map = 7;

  google.protobuf.StringValue api_endpoint = 8;
}

// Data structure for security review comments on pull requests.
message SecurityReviewCommentData {
  option (internal.endor.ai.endor.v1.parent_kinds) = {};
  option (grpc.gateway.protoc_gen_openapiv2.options.openapiv2_schema) = {
    json_schema: {
      extensions: {
        key: "x-internal";
        value {bool_value: true}
      }
    }
  };

  // Represents a specific security risk identified in the code review.
  message SecurityRisk {
    // Icon representing the severity level of the risk.
    google.protobuf.StringValue severity_icon = 1;

    // The category or type of the security risk.
    google.protobuf.StringValue category = 2;

    // The title or name of the security risk.
    google.protobuf.StringValue title = 3;

    // Link to the specific code location where the risk was identified.
    google.protobuf.StringValue code_link = 4;

    // Detailed description of the security risk and potential impact.
    google.protobuf.StringValue description = 5;

    // The level of the security risk.
    google.protobuf.StringValue level = 6;

    // The type of impact (improvement or regression).
    google.protobuf.StringValue impact_type = 7;
  }

  // Represents an issue that occurred during the security analysis.
  message AnalysisIssue {
    // The type of the issue.
    SecurityReviewPullRequest.Spec.IssueType type = 1;

    // A descriptive message about the issue.
    google.protobuf.StringValue message = 2;

    // List of error messages encountered during analysis.
    repeated string errors = 3;

    // List of files that were skipped during analysis.
    repeated string skipped_files = 4;

    // List of files that were summarized instead of fully analyzed.
    repeated string summarized_files = 5;
  }

  // The header of the security review comment.
  // It should always be at the top of the template.
  google.protobuf.StringValue comment_header = 1;

  // The footer of the security review comment.
  google.protobuf.StringValue comment_footer = 2;

  // A description of the changes made in the pull request.
  google.protobuf.StringValue changes_description = 3;

  // A general security assessment description.
  google.protobuf.StringValue security_description = 4;

  // The list of identified security risks in the pull request.
  repeated SecurityRisk security_risks = 5;

  // The list of issues encountered during analysis.
  repeated AnalysisIssue analysis_issues = 6;
}

See the following sections to understand the Finding and PackageVersion definitions that are used in this protobuf specification:

See the following specification to understand the additional functions that are also available. You can access these functions by using their corresponding keys.


// FuncMap contains the additional functions that are available to CommentTemplate.
var FuncMap = template.FuncMap{
	"now": utils.ToTime, // 'now' gives the current time

	// 'enumToString' coverts the enums for finding level, finding category and finding tags to string
	"enumToString": utils.EnumToString,

	// 'getPackageVersionURL' returns the URL for a given PackageVersion
	"getPackageVersionURL": utils.GetPackageVersionURL,

	// 'getFindingURL' returns the URL for a given Finding
	"getFindingURL": utils.GetFindingURL,

	// 'add' returns the sum of two integers
	"add": func(n int, incr int) int {
		return n + incr
	},

	// 'getOtherFindingsPackageMarker' returns the key for _findingsWithNoPackages for lookup in DataMap
	// Not all findings are associated with a PackageVersion, such findings are grouped under this key
	// in the DataMap
	"getOtherFindingsPackageMarker": func() string { return _findingsWithNoPackages },

	// 'getOtherFindingsDependencyMarker' returns the key for _findingsWithNoDeps for lookup in DataMap
	// Not all findings are associated with a dependency, such findings are grouped under this key
	// in the DataMap
	"getOtherFindingsDependencyMarker": func() string { return _findingsWithNoDeps },

	// 'getFindingsCountString' returns a string with number of findings, example - "5 findings"
	"getFindingsCountString": utils.GetFindingsCountString,

	// 'hasFindingCategory' checks if a finding has a specific category
	"hasFindingCategory": utils.HasFindingCategory,

	// 'isNotEmptyString' checks if a string is not empty
	"isNotEmptyString": utils.IsNotEmptyString,

	// 'getCustomLocation' extracts the location from Custom field
	"getCustomLocation": func(finding *endorpb.Finding) string {
		return utils.GetCustomFieldValue(finding, "location")
	},

	// 'getCustomCodeSnippet' extracts the code snippet from Custom field
	"getCustomCodeSnippet": func(finding *endorpb.Finding) string {
		return utils.GetCustomFieldValue(finding, "code_snippet")
	},

	"fixBackticks": utils.FixUnclosedBackticks,

	// 'getFirstPartyReachableFunctions' extracts first-party functions from reachable paths
	"getFirstPartyReachableFunctions": utils.GetFirstPartyReachableFunctions,

	// 'groupFindingsByRemediation' groups findings by their remediation value
	// Returns a slice of GroupedRemediation where findings with the same remediation are grouped together
	"groupFindingsByRemediation": utils.GroupFindingsByRemediation,

	"consolidateRemediations": utils.ConsolidateRemediations,
}

Bazel

Bazel is an open-source build and test tool commonly used in monorepos to quickly build software across multiple languages.

You can use Endor Labs and Bazel to scan software for potential security issues and policy violations, prioritize vulnerabilities in the context of your applications, and understand relationships between software components.

Endor Labs also supports Bazel aspects to augment the build dependency graphs with additional information and actions. If you use custom rules to build your software, you can create your own custom Bazel aspects and integrate them with Endor Labs. See Bazel Aspects for more information.

Ensure that the following prerequisites are in place for a successful scan:

  • WORKSPACE file exists in your repository
  • bazel command installed and available
  • Bazel version 5.x.x, 6.x.x, or 7.x.x
  • Supported target types in your project

Before you proceed to run a deep scan, ensure that your system meets the following specification.

Project Size Processor Memory
Small projects 4-core processor 16 GB
Mid-size projects 8-core processor 32 GB
Large projects 16-core processor 64 GB

You can choose to build the targets before running the scan. Use the bazel build commands to do this by passing a comma-separated list of targets. For example, for targets //:test and //:test2, run bazel build //:test,//:test2.

endorctl will automatically build targets if they are not already built. endorctl uses bazel build //:target and bazel query 'deps(//:target)' --output graph to build each target and analyze its dependency tree.

The following table lists the supported Bazel rules and Endor Labs features for each language.

Language Supported Rules Version Requirements
Java java_library, java_binary

📝 While dependency scanning is supported for java_binary targets, call graph generation requires an uber jar containing all dependencies. The java_binary rule itself does not produce an uber jar, but its deploy.jar output provides the necessary consolidated dependencies for call graph analysis.
4.1+
Python py_binary, py_library, py_image

🛑 py_image only supports PY3 toolchain (py3_image)
0.9.0+
Go go_binary, go_library, go_image 0.40.1+ (Bazel 5.x-6.x), 0.42.0+ (Bazel 7.x)

📝 For Bazel with Gazelle in vendored mode, see Go with Gazelle.
Scala scala_binary, scala_library 5.0.0 - 6.6.0
Rust (Beta) rust_binary, rust_library 0.40.0+

Use the following commands to find scannable targets in your repository.

bazel query 'kind(java_binary, //...)'
bazel query 'kind(py_binary, //...)'
bazel query 'kind(go_binary, //...)'
bazel query 'kind(scala_binary, //...)'
bazel query 'kind(rust_binary, //...)'
bazel query 'kind(".*_binary", //...)'

Use these common query patterns to find targets.

Run the following command to find all targets in a specific package.

bazel query '//your-package:*'

Run the following command to find all binary targets across languages.

bazel query 'kind(".*_binary", //...)'

Run the following command to find targets with specific attributes.

bazel query 'attr(visibility, "//visibility:public", //...)'

Run the following command to find dependencies of a target.

bazel query 'deps(//your-target:name)'

Run the following command to find reverse dependencies of a target.

bazel query 'rdeps(//..., //your-target:name)'

The following table lists the common flags and options to scan Bazel projects.

Flag Purpose Example
--bazel-include-targets Specify targets to scan --bazel-include-targets=//app:main
--bazel-exclude-targets Exclude specific targets --bazel-exclude-targets=//test:*
--bazel-targets-query Use Bazel query to select targets --bazel-targets-query='kind(java_binary, //...)'
--bazel-workspace-path Non-root workspace location --bazel-workspace-path=./src/java
--bazel-vendor-manifest-path Go vendored mode go.mod path --bazel-vendor-manifest-path=./go.mod
--disable-private-package-analysis Skip private package analysis --disable-private-package-analysis
--quick-scan Fast scan mode --quick-scan
--bazel-rc-path Specify custom paths for Bazel configuration files --bazel-rc-path=.custom.bazelrc.user
—-bazel-flags Specify additional command-line flags that should be passed to Bazel when running a scan -—bazel-flags="config=ci, config=dev, remote_retries=5"
--use-bazel-aspects Enable Bazel aspect framework for dependency resolution --use-bazel-aspects
--bazel-aspect-package Override base aspect package (defaults to @//.endorctl/aspects) --bazel-aspect-package=@//endor_aspects
-o json Output format -o json | tee results.json

To scan with Endor Labs, you need to specify which targets to analyze using one of two approaches:

  • Specific target list: Provide a comma-separated list of exact targets using --bazel-include-targets.
  • Query-based selection: Use the Bazel query language to select all targets matching your criteria with --bazel-targets-query.

Run a fast scan for software composition visibility without reachability analysis.

endorctl scan --use-bazel --bazel-include-targets=//your-target-name --quick-scan

Perform a full analysis with dependency resolution, reachability analysis, and call graphs.

endorctl scan --use-bazel --bazel-include-targets=//your-target-name
Private Package Analysis
When a deep scan is performed, all private software dependencies are completely analyzed by default if they have not been previously scanned. This is a one-time operation and will slow down initial scans, but won’t impact subsequent scans.

You can scan specific targets in your Bazel project using the --bazel-include-targets flag.

Run the following command to scan a single target.

endorctl scan --use-bazel --bazel-include-targets=//your-target-name

To scan multiple targets, provide a comma-separated list.

endorctl scan --use-bazel --bazel-include-targets=//target1,//target2,//target3

Use these commands to scan targets based on queries.

endorctl scan --use-bazel --bazel-targets-query='kind(java_binary, //...)'
endorctl scan --use-bazel --bazel-targets-query='kind(py_binary, //...)'
endorctl scan --use-bazel --bazel-targets-query='kind(go_binary, //...)'
endorctl scan --use-bazel --bazel-targets-query='kind(scala_binary, //...)'
endorctl scan --use-bazel --bazel-targets-query='kind(rust_binary, //...)'
endorctl scan --use-bazel --bazel-targets-query='attr(visibility, "//visibility:public", //...)'

If your WORKSPACE file isn’t at the repository root.

endorctl scan --use-bazel \
  --bazel-targets-query='kind(java_binary, //...)' \
  --bazel-workspace-path=./src/java

For Go projects using Bazel with Gazelle in vendored mode.

endorctl scan --use-bazel \
  --bazel-include-targets=//your-go-target \
  --bazel-vendor-manifest-path=./go.mod

For large codebases, disable private package analysis.

endorctl scan --use-bazel \
  --bazel-include-targets=//your-target-name \
  --disable-private-package-analysis

For detailed information about scanning specific languages:

You can save the findings of your scans to a local file or view the findings in the Endor Labs user interface.

Run the following command to save the results of a quick scan to a local file.

endorctl scan --use-bazel --bazel-include-targets=//your-target-name --quick-scan -o json | tee results.json

Run the following command to save the results of a deep scan to a local file.

endorctl scan --use-bazel --bazel-include-targets=//your-target-name -o json | tee results.json

To view your scan results in the Endor Labs user interface:

  1. Sign in to Endor Labs user interface and select Projects from the left sidebar.
  2. Select the project you want to view and click Findings to view your scan results.

For more information, see Viewing findings in the Endor Labs user interface.

Check the following common issues and solutions for Bazel projects scans.

No targets found
Check your query syntax and target types.
Workspace not found
Use --bazel-workspace-path flag.
Build failures
Pre-build targets with bazel build.
Slow scans
Use --disable-private-package-analysis
Go vendored issues
Specify --bazel-vendor-manifest-path.

Bazel Aspects

In Bazel, a rule defines how a target is built. An aspect is a reusable extension that Bazel can apply to that rule and its dependencies during analysis. Refer to the Bazel documentation for more information.

Endor Labs uses aspects to perform software composition analysis on your software packages and extract dependency information in a structured and repeatable manner.

Endor Labs provides built-in Bazel aspects that automatically enhance dependency resolution when scanning Bazel workspaces. You can run scans with aspects enabled so that Endor Labs can automatically discover and use the appropriate aspect rules for your project. If you have custom rules to build your software, you can create your own custom Bazel aspects and integrate them with Endor Labs.

The following table lists the Bazel aspect command reference.

Flag Description
--use-bazel-aspects Enable the Bazel aspect framework. You need to use this flag along with --use-bazel.
--bazel-aspect-package By default, endorctl reads the contents of the @//.endorctl/aspects package for the available aspects. To override the base aspect package, use the --bazel-aspect-package flag. For example, --bazel-aspect-package=@//endor_aspects.

Endor Labs supports Bazel aspects for the following open-source rulesets:

Ruleset Minimum Version Supported Languages
rules_go 0.42.0 Go
rules_rust 0.40.0 Rust
rules_js 2.0.0 JavaScript
Version support
Endor Labs automatically selects the appropriate aspect rule version based on the ruleset version detected in your workspace.

Run the following command to scan the workspace using Bazel aspects.

endorctl scan --use-bazel --use-bazel-aspects

Aspect rules are located under the .endorctl/aspects directory in the workspace.

For example, if your workspace is located at ~/my-workspace, the aspect rules will be located at ~/my-workspace/.endorctl/aspects.

Place your custom aspects in the .endorctl/aspects/custom directory.

When Endor Labs scans a Bazel workspace with aspects enabled, it performs the following steps:

  1. Set up Aspects: Initializes and extracts the Bazel aspects plugin to the workspace.
  2. Query the workspace: Runs bazel query to get information about the rules versions used in the workspace.
  3. Query the target: Runs bazel query to query the target being scanned and get information about the external dependencies used by it.
  4. Execute the aspect rule: Runs bazel build to execute the aspect rule.
  5. Read the aspect output: Reads the aspect output to get the dependency information.

Bazel aspects output data in JSON format, which Endor Labs uses to populate the dependency graph.

When executing aspects, Endor Labs runs bazel build with specific flags and configuration.

Endor Labs creates a temporary .bazelrc configuration that includes:

Flag Purpose
--aspects=<aspect_reference> Specifies the aspect to execute.
--output_groups=endor_sca_info Requests only the endor_sca_info output group.
--aspects_parameters=external_target_json='<json>' Passes external dependency information to the aspect.
--aspects_parameters=ref='<target_ref>' Passes the target reference (for example, git commit SHA) to the aspect.
--build_event_json_file=<bep_file> Specifies the Build Event Protocol (BEP) output file. endorctl always uses BEP to read build events and retrieve aspect-generated files.
--aspects_parameters=json_go_mod='<go_mod_json>' Passes Go module dependency information. (Go targets only)

When using remote executors or remote caching, aspect-generated files may be stored remotely, making them inaccessible to endorctl for processing.

To ensure all Bazel aspect outputs are available locally, endorctl automatically sets the following flags:

  • --remote_download_outputs=all: Forces all aspect outputs to be downloaded locally when using remote executors (for example, Build without Bytes). This is required because endorctl needs to read the json files generated by aspects to populate the dependency graph.
  • --remote_download_toplevel_outputs=all: Ensures top-level outputs are also downloaded locally, which is necessary for accessing aspect-generated files.

For more information about these Bazel flags, refer to the Bazel command-line reference.

You can extend Bazel with custom rules to support proprietary toolchains, internal build workflows or enterprise-specific requirements that are not covered by Bazel’s built-in rules. While powerful, these custom rules can obscure dependency information from standard analysis tools.

Endor Labs can automatically analyze dependencies for open-source rule sets. However, custom rules often define dependencies in a non-standard way, such as:

  • Generated targets
  • Internal dependency resolution logic

Since Bazel considers custom rules as first-class citizens, dependency information inside them is not automatically visible unless explicitly surfaced. Without an aspect, Endor Labs cannot reliably determine:

  • What dependencies the rule introduces
  • Whether those dependencies are internal or third-party
  • How they relate to the rest of the build graph

Custom aspects solve this by explicitly exposing dependency metadata in a format Endor Labs understands.

Before you can get started with developing your own aspects, ensure you have the following set up.

Your machine must have the relevant permissions to access the git repository regardless of where it is hosted, be it GitHub, GitLab, or self-hosted.

Bazel should be installed in the machine you are going to build custom aspects. If you don’t have it installed already, follow the Bazel installation instructions.

Run the following command to check your Bazel installation.

bazel version

You also need the endorctl CLI available in your path. See endorctl CLI documentation for more information.

Beta
Custom aspects support is currently in beta. The API and behavior may change in future releases as we continue to improve the framework based on feedback.

The following sections provide information to help you build your custom Bazel aspects.

To help engineers get started, we have open-sourced an example for JavaScript rules. You can find the complete codebase in the example repository.

You need a custom Bazel aspect if:

  • Your dependency graph flows through a custom Bazel rule kind (rule class) that Endor Labs does not support out of the box, such as my_company_js_binary.
  • The rule declares dependencies in non-standard locations, including custom attribute names, generated targets, or internal dependency resolution logic.

Custom aspects must be available in the repository that you want to scan.

Ensure that you organize them as shown in the following directory structure for endorctl to recognize them. Use –bazel-aspect-package to configure the base package (defaults to @//.endorctl/aspects).

.endorctl/aspects/
└── custom/                           # User-defined custom aspects
   └── {ecosystem}/
       └── {rule_class}/             # Directory named after rule class
           └── {rule_class}.bzl      # Custom aspect file

Use the following path pattern to create your custom aspect.

{baseAspectPackage}/custom/{ecosystem}/{rule_class}/{rule_class}.bzl
Component Example
Ecosystem Go, Rust, JavaScript
Rule Class go_binary, my_custom_rule

Your custom aspect must be named endor_resolve_dependencies. endorctl discovers it by looking for this symbol in a .bzl file at the path described above.

The aspect definition must declare attr_aspects to tell Bazel which rule attributes to traverse (for example, deps, data, srcs). It must also declare the following mandatory attributes. The scan fails if any are excluded.

Attribute Type Required Description
ref attr.string() Yes Git reference (branch/tag) for the scan. Passed by endorctl via --aspects_parameters.
log_level attr.string(default = "DEBUG") Yes Logging verbosity. Used internally by the aspect for debug output.
external_target_json attr.string(default = "{}") Yes JSON output of external dependency query. Passed by endorctl via --aspects_parameters.

The following attribute is language-specific and optional.

Attribute Type Required Description
json_go_mod attr.string(default = "{}") Go only Go module dependency information. Passed by endorctl via --aspects_parameters for Go targets.

The output files must be JSON. Serialize your provider (for example, EndorDependencyInfo) to JSON with json.encode_indent(). The following table lists the fields Endor Labs expects.

Field Type Required Description
original_label string Yes Canonical Bazel label (must use @@// prefix)
purl string Yes Package URL (PURL) for the dependency, for example pkg:npm/package-name@version
internal boolean Yes true for first-party code, false for third-party
dependencies string[] No List of direct dependency labels
vendored boolean No true if vendored dependency
hide boolean No true to hide the node from the Endor Labs dependency graph
depset requirement
The output file must be returned in a depset from the endor_sca_info output group. endorctl reads these depsets through BEP to construct the complete dependency tree.

The Endor Labs aspects example repository provides a complete custom aspect for JavaScript rules.

The example defines an EndorDependencyInfo provider that carries the metadata Endor Labs needs for each target: original_label, purl, dependencies, internal, vendored, and hide.

After defining the provider, it defines helper functions. _get_dependency_list() goes through each dependency attribute, and collects labels of targets that have an endor_sca_info output group. _get_dependency_files() collects the output files from those targets. _get_sca_information() resolves the package name and version from the rule context, and falls back to the target label and ref attribute when explicit metadata is not available.

The aspect implementation (_impl) extracts deps, data, src, and srcs from the rule attributes. It calls the helpers to build a list of dependency labels and collect transitive dependency files. It then constructs a PURL (for example, pkg:npm/package-name@version), populates the EndorDependencyInfo provider, and writes it to a JSON file using json.encode_indent(). Finally, it returns OutputGroupInfo(endor_sca_info = depset([output_file] + dependency_files)), combining the current target’s output with all files from its transitive dependencies.

The aspect itself is defined as endor_resolve_dependencies with the mandatory attributes described in Aspect attributes.

endorctl reads the resulting depsets through the Build Event Protocol (BEP) to construct the complete dependency graph. These files must be available locally. endorctl ensures downloads when using remote execution or caching (see Bazel aspect remote execution and caching).

Working with monorepos

Large monorepos are a reality for many organizations. Since monorepos can have anywhere from tens to even hundreds of packages scanning all packages in a monorepo can take significant periods of time. While the time requirements may vary based on your development team and pipeline times, in general, development teams need quick testing times to improve their productivity while security teams need full visibility across a monorepo. These two needs can conflict without performance engineering or an asynchronous scanning strategy. This documentation outlines some performance engineering and scanning strategies for large monorepos.

See Bazel documentation if you use a monorepo with Bazel as your primary build system.

When scanning a large monorepo, a common approach taken by security teams is to run an asynchronous cron job outside a CI/CD-based environment. This is often the point of least friction but is prohibitive. With this approach, inline blocking of critical issues is not generally possible. We would be remiss not to mention this as a scanning strategy for monorepos but this approach is NOT recommended beyond a step to get initial visibility into a large monorepo.

The following performance enhancements may be used with Endor Labs to enable the scanning of large monorepos:

For many CI/CD systems path filters are readily available. For example, with GitHub Actions, dorny path filters is a readily accessible way to establish a set of filters by a path. This is generally the most effective path to handle monorepo deployments but does require the highest level of investment in terms of human time. The human time investment is made up for by the time saved by reducing the need to scan everything on each change.

Based on the paths that change you can scope scans based on the files that have actually changed. For example, you can scan only the packages in a monorepo that are housed under the ui/ directory when this path has changed by running a scan such as endorctl scan --include-path=ui/** when this path has been modified.

Using a path filtering approach each team working in a monorepo would need to be responsible for the packages that they maintain, but generally, each team may be associated with one to several pre-defined directory paths.

When scanning a large monorepo organizations can choose to regularly scan the whole monorepo based on the packages or directories they’d like to scan. Different jobs may be created that scan each directory simultaneously.

Using scoped scans for monorepos with multiple parallel include patterns is a common performance optimization for monorepos.

The following example shows parallel GitHub action scan that you can use as a reference.

name: Parallel Actions
on:
  push:
    branches: [main]
jobs:
  scan-ui:
    runs-on: ubuntu-latest
    steps:
      - name: UI Endor Labs Scan
        run: endorctl scan --include-path=ui/
  scan-backend:
    runs-on: ubuntu-latest
    steps:
      - name: Backend Endor Labs Scan
        run: endorctl scan --include-path=backend/

In this example, the directories ui/ and backend/ are both scanned simultaneously and the results are aggregated by Endor Labs. This approach can improve the overall scan performance across a monorepo where each directory can be scanned independently.

To include or exclude a package based on its directory.

endorctl scan --include-path="directory/path/"

See scoping scans for more information on approaches to scoping scans.

For teams that work out of smaller monorepos, it is often most reasonable to parallelize scanning based on the language that is being scanned and performance optimize for individual languages based on need.

Below is an example parallel GitHub action scan that can be used as a reference. In this example, JavaScript and Java are scanned at the same time and aggregated together by Endor Labs. This approach can improve the overall scan performance across a monorepo with multiple languages.

name: Parallel Actions
on:
  push:
    branches: [main]
jobs:
  scan-java:
    runs-on: ubuntu-latest
    steps:
      - name: Java Endor Labs Scan
        run: endorctl scan --languages=java
  scan-javascript:
    runs-on: ubuntu-latest
    steps:
      - name: Javascript Endor Labs Scan
        run: endorctl scan --languages=javascript,typescript

Run the following command to scan a project for only packages written in TypeScript or JavaScript.

endorctl scan --languages=javascript,typescript

Run the following command to scan a project for only packages used for packages written in Java.

endorctl scan --languages=java

Define supported languages as a comma-separated list of the following languages: c,c#,go,java,javascript,kotlin,php,python,ruby,rust,scala,swift,typescript,swifturl