> ## Documentation Index
> Fetch the complete documentation index at: https://docs.endorlabs.com/llms.txt
> Use this file to discover all available pages before exploring further.
# Finding policies
> Learn about finding policies and how to use them.
All findings are enabled, disabled and/or customized via policies. There are three types of Finding Policies:
1. [Open-source software management](/platform-administration/policies/finding-policies/oss-policies) - Enable or disable findings for Vulnerabilities and Malicious Packages, Outdated Dependencies, Recently Released Dependencies, Unmaintained Dependencies, Unpinned Direct Dependencies, Unused Direct Dependencies, License Risks
2. [Repository security posture management configuration](/platform-administration/policies/finding-policies/managing-scm-configuration) - Enable, disable, or customize out-of-the-box policies repository security posture management (RSPM)
3. [Custom](#custom-finding-policies) - Create custom policies from scratch or from pre-defined policy templates
## Manage finding policies
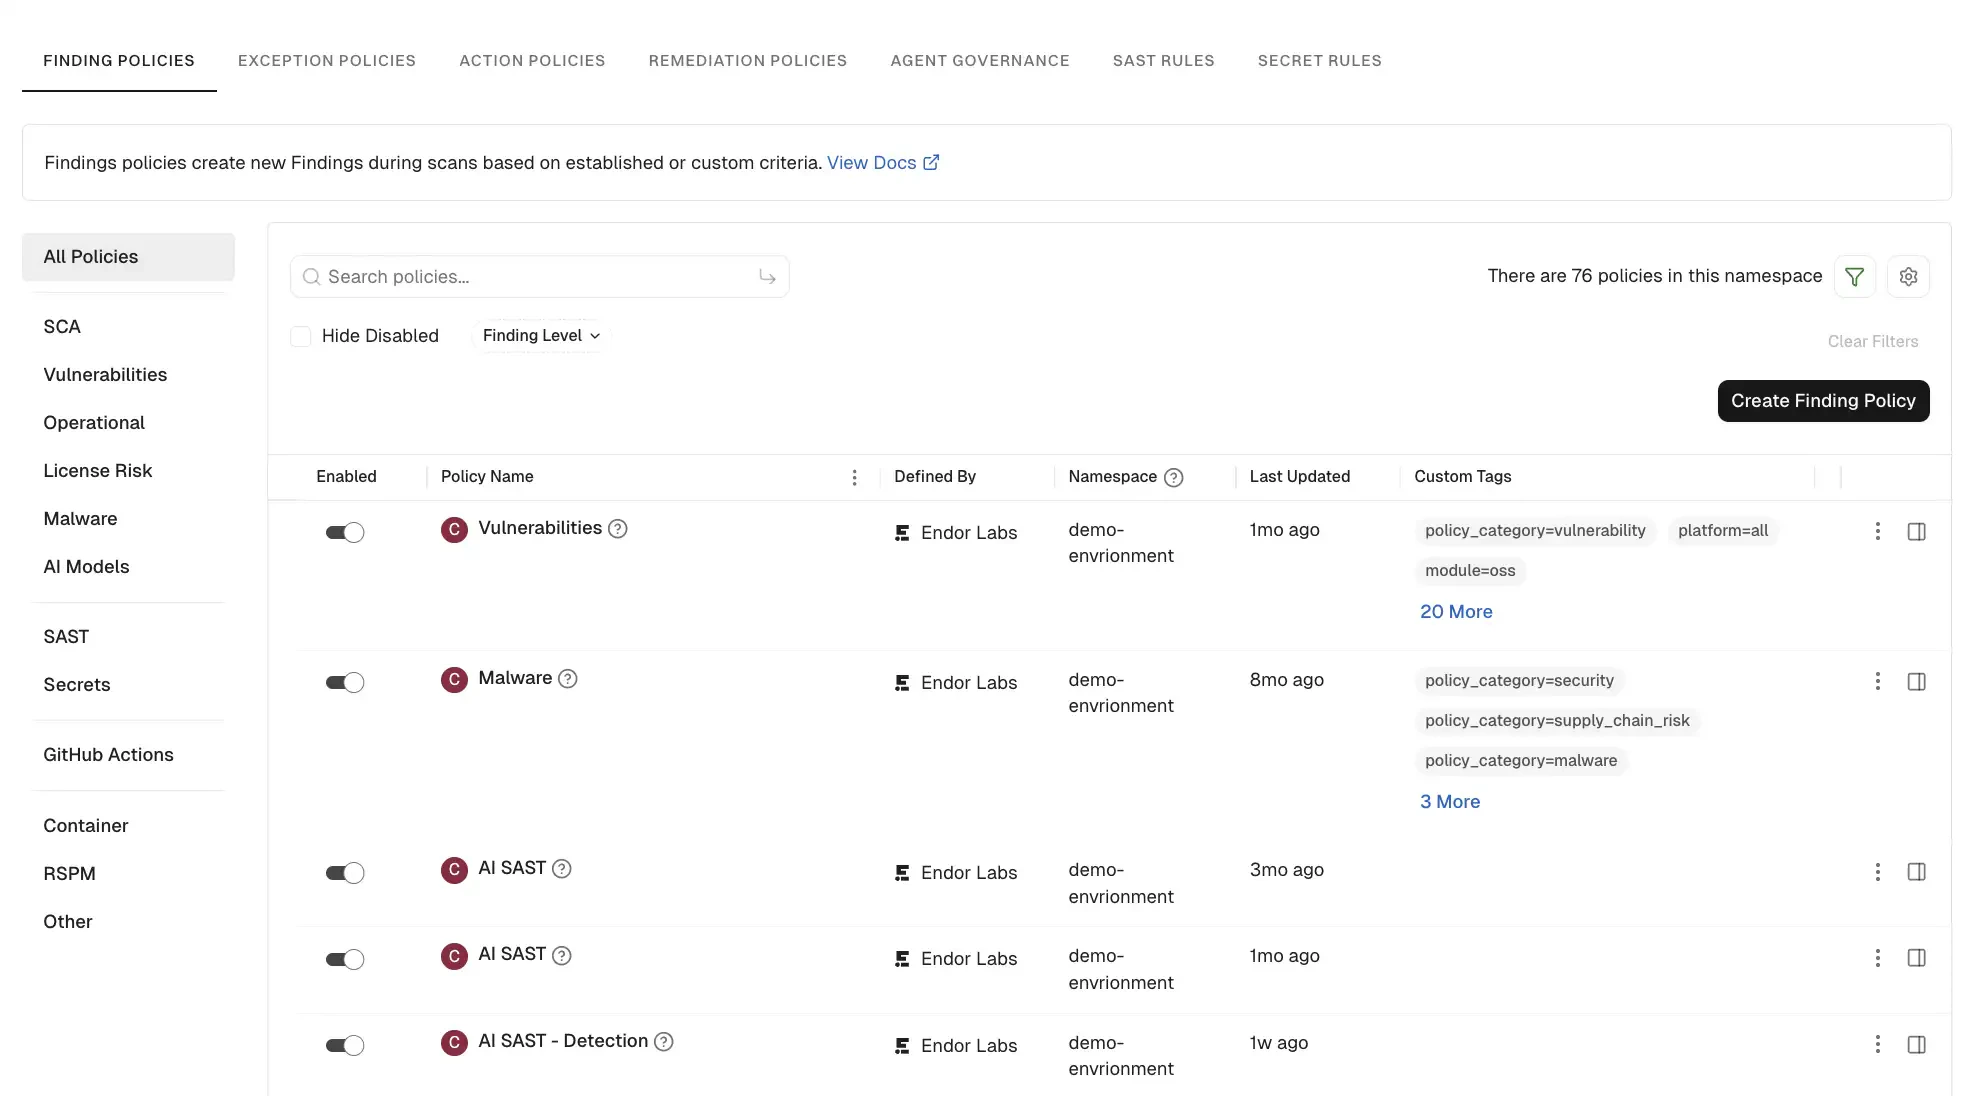
You can view, enable, disable, edit, upgrade, or delete your Endor Labs finding policies.
1. Select **User menu** > **Policies & Rules** from the left sidebar.
2. Select **Finding Policies** to view the list of finding policies.
3. The preset filters help you locate the finding policies that matter most to you. Select a category to narrow down and focus on the relevant policies.
4. Enter text in the search bar to find a policy by name or keyword.
5. Use the toggle next to a finding policy to enable or disable the finding policy.
6. Select **Hide Disabled** to hide policies that are not enabled.
7. Use **Finding Level** to filter policies by **Critical**, **High**, **Medium**, or **Low**.
8. To edit a policy, click on the vertical three dots and select **Edit**.
9. To delete a policy, click on the vertical three dots and select **Delete**. The findings associated with the policy are not deleted.
 ### Upgrade a finding policy
Upgrades are available when there are changes to a policy, such as new fields, parameters, tags, or updates to the Rego code.
After upgrading a policy, you can't revert it to its previous version.
You can upgrade a policy to the latest template version in any of the following two ways:
* Click on the vertical three dots and select **Upgrade** and click **Upgrade Policy**.
* Click on **Upgrade Available**, review the release notes and click **Upgrade Policy**.
You can enable automatic policy upgrades from the **Policies & Rules** system settings. See [configure policy settings](/platform-administration/configure-system-settings#configure-policy-settings) for more information.
You can upgrade finding policies if you have admin permissions.
## View policy details
1. Select **User menu** > **Policies & Rules** from the left sidebar.
2. Select **Finding Policies** to view the list of finding policies.
3. Select a policy you want to review and click **View Details**.
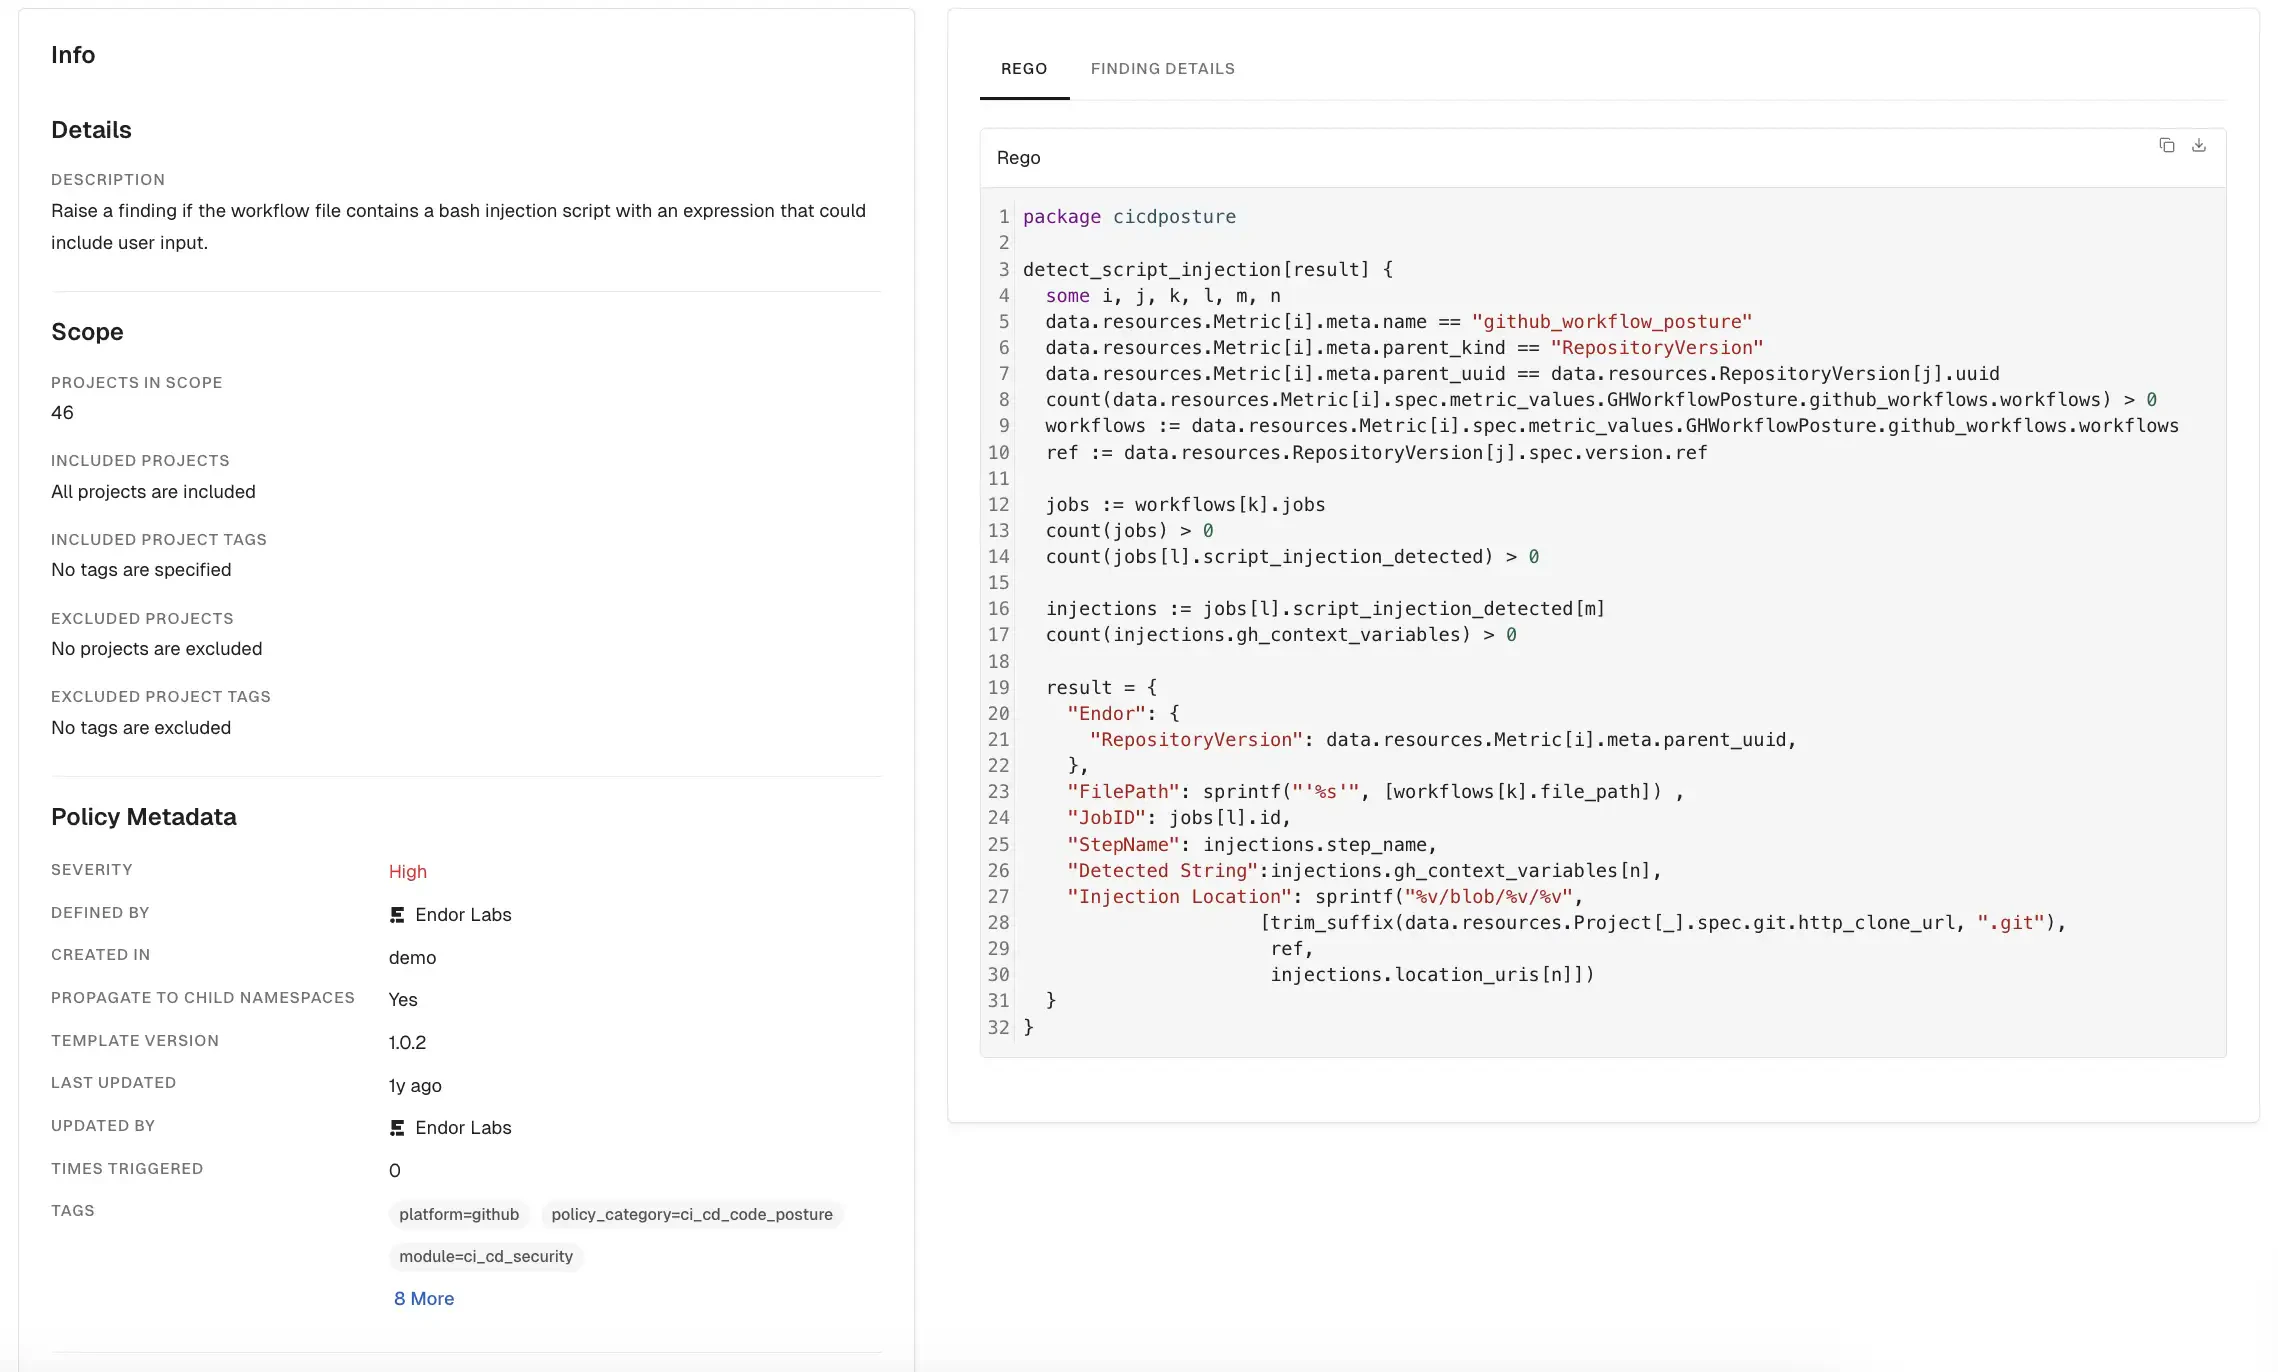
You can see the policy’s description, scope, and metadata. You can review the severity, finding categories, explanatory details, remediation steps and the Rego rules that implement the policy logic.
### Upgrade a finding policy
Upgrades are available when there are changes to a policy, such as new fields, parameters, tags, or updates to the Rego code.
After upgrading a policy, you can't revert it to its previous version.
You can upgrade a policy to the latest template version in any of the following two ways:
* Click on the vertical three dots and select **Upgrade** and click **Upgrade Policy**.
* Click on **Upgrade Available**, review the release notes and click **Upgrade Policy**.
You can enable automatic policy upgrades from the **Policies & Rules** system settings. See [configure policy settings](/platform-administration/configure-system-settings#configure-policy-settings) for more information.
You can upgrade finding policies if you have admin permissions.
## View policy details
1. Select **User menu** > **Policies & Rules** from the left sidebar.
2. Select **Finding Policies** to view the list of finding policies.
3. Select a policy you want to review and click **View Details**.
You can see the policy’s description, scope, and metadata. You can review the severity, finding categories, explanatory details, remediation steps and the Rego rules that implement the policy logic.
 ## Custom finding policies
Create custom finding policies to identify additional issues based on the needs of your organization. For example, you can create license violation policies to define the behavior for missing, unknown, problematic, or incompatible licenses. You can permit or restrict packages with certain license types.
Endor Labs provides finding policy templates for multiple use cases:
* [License management](/platform-administration/policies/finding-policies/license-policies)
* [Secret detection](/platform-administration/policies/finding-policies/secret-policies)
### Create a finding policy from template
Create a finding policy from a pre-defined Endor Labs template.
1. Select **User menu** > **Policies & Rules** from the left sidebar.
2. Click **Create Finding Policy**.
3. Choose **From Template** to create a finding policy from template.
4. Choose a **Template Category** from the list.
5. Choose a **Policy Template** from the list. The template details are pre-filled with recommended values on the form.
6. Endor Labs pre-populates **Severity**, **Summary**, **Explanation**, **Remediation**, **Finding Name**, and **Finding Categories** with recommended values. You can modify these fields except **Finding Categories**.
7. In **Finding Custom Tags**, enter custom tags that you want to associate with the findings of this policy. Custom tags can have a maximum of 255 characters and can contain letters, numbers, and characters = @ \_ -. These are different and separate from the system defined finding tags.
8. You can **Assign Scope** to the finding policy by specifying what projects the policy has to scan.
* In **Inclusions**, enter the projects and the tags of the projects that you want to scan.
* In **Exclusions**, enter the projects and the tags of the projects that you do not want to scan. Exclusions take precedence over the inclusions, in case of a conflict.
* Click the link to view the projects included in the finding policy scan.
* Click **Add project tag to these projects** and enter a tag for the selected projects. Click **Save Tags** to apply it or **Reset Tags** to discard changes.
* You can set custom tags for your projects from **Projects** > **Settings** > **Custom Tags**. See [Tagging projects](/platform-administration/policies/tagging-projects) for more information about creating project tags.
9. **Name Your Finding Policy**.
* Enter a human readable **Name** for your finding policy.
* Enter a **Description** for your finding policy that describes what it does.
* Enter any **Policy Tags** that you want to associate with your policy. Tags can have a maximum of 255 characters and can contain letters, numbers, and characters = @ \_ -.
10. **Advanced**: When you define a policy you do so for the current namespace and all child namespaces. If you do not want the policy to be applied to any child namespaces, click **Advanced** and deselect **Propagate this policy to all child namespaces**.
11. Click **Create Finding Policy**. The policy will be enabled by default.
Rescan the project to apply the newly created finding policy and update the findings.
### Create a finding policy from scratch
Write a finding policy from scratch using the [OPA Rego policy language](https://www.openpolicyagent.org/docs/latest/policy-language/).
1. Select **User menu** > **Policies & Rules** from the left sidebar.
2. Click **Create Finding Policy**.
3. Choose **From Scratch** to author a finding policy from scratch.
4. Enter the Rego rule for the policy in **Rego Definition**. For instance, the following Rego rule identifies dependencies with an Endor Labs overall score lower than 7.
```bash theme={null}
package examples
match_package_version_score[result] {
some i
data.resources.Metric[i].meta.name == "package_version_scorecard"
data.resources.Metric[i].meta.parent_kind == "PackageVersion"
data.resources.Metric[i].meta.parent_uuid == data.resources.PackageVersion[_].uuid
score := data.resources.Metric[i].spec.metric_values.scorecard.score_card.overall_score
score < 7
result = {
"Endor": {
"PackageVersion": data.resources.Metric[i].meta.parent_uuid
},
"Score": sprintf("%v", [score])
}
}
```
5. Enter the OPA **Query Statement** for the rule in the following format: `data..`. For the example, the query statement is `data.examples.match_package_version_score` in the above Rego rule.
6. Select the **Resource Kinds** required to evaluate the policy. For the example above the required resource kinds are `PackageVersion` and `Metric`.
7. In **Group by Fields**, if applicable, list which custom output fields to group the findings by in addition to the resource UUID. Use this optional field if you want to be able to raise multiple findings against the same finding target. For example, a repository version may have multiple exposed secrets and thus there are multiple findings of the same type for the same repository version.
You do not need to add all (or any) custom fields here, just the ones you want to be used to group the matches by.
8. Choose a **Severity** for the generated finding.
9. Enter a short **Summary** of the finding.
10. Enter an **Explanation** for the finding. You can include additional information or explain why this finding is important.
11. Describe how to mitigate the finding in **Remediation**.
12. Enter the **Finding Name**.
13. Select one or more categories for the finding in **Finding Categories**.
14. See steps 6-10 above under [Create a finding policy from template](#create-a-finding-policy-from-template)
The application verifies the Rego syntax and query statement before creating the policy. However, the logic cannot be fully validated without input data. See also [validate policy](#validate-policy).
#### Available resource kinds
Every policy must specify the resource kinds it needs to execute the Rego logic. Requested resource kind objects for the current scan are made available to the Rego code under `data.resources.`. The following resource kinds are available:
* [Project](/developers-api/rest-api/using-the-rest-api/data-model/resource-kinds#project)
* [Repository](/developers-api/rest-api/using-the-rest-api/data-model/resource-kinds#repository)
* [RepositoryVersion](/developers-api/rest-api/using-the-rest-api/data-model/resource-kinds#repositoryversion)
* [PackageVersion](/developers-api/rest-api/using-the-rest-api/data-model/resource-kinds#packageversion)
* [DependencyMetadata](/developers-api/rest-api/using-the-rest-api/data-model/resource-kinds#dependencymetadata)
* [LinterResult](/developers-api/rest-api/using-the-rest-api/data-model/resource-kinds#linterresult)
* [Metric](/developers-api/rest-api/using-the-rest-api/data-model/resource-kinds#metric)
#### Finding targets
Findings are raised against finding targets.
Findings targets have one of three resource kinds:
1. **Repository** (for example, default branch protections)
2. **RepositoryVersion** (for example, CI/CD coverage, secrets)
3. **PackageVersion** (for example, vulnerabilities, scores, licenses)
Individual finding target records are identified by their universally unique identifier (UUID).
The finding target record is the parent of the finding record.
The finding target resource kind is **PackageVersion** for findings in the root package as well as for findings in its dependencies. A dependency **PackageVersion** record may or not be in the same namespace as the root package. The relationships between the root package and its dependencies is captured by the corresponding **DependencyMetadata** records. All **DependencyMetadata** records are children of the root **PackageVersion** record in the same namespace as the root **PackageVersion**.
#### Expected output format
All finding policies must generate the finding payload as json data, listing the [finding target](#finding-targets) resource kind and UUID under "Endor" in the following format.
```bash theme={null}
foo[result] {
result = {
"Endor": {
:
},
:
}
}
```
##### Custom output fields
Custom key-value pairs are optional. The value is treated as a single string and must be formatted accordingly.
If a custom key is specified in the **Group by Fields** list then the value is appended to the finding name (the key is not included). Example: `SSL disabled for Webhook ID #444611302`, where `SSL disabled for Webhook` is the value of the **Finding Name** field and `ID #444611302` is the value of a custom key.
Otherwise, both the key and the value are listed at the end of the finding summary on a new line for each pair. Example: `Score: 4.10`.
#### Validate policy
See the [endorctl validate policy](/developers-api/cli/commands/validate) command for details on how to validate a custom policy and inspect the matches returned for a given project.
## Custom finding policies
Create custom finding policies to identify additional issues based on the needs of your organization. For example, you can create license violation policies to define the behavior for missing, unknown, problematic, or incompatible licenses. You can permit or restrict packages with certain license types.
Endor Labs provides finding policy templates for multiple use cases:
* [License management](/platform-administration/policies/finding-policies/license-policies)
* [Secret detection](/platform-administration/policies/finding-policies/secret-policies)
### Create a finding policy from template
Create a finding policy from a pre-defined Endor Labs template.
1. Select **User menu** > **Policies & Rules** from the left sidebar.
2. Click **Create Finding Policy**.
3. Choose **From Template** to create a finding policy from template.
4. Choose a **Template Category** from the list.
5. Choose a **Policy Template** from the list. The template details are pre-filled with recommended values on the form.
6. Endor Labs pre-populates **Severity**, **Summary**, **Explanation**, **Remediation**, **Finding Name**, and **Finding Categories** with recommended values. You can modify these fields except **Finding Categories**.
7. In **Finding Custom Tags**, enter custom tags that you want to associate with the findings of this policy. Custom tags can have a maximum of 255 characters and can contain letters, numbers, and characters = @ \_ -. These are different and separate from the system defined finding tags.
8. You can **Assign Scope** to the finding policy by specifying what projects the policy has to scan.
* In **Inclusions**, enter the projects and the tags of the projects that you want to scan.
* In **Exclusions**, enter the projects and the tags of the projects that you do not want to scan. Exclusions take precedence over the inclusions, in case of a conflict.
* Click the link to view the projects included in the finding policy scan.
* Click **Add project tag to these projects** and enter a tag for the selected projects. Click **Save Tags** to apply it or **Reset Tags** to discard changes.
* You can set custom tags for your projects from **Projects** > **Settings** > **Custom Tags**. See [Tagging projects](/platform-administration/policies/tagging-projects) for more information about creating project tags.
9. **Name Your Finding Policy**.
* Enter a human readable **Name** for your finding policy.
* Enter a **Description** for your finding policy that describes what it does.
* Enter any **Policy Tags** that you want to associate with your policy. Tags can have a maximum of 255 characters and can contain letters, numbers, and characters = @ \_ -.
10. **Advanced**: When you define a policy you do so for the current namespace and all child namespaces. If you do not want the policy to be applied to any child namespaces, click **Advanced** and deselect **Propagate this policy to all child namespaces**.
11. Click **Create Finding Policy**. The policy will be enabled by default.
Rescan the project to apply the newly created finding policy and update the findings.
### Create a finding policy from scratch
Write a finding policy from scratch using the [OPA Rego policy language](https://www.openpolicyagent.org/docs/latest/policy-language/).
1. Select **User menu** > **Policies & Rules** from the left sidebar.
2. Click **Create Finding Policy**.
3. Choose **From Scratch** to author a finding policy from scratch.
4. Enter the Rego rule for the policy in **Rego Definition**. For instance, the following Rego rule identifies dependencies with an Endor Labs overall score lower than 7.
```bash theme={null}
package examples
match_package_version_score[result] {
some i
data.resources.Metric[i].meta.name == "package_version_scorecard"
data.resources.Metric[i].meta.parent_kind == "PackageVersion"
data.resources.Metric[i].meta.parent_uuid == data.resources.PackageVersion[_].uuid
score := data.resources.Metric[i].spec.metric_values.scorecard.score_card.overall_score
score < 7
result = {
"Endor": {
"PackageVersion": data.resources.Metric[i].meta.parent_uuid
},
"Score": sprintf("%v", [score])
}
}
```
5. Enter the OPA **Query Statement** for the rule in the following format: `data..`. For the example, the query statement is `data.examples.match_package_version_score` in the above Rego rule.
6. Select the **Resource Kinds** required to evaluate the policy. For the example above the required resource kinds are `PackageVersion` and `Metric`.
7. In **Group by Fields**, if applicable, list which custom output fields to group the findings by in addition to the resource UUID. Use this optional field if you want to be able to raise multiple findings against the same finding target. For example, a repository version may have multiple exposed secrets and thus there are multiple findings of the same type for the same repository version.
You do not need to add all (or any) custom fields here, just the ones you want to be used to group the matches by.
8. Choose a **Severity** for the generated finding.
9. Enter a short **Summary** of the finding.
10. Enter an **Explanation** for the finding. You can include additional information or explain why this finding is important.
11. Describe how to mitigate the finding in **Remediation**.
12. Enter the **Finding Name**.
13. Select one or more categories for the finding in **Finding Categories**.
14. See steps 6-10 above under [Create a finding policy from template](#create-a-finding-policy-from-template)
The application verifies the Rego syntax and query statement before creating the policy. However, the logic cannot be fully validated without input data. See also [validate policy](#validate-policy).
#### Available resource kinds
Every policy must specify the resource kinds it needs to execute the Rego logic. Requested resource kind objects for the current scan are made available to the Rego code under `data.resources.`. The following resource kinds are available:
* [Project](/developers-api/rest-api/using-the-rest-api/data-model/resource-kinds#project)
* [Repository](/developers-api/rest-api/using-the-rest-api/data-model/resource-kinds#repository)
* [RepositoryVersion](/developers-api/rest-api/using-the-rest-api/data-model/resource-kinds#repositoryversion)
* [PackageVersion](/developers-api/rest-api/using-the-rest-api/data-model/resource-kinds#packageversion)
* [DependencyMetadata](/developers-api/rest-api/using-the-rest-api/data-model/resource-kinds#dependencymetadata)
* [LinterResult](/developers-api/rest-api/using-the-rest-api/data-model/resource-kinds#linterresult)
* [Metric](/developers-api/rest-api/using-the-rest-api/data-model/resource-kinds#metric)
#### Finding targets
Findings are raised against finding targets.
Findings targets have one of three resource kinds:
1. **Repository** (for example, default branch protections)
2. **RepositoryVersion** (for example, CI/CD coverage, secrets)
3. **PackageVersion** (for example, vulnerabilities, scores, licenses)
Individual finding target records are identified by their universally unique identifier (UUID).
The finding target record is the parent of the finding record.
The finding target resource kind is **PackageVersion** for findings in the root package as well as for findings in its dependencies. A dependency **PackageVersion** record may or not be in the same namespace as the root package. The relationships between the root package and its dependencies is captured by the corresponding **DependencyMetadata** records. All **DependencyMetadata** records are children of the root **PackageVersion** record in the same namespace as the root **PackageVersion**.
#### Expected output format
All finding policies must generate the finding payload as json data, listing the [finding target](#finding-targets) resource kind and UUID under "Endor" in the following format.
```bash theme={null}
foo[result] {
result = {
"Endor": {
:
},
:
}
}
```
##### Custom output fields
Custom key-value pairs are optional. The value is treated as a single string and must be formatted accordingly.
If a custom key is specified in the **Group by Fields** list then the value is appended to the finding name (the key is not included). Example: `SSL disabled for Webhook ID #444611302`, where `SSL disabled for Webhook` is the value of the **Finding Name** field and `ID #444611302` is the value of a custom key.
Otherwise, both the key and the value are listed at the end of the finding summary on a new line for each pair. Example: `Score: 4.10`.
#### Validate policy
See the [endorctl validate policy](/developers-api/cli/commands/validate) command for details on how to validate a custom policy and inspect the matches returned for a given project.