> ## Documentation Index
> Fetch the complete documentation index at: https://docs.endorlabs.com/llms.txt
> Use this file to discover all available pages before exploring further.
# Action policies
> Learn about action policies and how to use them.
Action policies define the workflows that are triggered when the application encounters a given set of criteria (a.k.a. findings).
For example, action policies can be used to:
* Configure the behavior of scan in a CI/CD based environment.
* Set up custom ticketing workflows.
* Set up custom messaging workflows.
## Manage action policies
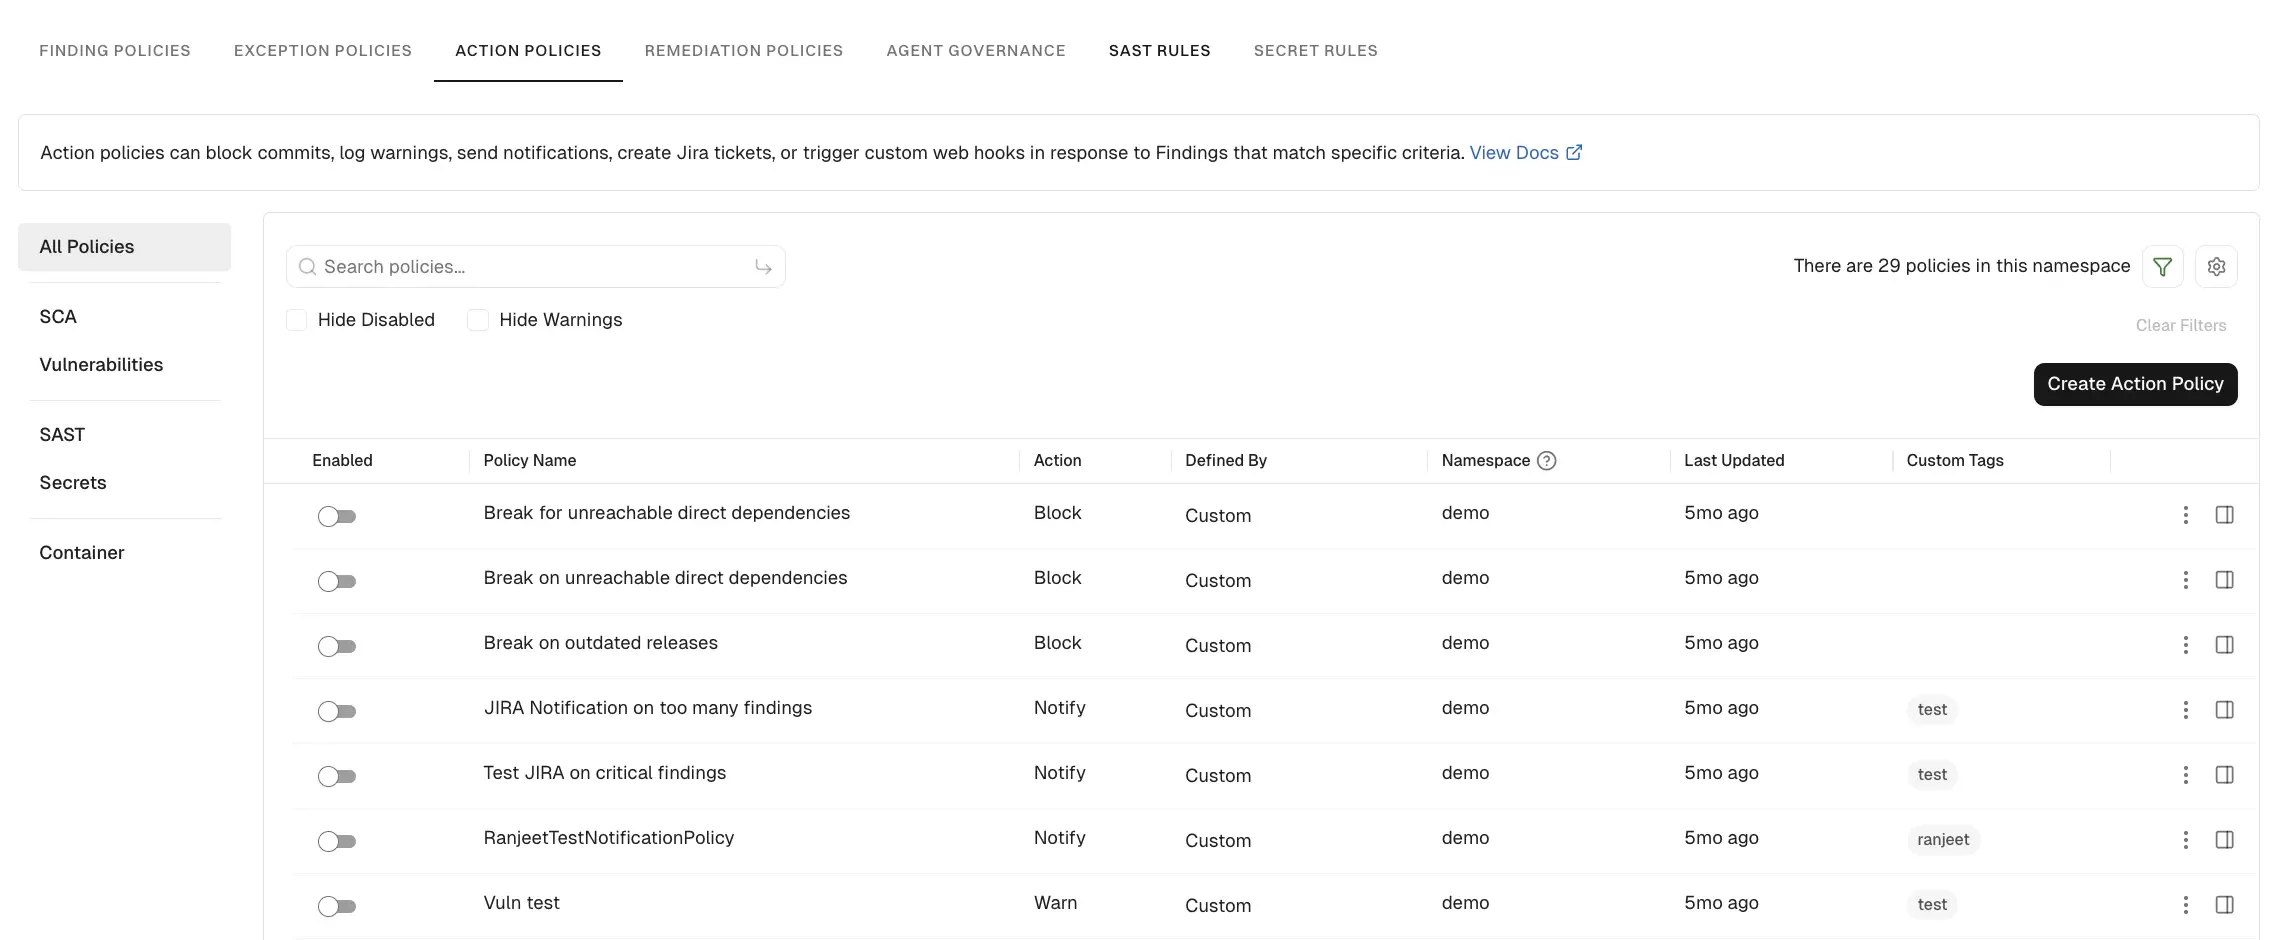
You can view, enable, clone, disable, edit, or delete your Endor Labs action policies.
1. Select **User menu** > **Policies & Rules** from the left sidebar.
2. Select **Action Policies**.
3. The preset filters help you locate the action policies that matter most to you. Select a category to narrow down and focus on the relevant policies.
4. Use the search bar to search for a policy.
5. Enable or disable a policy using the toggle.
6. Select **Hide Disabled** to hide policies that are not enabled.
7. Select **Hide Warnings** to hide policies that are not blocking or notifications.
8. To delete a policy, click on the vertical three dots and select **Delete Policy**.
9. To edit a policy, click on the vertical three dots and select **Edit Policy**.
 ## View policy details
1. Select **User menu** > **Policies & Rules** from the left sidebar.
2. Select **Action Policies** to view the list of action policies.
3. Select a policy you want to review and click **View Details**.
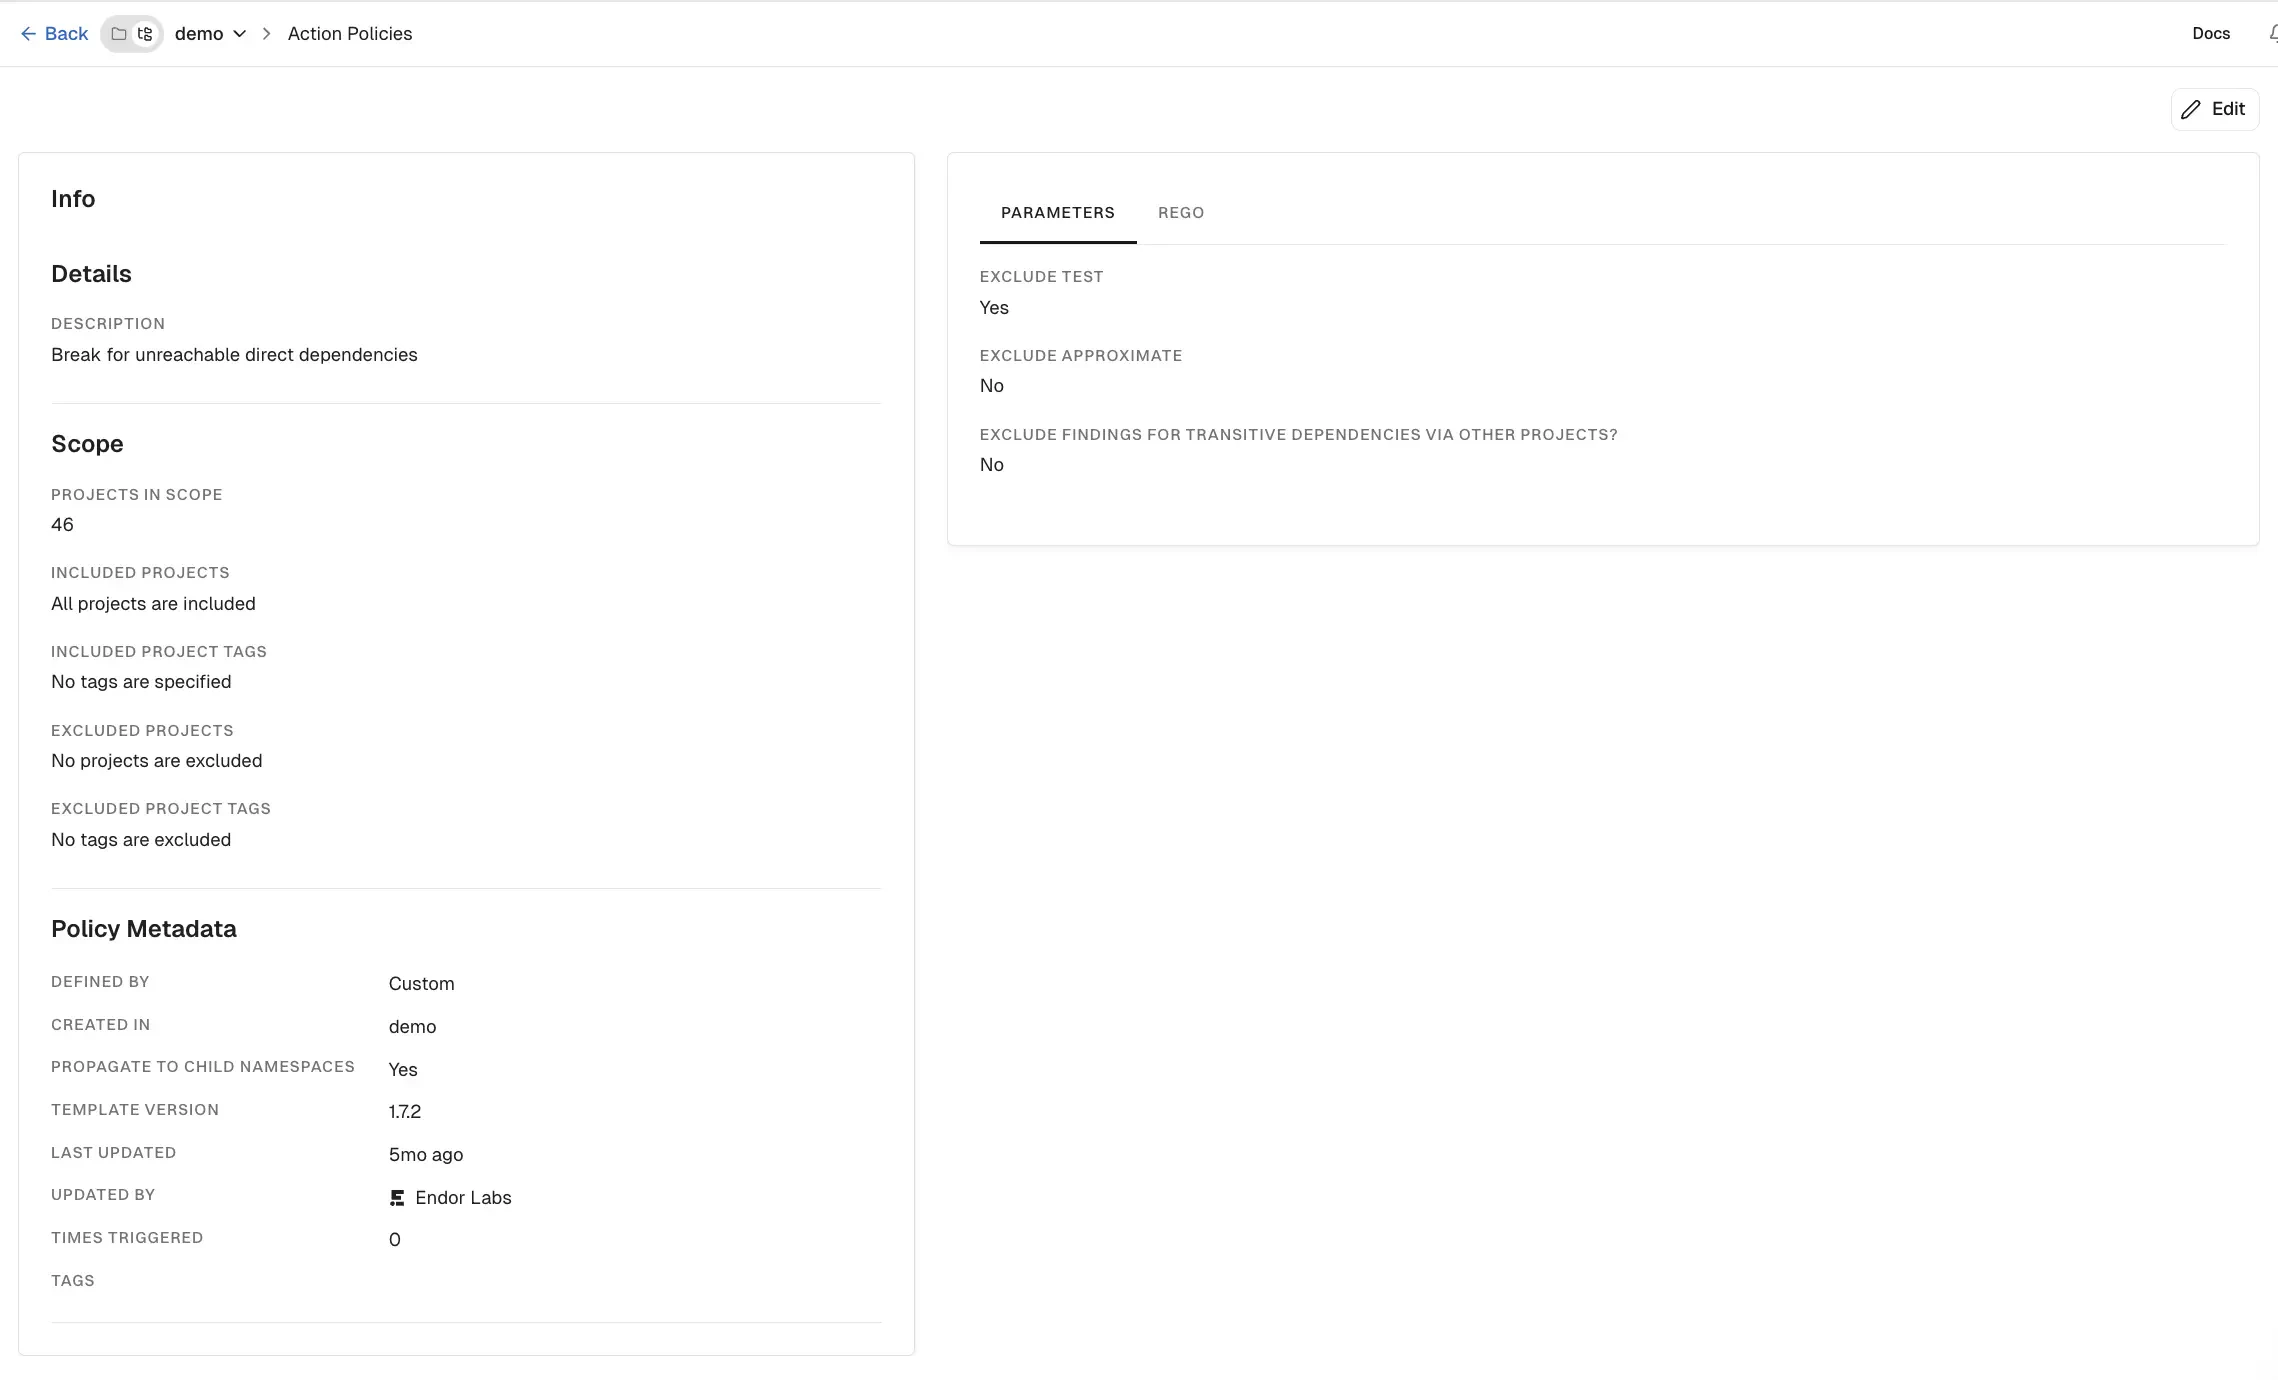
You can see the policy’s description, scope, and metadata. You can review the severity, finding categories, explanatory details, remediation steps and the Rego rules that implement the policy logic.
## View policy details
1. Select **User menu** > **Policies & Rules** from the left sidebar.
2. Select **Action Policies** to view the list of action policies.
3. Select a policy you want to review and click **View Details**.
You can see the policy’s description, scope, and metadata. You can review the severity, finding categories, explanatory details, remediation steps and the Rego rules that implement the policy logic.
 ## Create an action policy from template
You can create an action policy in Endor Labs to perform a given action when a given set of conditions are met.
1. Select **User menu** > **Policies & Rules** from the left sidebar.
2. Select **Action Policies**.
3. Click **Create Action Policy** to create a new action policy.
4. First, you must **Define a Policy**.
5. Choose a **Template Category** from the list.
6. Choose a **Policy Template** from the list and define the criteria for the action. See [Action policy templates](/platform-administration/policies/action-policies/templates) for more information.
7. Next, **Choose an Action** to take when the policy criteria are met.
* Choose **Enforce Policy** to define the behavior of endorctl scans.
* A **Warn** enforcement action will warn the user when the policy criteria are met by letting them know which findings violate the policy. **Warn** enforcement actions will only notify users of policy violations and will still return a 0 exit code in CI/CD environments, which won't fail a job. However, it is possible to configure the scan to return a non-zero (129) exit code for policy warnings by setting the `--exit-on-policy-warning` flag.
* A **Break the Build** enforcement action will return a non-zero (128) exit code, which will fail the job. This action will inform the user which findings violate the policy as part of the scan.
* Choose **Send Notification** to create a ticket or send a custom message to an integrated notification system.
* A **Notification Target** must be set to send a notification. A notification target may be defined as a notification integration. For more information, see [Endor Labs integrations](/integrations).
* From **Select aggregation type**, choose how findings are grouped into notifications.
* Choose **None (Notify for each Finding)** to trigger a separate notification for each finding.
* Choose **Project** to trigger a single notification for all findings.
* Choose **Dependency** to trigger multiple notifications for every dependency.
* Choose **Dependency per Package Version** to trigger multiple notifications for unique combinations of dependency and package. For more information, see [Aggregation types for notifications](#aggregation-types-for-notifications).
Notifications are only processed for monitored branches, not for pull requests.
8. You can **Assign Scope** to the action policy by specifying what projects the policy has to scan.
* In **Inclusions**, enter the projects and the tags of the projects that you want to scan.
* In **Exclusions**, enter the projects and the tags of the projects that you do not want to scan. Exclusions take precedence over the inclusions, in case of a conflict.
* Click the link to view the projects included in the action policy scan.
* Click **Add project tag to these projects** and enter a tag for the selected projects. Click **Save Tags** to apply it or **Reset Tags** to discard changes.
* You can set custom tags for your projects from **Projects** > **Settings** > **Custom Tags**. See [Tagging projects](/platform-administration/policies/tagging-projects) for more information about creating project tags.
9. **Name Your Action Policy**.
* Enter a human readable **Name** for your action policy.
* Enter a **Description** for your action policy that describes what it does.
* Enter any **Policy Tags** that you want to associate with your policy. Tags can have a maximum of 63 characters and can contain letters, numbers, and characters `=`, `@`, `_`, and `-`.
10. By default, a policy applies to the current namespace and all its child namespaces. To limit it to the current namespace, clear **Propagate this policy to all child namespaces**.
11. Click **Create Action Policy**. The policy will be enabled by default.
To block pull requests with an action policy, set the enforcement action to **Break the Build** and mark the Endor Labs check as a required status check in your source control manager. See [Block pull requests on findings](/scan/pr-scans#block-pull-requests-on-findings) for the end-to-end workflow.
## Create an action policy from scratch
Write an action policy from scratch using the [OPA Rego policy language](https://www.openpolicyagent.org/docs/latest/policy-language/).
1. Select **User menu** > **Policies & Rules** from the left sidebar.
2. Select **Action Policies**.
3. Click **Create Action Policy**
4. Choose **From Scratch** to author an action policy
5. Enter the Rego rule for the policy in **Rego Definition**.
For instance, the following Rego rule identifies all repository version findings that are not present in the baseline. Action policies should only operate on Findings. For more information about findings, see the [Finding resource kind documentation](/developers-api/rest-api/using-the-rest-api/data-model/resource-kinds#finding).
```rego theme={null}
package examples
match_baseline(finding) {
some i
data.baseline.Finding[i].meta.description == finding.meta.description
}
match_repo_version_finding[result] {
some i
data.resources.Finding[i].meta.parent_kind == "RepositoryVersion"
not match_baseline(data.resources.Finding[i])
result = {
"Endor": {
"Finding": data.resources.Finding[i].uuid
}
}
}
```
6. Enter the OPA **Query Statement** for the rule in the following format: `data..`.
For the example above the query statement is `data.examples.match_repo_version_finding`
7. Select the **Resource Kinds** required to evaluate the policy.
For the example above the required resource kind is `Finding`. The requested resource kind records for the current scan are made available to the Rego code under `data.resources.`. The corresponding baseline records are available under `data.baseline.`. Note: Action policies should only operate on Findings
8. Continue with steps 7-11 above under [Create an action policy from template](#create-an-action-policy-from-template)
Rescan the project to apply the newly created action policy and update the findings.
### Expected output format
All action policies must list the matching Finding UUID under "Endor" in the following format.
```rego theme={null}
foo[result] {
result = {
"Endor": {
Finding:
}
}
}
```
### Validate policy
The application verifies the Rego syntax and query statement before creating the policy. However, the logic cannot be fully validated without input data.
See the [endorctl validate policy](/developers-api/cli/commands/validate) command for details on how to validate a custom policy and inspect the matches returned for a given project.
### Baseline data
For action policies that are used to comment on, or block, PR scans you often only want to trigger the policy for findings that are not present in the baseline. The baseline data for the requested resource kinds is available under `data.baseline.`. Here are some examples of how to implement a function called `match_baseline` that returns true if a given finding also exists in the baseline. As in the [example above](#create-an-action-policy-from-scratch), you can then call `not match_baseline(data.resources.Finding[i])` to filter out findings that are not unique to the PR scan. Any additional resource kinds, for example `DependencyMetadata`, must be added to the list of requested [**Resource Kinds**](#create-an-action-policy-from-scratch).
Baseline data is only loaded for action policies with one of the **Enforce Policy** actions (**Warn** or **Break the Build**). It is not loaded for any other policy types.
```rego expandable theme={null}
match_baseline(finding) {
finding.meta.parent_kind == "PackageVersion"
some i
data.baseline.Finding[i].meta.description == finding.meta.description
data.baseline.Finding[i].spec.target_dependency_package_name == finding.spec.target_dependency_package_name
}
match_baseline(finding) {
finding.meta.parent_kind == "PackageVersion"
some i, j
data.baseline.DependencyMetadata[i].meta.name == finding.spec.target_dependency_package_name
data.resources.DependencyMetadata[j].meta.name == finding.spec.target_dependency_package_name
data.baseline.DependencyMetadata[i].spec.importer_data.package_name == data.resources.DependencyMetadata[j].spec.importer_data.package_name
data.baseline.DependencyMetadata[i].spec.dependency_data.reachable == data.resources.DependencyMetadata[j].spec.dependency_data.reachable
}
match_baseline(finding) {
finding.meta.parent_kind == "RepositoryVersion"
some i
data.baseline.Finding[i].meta.description == finding.meta.description
}
match_baseline(finding) {
finding.meta.parent_kind == "Repository"
some i
data.baseline.Finding[i].meta.description == finding.meta.description
}
match_baseline(finding) {
finding.spec.finding_categories[_] == "FINDING_CATEGORY_SECRETS"
some i
data.baseline.Finding[i].spec.extra_key == finding.spec.extra_key
count(data.baseline.Finding[i].spec.finding_metadata.source_policy_info.results) == count(finding.spec.finding_metadata.source_policy_info.results)
}
match_baseline(finding) {
finding.spec.finding_categories[_] == "FINDING_CATEGORY_SAST"
some i
data.baseline.Finding[i].spec.extra_key == finding.spec.extra_key
count(data.baseline.Finding[i].spec.finding_metadata.source_policy_info.results) == count(finding.spec.finding_metadata.source_policy_info.results)
}
```
## Aggregation types for notifications
Aggregation types for notifications streamline the organization and management of findings for efficient workflow. By default, all project findings are included in a single notification. With the option to select aggregation types, notifications can be tailored to specific criteria based on dependencies. This customization simplifies developer actions and enhances productivity.
Endor Labs enables you to choose the following notification aggregation types, each offering distinct benefits.
* **None (Notify for each Finding)**: Select **None (Notify for each Finding)** to create a separate notification for each finding in the project.
* **Project**: (Default) Select **Project** to create a single notification for all project findings.
* **Dependency**: Select **Dependency** to create separate notifications for each dependency in a project.
* **Dependency per Package Version**: Select **Dependency per Package Version** to create separate notifications for each package in a project. Sub-tasks are created for each unique combination of dependency and package.
### Example
For Jira integration notifications, a parent ticket is created with the selected issue type, either `Task` or `Bug`. The parent ticket includes the project name. Each identified dependency is grouped under a dedicated sub-ticket. The sub-ticket includes both the project name and dependency name. Findings without any dependency are grouped in a separate sub-ticket. During future scans, the existing sub-ticket status is updated or resolved. If a new dependency is found, a new sub-ticket is created.
## Create an action policy from template
You can create an action policy in Endor Labs to perform a given action when a given set of conditions are met.
1. Select **User menu** > **Policies & Rules** from the left sidebar.
2. Select **Action Policies**.
3. Click **Create Action Policy** to create a new action policy.
4. First, you must **Define a Policy**.
5. Choose a **Template Category** from the list.
6. Choose a **Policy Template** from the list and define the criteria for the action. See [Action policy templates](/platform-administration/policies/action-policies/templates) for more information.
7. Next, **Choose an Action** to take when the policy criteria are met.
* Choose **Enforce Policy** to define the behavior of endorctl scans.
* A **Warn** enforcement action will warn the user when the policy criteria are met by letting them know which findings violate the policy. **Warn** enforcement actions will only notify users of policy violations and will still return a 0 exit code in CI/CD environments, which won't fail a job. However, it is possible to configure the scan to return a non-zero (129) exit code for policy warnings by setting the `--exit-on-policy-warning` flag.
* A **Break the Build** enforcement action will return a non-zero (128) exit code, which will fail the job. This action will inform the user which findings violate the policy as part of the scan.
* Choose **Send Notification** to create a ticket or send a custom message to an integrated notification system.
* A **Notification Target** must be set to send a notification. A notification target may be defined as a notification integration. For more information, see [Endor Labs integrations](/integrations).
* From **Select aggregation type**, choose how findings are grouped into notifications.
* Choose **None (Notify for each Finding)** to trigger a separate notification for each finding.
* Choose **Project** to trigger a single notification for all findings.
* Choose **Dependency** to trigger multiple notifications for every dependency.
* Choose **Dependency per Package Version** to trigger multiple notifications for unique combinations of dependency and package. For more information, see [Aggregation types for notifications](#aggregation-types-for-notifications).
Notifications are only processed for monitored branches, not for pull requests.
8. You can **Assign Scope** to the action policy by specifying what projects the policy has to scan.
* In **Inclusions**, enter the projects and the tags of the projects that you want to scan.
* In **Exclusions**, enter the projects and the tags of the projects that you do not want to scan. Exclusions take precedence over the inclusions, in case of a conflict.
* Click the link to view the projects included in the action policy scan.
* Click **Add project tag to these projects** and enter a tag for the selected projects. Click **Save Tags** to apply it or **Reset Tags** to discard changes.
* You can set custom tags for your projects from **Projects** > **Settings** > **Custom Tags**. See [Tagging projects](/platform-administration/policies/tagging-projects) for more information about creating project tags.
9. **Name Your Action Policy**.
* Enter a human readable **Name** for your action policy.
* Enter a **Description** for your action policy that describes what it does.
* Enter any **Policy Tags** that you want to associate with your policy. Tags can have a maximum of 63 characters and can contain letters, numbers, and characters `=`, `@`, `_`, and `-`.
10. By default, a policy applies to the current namespace and all its child namespaces. To limit it to the current namespace, clear **Propagate this policy to all child namespaces**.
11. Click **Create Action Policy**. The policy will be enabled by default.
To block pull requests with an action policy, set the enforcement action to **Break the Build** and mark the Endor Labs check as a required status check in your source control manager. See [Block pull requests on findings](/scan/pr-scans#block-pull-requests-on-findings) for the end-to-end workflow.
## Create an action policy from scratch
Write an action policy from scratch using the [OPA Rego policy language](https://www.openpolicyagent.org/docs/latest/policy-language/).
1. Select **User menu** > **Policies & Rules** from the left sidebar.
2. Select **Action Policies**.
3. Click **Create Action Policy**
4. Choose **From Scratch** to author an action policy
5. Enter the Rego rule for the policy in **Rego Definition**.
For instance, the following Rego rule identifies all repository version findings that are not present in the baseline. Action policies should only operate on Findings. For more information about findings, see the [Finding resource kind documentation](/developers-api/rest-api/using-the-rest-api/data-model/resource-kinds#finding).
```rego theme={null}
package examples
match_baseline(finding) {
some i
data.baseline.Finding[i].meta.description == finding.meta.description
}
match_repo_version_finding[result] {
some i
data.resources.Finding[i].meta.parent_kind == "RepositoryVersion"
not match_baseline(data.resources.Finding[i])
result = {
"Endor": {
"Finding": data.resources.Finding[i].uuid
}
}
}
```
6. Enter the OPA **Query Statement** for the rule in the following format: `data..`.
For the example above the query statement is `data.examples.match_repo_version_finding`
7. Select the **Resource Kinds** required to evaluate the policy.
For the example above the required resource kind is `Finding`. The requested resource kind records for the current scan are made available to the Rego code under `data.resources.`. The corresponding baseline records are available under `data.baseline.`. Note: Action policies should only operate on Findings
8. Continue with steps 7-11 above under [Create an action policy from template](#create-an-action-policy-from-template)
Rescan the project to apply the newly created action policy and update the findings.
### Expected output format
All action policies must list the matching Finding UUID under "Endor" in the following format.
```rego theme={null}
foo[result] {
result = {
"Endor": {
Finding:
}
}
}
```
### Validate policy
The application verifies the Rego syntax and query statement before creating the policy. However, the logic cannot be fully validated without input data.
See the [endorctl validate policy](/developers-api/cli/commands/validate) command for details on how to validate a custom policy and inspect the matches returned for a given project.
### Baseline data
For action policies that are used to comment on, or block, PR scans you often only want to trigger the policy for findings that are not present in the baseline. The baseline data for the requested resource kinds is available under `data.baseline.`. Here are some examples of how to implement a function called `match_baseline` that returns true if a given finding also exists in the baseline. As in the [example above](#create-an-action-policy-from-scratch), you can then call `not match_baseline(data.resources.Finding[i])` to filter out findings that are not unique to the PR scan. Any additional resource kinds, for example `DependencyMetadata`, must be added to the list of requested [**Resource Kinds**](#create-an-action-policy-from-scratch).
Baseline data is only loaded for action policies with one of the **Enforce Policy** actions (**Warn** or **Break the Build**). It is not loaded for any other policy types.
```rego expandable theme={null}
match_baseline(finding) {
finding.meta.parent_kind == "PackageVersion"
some i
data.baseline.Finding[i].meta.description == finding.meta.description
data.baseline.Finding[i].spec.target_dependency_package_name == finding.spec.target_dependency_package_name
}
match_baseline(finding) {
finding.meta.parent_kind == "PackageVersion"
some i, j
data.baseline.DependencyMetadata[i].meta.name == finding.spec.target_dependency_package_name
data.resources.DependencyMetadata[j].meta.name == finding.spec.target_dependency_package_name
data.baseline.DependencyMetadata[i].spec.importer_data.package_name == data.resources.DependencyMetadata[j].spec.importer_data.package_name
data.baseline.DependencyMetadata[i].spec.dependency_data.reachable == data.resources.DependencyMetadata[j].spec.dependency_data.reachable
}
match_baseline(finding) {
finding.meta.parent_kind == "RepositoryVersion"
some i
data.baseline.Finding[i].meta.description == finding.meta.description
}
match_baseline(finding) {
finding.meta.parent_kind == "Repository"
some i
data.baseline.Finding[i].meta.description == finding.meta.description
}
match_baseline(finding) {
finding.spec.finding_categories[_] == "FINDING_CATEGORY_SECRETS"
some i
data.baseline.Finding[i].spec.extra_key == finding.spec.extra_key
count(data.baseline.Finding[i].spec.finding_metadata.source_policy_info.results) == count(finding.spec.finding_metadata.source_policy_info.results)
}
match_baseline(finding) {
finding.spec.finding_categories[_] == "FINDING_CATEGORY_SAST"
some i
data.baseline.Finding[i].spec.extra_key == finding.spec.extra_key
count(data.baseline.Finding[i].spec.finding_metadata.source_policy_info.results) == count(finding.spec.finding_metadata.source_policy_info.results)
}
```
## Aggregation types for notifications
Aggregation types for notifications streamline the organization and management of findings for efficient workflow. By default, all project findings are included in a single notification. With the option to select aggregation types, notifications can be tailored to specific criteria based on dependencies. This customization simplifies developer actions and enhances productivity.
Endor Labs enables you to choose the following notification aggregation types, each offering distinct benefits.
* **None (Notify for each Finding)**: Select **None (Notify for each Finding)** to create a separate notification for each finding in the project.
* **Project**: (Default) Select **Project** to create a single notification for all project findings.
* **Dependency**: Select **Dependency** to create separate notifications for each dependency in a project.
* **Dependency per Package Version**: Select **Dependency per Package Version** to create separate notifications for each package in a project. Sub-tasks are created for each unique combination of dependency and package.
### Example
For Jira integration notifications, a parent ticket is created with the selected issue type, either `Task` or `Bug`. The parent ticket includes the project name. Each identified dependency is grouped under a dedicated sub-ticket. The sub-ticket includes both the project name and dependency name. Findings without any dependency are grouped in a separate sub-ticket. During future scans, the existing sub-ticket status is updated or resolved. If a new dependency is found, a new sub-ticket is created.