> ## Documentation Index
> Fetch the complete documentation index at: https://docs.endorlabs.com/llms.txt
> Use this file to discover all available pages before exploring further.
# Set up Jira integration with Endor Labs
> Learn how to implement ticketing workflows for Jira.
Integrate Endor Labs with Jira to automatically create tickets in specified projects when scans violate configured policies, aligning with your organization’s existing security workflow. The integration supports both Jira Cloud and Jira Data Center.
You can configure the integration with a dedicated service account so credentials are limited to only the required permissions and are not tied to any individual user. This helps maintain consistent access and simplifies credential management. We recommend that the Jira account used for this integration includes only the following minimum required permissions:
* Create Issues
* Transition Issues
* Edit Issues
* Resolve Issues
* Add Comments
To integrate Endor Labs with Jira:
* [Generate Jira API token](#generate-jira-api-token)
* [Configure Jira Integration on Endor Labs](#configure-jira-integration-on-endor-labs)
* [Manage Endor Labs Jira notifications](#manage-endor-labs-jira-notifications)
* [Associate an action policy with a Jira notification](#associate-an-action-policy-with-a-jira-notification)
* [View ticket details in Jira](#view-ticket-details-in-jira)
* [View Jira notification in Endor Labs](#view-jira-notification-in-endor-labs)
## Generate Jira API token
Generate Jira API credentials to sign in to Endor Labs. Endor Labs supports both classic and scoped API tokens.
Refer to [Create an API token](https://support.atlassian.com/atlassian-account/docs/manage-api-tokens-for-your-atlassian-account/#Create-an-API-token) to create a classic API token or [Create API token with scopes](https://support.atlassian.com/atlassian-account/docs/manage-api-tokens-for-your-atlassian-account/#Create-an-API-token-with-scopes) to create a scoped API token. For scoped API tokens, select only the `read:jira-work` and `write:jira-work` permissions.
You cannot view the token after you close the form. Copy it to a secure location and have it handy. Do not share the token.
## Configure Jira Integration on Endor Labs
Set up Jira integration on the Endor Labs application.
1. Select **User menu** > **Integrations** from the left sidebar.
2. Under **Notifications**, click **Manage** for Jira.
3. Click **Add Notification Integrations**.
4. Enter a name and description for the integration.
5. Enter a Jira username.
The user account appears as the reporter for all the tasks or bugs created in Jira for this notification. We recommend creating a new user account for receiving Jira notifications from Endor Labs.
6. In **API Key**, enter the API token that you generated from Jira.
7. In **Jira URL**, enter the HTTPS endpoint of your Jira instance.
8. Select one of the following In **Authentication Method**:
* **Basic Authentication**: If you are using Jira cloud, enter your Jira user name in **Username** and the API token that you generated from Jira in **API Key**.
* **Personal Access Token \[PAT]**: If you are using Jira Data Center, enter the personal access token (PAT) in **Access Token**.
9. In **PROJECT Key**, enter the project key of your Jira project in which you want to create the notifications.
The project key is the prefix of the bug or task ID. For example, if the project key is `ENG`, Jira creates the task or bug with an ID in the format `ENG-352`.
10. In **ISSUE TYPE**, enter the notification issue type such as `Task`, `Bug`, `Story`, `Sub-Task`, or `Epic`.
The issue type is case-sensitive. Make sure to match with an exact issue type on your Jira board.
Make sure the endorctl version is 1.6.547 or higher to use **ISSUE TYPE**.
11. In **RESOLVED STATUS**, specify the resolved status used in your Jira projects.
For example, if you enter the value as `Completed`, after you resolve the findings, Endor Labs updates the Jira ticket to this status. If you don't specify a status, Endor Labs attempts to determine your project's resolution status. It defaults to one of the following in priority order: `Done`, `Resolved`, `Closed`, or `Fixed`.
If you do not provide a resolved status and your project's resolved status does not match `Done`, `Resolved`, `Closed`, or `Fixed`, you will be unable to configure the integration.
12. In **LABELS**, enter a label to associate it with your Jira notifications.
13. For [company-managed Jira project](https://support.atlassian.com/jira-software-cloud/docs/what-are-team-managed-and-company-managed-projects/#Company-managed-projects), enter one or more component values in **COMPONENTS**. These values are automatically populated in the **Components** field of the created Jira ticket.
14. Click **Add Custom Field** to add custom `KEY-VALUE` pairs in the created Jira ticket. Use this to create a **Components** field in your team managed Jira project.
For example, you can add `Source` as **KEY** and associate it to `Endor Labs` in **VALUE**, so that every notification created will now have the information `Source = Endor Labs` associated with the ticket.
For [team-managed Jira project](https://support.atlassian.com/jira-software-cloud/docs/what-are-team-managed-and-company-managed-projects/#Team-managed-projects), use **Add Custom Field** to create a **Components** field in your Jira ticket. In **KEY** enter `Components` and enter the component value in **VALUE**.
Ensure that the endorctl version is `1.6.567` or higher to use **Custom Fields**. Check that the **KEY** you enter matches an existing custom field in your Jira project. Otherwise, you cannot save the notification and the **KEY-VALUE** pair will not appear in your Jira ticket.
15. Click **Propagate this notification target to all child namespaces** to apply this Jira notification target to all child namespaces within the hierarchy.
16. Click **Add Notification Integration**.
### Manage Endor Labs Jira notifications
You can view and manage the Endor Labs Jira notifications created for a project.
1. Select **User menu** > **Integrations** from the left sidebar.
2. Under **Notifications**, click **Manage** for Jira.
3. To edit a notification, click the vertical three dots and choose **Edit Notification Integration**.
4. To delete a notification, click the vertical three dots and choose **Delete Notification Integration**.
## Associate an action policy with a Jira notification
Users can create action policies to execute a recommended action when a scan violates a policy. For example, if there is a license compliance violation, you can create a Jira ticket and notify the required personnel.
While creating an action policy, configure the following settings:
* Select **Choose an Action** as **Send Notification**.
* From **SELECT NOTIFICATION TARGETS**, choose the Jira integration notification that you created.
* Choose an **Aggregation type** for Jira notifications.
* Choose **None (Notify for each Finding)** to trigger a separate notification for each finding. This can result in a high volume of Jira tickets.
* Choose **Project** to trigger a single notification for all findings.
* Choose **Dependency** to trigger a notification for every dependency.
* Choose **Dependency per package version** to trigger notifications for every unique combination of dependency and package version.
See [Aggregation types](/platform-administration/policies/action-policies#aggregation-types-for-notifications) for more details.
### View ticket details in Jira
Endor Labs creates a parent ticket with the selected issue type, either a Task or a Bug, and includes the project name. It assigns each identified dependency to a dedicated sub-ticket that includes both the project name and the dependency name. It groups findings without dependencies into a separate sub-ticket. During future scans, Endor Labs updates existing sub-tickets or marks them as resolved. If Endor Labs detects a new dependency, it creates a new sub-ticket.
1. Sign into your Jira account.
2. Navigate to **Projects** drop down menu in the top bar and select your project.
3. Click on the issue to view its details.
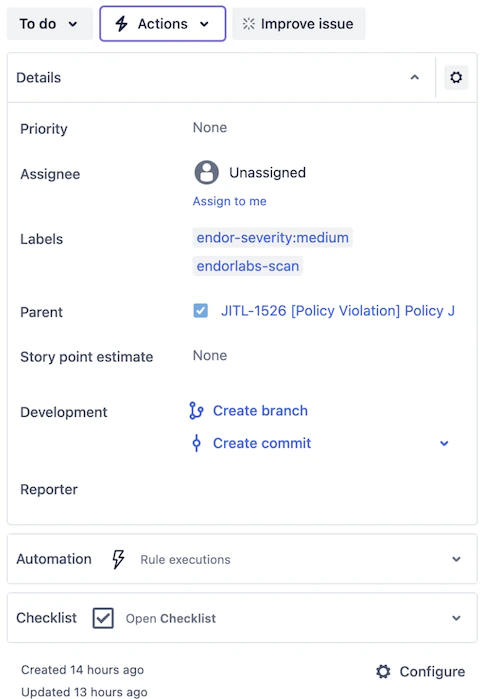
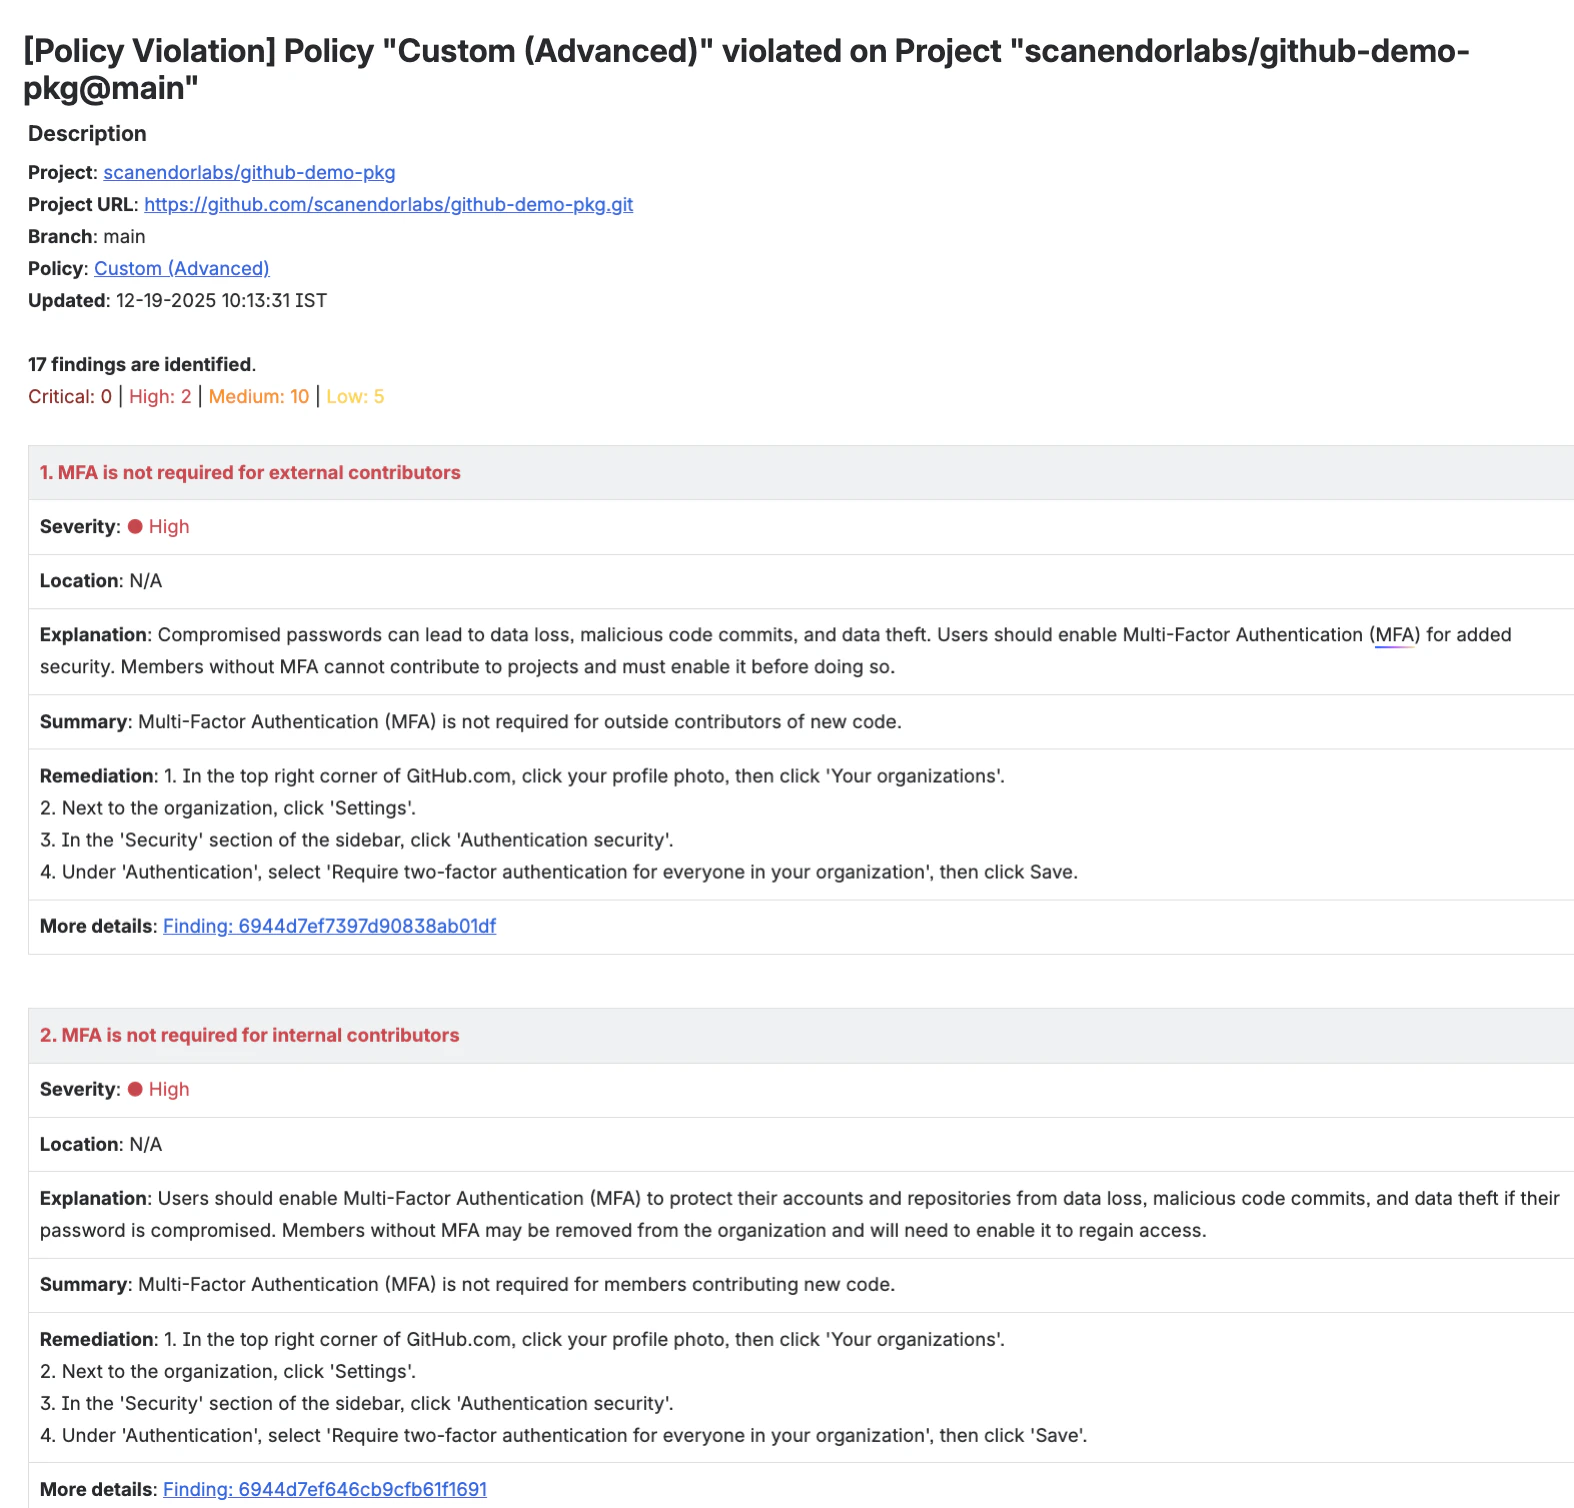 Endor Labs adds the following labels to a Jira ticket:
* `endorlabs-scan`: Indicates that an Endor Labs scan created the ticket.
* `endor-severity`: The `endor-severity` label has an associated value, `critical`, `high`, `medium`, or `low`, that reflects the severity of the associated Endor Labs finding. If a ticket includes multiple findings with different severities, the label represents the highest severity among them.
For Dependency and Dependency per package version aggregation types, Endor Labs includes the `endor-severity` label in the sub-task.
Endor Labs adds the following labels to a Jira ticket:
* `endorlabs-scan`: Indicates that an Endor Labs scan created the ticket.
* `endor-severity`: The `endor-severity` label has an associated value, `critical`, `high`, `medium`, or `low`, that reflects the severity of the associated Endor Labs finding. If a ticket includes multiple findings with different severities, the label represents the highest severity among them.
For Dependency and Dependency per package version aggregation types, Endor Labs includes the `endor-severity` label in the sub-task.
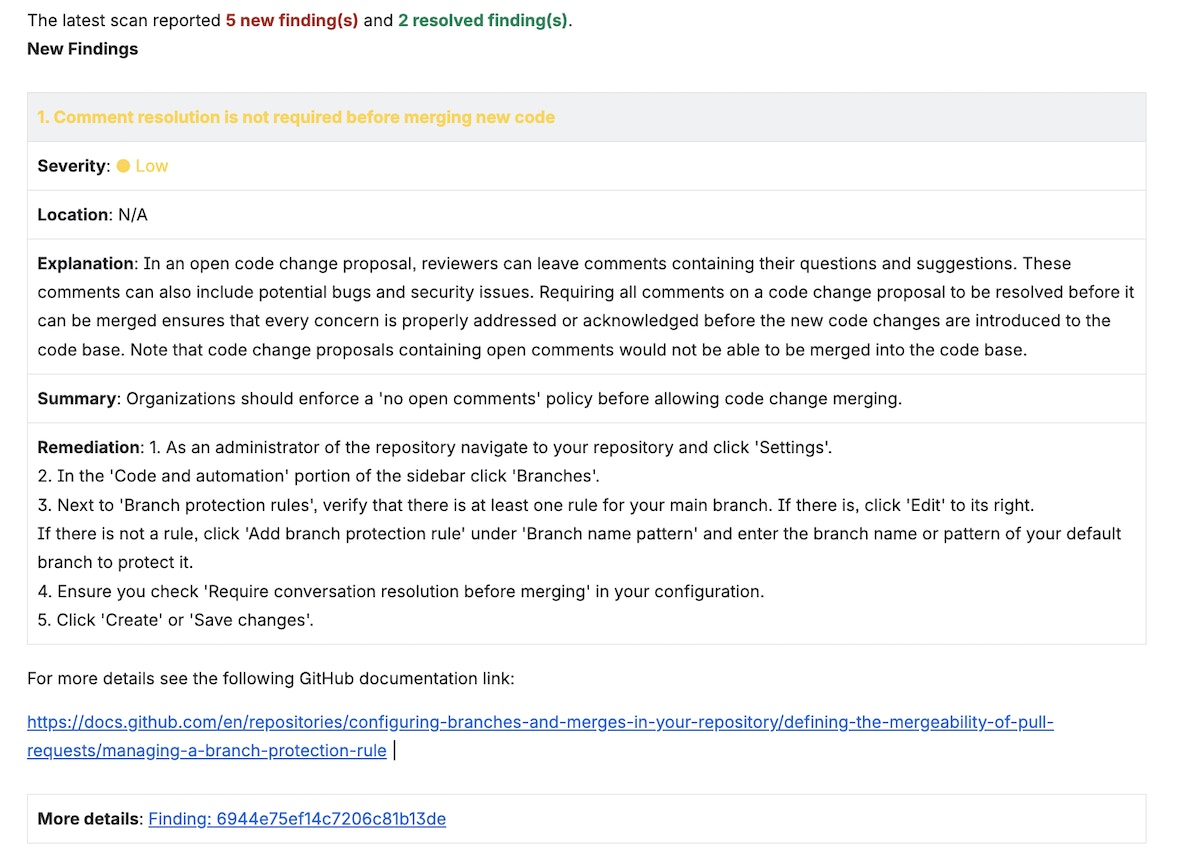
 During future scans, Endor Labs updates the status of the findings as comments on your Jira ticket.
* If Endor Labs detects new findings, it adds a comment with their details.
During future scans, Endor Labs updates the status of the findings as comments on your Jira ticket.
* If Endor Labs detects new findings, it adds a comment with their details.
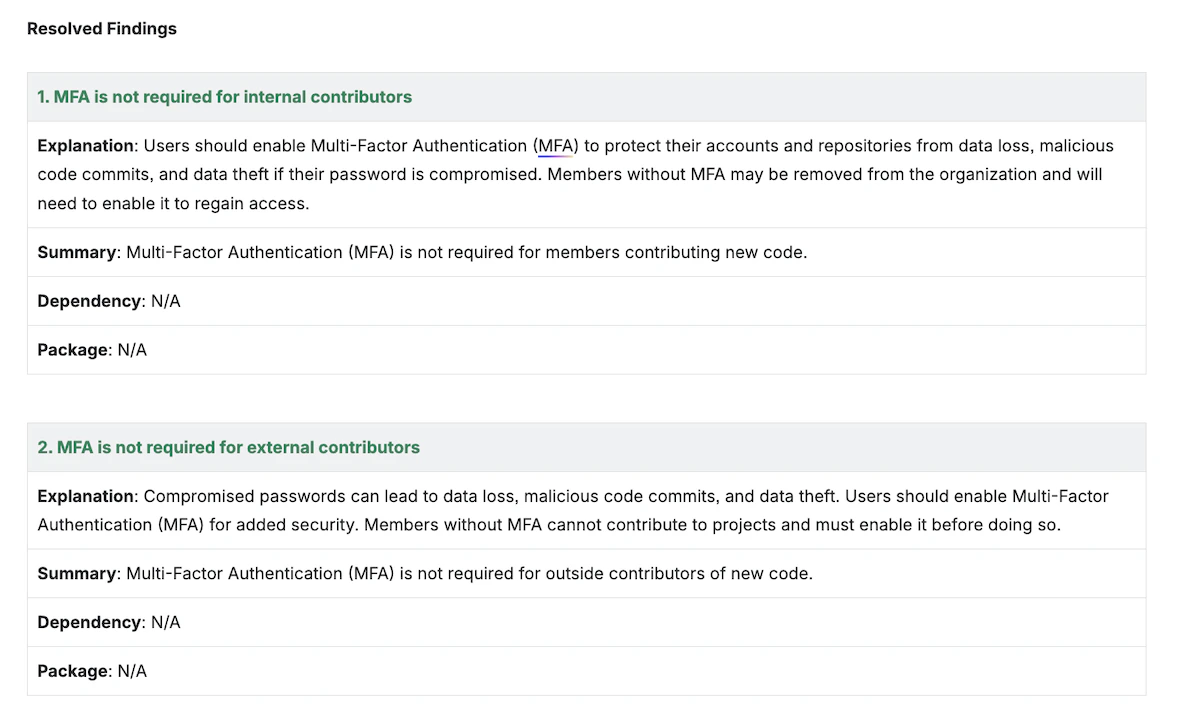
 * If existing findings resolve, Endor Labs adds a comment with their details.
 ### View Jira notification in Endor Labs
View created Jira tickets in Endor Labs, including their status (open or closed), associated action policy, and number of violations.
1. Click the bell icon in the top right section of the screen to view **Notifications**.
2. Navigate across **Open**, **Resolved**, **Dismissed**, or **All** to view the issues listed under them.
3. You can view specific details such as created date of the ticket, the name of the policy, the name of the project, the number of violations, and any labels associated with the projects.
4. Choose a notification and click the vertical three dots on the far right side and choose:
* **Dismiss Notification**: Stop all further processing and updates for the notification. The notification moves to **Dismissed**.
* **Show Details**: View the Jira ticket number and you can also navigate to Jira.
* **Go to Policy**: View configuration details of the policy that created this Jira ticket.
### View Jira notification in Endor Labs
View created Jira tickets in Endor Labs, including their status (open or closed), associated action policy, and number of violations.
1. Click the bell icon in the top right section of the screen to view **Notifications**.
2. Navigate across **Open**, **Resolved**, **Dismissed**, or **All** to view the issues listed under them.
3. You can view specific details such as created date of the ticket, the name of the policy, the name of the project, the number of violations, and any labels associated with the projects.
4. Choose a notification and click the vertical three dots on the far right side and choose:
* **Dismiss Notification**: Stop all further processing and updates for the notification. The notification moves to **Dismissed**.
* **Show Details**: View the Jira ticket number and you can also navigate to Jira.
* **Go to Policy**: View configuration details of the policy that created this Jira ticket.