This is the multi-page printable view of this section. Click here to print.
CI/CD Security
1 - CI/CD tools (Beta)
Endor Labs automatically discovers and identifies the CI/CD tools used in your organization based on your source code and source code management system configuration, giving you insight into your software development environment posture.
Scan for CI/CD tools
If you are using the Github App, CI/CD tools discovery is automatic. If you want to scan a particular repository for CI/CD tools, make sure that you are authenticated and then run the command:
endorctl scan --path=/path/to/your/repo --tools
Note: To include GitHub application data you must also set the
--githubflag and provide a GitHub token with read:org access.
View the CI/CD tools detected
To view the CI/CD tool coverage in all projects:
- Sign in to the Endor Labs application.
- Navigate to CI/CD > Tools on the left sidebar to view the list of all your projects and tools detected, grouped by tool category.
- Use Search to look for specific projects.
- Use Tool Categories to filter the search results by tool category.
- Use Tools to filter the search results by tool name.
- Click on the Settings Gear Icon in the top-right corner of the table to configure which columns you want to see.
- Select a project to navigate to the Tools section for the specific project, where you can view details and evidence of how the tool is used in the project.
- Click on the Drawer Icon at the right end of a row to view the details for the corresponding tool.
- Tools are identified based on a range of different patterns, from file names and file content, to webhooks and GitHub applications.
View the supported CI/CD tools and patterns used to detect them
To view the patterns that are used to detect the various CI/CD tools:
- Sign in to the Endor Labs application.
- Navigate to Policies on the left sidebar.
- Navigate to the CI/CD RULES tab to see the list of supported CI/CD tools and the corresponding category mapping.
- Click on the vertical ellipsis at the right end of a row and select View Rule to see the tool pattern definition.
Create finding policies for CI/CD tools
See CI/CD finding policies for details on how to create finding policies for CI/CD tools.
2 - Sign artifacts (Beta)
Endor Labs enhances software supply chain security by providing transparent mechanisms for signing and verifying software artifacts.
-
Integrity of container images and build artifacts: Using a cryptographic signature ensures that container images and other build artifacts are genuine and crafted by the organization. This adds an extra layer of security to the software supply chain, making sure that only authorized and unaltered items are scheduled for execution.
-
Traces across workflows: Beyond just verification, the framework offers thorough traceability. Users can trace the roots of container images and build artifacts, navigating through workflows and environments. Complete traceability ensures transparency, enabling organizations to validate the entire lifecycle of their software, from creation to deployment.
-
Certificate validity: Endor Labs uses a short-lived certificate with a validity period of 5 minutes to ensure that the build artifact has been signed during this time frame. To further guarantee the signing occurred within the valid window, a timestamp is added alongside the certificate and signature, confirming the signing within the specified time frame.
You can sign artifacts using the following methods.
Sign artifacts using GitHub Action
Use the Endor Labs GitHub actions to sign artifacts.
- Setup authentication to Endor Labs. a. (Recommended) If you are using GitHub action keyless authentication, set an authorization policy in Endor Labs to allow your organization or repository to authenticate. b. You can authenticate with a GCP service account setup for keyless authentication from GitHub actions or an Endor Labs API key added as a repository secret.
- Checkout your code
- Install your build toolchain
- Build your code
- Sign your artifacts with Endor Labs
Endor Labs GitHub Action
Use the GitHub Action endorlabs/github-action/sign@version to sign your artifacts. Set the following input parameters.
| Options | Description |
|---|---|
artifact_name |
Name of the artifact. For example, ghcr.io/org/image@sha256:digest. |
enable_github_action_token |
By default this is set to true and it fetches build information from the GitHub action OIDC token. Endor Labs uses this information to build provenance metadata for the signed artifacts. |
See the following example workflows to sign an artifact.
- name: Sign artifacts with Endor Labs
  on: [push, workflow_dispatch]
  name: build
  jobs:
  ko-publish:
    name: Release ko artifact
    runs-on: ubuntu-latest
    permissions:
      id-token: write
      packages: write
      contents: read
    steps:
      - uses: actions/setup-go@v4
        with:
          go-version: '1.20.x'
      - uses: actions/checkout@v3
      - uses: ko-build/setup-ko@v0.6
      - run: ko build
      - name: Login to the GitHub Container Registry
        uses: docker/login-action@v3
        with:
          registry: ghcr.io
          username: ${{ github.repository_owner }}
          password: ${{ secrets.GITHUB_TOKEN }}
      - name: Publish
        run: KO_DOCKER_REPO=ghcr.io/endorlabs/hello-sign ko publish --bare github.com/endorlabs/hello-sign
      - name: Get Image Digest to Sign
          run: |
          IMAGE_SHA=$(docker inspect ghcr.io/endorlabs/hello-sign:latest | jq -r '.[].Id')
          SIGNING_TARGET="ghcr.io/endorlabs/hello-sign@$IMAGE_SHA"
          echo ARTIFACT="$SIGNING_TARGET" >> $GITHUB_ENV

       - name: Sign with Endor Labs
          uses: endorlabs/github-action/sign@version
          with:
              namespace: "example"
              artifact_name: ${{ env.ARTIFACT }}
           namespace: "example"
Provenance information in signed artifacts
The signed artifacts contain provenance metadata that describe the origin, history, and ownership of an artifact throughout its lifecycle. Including this information in signed artifacts enhances transparency, trustworthiness, and accountability.
The following provenance information is included in the signed artifacts.
| Type | Description | Example |
|---|---|---|
| Build Config Digest | Specific version of the top-level/initiating build instructions (workflow sha) | 729595ed884ce7600925633e585016a4f855929d |
| Build Config Name | Name of the top-level/initiating build instructions (workflow) | Release |
| Runner Environment | Name of the platform-hosted or self-hosted infrastructure | self-hosted |
| Source Repository | The source repository that the build was based on | endorlabs/monorepo |
| Source Repository Digest | Specific version of the source code that the build was based on (commit sha) | 729595ed884ce7600925633e585016a4f855929d |
| Source Repository Owner | Owner of the source repository that the build was based on | endorlabs |
| Source Repository Ref | Source repository ref that the build was based on | refs/tags/v1.6.133 |
| Certificate OIDC Issuer | Issuer of the OIDC certificate used for verification |
|
| Certificate Identity | The identity expected in a valid certificate | repo:org/monorepo:ref:refs/tags/v1.2.3 |
Sign artifacts using endorctl
Use the endorctl CLI to sign an artifact. Ensure you have downloaded the latest endorctl binary.
To sign an artifact, use the following command:
endorctl artifact sign --name string --source-repository-ref string --certificate-oidc-issuer string
Specify the following options with the endorctl artifact sign command to include provenance information in your signed artifacts.
| Options | Required | Description |
|---|---|---|
--name string |
Mandatory | Name of the artifact. For example, ghcr.io/org/image@sha256:digest. |
--build-config-digest string |
Optional | Specific version of top-level/initiating build instructions. For example, workflow sha. |
--build-config-name string |
Optional | Name of top-level/initiating build instructions. For example, workflow. |
--runner-environment string |
Optional | Name of platform-hosted or self-hosted infrastructure. For example, self-hosted. |
--source-repository string |
Optional | Source repository that the build was based upon. For example, org/repo. |
--source-repository-digest string |
Optional | Specific version of the source code that the build was based upon. For example, commit sha. |
--source-repository-owner string |
Optional | Owner of the source repository that the build was based upon. For example, my-org. |
--source-repository-ref string |
Mandatory | Source repository ref that the build run was based upon. |
| Certificate OIDC Issuer | Mandatory | Issuer of the OIDC certificate used for verification. For example,
|
| Certificate Identity | Optional | The identity expected in a valid certificate. For example, repo:org/monorepo:ref:refs/tags/v1.2.3 |
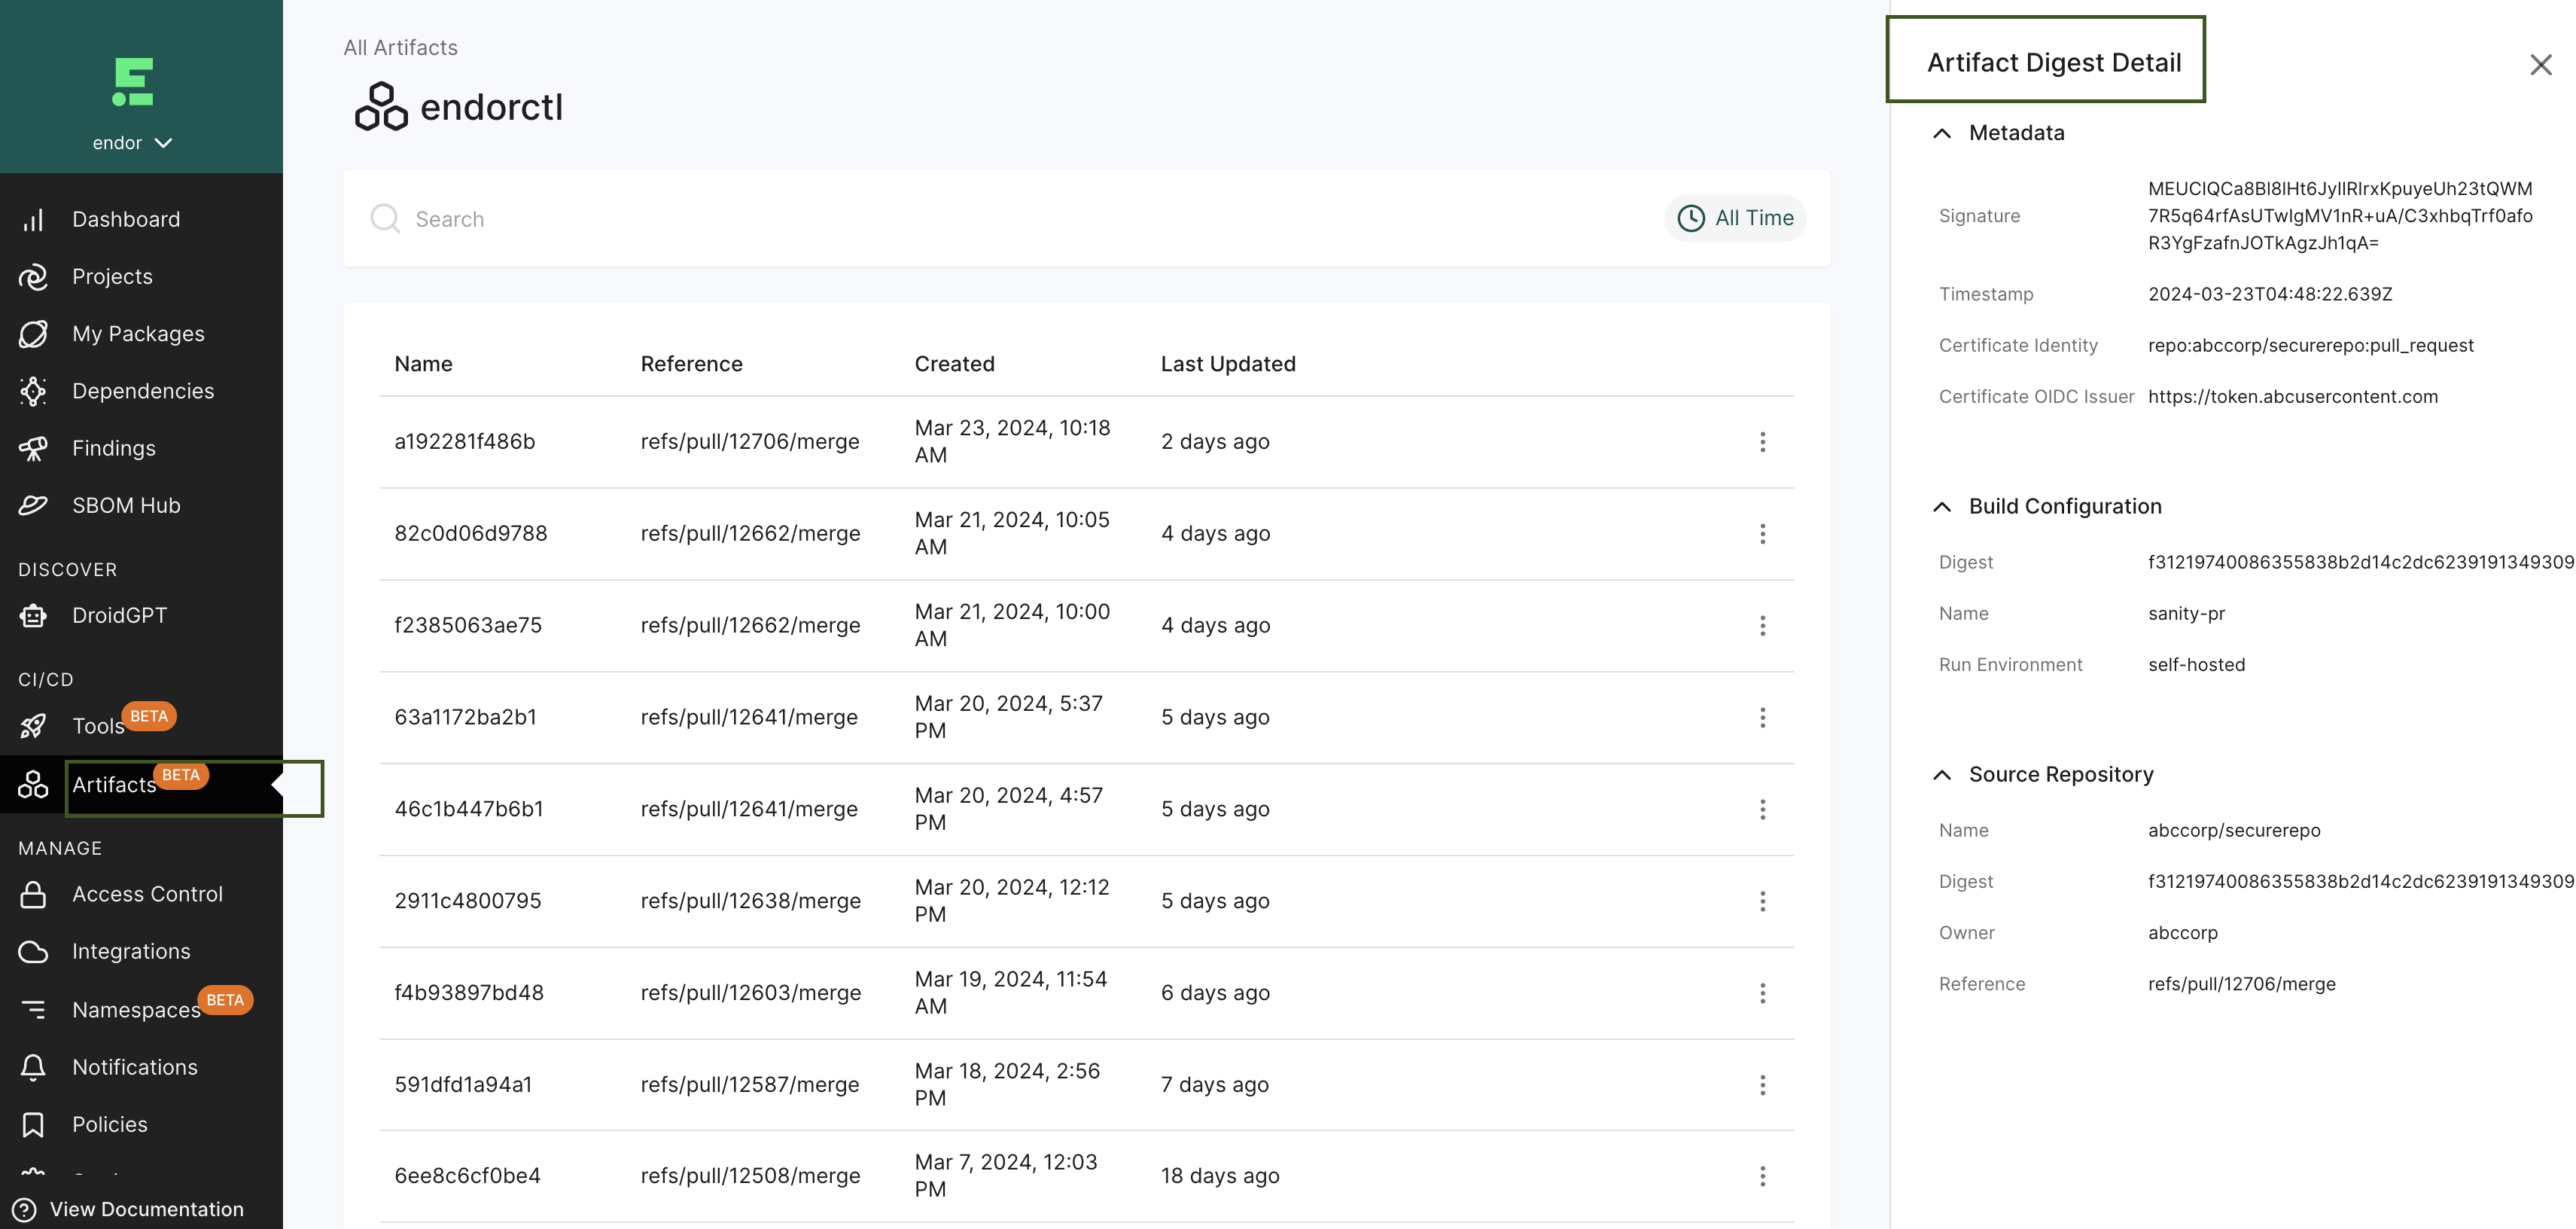
View the signed artifacts
To view the signed artifacts:
- Sign in to the Endor Labs application.
- Navigate to CI/CD > Artifacts under the left sidebar.
- You can view the list of signed artifacts with their created date, and last updated date.
- Select an artifact signature to view all details including its provenance information.
- Select an artifact in the row to view Artifact Digest Details to view metadata, build configuration, and source configuration details.
Understand the signing process
When you run the endorctl artifact sign <image> command, Endor Labs initiates the following processes:
- Authentication: Initiates regular authentication and retrieves a token from the OIDC or workflow provider while using an authentication option such as
--enable-github-action-tokenor API keys. - Key Generation: Generates a public and private key using ECDSA-256.
- Certificate Request: Sends a certificate request to the private Certificate Authority to obtain a short-lived certificate.
- Provenance Inclusion: Incorporates provenance information from the token (if available) or provided with the CLI, adding it as a set of extensions to the certificate using ASN.1 encoding.
- Image Signing: Uses the private key to actively sign the image.
- Certificate Storage: Stores the certificate containing provenance information along with the signature in the database.
- Timestamp: Adds a timestamp of the signing event.
Verify the signed artifacts
To verify a signed artifact, use the following command:
endorctl verify --name <artifact> --certificate-oidc-issuer <issuer>
Use the following command-line options with endorctl artifact verify:
| Options | Description |
|---|---|
--name <name> |
Name of the artifact to verify. For example, ghcr.io/org/image@sha256:digest |
--certificate-oidc-issuer <issuer> |
Issuer of the OIDC certificate used for verification. For example,
|
Understand the verification process
When you run the endorctl artifact verify --name <artifact> --certificate-oidc-issuer string command, Endor Labs initiates the following verification processes:
- Authentication: Initiates regular authentication and retrieves a token from the OIDC or workflow provider while using an authentication option such as
--enable-github-action-tokenor API keys. - Signature Retrieval: Retrieves a signature entry from the database using the artifact name.
- If the entry is not found, the verification process fails.
- Certificate Authority Check: Checks for a trusted Certificate Authority.
- Image Signature Validation: Validates the image signature using the public key from the certificate.
- Timestamp Validation: Validates that the timestamp in the signature entry is within the certificate’s validity.
- OIDC Issuer Verification: Checks whether the issuer provided matches the contents of the certificate.
- Provenance Verification: Ensures that any provenance information from the CLI matches the ones in the certificate.
Revoke the artifact signature
You can revoke a signature of a signed artifact for reasons such as a precautionary measure to safeguard against security risks, to maintain compliance, or to uphold trust and integrity.
To revoke a signature linked to an artifact and prevent its usage, use the following command:
endorctl artifact revoke-signature --name <image> --source-repository-ref "ref"
Specify the following command-line options for endorctl artifact revoke-signature:
| Options | Required | Description |
|---|---|---|
--name string |
Mandatory | Name of the artifact whose signature needs to be revoked |
--source-repository-ref string |
Mandatory | Reference to the source repository of the artifact. For example, refs/tags/v1.0.1. This identifies the specific signature and revokes it. |
Revoking the artifact signature invalidates the corresponding database entry and ensures that any attempts to verify the signature will fail.
Best practices
- While specifying the artifact name during the signing process, for the container images, adhere to the structure
registry.example.com/repository/image@sha256:digest. - The signing process does not support tags. Ensure that you specify a SHA256 digest with the artifact you are signing to represent a cryptographic hash of the image’s content. This ensures a unique digest is created for every minor alteration in the image.