This is the multi-page printable view of this section. Click here to print.

Return to the regular view of this page.

Best Practices

Learn how to integrate Endor Labs most effectively into your organization's workflows.

This is the multi-page printable view of this section. Click here to print.

Return to the regular view of this page.

Learn how to integrate Endor Labs most effectively into your organization's workflows.

The resources described here are designed to help you maximize the effectiveness and efficiency of your Endor Labs implementation. Whether you’re just getting started or seeking to optimize your current setup, this guide offers insights, strategies, and recommendations tailored to various use cases. By following these best practices, you’ll achieve seamless integration with Endor Labs and better meet your organization’s goals.

Best Practices: Branches and workflows

Explore how to effectively use Endor Labs to scan different branches within your organization’s software development workflows. Properly managing branches and integrating robust scanning processes is crucial for maintaining code quality, security, and consistency across your development pipeline.

This guide provides actionable insights and strategies for setting up Endor Labs to seamlessly scan and monitor your branches, ensuring that potential issues are detected and addressed early in the development cycle.

A typical Git Flow may include the following types of branches:

  • main
  • develop
  • release
  • feature
  • hotfix

The two primary branches in Git Flow are main and develop. The main or the develop branch stores the official release history and often serves as the integration branch for features. The feature, release, and hotfix branches can serve as supporting branches with different intended purposes.

A baseline branch is any branch that falls into one of the following categories:

  • A branch used to maintain release history or as a single source of truth
  • A branch used for managing releases
  • A branch serving as a source of integration for features and bug fixes

In the Git flow model, main, release, and develop can serve as the baseline branch.

The main branch is typically the primary branch and is often chosen as the default branch in a Git repository. It serves as the central integration point for all development efforts and usually contains the most stable and up-to-date version of the codebase, reflecting the latest approved changes that are ready for production or further testing. This is why we recommend using main not only as the baseline branch but also as the default branch for repositories. Endor Labs uses metrics from the default branch as the primary context for displaying statistics and metrics on the dashboards.
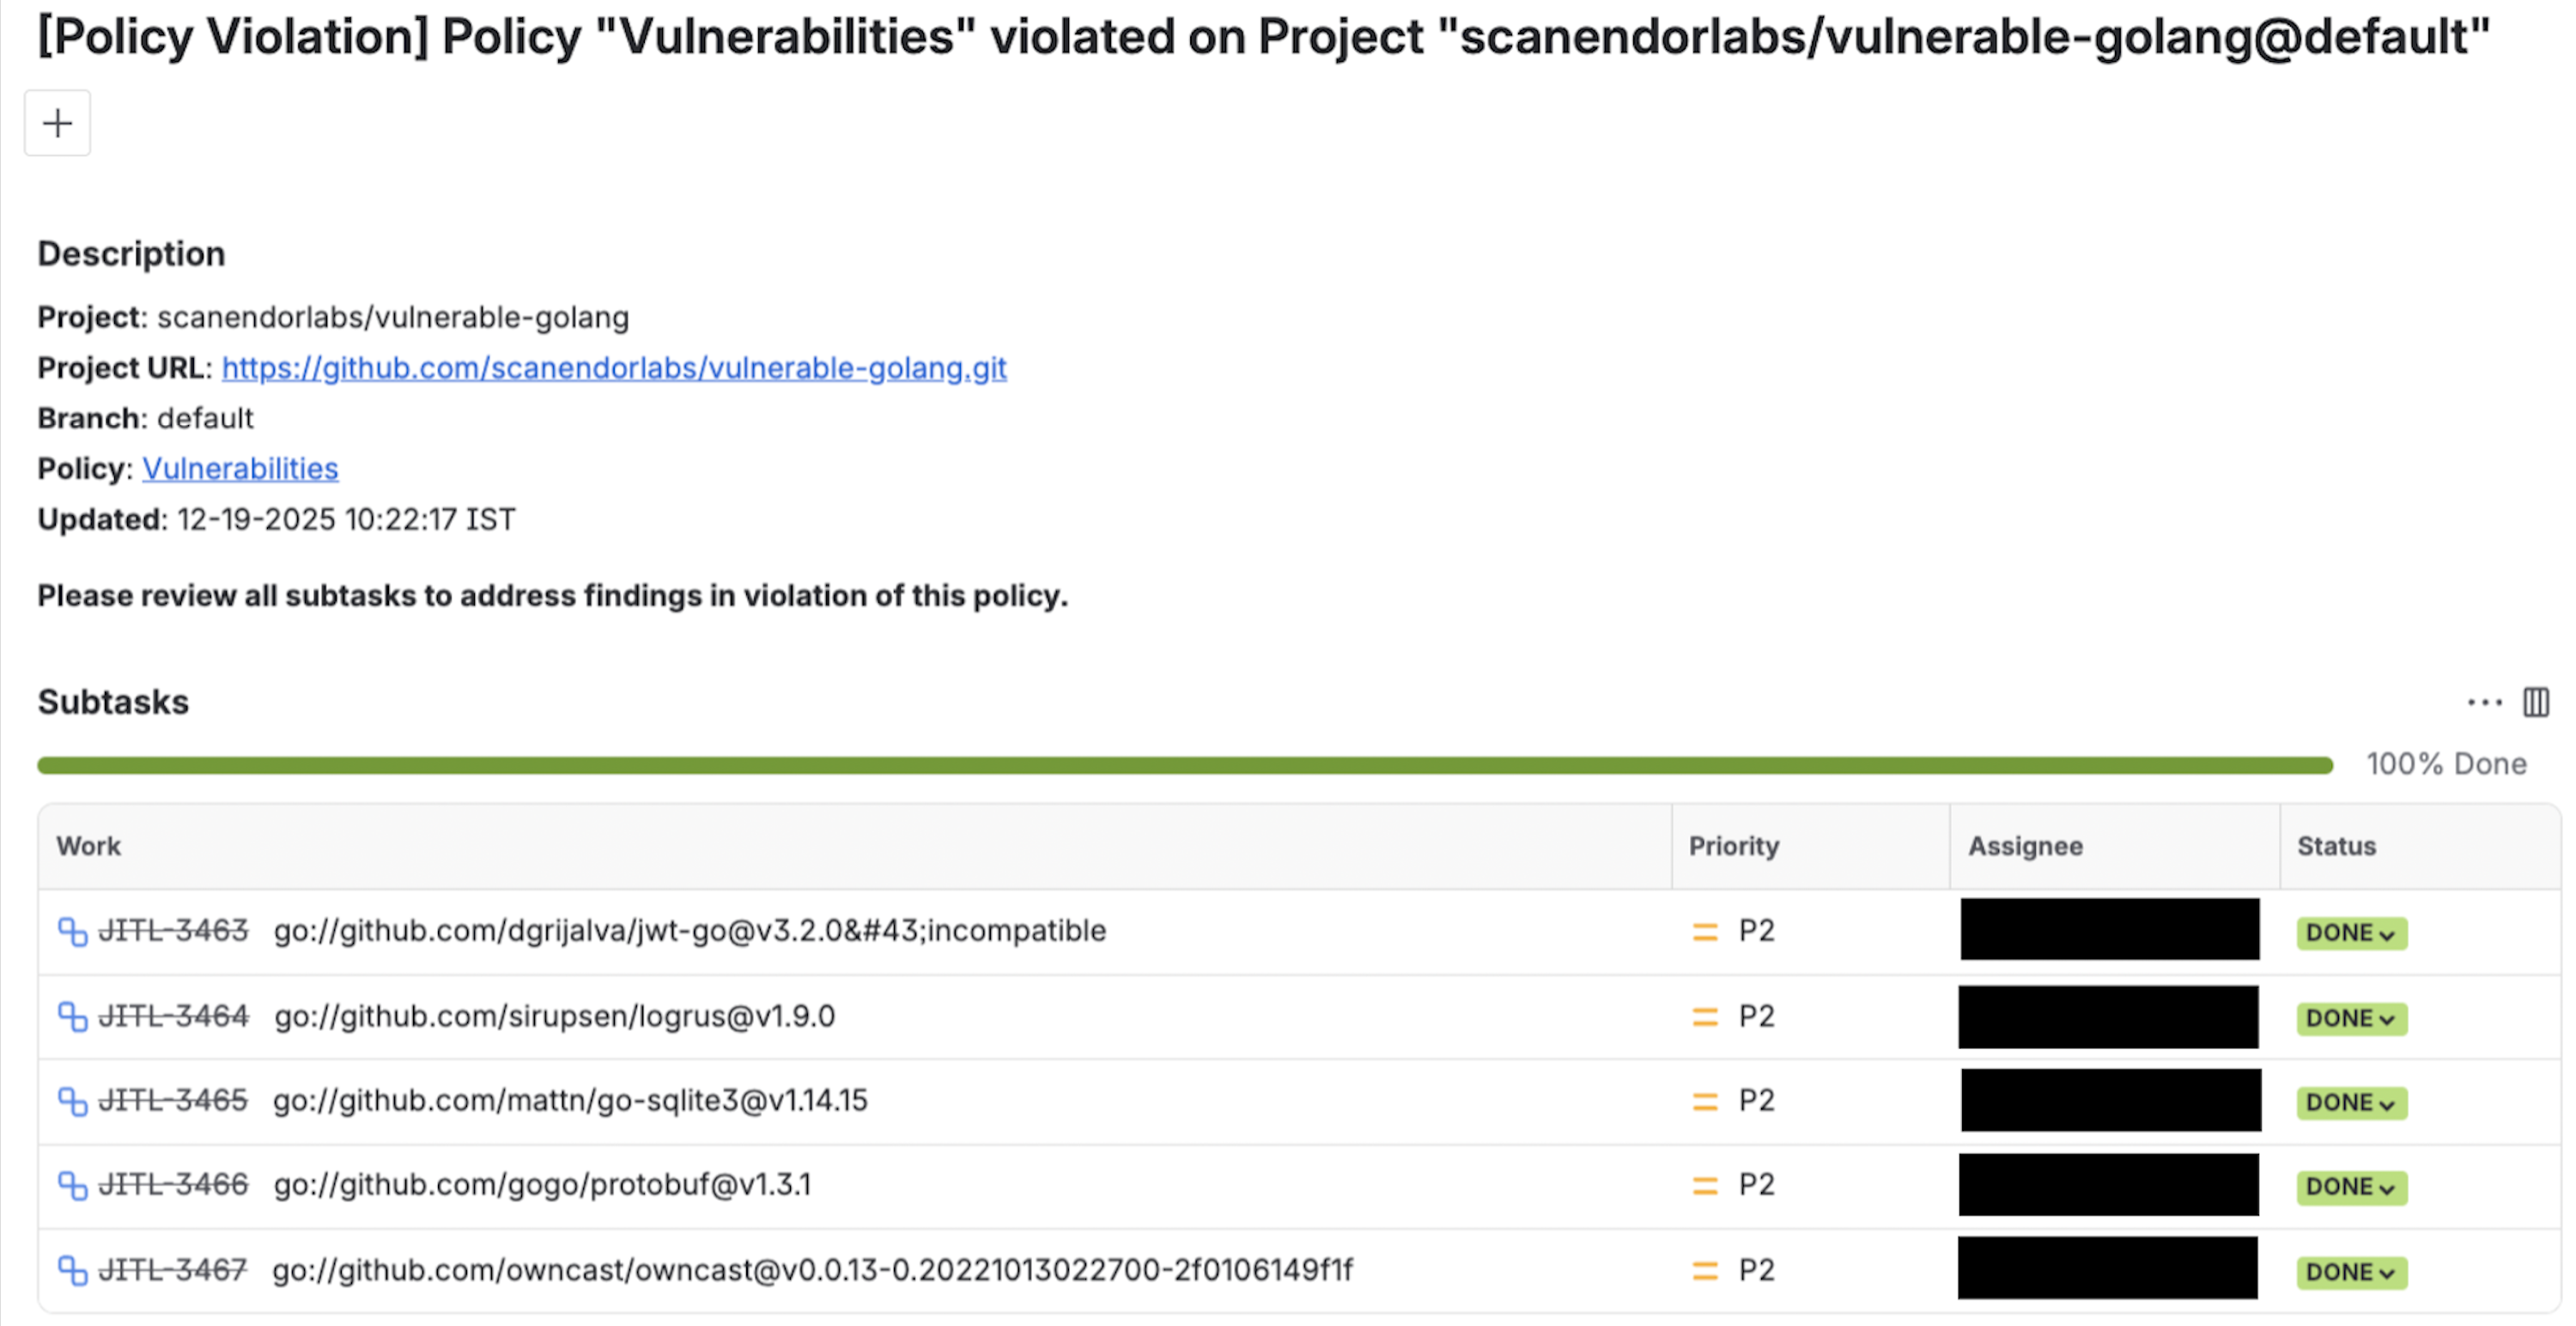
Scan the baseline branches to:

  • Establish a security and quality baseline: Scanning the baseline branch helps establish a reference point for the security and quality standards of your code, allowing you to identify any deviations or new vulnerabilities in subsequent branches.

  • Detect inherited issues: By scanning the baseline branch, you can catch existing issues that might be inherited by other branches, ensuring that these problems are addressed before they proliferate throughout your development workflow. It will help you understand the current state of security.

  • Ensure consistency across development: Regularly scanning the baseline branch ensures that all branches derived from it start from a consistent and secure foundation, reducing the risk of introducing errors or vulnerabilities to your project.

Set up a trigger to initiate a scan whenever changes are merged into the baseline branch, or schedule daily scans to ensure continuous monitoring.

Perform a standard scan with additional configuration to enhance the process. By default, Endor Labs uses the first scanned branch as the default branch. You can override this behavior by using the --as-default-branch argument to designate one of your baseline branches as the default branch during your future scans, ensuring the correct context and parameters are applied for displaying statistics on the dashboards.

For more information, see the GitHub Actions templates you can use in your CI pipelines. The repository also includes examples of other CI tools.

A feature or hotfix branch is a specialized branch in a version control system used to develop and integrate new features and bug fixes into the existing codebase. Changes are typically introduced into the code through pull requests.
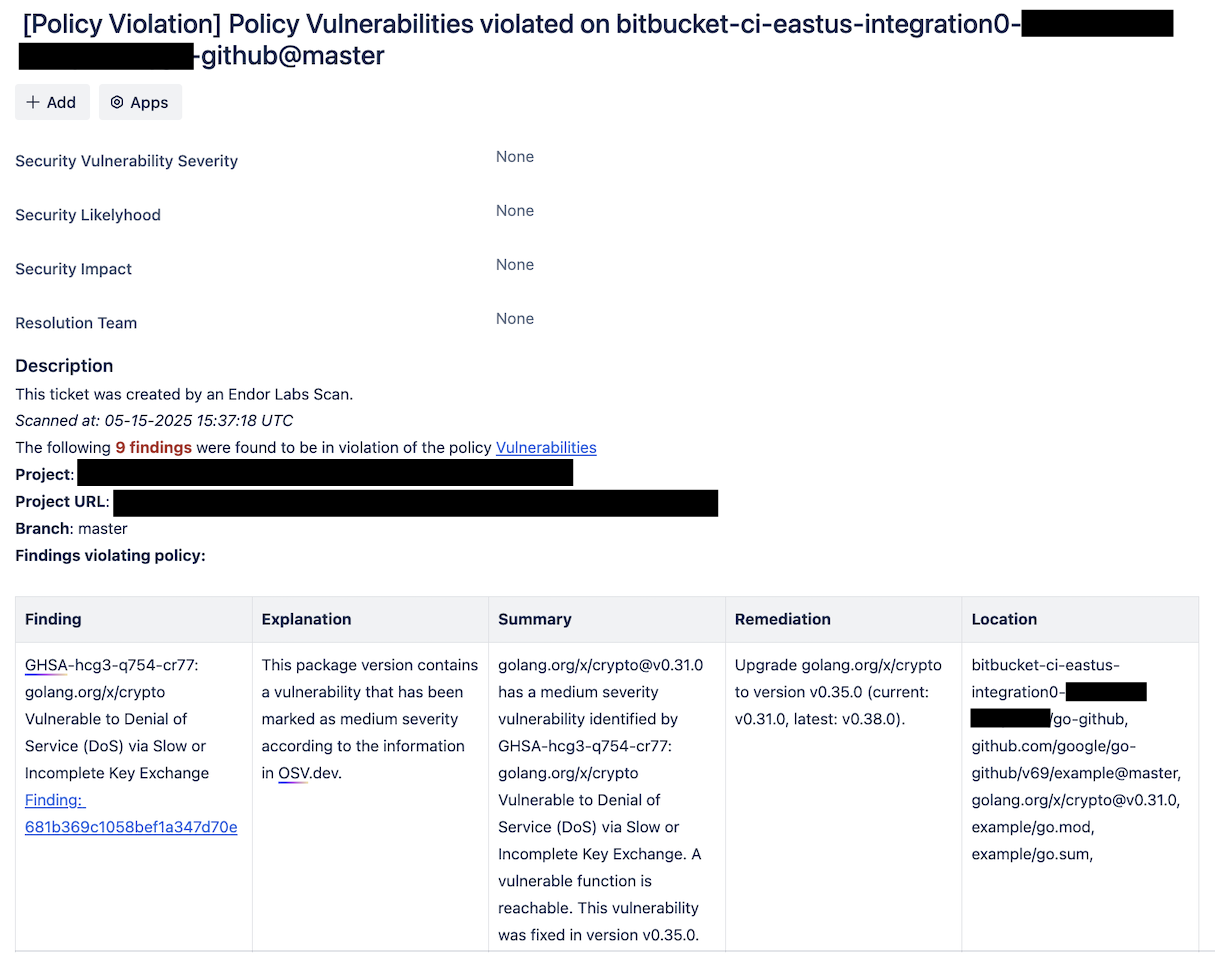
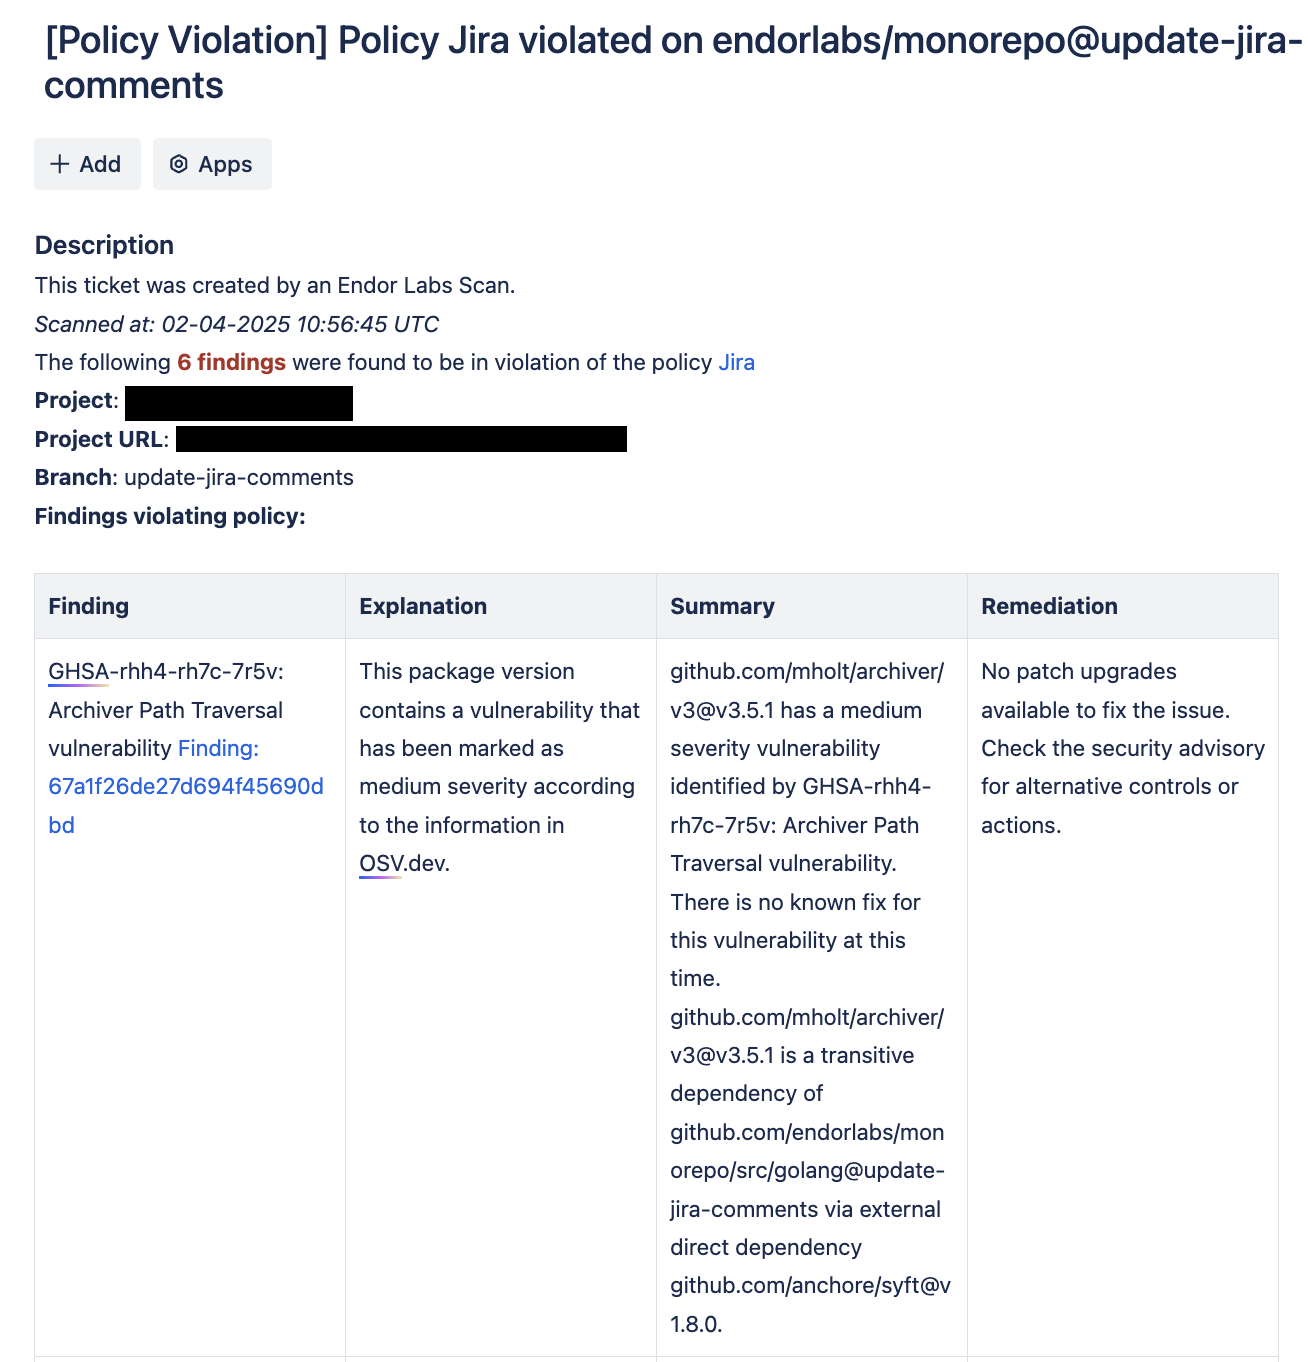
  • Prevent security vulnerabilities: Monitor pull requests to prevent the introduction of new vulnerable dependencies with known vulnerabilities, helping to maintain a secure codebase.

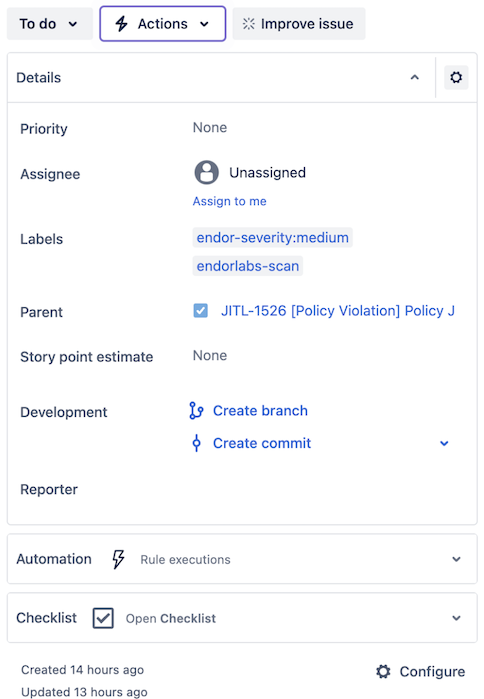
  • Enforce security policies: You can begin enforcing security policies to safeguard your codebase and ensure compliance with established best practices.

  • Perform incremental scans: Once you assess existing vulnerabilities in your baseline branch, you can perform incremental scans to optimize efficiency on your pull requests. Focus on these incremental scans to identify new vulnerabilities, and skip scanning pull requests if a package and its dependencies remain unchanged.

Set up PR scans to be triggered on pull requests to the baseline branch and specify the following arguments:

  • --pr (For GitHub Actions use pr: true)
  • --pr-baseline: {baseline_branch} (For GitHub Actions use pr_baseline: true)
  • --pr-incremental (For GitHub Actions use additional_args: --pr-incremental)

For more information, see the templates that you can use in your CI pipelines.

For more details on how to perform endorctl scans and scan parameters, see Scan with Endor Labs and endorctl CLI.

Best Practices: API key management

You can use API keys to engage with Endor Labs services programmatically to enable any automation or integration with other systems in your environment. See Manage API keys for more information on how to create and delete API keys.

Ensure that you rotate API keys regularly to limit the window of opportunity for an API key to be compromised.

Tip
Instead of using API keys, you can use keyless authentication to authenticate with Endor Labs services. See Keyless authentication for more information. Using keyless authentication eliminates the need to manage API keys and reduces the risk of API key compromise.

You can use the Endor Labs API to programmatically create scripts to manage API keys.

API key expiry can cause interruptions in your workflows. It is a good practice to check for expiring API keys so that you can rotate them before they expire.

You can use the following script (key-expiry.sh) to check for expiring API keys. By default, the script checks for API keys that expire in the next day in the currently configured namespace. You can pass the -d flag with a number to check for API keys that expire in the next n days. You can also pass a namespace with the -n flag followed by the namespace name to check for expiring API keys in a specific namespace. The script uses jq to parse the json response and generate a formatted output. If you do not have jq installed, the script provides a json output.

#!/bin/bash

# Default values. You can update the values here or pass the values as flags to the script.
DAYS=1
NAMESPACE=""
NAMESPACE_FLAG=""

while getopts "n:d:" opt; do
  case $opt in
    n)
      NAMESPACE=$OPTARG
      NAMESPACE_FLAG="-n $NAMESPACE"
      ;;
    d)
      DAYS=$OPTARG
      ;;
    \?)
      echo "Invalid option: -$OPTARG" >&2
      echo "Usage: $0 [-n namespace] [-d days]" >&2
      exit 1
      ;;
    :)
      echo "Option -$OPTARG requires an argument." >&2
      echo "Usage: $0 [-n namespace] [-d days]" >&2
      exit 1
      ;;
  esac
done

TODAY=$(date +"%Y-%m-%d")

# Detect OS type and use appropriate date command
if [[ "$OSTYPE" == "darwin"* ]]; then
    # macOS
    PLUS_DAYS=$(date -v+${DAYS}d +"%Y-%m-%d")
else
    # Other Unix systems
    PLUS_DAYS=$(date -d "+${DAYS} days" +"%Y-%m-%d")
fi

if [ -z "$NAMESPACE" ]; then
    echo "Searching for API keys expiring between $TODAY and $PLUS_DAYS ($DAYS days)"
else
    echo "Searching for API keys in namespace '$NAMESPACE' expiring between $TODAY and $PLUS_DAYS ($DAYS days)"
fi

# Check if jq is available
if command -v jq &> /dev/null; then
    # jq is available, use it for formatted output
    RESULT=$(endorctl api list $NAMESPACE_FLAG -r APIKey \
      --filter="spec.expiration_time >= date($TODAY) AND spec.expiration_time <= date($PLUS_DAYS)" \
      --field-mask "meta.name,spec.expiration_time,meta.created_by,spec.issuing_user.spec.email" -o json)

    if echo "$RESULT" | jq -e '.list.objects | length > 0' &>/dev/null; then
        echo "$RESULT" | jq '.list.objects[] | {name: .meta.name, expiration: .spec.expiration_time, user: .meta.created_by, email: .spec.issuing_user.spec.email}'
    else
        echo "No API keys found expiring in the specified date range."
    fi
else
    # jq is not available, use the regular output
    echo "Note: Install jq for better formatted output"
    endorctl api list $NAMESPACE_FLAG -r APIKey \
      --filter="spec.expiration_time >= date($TODAY) AND spec.expiration_time <= date($PLUS_DAYS)" \
      --field-mask "meta.name,spec.expiration_time"
fi

The script returns the API keys that are expiring in the specified days. The output contains the key name, expiry date, and the information about the user that created the key. You can inform the user that the API key is expiring in the specified days and ask them to rotate the API key. See Create API keys for more information on how to create API keys.

You can also create a cron job to run the script at a regular interval and fetch the details of the expiring API keys.

The following example shows a cron job script, check_key_expiry_cron.sh, that wraps the key-expiry.sh script, and sends an email to the specified email address if there are expiring API keys. You configure the script with the path to the script, the number of days to check for expiring API keys, the email address to send the report to, and the namespace to check for expiring API keys.


#!/bin/bash

# Configuration - Customize these values according to your needs
SCRIPT_PATH="/path/to/key-expiry.sh"
DAYS=1  # Days to check for expiring API keys
EMAIL="your-email@example.com"
NAMESPACE=""  # Namespace to check for expiring API keys

OUTPUT=$($SCRIPT_PATH -d $DAYS $([[ -n $NAMESPACE ]] && echo "-n $NAMESPACE"))

if [ $(echo "$OUTPUT" | wc -l) -gt 1 ]; then
    echo "$OUTPUT" | mail -s "API Keys Expiring in the Next $DAYS Days" $EMAIL
fi

Run the following command to create a cron job that runs the script at 8 AM every day if the script is located in the home directory.

0 8 * * * $HOME/check_key_expiry_cron.sh

API keys with long expiry can be a security risk. The Endor Labs Create API key endpoint allows you to create API keys with expiry time of over 365 days. Such long expiry times may not be necessary and incompatible with your security policies.

You can use the following script (check_long_expiry_keys.sh) to check for API keys with long expiry. The script checks for API keys with expiry dates longer than 365 days by default on the currently configured namespace. You can pass the -d flag with a number to check for API keys with expiry days according to the number you pass. You can also choose to pass an Endor Labs namespace to search for long expiry API keys in a specific namespace with the -n flag followed by the namespace name. The script uses jq to parse the json response.


#!/bin/bash

# Default values
DAYS=365
NAMESPACE=""
NAMESPACE_FLAG=""

# Parse command line options
while getopts "n:d:" opt; do
  case $opt in
    n)
      NAMESPACE=$OPTARG
      NAMESPACE_FLAG="-n $NAMESPACE"
      ;;
    d)
      DAYS=$OPTARG
      ;;
    \?)
      echo "Invalid option: -$OPTARG" >&2
      echo "Usage: $0 [-n namespace] [-d days]" >&2
      exit 1
      ;;
    :)
      echo "Option -$OPTARG requires an argument." >&2
      echo "Usage: $0 [-n namespace] [-d days]" >&2
      exit 1
      ;;
  esac
done

# Calculate today's date in YYYY-MM-DD format
TODAY=$(date +"%Y-%m-%d")

# Detect OS type and use appropriate date command for calculating the future date
if [[ "$OSTYPE" == "darwin"* ]]; then
    # macOS
    PLUS_DAYS=$(date -v+${DAYS}d +"%Y-%m-%d")
else
    # Linux
    PLUS_DAYS=$(date -d "+${DAYS} days" +"%Y-%m-%d")
fi

# Print info about the search
if [ -z "$NAMESPACE" ]; then
    echo "Searching for API keys with expiration dates longer than $DAYS days from today ($TODAY to $PLUS_DAYS)"
else
    echo "Searching for API keys in namespace '$NAMESPACE' with expiration dates longer than $DAYS days from today ($TODAY to $PLUS_DAYS)"
fi

# Check if jq is available
if command -v jq &> /dev/null; then
    # jq is available, use it for formatted output
    RESULT=$(endorctl api list $NAMESPACE_FLAG -r APIKey \
      --filter="spec.expiration_time > date($PLUS_DAYS)" \
      --field-mask "meta.name,spec.expiration_time,meta.created_by,spec.issuing_user.spec.email" -o json)

    # Check if list.objects exists and is not empty
    if echo "$RESULT" | jq -e '.list.objects | length > 0' &>/dev/null; then
        echo "$RESULT" | jq '.list.objects[] | {name: .meta.name, expiration: .spec.expiration_time, user: .meta.created_by, email: .spec.issuing_user.spec.email}'
    else
        echo "No API keys found with expiration dates longer than $DAYS days."
    fi
else
    # jq is not available, use the regular output
    echo "Note: Install jq for better formatted output"
    endorctl api list $NAMESPACE_FLAG -r APIKey \
      --filter="spec.expiration_time > date($PLUS_DAYS)" \
      --field-mask "meta.name,spec.expiration_time"
fi

The script returns the API keys with expiry dates longer than the number of days you passed with key name, expiry date, and the information about the user that created the key.

You should regularly check for and delete expired API keys.

Keeping only active and necessary API keys can improve system performance by reducing the volume of data that needs to be processed during authentication checks. Regular cleanup makes it easier to manage and monitor active keys, allowing for better oversight of API access and usage patterns.

You can use the Endor Labs API to check for expired API keys and delete them.

The following script (delete-expired-keys.sh) checks for expired API keys and presents the options to delete them. You can choose to pass an Endor Labs namespace to search for expired API keys in a specific namespace. If you do not pass a namespace, the script checks for expired API keys in the currently configured namespace. The script uses jq to parse the json response.

#!/bin/bash
# Add a namespace to search for expired API keys in a specific namespace
NAMESPACE=""
NAMESPACE_FLAG=""
while getopts "n:" opt; do
  case $opt in
    n)
      NAMESPACE=$OPTARG
      NAMESPACE_FLAG="-n $NAMESPACE"
      ;;
    \?)
      echo "Invalid option: -$OPTARG" >&2
      echo "Usage: $0 [-n namespace]" >&2
      exit 1
      ;;
    :)
      echo "Option -$OPTARG requires an argument." >&2
      echo "Usage: $0 [-n namespace]" >&2
      exit 1
      ;;
  esac
done

TODAY=$(date +"%Y-%m-%d")
if [ -z "$NAMESPACE" ]; then
    echo "Searching for expired API keys (expiration date before $TODAY)"
else
    echo "Searching for expired API keys in namespace '$NAMESPACE' (expiration date before $TODAY)"
fi

check_jq() {
  if ! command -v jq &> /dev/null; then
    echo "Error: This script requires jq to be installed."
    echo "Please install jq and try again."
    exit 1
  fi
}
check_jq

# Get all expired API keys
RESULT=$(endorctl api list $NAMESPACE_FLAG -r APIKey \
  --filter="spec.expiration_time < date($TODAY)" \
  --field-mask "meta.name,spec.expiration_time,uuid" -o json)

# Check if there are any expired keys
if ! echo "$RESULT" | jq -e '.list.objects | length > 0' &>/dev/null; then
  echo "No expired API keys found."
  exit 0
fi

KEY_COUNT=$(echo "$RESULT" | jq '.list.objects | length')
echo "Found $KEY_COUNT expired API key(s)."

echo -e "\nExpired API Keys:"
echo "===================="
echo "$RESULT" | jq -r '.list.objects[] | "ID: \(.uuid)\nName: \(.meta.name)\nExpired: \(.spec.expiration_time)\n"'

echo -e "\nWould you like to delete these expired API keys?"
echo "1) Delete all expired keys"
echo "2) Select keys to delete individually"
echo "3) Exit without deleting"
read -p "Choose an option (1-3): " CHOICE

case $CHOICE in
  1)
    echo -e "\nDeleting all expired API keys..."
    for UUID in $(echo "$RESULT" | jq -r '.list.objects[].uuid'); do
      echo -n "Deleting key with UUID $UUID... "
      if endorctl api delete $NAMESPACE_FLAG -r APIKey --uuid=$UUID &> /dev/null; then
        echo "Success"
      else
        echo "Failed"
      fi
    done
    ;;

  2)
    echo -e "\nSelecting keys to delete individually:"
    for UUID in $(echo "$RESULT" | jq -r '.list.objects[].uuid'); do
      NAME=$(echo "$RESULT" | jq -r ".list.objects[] | select(.uuid == \"$UUID\") | .meta.name")
      EXPIRY=$(echo "$RESULT" | jq -r ".list.objects[] | select(.uuid == \"$UUID\") | .spec.expiration_time")

      echo -e "\nID: $UUID"
      echo "Name: $NAME"
      echo "Expired: $EXPIRY"

      read -p "Delete this key? (y/n): " DELETE
      if [[ $DELETE == "y" || $DELETE == "Y" ]]; then
        echo -n "Deleting... "
        if endorctl api delete $NAMESPACE_FLAG -r APIKey --uuid=$UUID &> /dev/null; then
          echo "Success"
        else
          echo "Failed"
        fi
      else
        echo "Skipped"
      fi
    done
    ;;

  3)
    echo "Exiting without deleting any keys."
    ;;

  *)
    echo "Invalid option. Exiting without deleting any keys."
    ;;
esac

echo -e "\nOperation completed."

You can also create a cron job to run the script at a regular interval.

The following example shows a cron job script, check_expired_keys_cron.sh, that wraps the delete-expired-keys.sh script. You configure the script with the option to run the script to delete or report expired API keys, the path to the script, the email address to send the report to, and the namespace to check for expired API keys.

#!/bin/bash

# Configuration - Customize these values according to you need
SCRIPT_PATH="/path/to/delete-expired-keys.sh"
EMAIL="your-email@example.com"
NAMESPACE=""  # Set the required namespace or leave empty to check API keys in the currently configured namespace
OPERATION="REPORT"  # Set that value as "DELETE" to delete expired API keys

# Create a temporary file for the report
TEMP_REPORT=$(mktemp)

# Function to send email with the report
send_email() {
  local subject="$1"
  cat $TEMP_REPORT | mail -s "$subject" $EMAIL
  echo "Email sent with expired API keys report."
}

if [ "$OPERATION" = "REPORT" ]; then
  if [ -z "$NAMESPACE" ]; then
    echo "3" | $SCRIPT_PATH > $TEMP_REPORT 2>&1
  else
    echo "3" | $SCRIPT_PATH -n $NAMESPACE > $TEMP_REPORT 2>&1
  fi

  if grep -q "Found [1-9][0-9]* expired API key" $TEMP_REPORT; then
    send_email "Expired API Keys Found - Action Required"
  else
    echo "No expired API keys found."
  fi

elif [ "$OPERATION" = "DELETE" ]; then
  if [ -z "$NAMESPACE" ]; then
    echo "1" | $SCRIPT_PATH > $TEMP_REPORT 2>&1
  else
    echo "1" | $SCRIPT_PATH -n $NAMESPACE > $TEMP_REPORT 2>&1
  fi

  if grep -q "Found [1-9][0-9]* expired API key" $TEMP_REPORT; then
    send_email "Expired API Keys Deleted - Action Taken"
  else
    echo "No expired API keys found."
  fi

else
  echo "Invalid OPERATION value: $OPERATION. Must be 'REPORT' or 'DELETE'." > $TEMP_REPORT
  send_email "ERROR: Invalid Expired API Keys Operation"
fi

rm $TEMP_REPORT

You can use the following command to create a cron job that runs the script at 8 AM every day.

0 8 * * * $HOME/check_expired_keys_cron.sh

Best Practices: Scoping scans

Exclude and include filters help your team to focus their attention on the open source packages that matter most and to improve scan performance. Use inclusion patterns when you have many packages that you want to scan separately and exclusion patterns when you want to filter out packages that are not important to you.

You can include or exclude packages using the following standard patterns:

  1. Include or exclude specific packages.
  2. Include or exclude specific directories.
  3. Include or exclude with a Glob style expressions.
  4. Use include and exclude patterns together to exclude specific directories such as a test directory from a scan.
  5. Use multiple include and exclude patterns together to exclude or include specific directories or file paths.

To include or exclude a package based on its file name when you scan with endorctl.

endorctl scan --include-path="path/to/your/manifest/file/package.json"
endorctl scan --exclude-path="path/to/your/manifest/file/package.json"

To include or exclude a package based on its directory

endorctl scan --include-path="directory/path/**"
endorctl scan --include-path="src/java/**"
endorctl scan --exclude-path="path/to/your/directory/**"
endorctl scan --exclude-path="src/ruby/**"

The following examples show how you can use scoping scans.

Use --exclude-path="src/java/**" to exclude all files under src/java, including all its subdirectories.

endorctl scan --exclude-path="src/java/**"

Use --exclude-path="src/java/**" to only exclude the files under src/java, but not its subdirectories.

endorctl scan --exclude-path="src/java/**"

Use --include-path and --exclude-path together to exclude specific directories such as test directories.

endorctl scan --include-path="src/java/**" --exclude-path="src/java/test/**"

Use multiple inclusion patterns together.

endorctl scan --quick-scan --include-path="src/java/**" --include-path="src/dotnet/**"
  • Use multiple exclusion patterns together.
endorctl scan --include-path="src/java/**" --exclude-path="src/java/gradle/**" --exclude-path="src/java/maven/**"

Here are a few best practices of using scoping scans:

  • Ensure that you enclose your exclude pattern in double quotes to avoid shell expansion issues. For example, do not use --exclude-path=src/test/**, instead, use --exclude-path="src/test/**".
  • Inclusion patterns are not designed for documentation or example directories. You cannot explicitly include documentation or example directories:
    • docs/
    • documentation/
    • groovydoc/
    • javadoc
    • man/
    • examples/
    • demos/
    • inst/doc/
    • samples/
  • The specified paths must be relative to the root of the directory.
  • If you are using JavaScript workspaces, Endor Labs automatically detects workspace roots and their lock files:
    • You can scan individual workspace packages without explicitly including the root package. The scanner automatically detects the workspace root and locates the lock file.
    • For example, to scan only a specific workspace package: endorctl scan --include-path="packages/utils/**" - the scanner automatically finds and uses the lock file at the workspace root.
    • You can still exclude specific child packages from your scan while the workspace root is automatically detected.

Best Practices: Jira integration with Endor Labs

Explore how to effectively use Endor Labs with Jira to manage security findings within your organization’s software development workflows. Endor Labs analyzes your software dependencies, generates security findings, and automatically creates Jira tickets to track and resolve these issues. Each ticket is linked to your project and contains specific details about the detected vulnerabilities.

Endor Labs integrates with Jira Cloud to automatically create tickets in your projects when configured policies are violated, streamlining your organization’s security workflow.

See Jira integration with Endor Labs for more information.

A finding is a security vulnerability in your source code. When Endor Labs scans a project, it analyzes its dependencies, which are the software packages the project relies on and generates findings. A package version is a specific release of a dependency, identified by a version number (for example, jwx v1.0.5).

Endor Labs automatically creates a Jira ticket to track and address the issue when a finding is identified. The ticket includes the project URL, branch, details about findings such as:

  • Finding: A link to the identified vulnerability.
  • Explanation: A brief description of the issue.
  • Summary: Technical details about the vulnerability, versions affected, and packages impacted.
  • Remediation: Recommended actions, such as upgrading to a secure version.
  • Location: Exact file, package, dependency, and repository where the vulnerability is identified.

Findings in Jira

You can assign the ticket to an individual for remediation. Based on the selected issue type and the aggregation type, it can be one of the following:

  • Task
  • Sub-Task
  • Bug

Findings and their associated Jira tickets are organized within a project. In Jira, a project serves as a centralized space where all related issues are managed.

To learn more about setting up a project, refer to the Jira documentation.

Choose the appropriate notification aggregation type to organize security findings in Jira effectively. See Aggregation Types for more information.

Use Project aggregation to receive a single Jira notification for all findings in a project. This groups all findings into one Jira ticket. It is ideal for teams that prefer a high-level view of issues.

For example, the back-end team relies on libraries such as archiver and jwx. All findings from these libraries are compiled into a single Jira Task.

This approach helps the teams:

  • Avoid excessive notifications and streamline remediation efforts.
  • Manage all security related issues within their designated Jira project.
  • Improve tracking and collaboration.

Project Aggregation Type

Use Dependency aggregation to receive separate notifications for each affected dependency in a project. A parent Jira ticket is created, with each dependency tracked as a Sub-Task with its findings. This approach is ideal for teams prioritizing security management at the dependency level.

For example, the back-end team developing a Go application relies on libraries like archiver and jwx. When Endor Labs scans the project:

  • Findings for archiver are present in its Sub-Task.
  • Findings for jwx are present in its Sub-Task.

This approach ensures:

  • A clear division of responsibilities for efficient vulnerability tracking.
  • Focused issue resolution without overwhelming teams.
  • Granular visibility into security risks for targeted management.

Dependency Aggregation

Use this to receive separate notifications for each affected package version. Each version has its own Sub-Task under a parent Jira ticket, with its findings present in the respective Sub-Task.

For example, a Go project using the jwx library has multiple versions in use. Endor Labs creates a parent Jira ticket, with each affected version tracked as Sub-Tasks:

  • Findings for jwx v2.0.13 are present in its Sub-Task.
  • Findings for jwx v1.0.5 are present in its Sub-Task.

This approach helps the teams:

  • Apply security fixes precisely without triggering unnecessary updates.
  • Reduce notification noise and focus on resolving issues in their specific dependencies.
  • Maintain stability in machine learning workflows while managing vulnerabilities effectively.

Dependency Per Package Version Aggregation

Note
Ensure you have a Jira instance set up on Jira Cloud before integrating with Endor Labs.

Each Jira ticket contains specific labels, comments, and custom fields to provide context and streamline tracking.

Endor Labs automatically assigns labels to Jira tickets to simplify the management of security issues. These labels appear in the right-hand sidebar of the Jira ticket under Details. The following labels are provided by Endor Labs:

endorlabs-scan: Assigned to every Jira ticket that is generated by Endor Labs scan.

endor-severity: Indicates the severity of the associated finding, such as critical, high, medium, or low. If a ticket includes multiple findings with different severities, the label represents the highest severity among them.

Tip
For Dependency and Dependency per package version aggregation types, the endor-severity label is applied to the Sub-Task and not the parent ticket.

In the following example, the ticket titled “Findings with no dependencies” includes the following labels:

endorlabs-scan: Identifies that the ticket was created as part of an Endor Labs scan.

endor-severity:medium: Represents the severity of the detected finding.

Example of Jira label

During future scans, the status of the findings is updated in the form of comments in your Jira ticket.

If new findings are detected, a comment will be generated with their details.

New findings comment

If existing findings are resolved, a comment will be generated with their details. Update findings comment

Endor Labs automatically sets the Components field using values from your Jira project configured during the Jira integration with Endor Labs.

  • For a team-managed Jira project, Endor Labs applies the configured component value to each ticket it creates.

    In the following example, Test DEPR Component is the assigned components value. Team managed project components

  • For a company-managed Jira project, Endor Labs applies all configured component values to each ticket it creates.

    In the following example, Test DEPR Component and Test UI Component are the assigned components values. Company managed project components

Ensure your Jira board has a designated resolution state like Done, Fixed, etc. for Endor Labs to mark tickets as resolved. If no such state exists, the ticket remains unresolved.

Ensure that tickets can transition from a beginning state, such as To Do, to a resolution state like Done without requiring intermediate states such as In Progress. If the workflow restricts direct movement, Endor Labs cannot move tickets between states, and you must update the status manually on your Jira board.

What permissions are required for Jira integration?
Jira integration requires only the minimum project-level permissions, such as: create issues, transition issues, assign issues, resolve issues, and add comments.
What happens if a Jira ticket is manually marked as Resolved in Jira?
If a Jira ticket is manually marked as Resolved in your Jira board, Endor Labs does not scan the finding in the future scans and the finding is not displayed in the ticket.
What happens if we fix the security vulnerability?
Endor Labs marks the ticket as resolved in your Jira board after the next scan.
Can I change the project that I initially configured?
No. You must add a new Jira integration and then configure Endor Labs to the new project with a new API key.
What happens if I change the aggregation type?

Jira updates the grouping of findings in the board based on changes to the action policy’s aggregation type.

  • When changing from Project to Dependency, findings are split into separate Sub-tasks based on the dependency type.
  • When changing from Project to Dependency per package version, findings are split into Sub-tasks based on the package version.
  • When changing from Dependency or Dependency per package version to Project, all findings are consolidated into a single Jira ticket.

Best Practices: GitHub Security Campaign

A GitHub Security Campaign is an organized, time-bound initiative designed to identify, remediate, and prevent vulnerabilities across multiple repositories. By leveraging Endor Labs dependency intelligence and GitHub Advanced Security (GHAS), these campaigns transform vulnerability findings into coordinated remediation efforts that keep developers working inside GitHub. This approach is particularly effective when multiple projects share vulnerable dependencies or when organizations must meet compliance-driven remediation deadlines.

Endor Labs generates vulnerability findings in SARIF format, which are uploaded directly into GitHub Advanced Security. Once uploaded, these findings become actionable alerts enabling developers to triage, fix, and track vulnerabilities without leaving their familiar environment.

The security campaign allows organizations to:

  • Target a specific class of vulnerabilities, for example Log4j, or CVE-2024-xyz.
  • Drive dependency upgrades and security fixes across all affected repositories.
  • Address secrets detection and SAST findings alongside for comprehensive security remediation.
  • Enforce consistent remediation timelines and accountability across teams.
  • Monitor reduction in overall security debt using both GitHub’s campaign dashboard and Endor Labs analytics.

Ensure you have deployed Endor Labs and enabled GitHub Advanced Security before creating a security campaign.

Use GitHub Security Campaigns to coordinate and manage large-scale vulnerability remediation efforts by importing findings from Endor Labs.

  1. Run a scan with Endor Labs to generate vulnerability findings in SARIF format and upload them to GitHub Advanced Security. See SARIF output format for detailed information on generating, customizing, and uploading SARIF files.
Automatic SARIF upload
Configure Endor Labs GitHub App (Pro) with a GHAS SARIF exporter to automatically upload findings to GitHub after each scan. See Export findings to GitHub Advanced Security for setup instructions.
  1. In GitHub, navigate to Security > Campaigns > New Campaign to define your campaign parameters. Refer to security campaign guide for more information on GitHub’s campaign features and configuration options.

  2. Define the scope of your campaign.

    • Organization-wide: Apply the campaign across all repositories in your organization.
    • Selected repositories: Target specific repositories affected by the vulnerability class.
    • Teams or projects: Scope by team ownership or project grouping.
  3. Specify a clear focus area of the campaign that aligns with your security requirements. For example, remediating Log4j vulnerabilities across Java projects, or upgrading vulnerable npm packages to secure versions.

  4. Define campaign objectives with clear remediation timelines. For example, close 80% of critical dependency vulnerabilities within 30 days, or fully remediate exposed secrets within 10 days.

  5. Monitor campaign metrics in GitHub, including percentage of vulnerabilities remediated, active versus resolved alerts, and repository-level completion.

Security campaigns are a strategic way to remediate security alerts at scale while improving developer knowledge of secure coding practices. Below are the best practices to ensure successful campaign execution.

Select a related group of security alerts for remediation rather than attempting to fix all alerts at once. For organizations building secure coding knowledge, prioritize alerts that can serve as learning opportunities.

Use Endor Labs’ reachability analysis and severity scoring to identify high-impact vulnerabilities.

  • Focus on reachable vulnerabilities where the vulnerable code is actually used in execution paths.
  • Filter by exploitability score, CVE severity, or policy violation type.
  • Use Endor Labs Dependency Graph to visualize transitive relationships and focus on the most impactful fixes.
Tip
You can tag repositories with metadata such as critical, frontend, or backend in Endor Labs and scope your campaign accordingly. Exclude inactive or archived repositories to focus efforts where they matter most.

Include links to relevant educational materials in the campaign description to help developers understand and remediate vulnerabilities effectively, such as OWASP references, secure secrets management guides, or internal upgrade instructions.

Leverage AI-powered tools to accelerate remediation while maintaining code quality:

  • Use GitHub Copilot Autofix to suggest fixes for code scanning alerts automatically, reducing manual effort.
  • Make GitHub Copilot Chat available for developers to ask questions about vulnerabilities, testing, and secure coding best practices.
  • Enable Endor Labs automated remediation PRs to create pull requests with updated dependency versions, vulnerability references (CVE IDs, severity, reachability), and compatibility checks.

Campaign managers play a critical role in maintaining momentum and ensuring developers have the support they need to succeed. Campaign managers should:

  • Review PRs, provide guidance, and maintain consistent communication.

  • Provide a contact link for questions and collaboration.

  • Monitor progress and provide support where needed to ensure sustained engagement.

  • Help resolve complex or unclear fixes through open communication with developers.

Set timelines according to issue complexity and remediation scope. Simple dependency upgrades require minimal validation, whereas compatibility or architectural fixes need extended testing and integration checks. Align campaigns with sprint cycles or release milestones. Iterative, narrowly scoped campaigns improve predictability, code stability, and remediation quality.

Continuously monitor campaign performance using GitHub dashboards for remediation percentage, active versus resolved alerts, repository-level progress, and time-to-fix metrics, and use GitHub Issues for task tracking and communication within developer workflows.

Tip
Use GitHub labels such as security-campaign-q4 or log4j-remediation on issues and pull requests to enable easy filtering and audit tracking across repositories.

Scenario: A critical Log4j vulnerability affects multiple Java microservices across the organization.

Campaign execution:

  1. Export a SARIF file containing all dependency vulnerabilities from Endor Labs.
  2. Upload the SARIF file to GitHub to populate alerts across affected repositories.
  3. Create a security campaign titled “Fix outdated Log4j dependencies across all repos”.
  4. Assign the campaign to the Java development team with a 30-day remediation deadline.
  5. Developers fix vulnerabilities directly in GitHub by updating affected dependencies.
  6. The security team monitors campaign progress in GitHub until 85% of alerts are resolved, then closes the campaign.

Outcome: The organization remediates 85% of Log4j-related vulnerabilities within 30 days, improving dependency security posture and reducing exposure to known CVEs.

Can security campaigns include private repositories?
Yes. Security campaigns work with both public and private repositories. Ensure GitHub Advanced Security is enabled for private repositories and that the Endor Labs GitHub App has appropriate permissions.
How are alerts selected for a campaign?
Alerts are selected using GitHub’s campaign filters and Endor Labs’ vulnerability data. Use Endor Labs’ reachability analysis to prioritize alerts where vulnerable code is actively used in execution paths.
What is the maximum number of active campaigns allowed?
GitHub permits a maximum of 10 active campaigns, each with up to 1,000 alerts. You can prioritise active repositories, target specific vulnerability types, close completed campaigns swiftly, and run campaigns sequentially or split them into focused initiatives
Can multiple campaign types run simultaneously?
Yes. You can run multiple campaign types simultaneously, such as dependency remediation, secrets rotation, and license compliance. Each campaign can target different repositories, teams, or vulnerability classes.
What integrations are available for campaign management?
GitHub Security Campaigns integrate with GitHub Issues, GitHub Actions, Slack, Jira, and Endor Labs. You can export Campaign data to business intelligence tools and internal reporting dashboards

Best Practices: Build tools use cases

Endor Labs relies on build tools such as compilers, runtimes, and package managers to scan applications accurately. These tools are essential for reproducing your project’s build environment during a scan. This is especially important for languages like Python, Java, or .NET, where lock files are less common and exact tool versions help ensure consistency. By specifying build tools in your scan profile, you can avoid issues like incorrect language detection, broken dependencies, or missing findings.

Scans may fail if the toolchain is incorrect or required build tools are missing. A well-configured scan profile aligns the environment with your project and ensures accurate results. You can configure toolchains and build tools in scan profiles in multiple ways:

Auto detection takes place when no scan profile or build tool is configured for a project. The process identifies the toolchain versions required by the project and compares them with the versions that Endor Labs supports. See the toolchain support matrix to learn more about supported versions and auto detection to learn about the complete process.

Note
Use the --install-build-tools flag to enable auto detection in endorctl scans.

Understanding build tools use cases help you improve scan accuracy and streamline your scanning process. Here are some common use cases for build tools that show how you can customize scan profiles to better match your project’s needs.

You can configure language specific tool versions in a single scan profile based on OS and architecture. For example, to scan a multi-language repository with Python, Golang, and Node.js, set Python 3.9.19, Golang 1.22.7, and Node.js 20.10.0. During the scan, Endor Labs applies the configured toolchain version for each language. This ensures accurate builds, better dependency resolution, and improved findings.

Multiple language repository

In a multi-architecture environment, you can configure toolchains for operating system and architecture combination to ensure scans align with system specific setups.

For example, a Linux AMD64 machine with Python 3.8.0 installed but Python 3.8.19 specified in the toolchain configuration will use version 3.8.19 during scans. A macOS AMD64 machine with Python 3.10.14 installed but Python 3.7.0 configured will use the system’s Python 3.10.14. Meanwhile, a macOS ARM64 machine without any version of Python installed and no toolchain configured will use Python 3.12.4, the default version supported by Endor Labs.

Multiple architecture

Set up a custom toolchain version when your project depends on a specific version not provided by Endor Labs. This gives you precise control over the scanning environment and helps avoid issues caused by version mismatches.

For example, the highest supported Java version in the default list is 17, but your project needs 23.0.2, the scan will fail if no toolchain is configured. In such cases, create a custom build toolchain for Java 23.0.2 in your scan profile which is linked to your project. When you re-run the scan, Endor Labs uses the configured 23.0.2 version and gives reliable results. This configuration works only in the namespace where you created the build tool. See configure custom version for the toolchain to learn how to configure custom version for a toolchain.

Custom toolchain version for Java which is not provided by Endor Labs

Endor Labs selects the toolchain version for each language based on your scan profile. When you configure toolchain versions for some languages and leave others unspecified, the scan uses your specified versions and defaults to the Endor Labs toolchain matrix for the remaining languages.

For example, if your project’s scan profile specifies Yarn 3.8.7 and pnpm 8.10.2 but does not specify a Node.js version, Endor Labs will use the configured Yarn and pnpm versions, and automatically select Node.js 20.10.0 from the default supported version list. This approach ensures your project builds successfully without requiring extra configuration.

Default and configured

Multiple projects often require specific custom toolchain versions, which you can configure in your scan profile. For example, Project A needs Python 3.13.0 and Go 1.24.6 and Project B requires the same Python and Go versions, and an additional Java 22.0.2. Configuring each toolchain separately for these two project can be time-consuming.

You can configure these build tools and name them 3.13.0 and 1.24.6 in your namespace. See configure build tools for setup instructions.

Build tools use case 1

  • For Project A’s scan profile, add these reusable build tools in its scan profile.

Build tools use case 3

  • For Project B’s scan profile, add the same reusable build tools and the additional Java toolchain.

Build tools use case 2

This approach reduces duplication, saves time, and ensures consistent toolchain use across projects. Note that these reusable build tool configurations are namespace specific, so only projects within your namespace can access them.

Note
Use clear, unique, and consistent naming for build tool and scan profiles to improve visibility and promote reuse. For example frontend-node16, backend-java17, shared-go120.

Best practices: Working with project filters

Filters enable targeted queries based on attributes such as severity, package ecosystems, dependency resolution, and platform source.

This guide explains how filters work, how to apply and combine them effectively, and provides practical examples to support triage, audit, and reporting workflows across large codebases.

Perform the following steps to apply filters to the project list.

  1. Select Projects from the left sidebar.
  2. Filter your projects using the list of available filters in the filter bar.
  3. Toggle the Advanced option in the filter bar to apply API-style filters.

You can combine multiple filters to create more specific searches and narrow down the project list based on multiple criteria.

Each filter consists of three parts.

  • Field: The attribute to be filtered (for example, Package Count and Platform Source).
  • Operator: The comparison logic (for example, equals, greater than, and in).
  • Value: The target value to evaluate (for example, npm and 100).

Project filters use standard comparison operators to evaluate criteria. See Filter operators for detailed information about available operators and their usage.

When you apply multiple filters, the system combines them using logical AND operations across filters for different fields and logical OR operations across filters for the same field.

For example:

  • Filter 1: Package Ecosystems contains: npm
  • Filter 2: Platform Source in: GitHub
  • Filter 3: Package Count: greater than 1
  • Filter 4: Reachability Analysis Status greater than or equal to: 90%
Multiple filters

This combination returns only projects that use npm packages, are from GitHub, have more than one package, and have a reachability analysis status of at least 90%.

You can use the following filter types to manage your projects effectively.

The following examples demonstrate how to apply preset filters for common project scenarios.

Use custom tags to filter projects based on environment or predefined labels assigned during project initialization or scan configuration.

For example, to view only projects related to SAST, use the Custom Tags contains: sast filter.

filter by custom tags

Prioritize remediation efforts by filtering projects based on the severity of security findings. You can select from Critical (C), High (H), Medium (M), or Low (L) severity filters to target different priority levels.

For example, to identify projects with critical findings, select the C filter.

filter by severity

Use package ecosystem filters to segment projects by programming language or package management system for targeted security policies such as stricter vulnerability thresholds for JavaScript projects or specific license compliance checks for Java applications.

For example, to focus on PHP projects for a security assessment, use the Package Ecosystems contains: Packagist filter.

filter by package ecosystem

Use platform source filters to segment projects by their source platform and correlate findings with platform-native security tools like GitHub’s Dependabot alerts or GitLab’s vulnerability scanning.

For example, to identify projects analyzed from GitLab, use the Platform Source in: GitLab filter.

filter by source platform

Use dependency resolution status to identify projects with resolution issues that impact security analysis accuracy. You can filter by a single value or a range of percentages.

For example, to identify projects with poor dependency resolution, use the Range filter to find projects with Dependency Resolution Status greater than 0% and less than 50%.

filter by resolution

Use last scanned filters to identify projects with stale security data that require fresh scans for current security posture. You can select from predefined time ranges or use the calendar to select a specific date.

For example, to identify projects scanned within the last 24 hours, use the Last Scanned: Last Day filter.

filter by last scanned

Identify projects based on their size and complexity, which may require different levels of security attention and resources.

For example, to focus on large projects with extensive dependency trees, use the Package Count: greater than 100 filter.

filter by complexity

Use reachability analysis status to identify projects based on the success rate of call graph generation and reachability analysis. You can filter by a single value or a range of percentages.

For example, to identify projects with successful reachability analysis, use the Reachability Analysis Status greater than or equal to: 90% filter.

filter by reachability status

For complex queries, use the advanced filter syntax to combine multiple attributes and apply logical operators.

The following table lists the available attributes for project filters.

Attribute Description
Project UUID Filters projects by their unique identifier.
Name Filters projects by the display name of the project.
Custom Tags Filters projects by custom tags set during project setup or scan configuration.
Last Scanned Filters projects based on the timestamp of the last successful scan.
Package Count Filters projects by the total number of packages resolved in the project.
Package Ecosystems Filters projects based on the language-specific package ecosystems they use.
Dependency Resolution Status Filters projects by the percentage of resolved dependencies in the project.
Reachability Analysis Status Filters projects based on the success rate of reachability analysis through call graph generation.
Critical Findings Count Filters projects based on the number of critical-severity findings in the project.
High Findings Count Filters projects based on the number of high-severity findings in the project.
Medium Findings Count Filters based on the number of medium-severity findings in the project.
Low Findings Count Filters projects based on the number of low-severity findings in the project.
Dismissed Findings Count Filters projects based on how many findings were manually dismissed by users. Useful for reviewing triaged issues.
Total Findings Count Filters projects based on the total number of findings detected in a project.
Platform Source Filters projects based on source platform and helps narrow results by version control origin such as GitHub, GitLab, or Bitbucket.

The following examples demonstrate how to combine these attributes for common security and compliance workflows.

Identify high-risk GitHub projects

Find GitHub projects with more than 5 critical findings and a reachability analysis status below 80%.

spec.platform_source == "PLATFORM_SOURCE_GITHUB" and spec.finding_counts.critical > 5 and spec.package_coverage.call_graph_success_rate < 0.8
Audit stale projects with risks

Identify projects not scanned in the last 7 days that still have outdated dependencies.

spec.last_scanned < now(-168h) and spec.dependency_counts.outdated > 0
Identify projects with low dependency resolution quality

Find projects where dependency resolution is below 90%, which may indicate incomplete security analysis.

spec.package_coverage.success_rate < 0.9
Find large projects with high vulnerability density

Identify projects with more than 100 total packages that also have a high number of critical vulnerabilities.

spec.package_coverage.total > 100 and spec.vulnerability_counts.total.critical > 20
Audit projects with high triaged findings

Find projects where more than 50 findings have been dismissed, useful for auditing triage quality.

spec.finding_counts.dismissed > 50
Triage critical vulnerabilities by ecosystem

Focus on npm projects with a high number of critical vulnerabilities.

spec.package_coverage.ecosystems contains ECOSYSTEM_NPM and spec.vulnerability_counts.total.critical > 10

Troubleshooting

This topic provides information about troubleshooting issues that you may encounter in the application.

endorctl CLI exit codes

The endorctl exit codes provide the result of the program’s execution, indicating whether it was completed successfully or encountered an error. This page documents the possible endorctl exit code values and the recommended next steps. When contacting support, provide the error code and the error message to help us debug the issue.

To get the exit code, run echo $? on the command line prompt.

Value Exit Code Name Description
2 ENDORCTL_RC_ERROR The exact reason for the error could not be determined.
3 ENDORCTL_RC_INVALID_ARGS An invalid argument was provided. This may occur due to an invalid parameter value, or an incorrect package format.
4 ENDORCTL_RC_ENDOR_AUTH_FAILURE The user does not have the correct permissions to perform the given operation. Check the Endor Labs token or API keys to make sure they are valid and include the necessary permissions. These are provided using the --token flag or through the environment variables ENDOR_TOKEN, or ENDOR_API_CREDENTIALS_KEY/SECRET. Note that the environment variables are mutually exclusive, that is you cannot have both a token and API keys set at the same time.
6 ENDORCTL_RC_GITHUB_AUTH_FAILURE The user has provided an empty or invalid GitHub token. This token is provided using the --github-token flag or through the environment variable GITHUB_TOKEN. You can skip the GitHub scan by not setting the --github flag.
7 ENDORCTL_RC_ANALYTICS_ERROR There was an error analyzing the dependencies.
8 ENDORCTL_RC_FINDINGS_ERROR There was an error generating findings based on the analytics output.
9 ENDORCTL_RC_NOTIFICATIONS_ERROR There was an error processing a notification triggered by a notification policy. See the error log for details and verify that the corresponding notification target is set up correctly.
10 ENDORCTL_RC_GITHUB_API_ERROR An error was returned by the GitHub API. This can occur due to GitHub rate-limiting or context deadline exceeded. Check the log message to see what object is causing the issue.
11 ENDORCTL_RC_GITHUB_PERMISSIONS_ERROR This error typically occurs when the user is authenticated with GitHub, but does not have the necessary permissions to perform the requested operation. It indicates that the user is forbidden from accessing the requested resource due to insufficient permissions. Check the GitHub token permissions, as well as the permissions and user accounts associated with the repository and/or organization and try again.
12 ENDORCTL_RC_GIT_ERROR A Git operation has failed. Examples of Git operations are: cloning, opening, finding the root, finding the HEAD, finding the default branch, and more. Ensure you are scanning the correct Git repository and that it is properly set up for the scan.
13 ENDORCTL_RC_DEPENDENCY_RESOLUTION_ERROR There was an error resolving the dependencies.
14 ENDORCTL_RC_DEPENDENCY_SCANNING_ERROR There was an error processing the resolved dependencies.
15 ENDORCTL_RC_CALL_GRAPH_ERROR There was an error generating the call graph.
16 ENDORCTL_RC_LINTER_ERROR There was an error while running the linters used to analyze the source code. This can affect secret and vulnerability detection.
17 ENDORCTL_RC_BAD_POLICY_TYPE An invalid policy was detected. Note that this is not a fatal error, but the policy in question was not processed. See log for details.
18 ENDORCTL_RC_POLICY_ERROR There was an error evaluating one or more policies. See log for details.
20 ENDORCTL_RC_INTERNAL_ERROR There was an internal error within endorctl. See log for details.
21 ENDORCTL_RC_DEADLINE_EXCEEDED The deadline expired before the operation could complete.
22 ENDORCTL_RC_NOT_FOUND The requested resource was not found.
23 ENDORCTL_RC_ALREADY_EXISTS An attempt to create an entity failed because a resource with the same key already exists.
24 ENDORCTL_RC_UNAUTHENTICATED The request does not have valid authentication credentials for the operation.
25 ENDORCTL_RC_VULN_ERROR There was an issue ingesting and processing vulnerability data. See log for details.
26 ENDORCTL_RC_INITIALIZATION_ERROR There was an error initializing the project or the repository. This can happen if the project ingestion token is missing, the project URL is invalid, or authorization failed. See log for details.
27 ENDORCTL_RC_HOST_CHECK_FAILURE The endorctl host-check failed. Host won’t be able to run endorctl scan successfully. See log for details.
28 ENDORCTL_RC_SBOM_IMPORT_ERROR There was an error importing an SBOM. See log for details.
29 ENDORCTL_RC_PRE_COMMIT_CHECK_FAILURE The pre-commit-checks command discovered one or more leaked secrets. See log for details.
30 ENDORCTL_RC_GH_ACTION_WORKFLOW_SCAN_FAILURE There was an error scanning the GitHub action dependencies. See log for details.
31 ENDORCTL_RC_FILE_ANALYTICS_ERROR There was an error reading files for analytics processing. See log for details.
32 ENDORCTL_RC_SIGNATURE_VERIFICATION_FAILURE Signature verification failed. See log for details.
33 ENDORCTL_RC_LICENSE_ERROR The requested operation requires additional licensing. See log for details.
34 ENDORCTL_RC_HUGGING_FACE_ERROR There was an error running the HuggingFace scanner.
35 ENDORCTL_RC_SAST_ERROR There was an error running the SAST scanner.
36 ENDORCTL_RC_ARTIFACT_OPERATION_FAILURE An error occurred while performing an artifact operation.
37 ENDORCTL_RC_SEGMENTATION_ERROR There was an error during file segmentation.
38 ENDORCTL_RC_TOOLCHAIN_ERROR An error occurred during the process of generating toolchains. See log for details.
39 ENDORCTL_RC_SANDBOX_ERROR An error occurred during endorctl sandbox execution, possibly due to setup or dependency issues. See log for details.
40 ENDORCTL_RC_RULE_SET_ERROR An error occurred when importing rules. See logs for details.
128 ENDORCTL_RC_POLICY_VIOLATION One or more “blocking” admission policies were violated. See log for details.
129 ENDORCTL_RC_POLICY_WARNING One or more “warning” admission policies were violated. This error code is only returned if the --exit-on-policy-warning flag is set.
133 ENDORCTL_RC_EXPORTER_WARNING A warning occurred while trying to export data via the configured exporter. Please check your exporter configuration, scan profile setup, and integration status.

Firewall & Proxy Rules

A web proxy bypass rule or firewall rule with the following information may be required in your environment to use Endor Labs successfully.

Description DNS Direction IP Address CIDR Port
User access to Endor Labs UI app.endorlabs.com Outbound (Egress):32.133.71.122/32, 52.224.62.85/32 443
CI system and user access to Endor Labs API and CLI downloads api.endorlabs.com Outbound (Egress):34.96.123.220/32, 52.234.140.241/32 443
Access to The Endor Labs OSS API api.oss.endorlabs.com Outbound (Egress) 52.170.129.128/32 443
User access to Endor Labs documentation docs.endorlabs.com Outbound (Egress):34.123.199.118/32, 52.224.70.63/32 443
Access to Endor Patches factory.endorlabs.com Outbound (Egress):52.224.70.62/32 443
Access to Endor Patches elprodoss.blob.core.windows.net N/A 443

If you have configured integrations with third-party applications like Jira, you may need to configure additional egress rules to complete that integration. Consult the documentation for those applications to add the required rules.

Note
For better performance, the Endor Labs client, endorctl, may attempt to connect to dynamically managed Endor Labs cloud resources not listed above. Egress restrictions that prevent such connections will not limit Endor Labs’ functionality.

Endor Labs scans use dynamic IP addresses by default. If your environment requires IP allowlisting for firewall rules, contact Endor Labs’ support to enable Network Address Translation (NAT), which assigns a dedicated static IP address.

NAT IP allowlisting is required for:

  • Self-hosted source code management systems: Bitbucket Data Center or self-hosted GitLab instances behind a firewall that Endor Labs needs to access for organization sync and repository cloning.
  • IP-restricted cloud SCMs: Cloud-based source code management systems that enforce IP allowlisting for app installations and API access.
  • Self-hosted artifact registries: Private artifact repositories that Endor Labs needs to access during dependency resolution in monitoring scans.
Note
When scans run within a private environment such as CI pipelines or Outpost-scheduled SCM App scans, NAT configuration is not required.

To enable NAT IP allowlisting for your tenant:

  1. Contact Endor Labs support to enable NATed network requests for your tenant and obtain the NAT IP address.
  2. Configure firewall ingress rules to allow HTTPS (port 443) traffic from the provided Endor Labs NAT IP address to your internal resources.

Scanning Podman built container images

To successfully run endorctl scans on a container image built using Podman, use the following instructions:

  1. Build the image using the following command. This command builds a container image and tags it with the label test:latest.

       podman build -t test:latest
    
  2. After building the image, confirm the target registry by running the following command. Podman automatically adds localhost as the target registry for this image.

       podman image ls
    
  3. Before scanning the image with endorctl, sign in to the target registry where the image is stored.

  4. Check if there is a registry running at localhost.

  5. If a registry is not running at localhost, then you must re-tag the image to a reachable registry, using the following command. Replace <reachable-registry> with the actual URL of an accessible registry.

       podman tag test:latest <reachable-registry>/test:latest
    
  6. Sign in to the reachable registry using any container runtime. Now you can run the endorctl scan. Targeting a reachable registry lets you locate the image manifest and download all required layer blobs for vulnerability analysis.